Bleuvet rejuvenation

The friendliest place on the web for anyone who enjoys boating.
If you have answers, please help by responding to the unanswered posts.
Another day another task...
Today I took care of the bow pulpit.
I cut/ground the damaged part before starting to rebuild it.
I first cut fiberglass and core with that little saw (not sure how that is called in English)
1558000159.jpg
I then used a right angle grinder with a metal grinding disk to smooth edges
908251913.jpg
I must admit that my heart was beating too much while doing this to my boat!
After cleaning the cut I started the repair. I first wet the part with straight epoxy, then applied 2 layers of well wet fiberglass cloth, and a layer of thickened epoxy. I used a mix of colloidal silica and milled glass fibers to thickened the soup to a workable non sagging texture.
1610697967.jpg
I covered it for two reasons, first weather is changing so not sure if there won't be a shower, second the plastic sheet allowed me to keep the thickened epoxy in place like a mold and as polyethylene does not stick to epoxy it will be easy to remove.
I will need another layer of fiberglass and fairing epoxy and I will call it done.

Tomorrow rain it will be so I will finish to remove that %*&$ glue and will apply fiberglass to the homemade cooler in the forward V.

L
 
Short day today.
I removed the poly tarp from the bow pulprit epoxy done yesterday and ground it to form.
I then took care of the capstan support. After having fiberglassed all sides I formed it to the hull lip. The lip forms a S shape vertically and an arc horizontally.
914494306.jpg
So I made the same profile on the support forward side.
165216264.jpg
After some grinding and sanding the fit is not bad.
1120670699.jpg
I will leave that baby to cure for a week and will paint it before installation.

L
 
In today episode, epoxy and fairing.
First thing I tackled in the fresh morning was the second fiberglass and epoxy layer on the bow pulpit as well as some small cosmetic cracks filling so it was not too warm on the deck.
I then started to apply fairing putty to the custom cooler in the forward V.
Instead of using my gallon of QuickFair I gave a try to the homemade putty mixing epoxy and fillers.
I used a slow hardener so to have far enough time to properly mix ingredients and not to run. I keep my epoxy stuff in my workshop in the basement and prepare every batch from there. The main reason is that it keeps the resin at constant temperature about 20C to 23C and I mix things at the temp that is about the perfect time to know your pot life.
I am using a 3:1 mix so here is the chef recipe for the fairing soup:
90ml of resin
30 ml of hardener
12 table spoon of glass bubbles in 4 batches (so 3 spoon, mix, add 3 spoon, mix...)
3 table spoon of cabosil (or west system 406).
Stir well, and when you think you are done, stir again and again.
The result is a nice creamy, non sagging putty.
635437398.jpg

Application is easy but I will only see if the mix is good or not when I will sand it tomorrow, will it sand?
I applied this on one side of the cooler.
1785135320.jpg

Tomorrow will be time for the other side, to filet the corners and finish openings properly.
468098481.jpg

After sanding everything and fixing low spot this will be painted and I will fit the pump to evacuate any water.

L
 
I love epoxy, it is wonderful material. You can modify its curing property (I have 4 types of hardener low, medium, fast and UV resistant), you can modify it with all sort of fillers, color it and took at the right texture it is easy to form. And I don't fen talk about its strength.
I simply love it [emoji3]

L
 
I use it fo fix so many things on and off the boat. I always keep a gallon of it on hand.
 
I love epoxy, it is wonderful material. You can modify its curing property (I have 4 types of hardener low, medium, fast and UV resistant), you can modify it with all sort of fillers, color it and took at the right texture it is easy to form. And I don't fen talk about its strength.
I simply love it [emoji3]

L
Great progress, great sharing. Thanks Lou.
 
In the new episode today: sanding in the sun
I sanded the second layer of fiberglass and epoxy on the bow pulpit. The mix epoxy, cabosil and milled fiberglass is quite hard to sand but came out nice.
2112740185.jpg
1520271446.jpg

Still few low spots to fair and I will call it done and ready for paint prep.

I also applied fairing compound to the other side of the custom cooler. I will have tons of fun to sand this head down in the cooler.

L
 
Looks nice, wish I had a dollar for every hour sanding on our last boat.
 
In the today episode: glue removal

I am done with that damned glue, well at least for the forward dining. The product I used shortened greatly the time needed, about 6h in total to clean that mess.
1973586504.jpg

Next step will be to wipe everything with a rag and Acetone and to apply the fairing compound.

On the ceiling (sorry forgot the marine term for it) I am wondering if the primer (pre-kote) would be enough to hide imperfection. In the application guide it is mentioned that it is a sanding primer intended to smooth the finish but to what extend I a not sure.
The imperfections are not really huge just irregular as shown on the picture below.
1637305121.jpg

Yesterday I also sanded the cooler homemade fairing putty. It is sanding nicely so I will keep the recipe!

L
 
I don’t think PreKote will cover that much.. it is designed to halp fair out minor imperfections but not that much.
 
In today's episode: Fairing and sanding
I spent the last few days playing with quick fair. First thing I must say is that this product is very nice to use, very creamy and soft to apply and quite easy to sand. Also I was expecting to need more than what I used for the work I had to do but it is so soft and creamy that you can really apply very thin layer.
I only found two negative point to it (this is my own opinion based on my own experience):
1. It has a pot life of 10 minutes at standard temperature what is in my sense too short. This involve making very small batches more often what is a waste of time. I started with a mix of 100gr of resin and 44 of hardener (far easier to mix it by weight than volume) what give about a third (in volume) of a 500gr yogourt pot and it was too long to apply it properly to no waste any. I then started to use half of that mix and it is at the limit. Even when using it in the early morning when temperature is fresh. Yesterday, I did not check the exact temperature but it was hot and boat interior was quite warm (about 30 to 35 C). What a mistake I did! After few minutes the pot started to smoke, part of the mix started to harden like a rock, I needed to put the pot in cold water to avoid it to melt!
I would personally prefer something like 20 minutes of pot life at least.
2. It smells hawfully bad. The smell is not strong, just bad, a bit like burning plastic. Even with gloves my hands were smelling as well as my clothes. They should put some fragrance in it [emoji3].

I applied two coats of quick fair, sanding between the coats. What a PITA to sand the overhead!
The result is below.

1565216437.jpg
1795650375.jpg

Remains to finish the filets in some corners and manually sand areas I can't reach with the sander and I will be ready to apply the primer.

L
 
Looks like you are having fun. I put the fairing compound in a bucket of ice when it is going off too quickly.
 
Greetings,
Mr. L_t. Are you going to put your disco ball back up? Agree with Mr. C. Chill everything (Resin and hardener before mixing then mixed batch). Put a nice bottle of white in the bucket as well.


Looks nice.


200w.gif
 
More strength to you arm Lou! Applying fairing overhead, and sanding overhead, no fun there.
 
Greetings,
Mr. L_t. Are you going to put your disco ball back up? Agree with Mr. C. Chill everything (Resin and hardener before mixing then mixed batch). Put a nice bottle of white in the bucket as well.


Looks nice.


200w.gif
I am thinking to cover all walls with mirror tiles and to add one or two lights but I shaved my hair and I am not wearing any pink shirt :[emoji3]
Joke apart one day a cigarette boat participating in a poker run stopped at my previous marina and I was the lucky neighbor. The guy had a disco ball in the v berth with multi color lights, it was like dirty dancing on water.

I try to make my epoxy/putty a 6AM when I wake up, not sure a bottle of wine would be a good idea, not that I would no like it, not at all but not sure my beloved wife would... Well maybe after all lol

L
 
More strength to you arm Lou! Applying fairing overhead, and sanding overhead, no fun there.
Yeah, my arms and shoulders are aching, like all my body parts, I guess I am getting old!
I must admit sanding is no fun, but the pleasure is to work on the boat and to think about the final result. Hopefully the result will worth it!

L
 
In today's episode: sanding, tearing out the galley and some interesting findings.

Starting with sanding, V dining is almost ready for primer, very few details to iron out and my beloved wife will start priming and painting. Yes she wants me to keep all painting for her as she loves to do that. Good things as I hate it!

These days it is a bit difficult to work with epoxy and fiberglass as temperature is going up and down. I am able to tackle some early morning between 6AM and 9AM or 10AM but later is no possible with temp rising above 30C outside so far more in the boat.

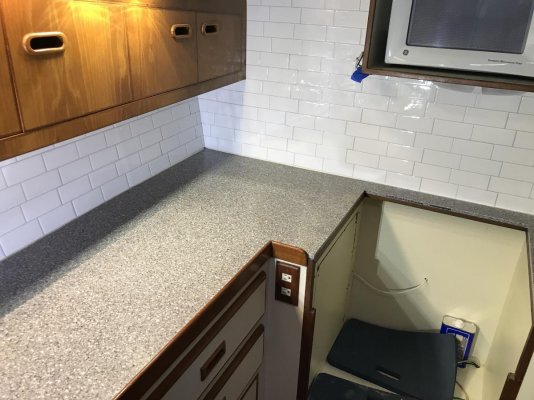
I teared apart the galley, removed upper section cabinets, removed the fridge, all drawers etc.
40788730.jpg

Also removed all outlets and all wiring as all this has to go and needs to be redone properly. Everything in 110 has been wired with the solid conductor household wires.
624447760.jpg

Also when I removed one outlet, I really liked the usage of household metallic non waterproof box, and the corrosion on the outlet connections.
1149336961.jpg
Also note how the ground is connected to the box but not to the outlet.

For folks who wonder why tinned wires are recommended, the picture below showing the nice wire corrosion will give some insight.
1047709512.jpg

Only left to remove the sink and stove and I will be ready to replace or enhance the countertop and setup.
1455640672.jpg

I cannot replace the current one, well not easily as it is a piece of plywood fiberglassed with the port side of the hull so I will cover it with another one. I will use some wood but still no decided if it will be maple, birch or acacia.

Finally I mapped all 110V and 12V wiring and beakers (more on that in the interesting findings list) size as the plan is to rewire everything.

About the interesting findings, there is a good list.
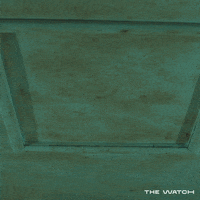
1. Forward hatch seal is damaged and leaks I will need to replace it. Fortunately it is a bomar hatch so parts looks easily available.

2. Removing 110V wires I found out that a new way of making a ground bus.
1231505549.jpg

3. Tracing 12 wires I found a new way of making a +12V positive junction.
1006715082.jpg

4. The head pump breaker is a 30A while the main bilge pump is 5A.

5. The Radio/TV breaker also controls VHF, radar and something that I did not yet found wired with a very thin (like awg 20) speaker wire.

Finally for the ones who love a nice clean wires setup and sorting, here is my current one that will have to sort out and deal with
416571766.jpg

More fun to come!

L
 
In today's episode: Fairing and sanding
I spent the last few days playing with quick fair. First thing I must say is that this product is very nice to use, very creamy and soft to apply and quite easy to sand. Also I was expecting to need more than what I used for the work I had to do but it is so soft and creamy that you can really apply very thin layer.
I only found two negative point to it (this is my own opinion based on my own experience):
1. It has a pot life of 10 minutes at standard temperature what is in my sense too short. This involve making very small batches more often what is a waste of time. I started with a mix of 100gr of resin and 44 of hardener (far easier to mix it by weight than volume) what give about a third (in volume) of a 500gr yogourt pot and it was too long to apply it properly to no waste any. I then started to use half of that mix and it is at the limit. Even when using it in the early morning when temperature is fresh. Yesterday, I did not check the exact temperature but it was hot and boat interior was quite warm (about 30 to 35 C). What a mistake I did! After few minutes the pot started to smoke, part of the mix started to harden like a rock, I needed to put the pot in cold water to avoid it to melt!
I would personally prefer something like 20 minutes of pot life at least.
L

You can significantly extend the pot life by not mixing it in a pot or tub. Get a cheap plastic cutting board, the smoother the better. put your globs of each part on it and mix it with a drywall knife until it's smooth. Then smooth it out evenly all over the board in a thin layer. It will slow it down significantly. Having it in a pot in a big lump concentrates it's reaction heat which causes a faster reaction which causes more heat which.... shortens pot life and risks an exothermic runaway reaction.
 
Don’t you love finding wiring done like that. When we redid the countertops in our last boat I used a solid surface material. Made a template with 1/4” luan plywood and then routed it to match the pattern. Then overlaid the current high oressure laminate countertop. Looked great.
 

Attachments

  • 8195BCB9-5248-42E9-88B7-E1FD07B24D15.jpg
    8195BCB9-5248-42E9-88B7-E1FD07B24D15.jpg
    140.3 KB · Views: 21
  • 8A4AE6C4-4F44-4106-B72A-9BCE788237B5.jpg
    8A4AE6C4-4F44-4106-B72A-9BCE788237B5.jpg
    152.8 KB · Views: 21
Last edited:
In the episode today, primer, paint and wiring.
Sorry but no pics as I did not take any while being busy and hands full of paint, some will come later.
In the past few days I did some fairing/sanding in the galley and finish to prep V dining for painting. Looks like dust is finding its way to any places even the less accessible!
I painted the interior of the cabinets in the benches and walls, applied primer on walls and overhead. Did the same in he galley.
Today was wiring day, spend some time passing wires for the capstan, cooler pump etc.

About wires, looks like ABYC recommend not using wires smaller than AWG16 aboard. In old times when all lights were incandescent bulbs I would not have argued with this, but nowadays, when you have led lights burning 0.25A I find this a total overkill. As an example, in my V dining I have 2 light fixture on the wall, both led, the two of them are drawing 0.5A, and the wire run is about 10 feet round trip, even a AWG22 would be enough to power this.

L
 
Back
Top Bottom