Bleuvet rejuvenation

The friendliest place on the web for anyone who enjoys boating.
If you have answers, please help by responding to the unanswered posts.
Yesterday went to the boat to unwrap and start working.
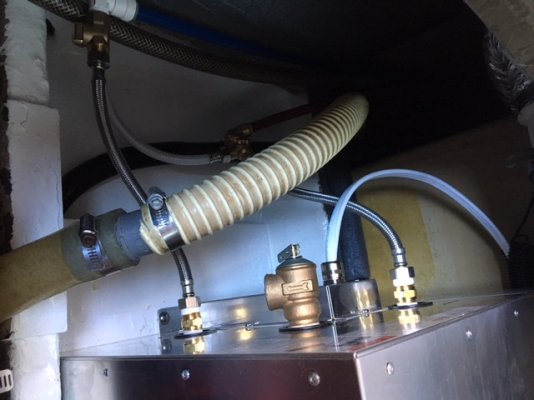
After having removed the head countertop, while taking some measurement to fit my filter and tank I found another pearl from the PO.
Below two pictures on my findings

image1.jpeg

First picture shows the + side of the pump connection, the red wire on the right is coming from the pump, it is then connected to a yellow piece of wire of smaller size (a mistake in my sense) then 3 crimped connector and pieces of wires to end to the red wire on the left. Another thing I noticed is that the incoming red wire on the left is not a stranded wire but a solid one like in houses.


image2.jpeg

Second picture is the negative side of the pump connection. The wire from the pump was connected to a short wire with a crimped connector that was not crimped correctly and broke apart when I touched it. This is then connected to ball of solder to the main negative grounding. No need to mention that again the used wire were solid like in houses.

All this will go away and I will rewire this properly, one more thing on the list :)

L
 
Xmas never ends, just received this:

image1(1).jpeg

[emoji106]

L
 
Wow. I've just been reading this impressive thread.
Lou - I think you've been inspired by Hendo's project. Nice work.
 
Wow. I've just been reading this impressive thread.
Lou - I think you've been inspired by Hendo's project. Nice work.
Thank you :)
I think Hendo is an inspiration for all of us but I am far far far from his level of involvement and dedication, just trying to make things right.

L
 
200w.gif


Be careful out there...
Lol Mr RTF, this is something I am very careful about and alsothe reason for mybwish to rewire things adequately :)

By the way, after measurement the bilge where I wanted to fit my new batteries will be a bit tight, the plan is now to keep them where the old ones were, in the ER on starboard side. I will soon start building my box with 4 compartments where to install the gc2.

L
 
More work done this weekend, first we removed the old water heater, cleaned the ER space where it was fitted and repainted it white.
All old plumbing as been removed and we set water filter and expansion tank.
image2.jpeg
image3.jpeg
I also added some kind of small rubber feet under the fresh water pump to better "absorb" vibrations.
image1.jpeg
My lovely wife did a great work with bottom paint job too:
20180521_172438.jpg
20180521_172453.jpg
20180521_172512.jpg

Second coat planned for next weekend with more fun!

Note: No we did not put the boat upside down to ease the bottom paint job, it is just the picture lol

L
 
Today was a great day, the new water heater made is way to the engine room.
As a prerequisite my beloved wife cleaned the ER (how much lucky I am!):

View attachment 77296

Then we installed the underlaying support plank, fb glazed and painted with bilgekote.
Time was to fit in the water heater and that is when we had some concerns as we were not able to fit the new one (we replaced a 6gal by a 11gal), but I measured and it was fine!!!
Finally after removing a engine hose for oil vapor we were able to put it in.
Next challenge was replacing a chafed coolant hose with a new one and connect everything to the heater. I was worrying a lot as I expected to spill coolant everywhere but it went fine. I filled hose and the heater by gravity and everything was fine.
Below some pictures of the new setup:

View attachment 77303

20180610_163208.jpeg

20180610_163243.jpeg

By comparison here is a pic of the old setup on the left of the picture, I think I did it a bit cleaner:

IMG_3140.jpeg

L
 
Wow, looks really nice. Want to come work in my bilge?
 
Another busy weekend.
Another things, the water heater is plumbed and electrically connected. I spend 1 hour to remove the old wire that was "house" type (single solid conductor), 1 down 4 to go!

I discovered another idiosyncrasy from the previous owner. The old batteries were wired with black cables with red tape for positive and red cable with black tape for negative :facepalm:

If everything goes as planned tomorrow will be splashing day and work will continue on water.

L
 

Attachments

  • IMG_0454.JPG
    IMG_0454.JPG
    99.1 KB · Views: 79
You might want to check those battery leads further. Mine were welding cable, untinned copper, and the insulation had failed in several places. I'm in the process of replacing every last one of them with the right stuff in the right colors.
 
You might want to check those battery leads further. Mine were welding cable, untinned copper, and the insulation had failed in several places. I'm in the process of replacing every last one of them with the right stuff in the right colors.
Indeed these are welding cable with plain copper crimped connector, of course of different size ranging from awg 4 to awg 2. All that will end in the nearest recycling center and will be soon replaced by proper tinned stranded copper wires (ancor awg 0).
Cannot wait to get rid of all this mess!

L
 
Don’t you love DIYers that don’t have a clue.
 
Don’t you love DIYers that don’t have a clue.
I am one of those, but at least before doing I try to do my homework :)
Next time I go to the boat I will take a pic of how are connected the grounds for shore power, I almost had an heart attack seeing that :)

L
 
Lot of boat fires caused by faulty DC wiring. Glad you are getting it cleaned up.
 
Today has been the launch day. I am always nervous when putting the boat back in the water, too much nervous maybe!
I always think like did I forget something? Will the engine start?
But everything is well and we are happy boater once again!
Did I mention how much impressive that boat engine is? After 6 months storage with temperatures ranging from -35 to +30 C, that engine started as soon as I turned the key in less time than I needed to say "one", I am just impressed.

L
 
Here is the new head countertop, sink and faucet. Countertop is bambou and will be epoxied on all not visible faces and will receive 5 coat of varnish on the top surface, sink is made of recycled copper and faucet oiled bronze finish.
These littles guys will find their way in next weekend :)

IMG_0456.jpg

IMG_0457.jpg

IMG_0459.jpg

L
 
Countertop just received his last coat of varnish and his mahogany accent and is ready for tomorrow setup after drying overnight.

image2(1)(1).jpeg

L
 
Finally the plumbing is all done, not any leak (for now)!
Below is the new head look:

image1(1)(1)(1).jpeg

The 5gal expansion tank makes a huge difference, as is making the new 11gal water heater. It is a pleasure to open the faucet and not hear the pump going on all the time!

L
 
Looks very nice. We finally launched last Saturday after painting the whole boat. Went to start the port engine and got nothing. It took 2 jumper packs to get the Lehman started. I will be buying 2 new starter batteries tomorrow.
 
In the process of replacing the old battery charger, step one of the batteries upgrade.
Here is a picture of the old boy I just removed, dated from 1991:


IMG_0490.jpg


IMG_0491.jpg

L
 
The old charger is good at boiling the batteries dry. What are you going to replace it with?
 

Latest posts

Back
Top Bottom