1974 Roughwater 35 re-bedding windows & deck repair

The friendliest place on the web for anyone who enjoys boating.
If you have answers, please help by responding to the unanswered posts.

Ttsaang

Veteran Member
Joined
Sep 25, 2019
Messages
39
Location
Canada
Vessel Name
Ttssang
Vessel Make
1974 Roughwater 35
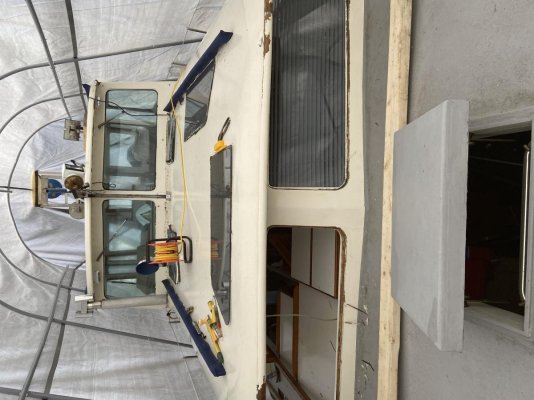
I've removed 12 windows that need were leaking and I'm in the process of drying out and repairing the wooden frames. I plan to use West System epoxy to seal and repair the frames before I re-bed the 1/4" glass with Sikaflex. I'm waiting to hear back from someone at Ocean Pacific Marine Supply about using Sikaflex 296 as well as the Sika Aktivator primer for glass to wood applications. As opposed to Sikaflex 291. Any thoughts about this are appreciated. I'm going to seal and fill all the end grain ply window frames with West System and I plan to get the windows back in and eventually paint the entire superstructure cabin with Interlux Brightside. There's 2 windows in the galley that look like they used to open and the previous owner siliconed them shut. I plan to rework the framed for a single piece of glass. It looks like the current windows were installed in 2013 and there's signs of green bondo looking fibreglass repair in different locations. I will need to laminate some new wood in with epoxy in a few sections.

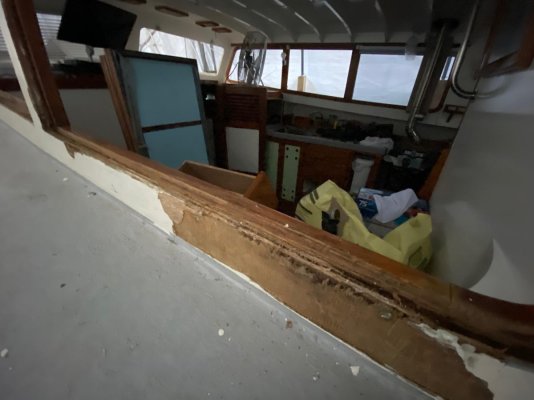
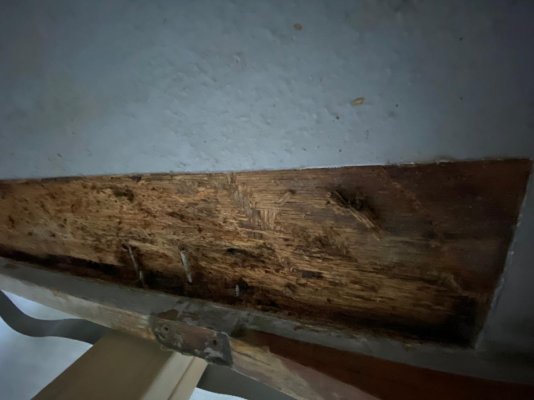
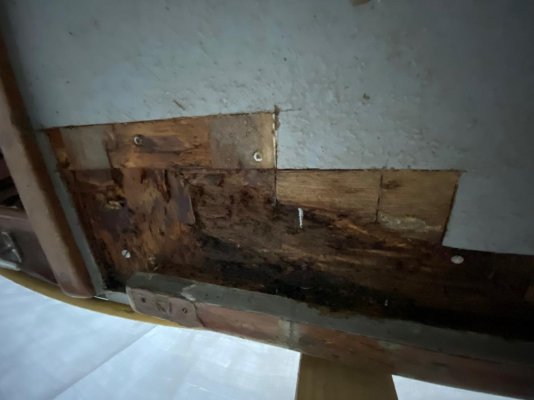
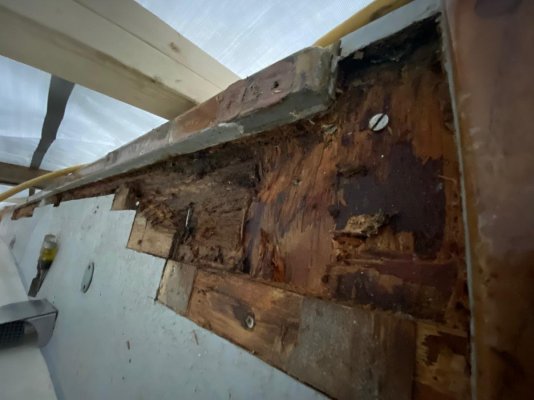
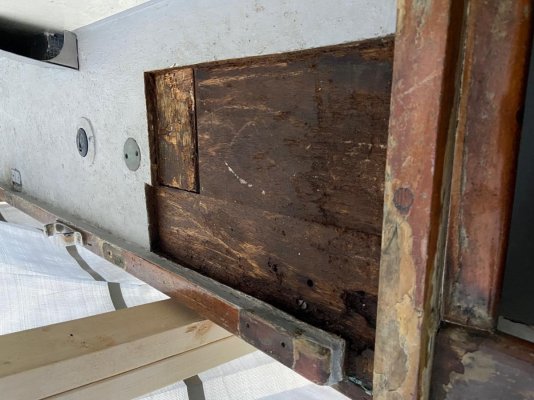
While crawling around removing the windows and scraping off the Sika I noticed a soft spot along the deck near the teak cap rail on the starboard side (I apologize if my terminology is incorrect) The deck is fibreglass with mahogany plywood below. I cut away the fibreglass and removed the rotten ply. Some of the rot went beyond the plywood into what looks like a 2 x 6 piece of wood below the mahogany ply. It has partially exposed some of the stainless fasteners and the rotten ply recesses under the teak cap rail by about a 1/2" in several locations. I'm hoping to use West System high density filler to build up the low area's and then replace the ply and fibreglass. Is the West System High density filler structurally strong enough? Once I have everything reassembled I'm thinking about putting a very small fillet along the edge of the deck where the deck meets the teak cap rail to encourage water away from that joint. I tapped around the whole deck with a hammer and the only other bad spot is on the port side midships. That section of ply cut out nicely and there was not rot beyond the ply. Have a look at the pictures. I'm trying to dry everything out still, the wood is quite saturated. I'm open to any input or advise. I'm fairly handy and this will be my first experience working with epoxy. Thanks
 

Attachments

  • 60366217589__66D46CA7-3233-4D7F-9A47-524281F612FE.jpg
    60366217589__66D46CA7-3233-4D7F-9A47-524281F612FE.jpg
    133.6 KB · Views: 75
  • IMG_2888.jpg
    IMG_2888.jpg
    71.5 KB · Views: 77
  • IMG_2889.jpg
    IMG_2889.jpg
    67.1 KB · Views: 72
  • IMG_2890.jpg
    IMG_2890.jpg
    87.7 KB · Views: 69
  • IMG_2891.jpg
    IMG_2891.jpg
    82.6 KB · Views: 64
  • IMG_2892.jpg
    IMG_2892.jpg
    93.2 KB · Views: 62
  • IMG_2894.jpg
    IMG_2894.jpg
    72.6 KB · Views: 64
  • IMG_2895.jpg
    IMG_2895.jpg
    71.1 KB · Views: 62
  • IMG_2896.jpg
    IMG_2896.jpg
    90.1 KB · Views: 64
  • IMG_2898.jpg
    IMG_2898.jpg
    149.4 KB · Views: 64
Last edited:
I'm having a bit of an issue uploading pics, stay tuned...
 
That’s quite a project! My first comment is you need to bed the windows in something that gives - different expansion than wood surrounding. Suggest you look at butyl/glass glazing tape. Filling the edges then becomes cosmetic and relatively easy.
 
Smith and Company makes a very thin, almost water consistency epoxy for rotted wood. You dry the wood, not plywood, and then drill a whole bunch of small holes into the wood. Then keep saturating the rotted wood with the epoxy. When it will take no more epoxy it cures and the wood will be hard. Then you can use an epoxy filler to fill the divots and fair it to the shape needed. I have used it on previous boats and it works well but it takes a long time to completely saturate the wood. The regular West epoxy is too thick to be absorbed into the wood. It will coat the surface fine but won’t go deep into the wood like Smith and Co. This may help in some of the areas. It does not work well with plywood though.
 
Make sure the Sika primer is new. It has an expiration date of 1 year. I used it on the teak toe rail that I caulked to the fiberglass deck on my boat a couple of years ago and so far it is doing great. But the primer isn’t cheap. I used 295UV to caulk some plexi to aluminum and to fiberglass and it has held up well also.
 
@Comodave made a good point - use CPES (clear penetrating epoxy sealer) not only on deteriorated wood but also on good wood that might come in contact with moisture later on.
 
thanks for the tips, I will use the method of drilling small holes and use the CPES to seal the wood. I have a friend with a glass shop who's going to help me with the windows once I have the frames repaired sealed and ready.
 
Also concur with Comodaves suggestion.

As for WEST epoxy, I used it for nearly 35 years.

I recently started using System Three Silvertip Epoxy. You can recoat it within 72 hours without sanding. There is no amine blush to wash off and the epoxy will cure in colder temperature than West epoxy.

They also manufacture Gel Magic, a non sagging - no drip adhesive and Quick Fair a fast curing putty. Both are easy to mix and dries faster than other similar products.

They also sell EndRot, a penetrating epoxy and filler solution to rot similar to Smith. I've used Smith's with success but have not used EndRot.

I still adhere to the WEST system technique.
 
Thanks Refugio, Comodave and Syjos for the advise and input. I now need to dry it out before I can start drilling and sealing. Any tips on speeding up the drying process? I have the boat in my driveway under a rigged up canopy on Mid Vancouver Island. It's still getting quite cold at night and I'm not able to heat the whole space. I have a large fan keeping air moving. I'm sure I could use a heat gun in certain area's, not sure how effective that will be. I guess it will take as long as it takes. What's safe moisture content for Smith & Company penetrating epoxy sealer? 10% to 15% ?
 
Thanks Refugio, Comodave and Syjos for the advise and input. I now need to dry it out before I can start drilling and sealing. Any tips on speeding up the drying process? I have the boat in my driveway under a rigged up canopy on Mid Vancouver Island. It's still getting quite cold at night and I'm not able to heat the whole space. I have a large fan keeping air moving. I'm sure I could use a heat gun in certain area's, not sure how effective that will be. I guess it will take as long as it takes. What's safe moisture content for Smith & Company penetrating epoxy sealer? 10% to 15% ?

The dryer the better.

I would enclose the area with plastic and place a heater and a dehumidifier in there. The dehumidefier will suck the moisture out of the wood and the heater keeps the humidifier from shutting down the compressor from the cold temperature.

To check for remaining moisture, cover the rotted section with very clear plastic, sealing all possible openings and leaks. Leave it overnight or more and if you see water droplets on the inside surface of the plastic, there is still moisture in the wood.

A moisture meter will do the same thing but if the moisture is deep in the wood and surface dry, you'll get a false reading.

You can also empty and monitor the dehumidifier's bucket and when it stops picking up water, the woods dry. But toward the end, the amount of water picked up is minuscule and you may not see or feel it in the bucket.

The clear plastic method is my favorite and foolproof.

When applying penetrating epoxy, heat up the wood before applying it. Turn off the heat for a while during application and the cooling wood will contract and draw in the thin epoxy into the wood cells more effectively. Keep applying it until the wood will not absorb any more epoxy. Wait a while before reapplying heat.
 
Last edited:
You can also drill the holes now which will give you more surface area exposed for the moisture to evaporate. Keep fans on it and a dehumidifier if possible. The clear plastic is a good way to check for moisture.
 
When bedding glass/lexan to wood or fiberglass, I like to apply silicone dots/ bumpers first. They are available in all sizes sometimes at home centers. The ones I have used are very small 3/16-1/4" in diameter and less than 1/8" in height. These are clear so don't show on the finished product. What they do is make sure the sealant isn't completely squeezed out at any point around the pane. The butyl tape is good too also although it keeps squeezing out forever. Nothing sticks to glass like silicone and nothing sticks to cured epoxy unless it is washed with soap & water after curing.
 
I use spacers when bedding glass also. That way you get a silicone gasket all around the glass. Bedding glass is absolutely the only place where I use silicone on board.
 
I use spacers when bedding glass also. That way you get a silicone gasket all around the glass. Bedding glass is absolutely the only place where I use silicone on board.

Is there adhesive on one side of the spacers?
 
Yes, but they are small enough so they will be completely encased in the silicone. If you can’t find small ones, cut larger ones down.
 
Yes, but they are small enough so they will be completely encased in the silicone. If you can’t find small ones, cut larger ones down.

I wasn't able to find then on google. What are they called?
 
Last edited:
Look on Amazon for rubber bumpers. They have many to choose from.
 
Another idea on drying is vacuum - I have a Fein vac that I have run 24+ hours to pull moisture - you might be able to seal an area off enough to make that effective.
 
My dock neighbor last winter in Fort Myers used a method described at www.Stardistributing.com that utilized their Clear Penetrating Epoxy Sealer to repair a mess of rotten core on an old Chris 57. Took him two weekends by himself. This fall the boat passed survey and was sold to a new owner and so far no problems, worth a look!
 
deck rot

in regards to your soft decks and repairing them. I have a similar problem on my flybridge. I plan to get all the rotten wood out and recore the deck . that way I know it is right and will outlast me. wondering why you don't want to fix it right the first time ? you already have the deck cut out, why not remove the rotten plywood and replace it ? I have spoken with andy at boatworkstoday.com and have watched his videos on recoring a deck. seems like a good winter project.
 
I am replacing the plywood core. The part that I'm repairing with Clear Penetrating Epoxy sealer is the top section of the 2 x 6 frame below the plywood core that had some area's of rot. I'm in the process of drying it all out before I can seal and fill it, then I'll install the new core. This has turned out to be a bigger project than I'd planned, I'm also still working on the window frames and have removed some of the plywood and past repairs, I'm almost to the point of starting to put it back together. I'll post some updated pics soon. Thanks
 
Hi Ttsaang:


Just checking in to see how you have been getting on with the window resealing. I am going to try to reseal the pilothouse sliding windows on my RW41. It looks like they have to be removed from the outside, which means first removing the teak window surround. It will be tricky getting that out in less than 10 pieces so I am looking for a source of replacement material. Have you come across this in your efforts and if so, what was your solution?


Thanks,


Mike (Richmond, BC)
 
Folks that have only a small area to repair can use most any epoxy if it is cut with alcohol.

The alcohol "chases" the water bringing the epoxy with it. Extra hardener is required to cure the epoxy .

And as always a detergent scrub is needed to loose the hardener after it has set.

This is how folks made their own Git Rot in past times.
 
Hi Ttsaang:


Just checking in to see how you have been getting on with the window resealing. I am going to try to reseal the pilothouse sliding windows on my RW41. It looks like they have to be removed from the outside, which means first removing the teak window surround. It will be tricky getting that out in less than 10 pieces so I am looking for a source of replacement material. Have you come across this in your efforts and if so, what was your solution?


Thanks,


Mike (Richmond, BC)
Hi Mike,
My windows are all re-sealed with Sikaflex 296. Most of the teak window trim around my windows has been removed by a previous owner. I can send you some detailed photo's if you like or if you are ever on Vancouver Island you can come have a look.

Cheers,
Jeff
 

Latest posts

Back
Top Bottom