Refurbishing a hatch

The friendliest place on the web for anyone who enjoys boating.
If you have answers, please help by responding to the unanswered posts.

angus99

Guru
Joined
Feb 19, 2012
Messages
2,742
Location
US
Vessel Name
Stella Maris
Vessel Make
Defever 44
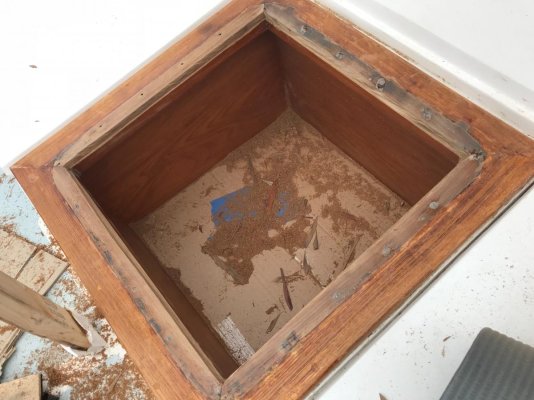
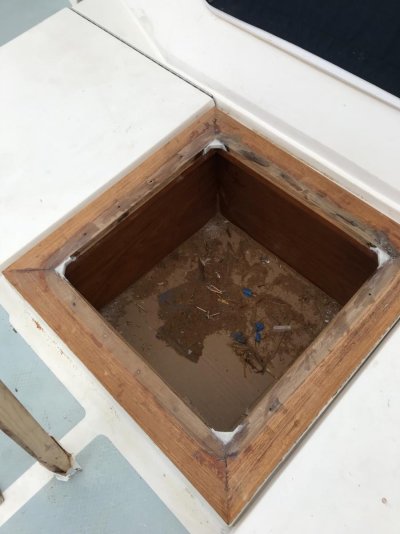
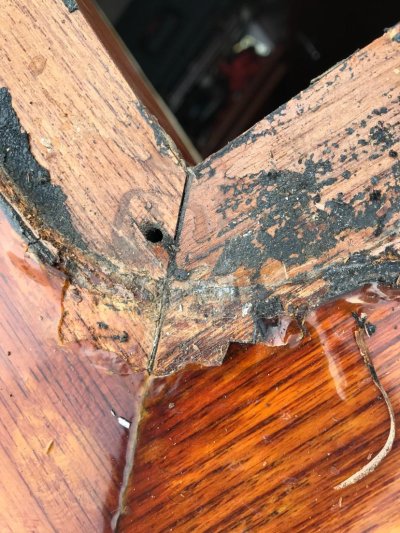
I traced a persistent leak in our forward hatch area to a gap in a miter joint on the underlying wooden frame. After removing the hatch I have a few questions about the best way to proceed.

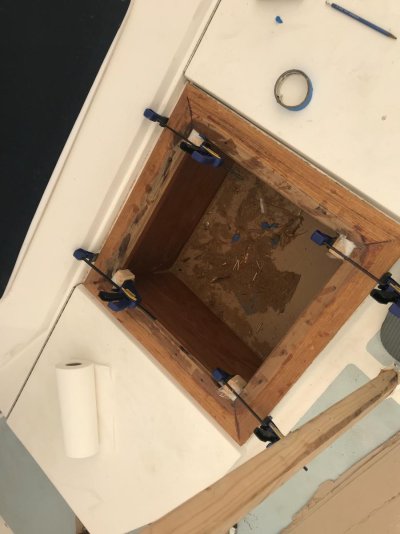
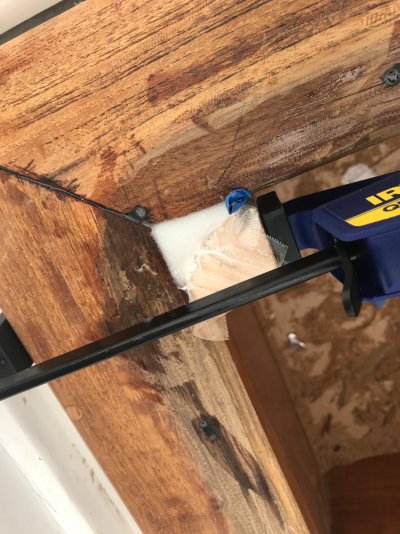
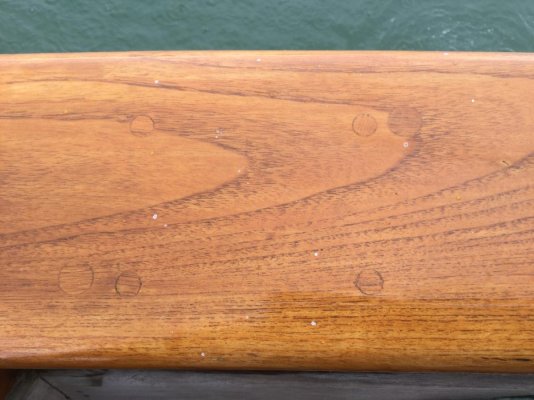
First, the source of the leak: I’d rather not remove the wooden frame since it extends down into the mouth of the opening and seems to be bedded soundly. I used a heat gun to get down to bare wood. How would you wood-working experts fill the gap in the miter joint? (I’ll probably redo all four miters while I can.) I’m thinking I’d rout the old caulk out and reacaulk or press in some butyl tape before finishing everything with CPES and Epifanes. Assuming this is a good fix, would you use something like a Fein multitool or knife to cut out the caulk—perhaps expanding the joint in the process?

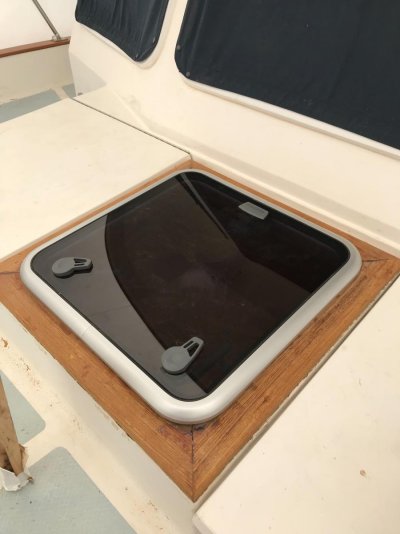
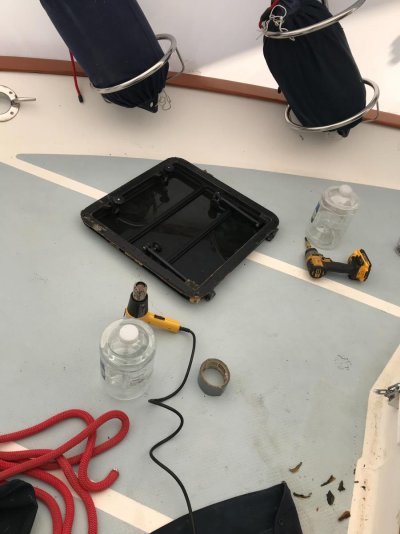
Refurbishing the metal hatch: I assume it’s aluminum. Thought I’d have it powder coated and renew the gasket while it’s out. The finish (Maybe it’s anodized) on the hatch isn’t affected by the heat gun. Has anyone stripped off the old coating on an aluminum hatch and, if so, how? Thinking I’ll rebed the metal frame with butyl tape per CMS’s guidance.

Any thoughts much appreciated.
 

Attachments

  • F01E76F1-5FE8-4483-B03C-C5727B443F45.jpg
    F01E76F1-5FE8-4483-B03C-C5727B443F45.jpg
    95.3 KB · Views: 117
  • EC5972A2-880F-47E1-83E8-4EFCF46CB9D1.jpg
    EC5972A2-880F-47E1-83E8-4EFCF46CB9D1.jpg
    96.8 KB · Views: 127
  • BC336890-A199-41E8-891B-3E5654F1A788.jpg
    BC336890-A199-41E8-891B-3E5654F1A788.jpg
    199 KB · Views: 115
Angus, it definitely looks like the miter joints can be your leak source. To get a water tight seal you need the hatch flange and it’s mating surface to be ideally continuous. I like butyl chalk on the hatch flange because it should seal into the irregular surface of the teak trim and it stays flexible which is critical . Routing out the miter joints and bedding them is going to be critical. You want the joint to be filled level with the mating surface but the wood will expand and contract. I mght be tempted to use teak deck seam chalk but will defer to others on the best way to seal the teak miter joints. My choice would be TDS 440 from reports I’ve read but I have not used it.
 
Last edited:
I agree with the above but I would remove the picture frame part and remake it such that it slopes away from the opening so that standing water will not sit on it but run away from the opening. Rather than mess about remediating the anodizing on the metal frame I would replace it. Butyl tape is very sticky and will attract grit but teak deck sealer cures and stays flexible. Glue the mitred corners after the repair and use butyl tape to bed it to the deck.
 
angus ,You’ve got me thinking some on this one . Those hatch screw down holes that close to the miter may always be a problem . It’s almost like you need something solid on top of the frame that would keep those screw down holes away from the miter, like a riser frame made from thick fiberglass sheet. If you open the miter up some for more caulk you’re going to be getting even closer to the holes .I think I would open up the miters for more caulk for sure and make a riser frame or relocate those hold down holes a little bit and let the the caulking fill in the old holes or get the old holes welded up .
 
Last edited:
Marty is right about the teak collar, miters and screw holes. To change the design IF you would not miss the teak collar you might consider removing the teak frame/ collar and replace it with a starboard collar. Might be a little pricey but you could bed the starboard to f/g and the hatch flange with butyl chalk. I think that would make it water tight although not with the classy look of the teak collar.
Bill
 
Those screw holes close to the miters bothered me as well so I’ve decided to replace the hatch with a medium profile Lewmar 60 that should be a perfect drop-in. On this series, the screw holes are inches away from the corners. By the time I strip, paint, regasket and rebed the lens in the old hatch, I’d be close to the cost of a new one anyway. This hatch was on my “eventually replace” list anyway, so why do this job twice. (Isn’t it amazing how rationalization mode kicks in?)

I do want to retain the teak collar so I’ll open up and recaulk the miters, fill in the old holes and use butyl tape to bed the new hatch. The new hatch will even open from the outside, a short-coming of the existing hatch.

Thanks for the ideas.
 
Hey, all you woodworkers!

When I return to the boat in a couple of weeks, this is going to be job #1. I have some wood-finishing experience, but not on boats.

I bought a replacement hatch that has a slightly larger flange than the old one and no screw holes anywhere close to the miters. I do plan to use butyl tape to seal the metal flange to the teak frame (which I definitely want to retain).

As per above, I’m planning to rout out the miter joints and recaulk them.

Questions:

What caulk is best for this and what should I use to fill the old screw holes? (The entire teak frame, including the screw holes and miters, will be coated with CPES and varnish before the hatch is finally installed.)
 
Been there, done that...unsuccessfully. I've concluded that it's the hatch itself that is the culprit, that is, that the seal between the acrylic glazing and the aluminum hatch frame has failed. Sloth dictates that we use a square bit of tarp with a loop of chain ziptied into a perimeter hem to keep rain off the hatch and coaming itself.
 
...what should I use to fill the old screw holes?...

Use 3/8” plugs. Align the grains and cut off with a chiesel. I’d use varinish to glue the plugs in. You could use epoxy but it will make the outer plug rings darker with age more so than varnish but both will hold the plugs.

The op had a downrigger base screwed to the cap rail. The 1/2” plugs were factory install for the cap rail.
 

Attachments

  • 486E89AB-E7C4-4EC7-9D98-3F933EB57400.jpg
    486E89AB-E7C4-4EC7-9D98-3F933EB57400.jpg
    130.1 KB · Views: 79
Use 3/8” plugs. Align the grains and cut off with a chiesel. I’d use varinish to glue the plugs in. You could use epoxy but it will make the outer plug rings darker with age more so than varnish but both will hold the plugs.

The op had a downrigger base screwed to the cap rail. The 1/2” plugs were factory install for the cap rail.

Looks great, Larry.

The screw holes I’ll be filling will be under the metal flange of the hatch, so not visible. I just need to pump them full of something before I refinish the teak frame and the choices seem to be caulk, epoxy or butyl.
 

Attachments

  • 1AE93B47-139F-4FCE-B665-21F589D890E9.jpg
    1AE93B47-139F-4FCE-B665-21F589D890E9.jpg
    96.8 KB · Views: 79
  • FF840345-833E-4FB3-8CF9-852B30E5ED08.jpg
    FF840345-833E-4FB3-8CF9-852B30E5ED08.jpg
    199 KB · Views: 86
I wouldn't think it would matter all that much because, as you said, they'll be under the new hatch. If water gets as far as those holes, something else has gone wrong.
 
Hey, woodworkers!

So, I’m at the boat and need to fix this but still haven’t settled on how.

I bought a new hatch and the screw holes are much farther away from the old holes in the wooden frame that, along with the miter joints, were probably causing the leak.

Question 1: I still need to fill those screw holes and gaps in the miter joints (Top photo).

How does this sound? Pump them full of epoxy, then sand and seal the entire frame with CPES before varnishing.

Question 2: if you look closely at the lower photo, you’ll see that some of the wood sheared off at the upper part of the frame when I removed the old hatch with too much force. The wood basically split along the grain across the entire length of the frame section and the inner piece can be lifted completely off. It’s a clean break and fits back well together. Would epoxy be the best way to repair this. It’s outdoors and will be in the weather.

I’ll use butyl tape to bed the hatch.

Is this the best way to fix this, using the existing frame which I do want to keep.
 

Attachments

  • F1C5D172-AFDB-4E67-BDE4-3ACFACBBC4C1.jpg
    F1C5D172-AFDB-4E67-BDE4-3ACFACBBC4C1.jpg
    199 KB · Views: 72
  • D90CAA71-E882-40E2-AA09-B60AD437A3D9.jpg
    D90CAA71-E882-40E2-AA09-B60AD437A3D9.jpg
    96.8 KB · Views: 80
FWIW I’d drop epoxy resin the the screw holes, use teak caulk in the miters, bedding the hatch with butyl as others have suggested. I prefer the look of high alkaloid varnish applied with an ox ear hair brush but CPES looks good too.

HTH
 
FWIW I’d drop epoxy resin the the screw holes, use teak caulk in the miters, bedding the hatch with butyl as others have suggested. I prefer the look of high alkaloid varnish applied with an ox ear hair brush but CPES looks good too.

HTH

Thanks. From the look of your avatar, you’ve done this before! So, caulk in the miters vs epoxy.

I do plan to go over the CPES with varnish.
 
There maybe more than one right way.

I’d fill the miters with thicken epoxy after cleaning and wetting out. Basically the same way way it was originally built. If the miters are caulked, you may have and issue with keeping a finish on the caulk which will cause cracking in finish.
 
Good point, Larry. I’ll fill the miters with thickened epoxy.

Unless this blows up on me today, I’ll post results.
 
Based on what color your epoxy and thickener is, you can add some teak saw dust to better color match the frame also.
 
Based on what color your epoxy and thickener is, you can add some teak saw dust to better color match the frame also.
I do this all the time when making mistakes and I make plenty of them . A sign of a good woodworker is how good he can fix those mistakes.
 
Last edited:
Postmortem

Just got back from a week working on the boat. The hatch was quite a challenge but I think it turned out well.

The Lewmar Series 60 medium profile was the closest I could find to fit the teak-framed opening on the boat; still, it has an aluminum flange that protrudes into the opening (unlike the flat-bottomed original hatch) and the flange was too wide by about 1/2-inch in both dimensions. I rabbeted the frame so that the flange fits snugly, then realized there was a significant gap between the rounded corners of the flange and the square corners of the teak frame :banghead:
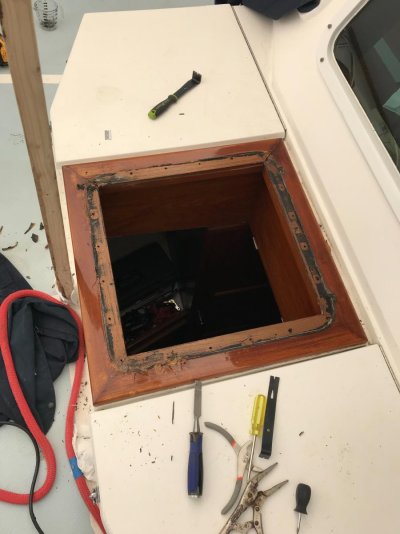
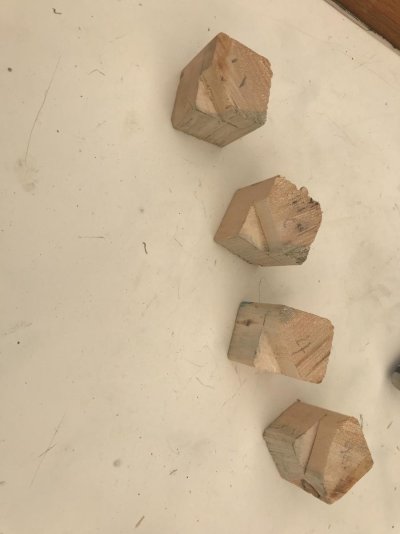
. (Any real worker would have seen this at the outset.). In other words, there would be nothing under the hatch corners to support the bedding material and it would leak at all four corners.

The solution was to cut blocks of wood and clamp them into each corner. I used my Fein Multimaster (probably the most useful tool I own) to trim the blocks so they would form a cavity at each corner. I covered the blocks with heavy shipping tape, wetted out the frame and poured thickened epoxy into the cavities. (I also used a dovetail saw to clean out the miters and poured them and the old screw holes solid with epoxy.). The blocks popped off easily and I used the Fein tool to trim the epoxy. The result was a perfect fit with no gaps.

I’ll finish the frame up with CPES/Epifanes and bed the hatch with butyl tape on my next visit.

Thanks again for all the good advice.
 

Attachments

  • 1B587EA4-49D2-4353-894F-9B72C7D3D489.jpg
    1B587EA4-49D2-4353-894F-9B72C7D3D489.jpg
    136.2 KB · Views: 58
  • FA98A014-AAD8-40FB-9B70-D4B926481522.jpg
    FA98A014-AAD8-40FB-9B70-D4B926481522.jpg
    58 KB · Views: 51
  • 40870FF0-6E97-4E06-B3CF-7177A7A7212B.jpg
    40870FF0-6E97-4E06-B3CF-7177A7A7212B.jpg
    87.9 KB · Views: 50
  • 762BE368-2C81-428C-A477-F7178AEA217B.jpg
    762BE368-2C81-428C-A477-F7178AEA217B.jpg
    169.6 KB · Views: 59
  • F8F49B13-0ACE-4105-80E0-3241CAB41D5B.jpg
    F8F49B13-0ACE-4105-80E0-3241CAB41D5B.jpg
    91.9 KB · Views: 60
  • 6DEBB503-DA1E-46C6-B2C2-672C19E2F1A4.jpg
    6DEBB503-DA1E-46C6-B2C2-672C19E2F1A4.jpg
    81.3 KB · Views: 53

Latest posts

Back
Top Bottom