Teak deck caulking -- bond breaker?

The friendliest place on the web for anyone who enjoys boating.
If you have answers, please help by responding to the unanswered posts.

AZ2Loop

Senior Member
Joined
May 29, 2018
Messages
304
Location
USA
Vessel Name
Sea-N-Stars
Vessel Make
1990 49' Albin
I am going to tackle re-caulking the teak deck on my sundeck and cockpit soon. I also need to figure out whether to seal the teak somehow, too.


The sundeck is all under a covered hard top. The cockpit is exposed to weather. Both are gray now, and I don't mind the look, but I want to do what I should to preserve the wood. Fortunately, my main decks around the sides and bow are fiberglass, so the sundeck and cockpit are the only areas I need to deal with.


I guess I will use TDS SIS440 black for the caulking. BoatLife makes one for this too, but the TDS seems to have great reviews.


For those that have tackled this job, did you use a bond breaker tape in the bottom of the channels between the teak boards? Any tips are welcome including removing the old caulk, sanding, sealing, recualking... I welcome all advice from those who have done it. Thanks!
 
Getting back to the OP's question, yes and I believe we got it from Jamestown distributors (who has some good videos too, or TDS. Definitely use TDS.
For the prep work of removing the old caulk. An oscillating tool like the Fein Multimaster and its various clones, fitted with a blade designed and sized for this specific purpose, is invaluable in making this a much easier job.

We much preferred our decks with no sealants, letting them get a nice silver color. Much like the hundred year old benches you see in British parks.
 
Last edited:
TDS is the only way to go. Everything else is just licorice.


The longest part of this job is removing the existing caulking and cleaning up the seams. I use a utility knife to slice along both sides of the caulking and a bent tip file to pull the caulking out. I use a 1/4" wide wood chisel to clean up and fix the seams. Other smaller knives, saws and fingernails help to get out all the old caulk and junk. Don't be afraid to experiment. There are also some commercial made tools if that is your bent. Finally sand the sides of the seams and vacuum them clean. I don't use a bond breaker on the bottom. I need all the bonding I can get.


The fun part starts with several rolls of cheap 1/2" paper masking tape, a sharp 1" wide putty knife, plastic grocery bags, throwaway gloves and a wastepaper basket. You must tape every single seam side, top and bottom of each piece of teak. This is tedious but the sharp putty knife makes cutting the tape easy and clean. When you are done taping what you are going to caulk that day press down on the tape edges with the putty knife handle so the edge against the caulking is down tight. All the edges, side, top and bottom.


The day you are going to do the caulking show up in the grungiest throw away clothing you have and a backup outfit. Plan how much area you are going to caulk that day leaving a path for you to back out. (Basically don't caulk yourself into a corner) Cut the tip of the tube of caulk at a 45 degree angle and pump it into the seams so the seam is full and plumps up as you pass down the seam. When you are finished with a few seams put down the caulking gun and pickup the putty knife. Press the plump of the seam down while dragging the putty knife down the seam. Fill any "holidays" and make everything smooth staying on the tape.


Now you are ready to start pulling the tape. Don't let the caulking set (overnight) or you'll never get the tape or the excess caulking off the boat. Pull it when you are done with a convenient section. Place one of the garbage bags open into the wastepaper basket. You'll be placing the long strips of uncured caulk encrusted tape in here. Untouched. Using the utility knife or putty knife grab a corner of the tape and peel it sharply upwards. Be careful as it becomes lively and twisty and it's covered in uncured caulking. Let it down into the wastepaper basket. Do this until you have pulled up all the caulked seams. Try not to get it on everything. Don't try to clean it up until it cures.

When you are done carefully throw away your clothes, shoes, the garbage bags and clean the knifes. Don't step on the newly caulked area for 24 hours. When it's cured you can sand it and the teak for a real Yachtie look or leave natural for a workboat vibe.

I don't use bond breaker tape. There is enough dirt at the bottom of my seams to provide slippage.

If you are lucky you won't have to do this again on this boat. If you used other than TDS caulking you will be doing this again in a few seasons.


Good luck!
 
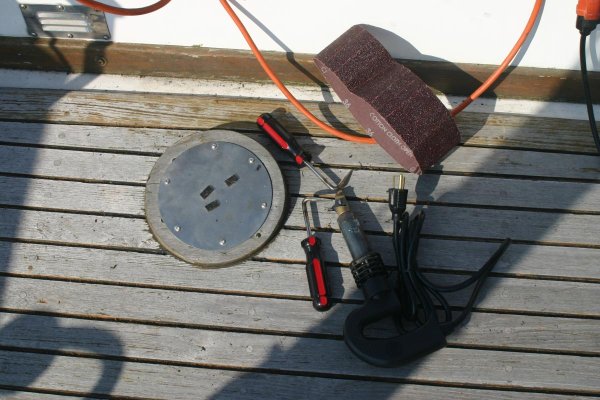
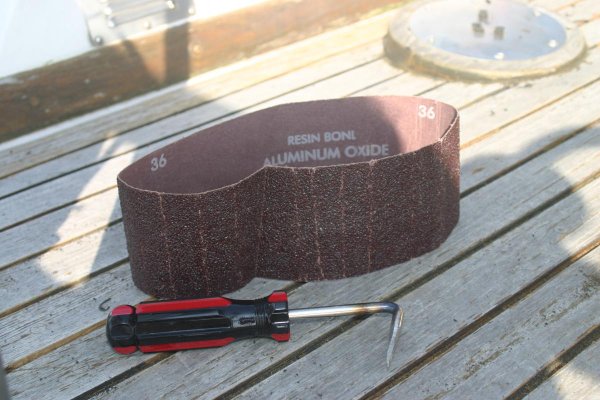
Below are pics of the tools I used to re-caulk my flybridge and some of the main deck. Not a great picture of the electric hot caulk knife (Defender) which does a great job of cutting out the old caulk like butter. Then I used a home made scraping tool. Easy to make from a 1/4 blade common screwdriver, bent in a vise using a propane torch. This scrapes the corners and sides of the grooves.
Then a sanding belt as show. It fit the grooves perfectly.
I did not use any tape at the bottom of the groove. As stated there's enough stuff remaining after cleaning and vacuuming to prevent a strong bond there.

I considered using a Fein tool but I felt this method was faster and easier.
Good luck with your project!
 

Attachments

  • IMG_7723.jpg
    IMG_7723.jpg
    149.4 KB · Views: 93
  • IMG_7722.jpg
    IMG_7722.jpg
    128.1 KB · Views: 75
I also used TDS 440. I used the Fein cutting blade to cut out the old caulk. I used the tool for sanding the sides of the grooves from Jamestown Distributors until I got tired of it taking so much effort. I took an old multi tool saw blade and ground off the teeth on the blade. I rounded the corners a bit so they would not gouge the wood. Then I used the PSA sand paper and put it on both sides of the smooth saw blade on the multi tool. Then used the multi tool to sand the sides of the groove. It went much quicker and easier. I tried using bond breaker tape but I could not get it to stick to the bottom of the grooves. After about 45 minutes and no breaker tape stuck down successfully, I gave up and went without the breaker tape. The old caulk didn’t have breaker tape under it anyway. I taped the edges of the grooves and then shot in the caulk with a pneumatic caulk gun, got a Cox 63001 Bexley gun from Amazon that worked well but sometimes would keep putting out caulk after the trigger was released. So I would hand it to my wife and she would put her finger over the end of the tube until I was ready to use the gun again. Still was way better than a hand caulk gun. Then strike the caulk off and carefully pull the tape. Have lots of vinyl gloves ready. Sand the deck after the caulk has gone off and then finish the teak however you like.
 
I’ve known some people to stack a number of circular saw blades to match the thickness of the old seam material. They use a wood guide strip temporarily secured to the deck as a way to keep the blades where you want them...in the groove!

I used cheap pin-striping tape from the local automotive store in the bottom of the groove to serve as a bond breaker. It’s important to get your TDS seam caulking to adhere to the sides of the teak and not the bottom. The deck expands and contracts with changing temperature. The seam caulking will have a tendency to pull away from the sides if it is also attached to the bottom, hence, the bond breaker.
 
Some brand of automatic caulk gun is a good idea. Wish I had thought of that at the time.
 
Another method to remove the old caulk and take care of the groove sanding at the same time is to use a laminate trimmer/router. A batten is nailed in place as a guide. The nails are cleverly placed into the groove/caulking a board or two away; so no holes in the visible wood. Once the batten is precisely placed and checked with the trimmer butted up against it and the bit just wide enough and deep enough, you finish the groove in snap time with no residue whatsoever. This method can be used on even curve grooving, the batten material is the key.
 
Some brand of automatic caulk gun is a good idea. Wish I had thought of that at the time.

Well I have some arthritis in pretty much everything including my hands and I figured that I would never be able to squeeze about 30 tubes of caulking out so I looked for some fairly cheap pneumatic gun. The one I got was about $90 and worked great. Made the job much easier and also able for me to do it.
 
The longest part of this job is removing the existing caulking and cleaning up the seams.

Not with the right tool it isn't. With the right tool, I'd argue it is the shortest.
 
I would add to all the awesome advice above to do the caulking on a light/no wind day. Those long stretches of gooped up tape WILL contaminate something if they are flapping in the breeze......
 
I would add to all the awesome advice above to do the caulking on a light/no wind day. Those long stretches of gooped up tape WILL contaminate something if they are flapping in the breeze......


Or under shrink wrap.
 
One comment was to use a sharp putty knife to cut the tape...does that mean to tape OVER the seam leaving the tape on both sides and then come back and cut the tape on each seam side, uncovering the seam? Or....just tape up to the edge on both sides?
 
Thanks everyone. Great responses as usual from Trawler Forum members. It was time to start collecting advice and I appreciate it very much.

With regard to masking off: alormaria, when you said "You must tape every single seam side, top and bottom of each piece of teak", I am not sure I follow when you say "side, top and bottom". My plan was to tape (mask off) the top surface of the teak to keep from getting excess caulk on the teak surface, carefully following the edge as precisely as possible with the tape. Of course the 1/8" gap that is the seam between the strips of teak would be left open for caulking to go in. Then, after caulking 2 or 3 strips, take something like a 1" flat knife and drag it along the caulking to be sure the caulking is compacted/pressed adequately into the seam. The excess would hopefully be on the tape rather than the top of the teak boards. Then carefully remove the messy tape -- getting the messy caulking all over me, clothing, the dog, and eventually into the trash can. That is the only use of masking tape I had planned Am I missing something? I am not sure I understand what you were saying above when you say top, sides, and bottom of the teak, but I want to understand. Were you taping across the seams, too, and then cutting the tape out of the seams before caulking?

In addition to that masking off, I am still considering bond breaker tape in the seam, but I see there are different opinions of how necessary bond breaker is and how well it works. I had not thought about the dirt/debris that will no doubt remain to possible serve as bond breaker. Interesting thought. Nor had I considered not being able to get the bond breaker tape to stick -- probably also due to the same dirt/debris.
 
I would certainly use a bond breaker

My background with caulk is with architectural applications instead of marine. Regardless, many caulk compounds, urethane, silicone, sulfide, or acrylic have the elasticity to absorb flexing between two opposing structures (like deck planks) however, having the caulk also adhering to structure which bridges the gap (like the bottom of the gap being sealed) very much compromises the caulk's elasticity.
 
One comment was to use a sharp putty knife to cut the tape...does that mean to tape OVER the seam leaving the tape on both sides and then come back and cut the tape on each seam side, uncovering the seam? Or....just tape up to the edge on both sides?


Tape both sides and use the putty knife to cut the tape by pressing it down where you want it cut. Especially fast for the little top and bottom pieces of each plank.


Use bond breaking tape if it makes you feel better. You're the Captain.
 
Last edited:
Tape both sides and use the putty knife to cut the tape by pressing it down where you want it cut. Especially fast for the little top and bottom pieces of each plank.


Use bond breaking tape if it makes you feel better. You're the Captain.

I'm not talking about bond-breaking tape or anything in the bottom of the seam. I'm talking about taping off to keep the caulk from getting on the top of the planks. I have no idea what you mean by "little top and bottom pieces of each plank."
 
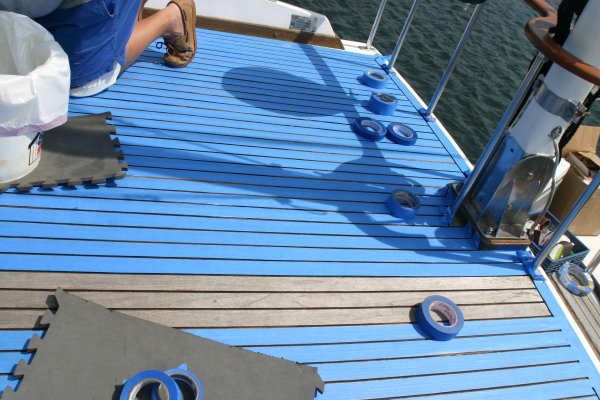
This is how I taped prior to caulk application.
 

Attachments

  • IMG_7731.jpg
    IMG_7731.jpg
    151.7 KB · Views: 45
Thanks Jay. Just run it down each edge. My knee hurts already. You appear to be doing the job out in the open. Did you ream the caulk and sand one day then tape and recaulk the next? If so, how much of the deck did you attempt at one time?
 
Hopefully my questions above get a response but...I have another one to add to them!

When doing this piecemeal (the whole deck that is), you have to stop at some point and call it a day. Don't bite off more than you can chew so-to-speak. This would make you butt the new caulk up to the old. I would assume that when you are ready to move further forward on a seam that you would go back an inch or so and clean the new out along with the old. You then caulk from that point forward. Is it ok to butt caulk joints together like that? Is it better to go the full length of the boat and redo a complete seam vs. butt jointing?

Geez I hope that made sense.
 
Last edited:
Thanks Jay. Just run it down each edge. My knee hurts already. You appear to be doing the job out in the open. Did you ream the caulk and sand one day then tape and recaulk the next? If so, how much of the deck did you attempt at one time?

We did all of the flybridge that was open. We prepped one day then taped and caulked the next morning after it dried a bit.
 
Yes use bond breaker tape. If you don’t your work won’t last as long and it will be harder to do next time.

Use a razor knife to cut the existing caulk from the sides of the seam then scrape it out with a TDS caulk removal tool. It’s a lot easier on your hands than holding a file with a bent and sharpened tang.

Use a TDS seam sander to sand the sides of the seam.

Ryobi makes a battery powered caulking gun that works pretty well.
 
"Is it ok to butt caulk joints together like that? Is it better to go the full length of the boat and redo a complete seam vs. butt jointing?"


The joining is about a 1 to 2 inch long shallow angle cut on parts where you have to butt joint in a plank seam. The rest of the time just end it at a fitting or the end of the plank. A few days after it dries you'll never see it.
 
I'm not talking about bond-breaking tape or anything in the bottom of the seam. I'm talking about taping off to keep the caulk from getting on the top of the planks. I have no idea what you mean by "little top and bottom pieces of each plank."


I don't know how it is with your boat but on my Taiwanese Tub the planks of teak do not go the entire distance on each side deck. Each strip goes about 4 or 5 foot and stops and another plank of teak starts and continues. There is a seam between those planks, top and bottom, just as there is on the sides. That has to be taped too.


I use 1/2" wide tape and it doesn't cover the entire plank. It leaves an open space between the two strips of tape. The top and bottom seams of each plank need that open space taped over. So my taping is a bunch of straight lines with little strips crossing at the end of each plank.


This was taking forever so I started using the blade of the putty knife to cut the tape quickly. Pull the tape down along each seam - put the putty knife blade on the tape at the end of the plank and pull up sharply on the tape. Put the tape across the bottom of each plank connecting the two strips of tape - put the blade down and pull. It takes a little less than forever.


Did I mention you need comfortable knee pads?
 

Latest posts

Back
Top Bottom