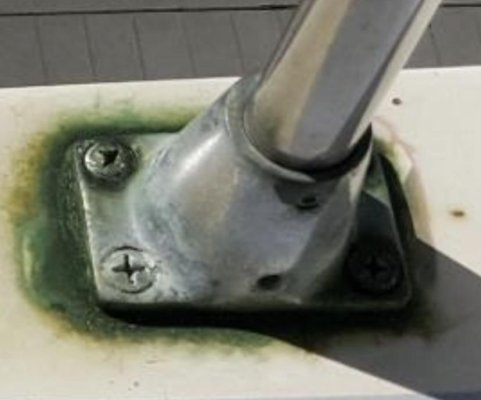
A couple of my stanchions have a pretty awful green stain coming from them. I was thinking I would need to re-bed them and fill the screw holes with epoxy and redrill them. Anyone felt with this? I assume some of the screws must be copper causing the green.
You are using an out of date browser. It may not display this or other websites correctly.
You should upgrade or use an alternative browser.
You should upgrade or use an alternative browser.
Repairing green stained stanchions
- Thread starter Sna
- Start date
The friendliest place on the web for anyone who enjoys boating.
If you have answers, please help by responding to the unanswered posts.
If you have answers, please help by responding to the unanswered posts.
Comodave
Moderator Emeritus
- Joined
- Jul 2, 2015
- Messages
- 21,306
- Location
- Au Gres, MI
- Vessel Name
- Black Dog
- Vessel Make
- Formula 41PC
I seriously doubt the screws are copper. I am sure Tolly didn’t use copper screws. I see your location is Seattle. We bought a boat there years ago and it had green moss growing on it in a couple of places, sure it isn’t organic? Have you tried cleaning it up? Maybe some metal polish?
Lepke
Guru
- Joined
- Jun 19, 2016
- Messages
- 3,035
- Location
- US
- Vessel Name
- Charlie Harper
- Vessel Make
- Wheeler Shipyard 83'
Green is probably from the casting. Some castings are either brass and chrome plated or steel and copper plated before the chrome.
You need to remove the stanchion and clean the bottom of the casting and seal it.
Whenever I put screws into wood or fiberglass, I seal them in epoxy. Stanchions take a beating from people leaning on them or pulling themselves aboard with the stanchion. When the screws are set in epoxy, they remain solid for years.
Green is probably from the casting. Some castings are either brass and chrome plated or steel and copper plated before the chrome.
You need to remove the stanchion and clean the bottom of the casting and seal it.
Whenever I put screws into wood or fiberglass, I seal them in epoxy. Stanchions take a beating from people leaning on them or pulling themselves aboard with the stanchion. When the screws are set in epoxy, they remain solid for years.
This explanation makes sense because the two green ones are on either side of the ladder where people would be applying more force on them. Thanks
i see mismatched screws there too. i bet some threads have been pulled in the past and bigger or longer screws added. some of the cheaper cast bases are chrome plated zamak. pot metal essentially. not sure what those ones are.
i might consider replacing those old bases with new stainless steel ones. in addition to epoxy in the screw holes, i use butyl tape under the bases.
i might consider replacing those old bases with new stainless steel ones. in addition to epoxy in the screw holes, i use butyl tape under the bases.
jungpeter
Guru
i see mismatched screws there too. i bet some threads have been pulled in the past and bigger or longer screws added. some of the cheaper cast bases are chrome plated zamak. pot metal essentially. not sure what those ones are.
i might consider replacing those old bases with new stainless steel ones. in addition to epoxy in the screw holes, i use butyl tape under the bases.
Bmarler-uhh, not-so-hot observations. I can unequivocally state that Tollycraft did NOT use pot metal for their OEM stanchion bases. Stainless steel or chrome-plated bronze exclusively. It is possible that some prior owner added an aftermarket pot metal fitting. If so, jerk it out and replace it. And while it's not possible to determine the composition of the screws from a photograph, in this case probably stainless steel as well. And what in heck does the length of the screw have to do with the appearance shown in this photo?
It's my opinion that butyl tape is a poor choice for sealing under SCREWED fittings into fiberglass. Bolted, yes. Screwed, no. Too much chance of stripping the fiberglass during installation in the typical PNW cooler weather. Setting into epoxy is not a bad suggestion, and lightly countersinking the screw holes in advance is a good idea also. But there's not much to be gained from removal and re-bedding the stantion(s), unless there is leakage observed on the backside.
Sna-I doubt the "green gradoo" at your stanchion base is material-related. More likely simply mold from inadequate cleaning. There are any number of cleaning products on the market that will make light work of this stuff. Including good old bleach in a spray bottle.
Regards,
Pete
HTurner
Guru
- Joined
- May 21, 2021
- Messages
- 500
- Vessel Make
- Willard Vega Horizon
As has been mentioned before more than likely there is a copper plated undercoat under the chrome. This is a very common chrome plating practice.
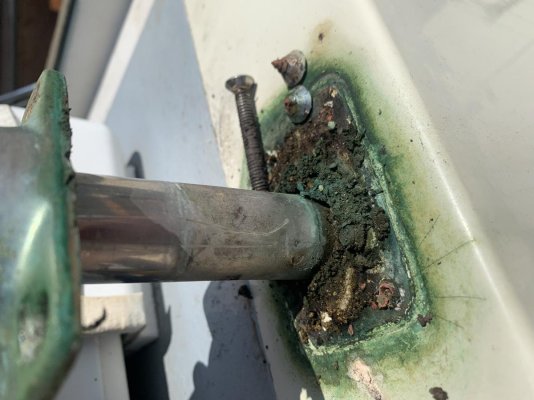
I just removed the stanchion. One screw missing. One screw original looking stainless. Two screws were copper coated with stainless and the broke off right at the head with almost no force. And that look hollow?
Wetness in the screw holes too.
Wetness in the screw holes too.
Attachments

The screws were more than likely chrome plated brass as were the stanchions. You can get the bases re-plated. The better shops will strip off the old chrome then re-plate the bases. Stainless fasteners will be stronger but you occasionally you will get a fastener that will start rusting. You can clean your chrome hardware with Ospho then rinse with water. Make sure that you don’t get it on any aluminum.
Thanks for all the advice/suggestions.
I think the bigger problem I’m seeing is the core under the stanchion is some combo of mush or mud from the water intrusion rotting out the wood core in that area. Wondering if the one right path is to cut out the glass from inside the cabin and re-glass in some new core?
I think the bigger problem I’m seeing is the core under the stanchion is some combo of mush or mud from the water intrusion rotting out the wood core in that area. Wondering if the one right path is to cut out the glass from inside the cabin and re-glass in some new core?
1) Drill the broken screws out with https://www.rockler.com/screw-extractor
2) Poke around with sharp pick or long brad
3) If core is simply rotten around screw holes, overdrill and fill with epoxy
4) If core has extensive rotten area then repair from either inside or outside, whichever is easier.
5) I use butyl rubber everywhere. Every screw that goes into fb, under every stanchion base, under every screw head that goes into base, everywhere.
dhays
Guru
- Joined
- May 26, 2015
- Messages
- 9,045
- Location
- United States
- Vessel Name
- Kinship
- Vessel Make
- North Pacific 43
It's my opinion that butyl tape is a poor choice for sealing under SCREWED fittings into fiberglass. Bolted, yes. Screwed, no. Too much chance of stripping the fiberglass during installation in the typical PNW cooler weather. Setting into epoxy is not a bad suggestion, and lightly countersinking the screw holes in advance is a good idea also. But there's not much to be gained from removal and re-bedding the stantion(s), unless there is leakage observed on the backside.
Pete I’m unclear as to why using butyl tape cause “stripping the fiberglass during installation”.
Thanks, SoWhat, that’s about the plan. I drilled out the screws. They were indeed brass coated with stainless — not original (other stanchions on the boat have full stainless screws). It’s a 48’ Tollycraft.
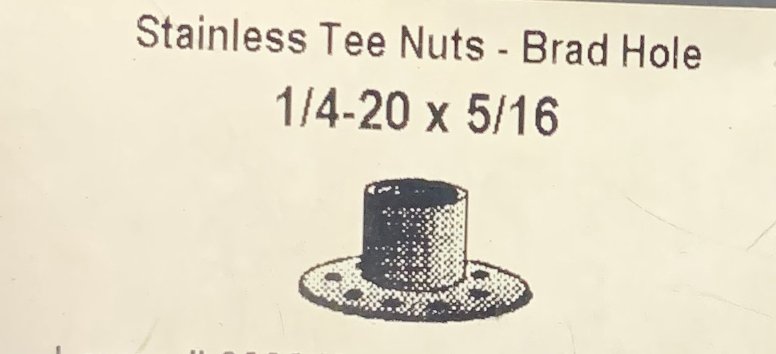
I pulled down the headliner to get a look at the other side. There were some “Brad Hole Nuts” (see image) on each screw in the inside of the cabin and all but one had a broken nut rusted together with it. None were stainless so they were falling apart. I assumed there was an aluminum plate, but no.
I pulled down the headliner to get a look at the other side. There were some “Brad Hole Nuts” (see image) on each screw in the inside of the cabin and all but one had a broken nut rusted together with it. None were stainless so they were falling apart. I assumed there was an aluminum plate, but no.
Attachments
Thanks, SoWhat, that’s about the plan. I drilled out the screws. They were indeed brass coated with stainless — not original (other stanchions on the boat have full stainless screws). It’s a 48’ Tollycraft.
I pulled down the headliner to get a look at the other side. There were some “Brad Hole Nuts” (see image) on each screw in the inside of the cabin and all but one had a broken nut rusted together with it. None were stainless so they were falling apart. I assumed there was an aluminum plate, but no.
Those are "tee nuts". The "brad hole" refers to the holes in the top (bottom) where you can use brads to hold them in place. Other tee nuts have built in prongs to do the same thing.
Since you have taken this apart, you can make a better repair using a 1/4" thick aluminum plate and drilling and tapping it to fit. Or use a plate and then fender washers and nylock nuts.
I would take a guess and say that Tolleycraft did not use that hardware when they built that boat. I wouldn't tap an aluminum plate for a stainless bolt if you ever need to get it apart again. The dissimilar metals have a way of growing together and you can't get the machine screw to back out. If you use an aluminum plate I would drill the holes slightly oversized so you can get it apart if you ever need to or want to remove the base. They do make a material that is supposed to prevent the fasteners from welding themselves to the aluminum. I think it was called T-gel or something like that. Glad to see that you are repairing it properly.
Pete I’m unclear as to why using butyl tape cause “stripping the fiberglass during installation”.
I'm not Pete, but I can take a guess. I have found that if you have a "pointy screw" going into a solid substrate, and then you try to compress something like butyl (especially in cold weather), you can strip not the screw, but the substrate with the force needed.
Unless there is some overriding reason it's not possible, I will always choose to through-bolt, or least drill and tap thickened epoxy (if no access to backside).
Obviously stanchions should be through bolted with the force they are subjected to, and in that case butyl would be fine, in my book (Bed-It brand is the best I've found).
I also would say there is a point to re-bedding even if not leaking, because then you can epoxy pot the opening and try to avoid future core mush issues (if cored). It's much nicer to do it in advance than after things have rotted.
OP: That certainly looks gnarly. Will be so much nicer when you get it squared away.
We all have our own preferences. I like to clear out the balsa and fill with thickened epoxy. Then I install the backing plate, my preference is pre-made fiberglass board (plain or G10, I buy at Mcmaster Carr). I adhere the backing plate to the underside of the deck with an epoxy mush (keeping it parallel with deck), then drill right through both from on top and through bolt. Of course you don't always have the access for this, and too, other things will work (stainless, etc.). I avoid Starboard for backing plates as it creeps under load.
Last edited:
Comodave
Moderator Emeritus
- Joined
- Jul 2, 2015
- Messages
- 21,306
- Location
- Au Gres, MI
- Vessel Name
- Black Dog
- Vessel Make
- Formula 41PC
Yes, if the core is mush then it needs to be replaced. From the bottom will mean you don’t have to refinish the top layer of fiberglass. I agree that G10 would make an excellent backing plate. Check howtomarine.com for bedding directions. I do not use butyl when things are screwed to the deck since with screws you may not be able to compress the butyl properly without stripping out the fiberglass. But if the things are through bolted then definitely use butyl, I also like bed-it butyl from Compass Marine, also known as howtomarine.com. I doubt the screws were copper covered with stainless, maybe chrome plated.
ORIF
Senior Member
I have a 44 Tolly CPMY
Sad to say those T bolts are factory.
There used to be a great Tollycraft forum with a wealth of information. Something happened to their server/database and a lot of valuable information was lost. These T bolts were often spoken of and cussed at on that site. It was often said to be the only thing you could criticize about this otherwise well built boat.
My access to the stanchions your talking about is behind the salon steps. Sounds like yours is different if you’re going through the headliner. I’m having a hard time picturing that.
Sounds like your going about the process correctly, especially adding a backing plate.
I’ve had to redo several of these for leak issues. Some have required more steps than others. Use a backing plate everywhere that you can get to the other side. There’s some tricks to getting a backing plate on to an area you can’t reach all the way to. I can explain or find that link if you need.
Our boats are similar so happy to tell you what I’ve learned about access points if you need.
C lectric
Guru
No Tolly here but I have made alum. backing plates BUT I Helicoiled all the holes in the backing plate. Costs a few bucks for sure but I will be able to disassemble the bolts from the plates.
I always use 1/4" or 3/8" thick aluminum.
Th coating to slow the corroding together of the SS bolts into the aluminum is called TefGel. Another is called Lanocote. Both or either should be available at any chandlery, especially those that cater to sailboat owners.
I always use 1/4" or 3/8" thick aluminum.
Th coating to slow the corroding together of the SS bolts into the aluminum is called TefGel. Another is called Lanocote. Both or either should be available at any chandlery, especially those that cater to sailboat owners.
I might think about oversizing the mounting holes on the top side, rooting as much core out as possible with the old bent nail in the drill. Let it dry well. Fill the cavity with plexus. Tap new mounting holes. That plexus will hold threads as well as glass, maybe better.
I know some guys don’t like butyl to bed those, but I have good luck doing it. Just don’t sock it down tight right out of the gate. Do it in steps over a couple of days.
I know some guys don’t like butyl to bed those, but I have good luck doing it. Just don’t sock it down tight right out of the gate. Do it in steps over a couple of days.
I might think about oversizing the mounting holes on the top side, rooting as much core out as possible with the old bent nail in the drill. Let it dry well. Fill the cavity with plexus. Tap new mounting holes. That plexus will hold threads as well as glass, maybe better.
I know some guys don’t like butyl to bed those, but I have good luck doing it. Just don’t sock it down tight right out of the gate. Do it in steps over a couple of days.
How do you get the bent nail to start rooting out the core if the core is intact? I can't imagine a spinning nail doing anything good if you are trying to keep the top hole small, and if not, why not just use an appropriate sized Forstner bit and take off the top layer as well?
How do you get the bent nail to start rooting out the core if the core is intact? I can't imagine a spinning nail doing anything good if you are trying to keep the top hole small, and if not, why not just use an appropriate sized Forstner bit and take off the top layer as well?
I mentioned oversizing the hole. You can't get to any of the soggy core through the little screw holes.
I was just going to edit my last post but I don’t see that option?
I missed where the headliner has already been pulled away. That would make me want to do the repair from inside if possible. Disregard what I mentioned earlier.
I missed where the headliner has already been pulled away. That would make me want to do the repair from inside if possible. Disregard what I mentioned earlier.
Similar threads
- Replies
- 7
- Views
- 907