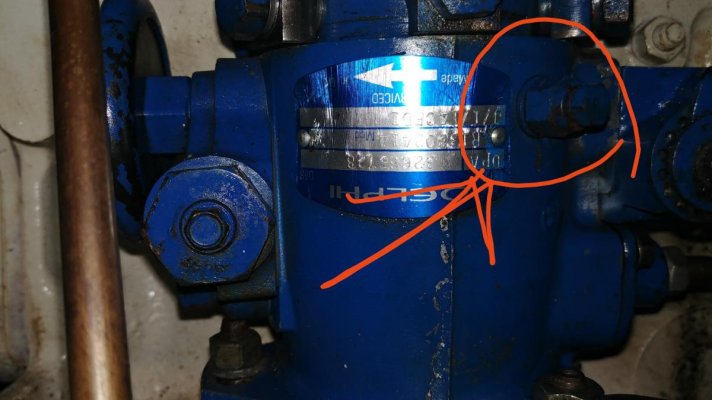
I have a fuel leak at the primary fuel pump..Perkins 6.3544…the leak is at the input connection coming from the primary fuel filters. I tried tightening the connection…the nut is tight but the copper Input pipe still seems loose and can easily be moved around. Is this a special pipe connection like a rosebud that may be worn?? I am 70 miles away from winter storage and am afraid to take it apart without an idea of what I will find..thanks, cliff
You are using an out of date browser. It may not display this or other websites correctly.
You should upgrade or use an alternative browser.
You should upgrade or use an alternative browser.
Perkins lift pump
- Thread starter cbouch
- Start date
The friendliest place on the web for anyone who enjoys boating.
If you have answers, please help by responding to the unanswered posts.
If you have answers, please help by responding to the unanswered posts.
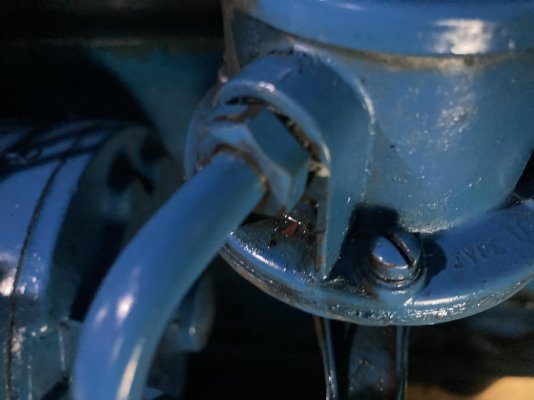
There is probably a flared tubing connection under that nut.
Back it out and inspect it. Looks for cracks or other damage.
Over-tightening a copper flare can cause a leak, too.
Also, the whole assembly could probably be streamlined.
Back it out and inspect it. Looks for cracks or other damage.
Over-tightening a copper flare can cause a leak, too.
Also, the whole assembly could probably be streamlined.
Last edited:
Brooksie
Guru
- Joined
- Oct 20, 2007
- Messages
- 1,310
- Location
- USA
- Vessel Name
- Island Seeker
- Vessel Make
- Willard 36 Sedan
The brits use what they call "olives" on most of their low pressure connections and they do deteriorate over time. I notice you have a ferrule fitting and a couple of adapters on the other end of that elbow. Compression (ferrule) fittings are not code for fuel.
Proper fittings are available here: https://injectionpumps.co.uk/product-category/fuel-supply/fittings/adapters/
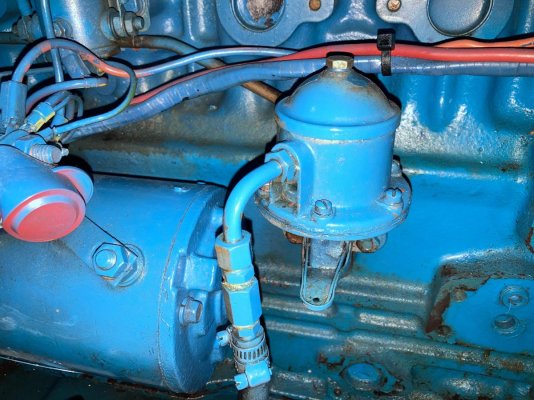
It would be best to get rid of all the fittings on the hose end of that elbow as it will surly work-harden & fracture from vibration w/ that weight on it.
Proper fittings are available here: https://injectionpumps.co.uk/product-category/fuel-supply/fittings/adapters/
It would be best to get rid of all the fittings on the hose end of that elbow as it will surly work-harden & fracture from vibration w/ that weight on it.
Barking Sands
Guru
- Joined
- Dec 24, 2019
- Messages
- 888
- Location
- United States
- Vessel Name
- M/V Intrigue
- Vessel Make
- 1985 Tung Hwa Senator
On the hose up stream of that fitting is all vacuum. It may not be leaking with the engine running. But if thats the case it is surely leaking air into your fuel line. 70 miles...tough call. Especially if you dont have any spare fittings or pump.
Edited to add....Every time I encounter a fitting of this type I convert to AN or JIC 37 degree flare. Far superior and you can get soft copper SECO seals to put between the mating faces should a leak develop.
Edited to add....Every time I encounter a fitting of this type I convert to AN or JIC 37 degree flare. Far superior and you can get soft copper SECO seals to put between the mating faces should a leak develop.
Last edited:
STB
Guru
That lift pump has a black rubber ring seal in it. Call Trans-Atlantic Diesel in Virginia or S&W Diesel in Los Angeles and then email them that picture. They can send you one. Just make sure you take the old one and remnants out and don't over-tighten or the ring seal gets buldged and shredded.
But, that nut should not be loose. It should thread into the pump and tighten down compressing the ring seal a bit (but not too much!) If it doesn't thread in correctly, something is off. You'd have to take it off to see if the problem is on the nut end or the pump end.
I know you are 70 miles from the destination, but if you are in a metro area, or near one, there will be hose and hydraulic shops. I'd find one, call to verify their capabilities, and then order a new lifter pump, which will come with new seals, and also order a seal for the pump you have. With that in hand, I'd pull things apart.
If the old nut looks good, you can clean out the old seal, and it tightens down well, that's a win. If not, bytbthe nut looks good and is threaded for the new pump, that's a win, too. Lastly if the hose threads don't fit the new pump, takenthem off and bring them with you to the hydraulic shop. They often can set you up in minutes.
Some of the newer pumps and fittings seal with an o-ring near the nut vs the ring seal along the stem that goes into the pump.
You could also try using an "improvised" repair by using a sealant if things won't tighten down. But be careful not to get it into the fuel line or it could become an obstruction.
If it were me, I'd get the parts sent by overnight shipping and get it fixed, even if it meant a visit to the hose shop.
Everywhere I've ever lived or boated there has been a shop nearby, not just in super industrial areas.
Lepke
Guru
- Joined
- Jun 19, 2016
- Messages
- 3,035
- Location
- US
- Vessel Name
- Charlie Harper
- Vessel Make
- Wheeler Shipyard 83'
Or you could replace the metal line parts with hose.
It leaks because of vibration. If you're gonna use metal fuel line, it's better if the last foot before the engine connection is fuel hose.
It leaks because of vibration. If you're gonna use metal fuel line, it's better if the last foot before the engine connection is fuel hose.
STB
Guru
Or you could replace the metal line parts with hose.
It leaks because of vibration. If you're gonna use metal fuel line, it's better if the last foot before the engine connection is fuel hose.
The standard setup on that engine uses a hard line only for the 90 bend down, a small few inches in all. After that, it is a rubber hose.
Barking Sands
Guru
- Joined
- Dec 24, 2019
- Messages
- 888
- Location
- United States
- Vessel Name
- M/V Intrigue
- Vessel Make
- 1985 Tung Hwa Senator
I would take it apart. It either has a flare end or likely has the olive. I am betting on olive. If the line turns easy with the nut tight then the olive is probably loose at the tip of the line as well as fully compressed with no more capacity to be "crushed". Occasionally I have been able to get the olive off and turn it around and retighten to get a leak to stop.
Of course other times the line is crushed and the olive is crushed too..lol. Then you just need to replace it. I wouldn't doubt you can get one at an autoparts store like NAPA.
Of course other times the line is crushed and the olive is crushed too..lol. Then you just need to replace it. I wouldn't doubt you can get one at an autoparts store like NAPA.
STB
Guru
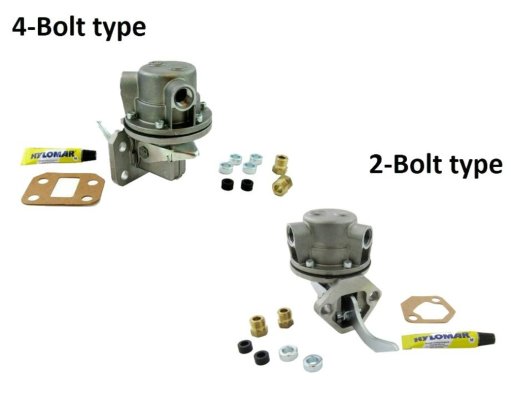
Take a look at the picture attached, from here:
https://www.parts4engines.com/perkins-6-354-fuel-lift-pump/
See the black ring seals? That's what you've got. Hope that helps. If I was at my boat I could show you pictures from the same version of pump you have. But the original is like the replacement in this respect.
https://www.parts4engines.com/perkins-6-354-fuel-lift-pump/
See the black ring seals? That's what you've got. Hope that helps. If I was at my boat I could show you pictures from the same version of pump you have. But the original is like the replacement in this respect.
Attachments
High Wire
Guru
Yes it is a simple tubing fitting. I can’t remember if it’s a flared or olive. Back the nut off a couple turns, wire brush the steel nut all around then tighten again. Worse case the pump is a CAV/Delphi available lots of auto parts stores as well as the inlet fuel line. You would need to borrow a tubing bender to put a 90 deg in the new tube. Be sure to check for 2-bolts or 4-bolt mount. Can’t tell for sure from the pictures.
Last edited:
Since this is the supply side of the IP no bleeding should be requiredSo if I take this line off what is the bleeding procedure or isn’t it necessary??
unless there is a long downhill run to the fuel tank that could fill with
air.
If that looks possible then I would pinch the fuel hose to retain the fuel.
Last edited:
High Wire
Guru
If you take the intake line off the lift pump completely you most probably need to bleed the engine. An air bubble will get into the secondary filter. It may or may not be big enough to stall the engine. The secondary is easy to bleed. The bleed is described in the owners manual. Good time to change the filter elements so you only have to do it once. Something every diesel owner needs to know and best practiced in your slip with a cool engine. Work from secondary filters towards the injectors.
Bleed points:
Secondary filters - 2 bleed ports
CAV injection pump - 2 bleed ports and any 1 injection line nut
Injector lines - Pick any 2 injector nuts at the injector.
Bleed points:
Secondary filters - 2 bleed ports
CAV injection pump - 2 bleed ports and any 1 injection line nut
Injector lines - Pick any 2 injector nuts at the injector.
STB
Guru
It will most certainly need to be bled because the lifter pump and supply line will be lose much of their fluid and become filled with air. The discharge line will also lose its fuel if disconnected. If it isn't bled this will all get pushed into the pump and past the pump into the injectors, etc.
Also, before I forget, make sure you shut off the fuel before disconnecting the line(s).
If you want to make things a little faster, and if your tanks are above the lifter and will gravity drain to it, open the valve before tightening down the supply line to the pump and let the fuel gravity drain to the pumpcand out the loose connection (have rags ready). When it comes gushing out, tighten it until it stops and clean up. If you don't want that mess, skip it and just tighten the connections. You may just end up bleeding more.
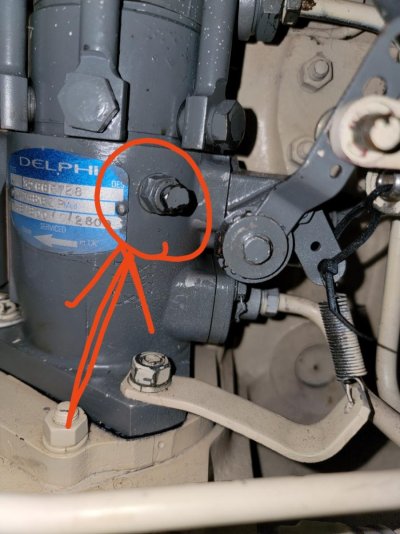
Loosen the bleeder screw on the injector pump. I've marked it on two pictures. Note that one of them has the tag upside down. The screw is just left and above the tag (tag right side up or upside down!). Set up some rags there. Open the fuel valve.
Pump the lifter pump and keep pumping. It can be a couple hundred pumps. Initially it'll feel really soft. That is pushing only compressible air. As it gets fuel to it, it becomes firmer
Initially, it is inconsistent as it gets a mix of air and fuel, then it gets consistent. The fuel will start to spit a bit out of the bleeder, then fommfor a long while. Then get to be pure fuel with no air. Don't rush this. Get all of the air out and then some. Once it is bled, tighten the bleeder. You are done.
If you have an inline bleeder, use it instead of pumping by hand, but otherwise do the same thing.
I know the manual points to two different bleeders on the pump and then instructs to bleed the injectors. Bleeding thebinjectors requires turning the engine over to spin the pump. There is no need. None. Just bleed the pump well at that one bleeder and you are done. Really.
There will still be some air in there, but it is fine. Start the engine. The first few turns will push the air into and out of the injectors into the return and eventually into your fuel tank where it makes up for some fuel going into the tank with mess vent air coming in by a hair. Then the engine will start. For just a few seconds, the rpms will be a bit unsteady and there will be a bit of white fuel smoke. This is just do to an unsteady fuel flow and uneven fuel pressure while it clears the rest of the air. In just a few seconds it'll run as nice and smooth as ever. All good.
You can start cracking injectors and bleeding them by turning over the engjne, but it'll change little. You still won't get all the air out. If you do it anyway, have some more copper crush washers for the injector returns handy. Eventually one (or more) will have been recrushed one too many times and will develop a leak and need replaced. Again, just don't bother. No good comes from it. It decreases the smoke and unsteady phase a bit, but it is more work and can need crush washers or leak. Not worth it.
If you go a couple hundred pumps by hand and aren't getting any fuel or resistance, double check your valve, then tap the starter and go for a couple hundred more. It is unlikely, but there is an engine rotation where the pumping can be problematic.
Hope this helps.
Also, before I forget, make sure you shut off the fuel before disconnecting the line(s).
If you want to make things a little faster, and if your tanks are above the lifter and will gravity drain to it, open the valve before tightening down the supply line to the pump and let the fuel gravity drain to the pumpcand out the loose connection (have rags ready). When it comes gushing out, tighten it until it stops and clean up. If you don't want that mess, skip it and just tighten the connections. You may just end up bleeding more.
Loosen the bleeder screw on the injector pump. I've marked it on two pictures. Note that one of them has the tag upside down. The screw is just left and above the tag (tag right side up or upside down!). Set up some rags there. Open the fuel valve.
Pump the lifter pump and keep pumping. It can be a couple hundred pumps. Initially it'll feel really soft. That is pushing only compressible air. As it gets fuel to it, it becomes firmer
Initially, it is inconsistent as it gets a mix of air and fuel, then it gets consistent. The fuel will start to spit a bit out of the bleeder, then fommfor a long while. Then get to be pure fuel with no air. Don't rush this. Get all of the air out and then some. Once it is bled, tighten the bleeder. You are done.
If you have an inline bleeder, use it instead of pumping by hand, but otherwise do the same thing.
I know the manual points to two different bleeders on the pump and then instructs to bleed the injectors. Bleeding thebinjectors requires turning the engine over to spin the pump. There is no need. None. Just bleed the pump well at that one bleeder and you are done. Really.
There will still be some air in there, but it is fine. Start the engine. The first few turns will push the air into and out of the injectors into the return and eventually into your fuel tank where it makes up for some fuel going into the tank with mess vent air coming in by a hair. Then the engine will start. For just a few seconds, the rpms will be a bit unsteady and there will be a bit of white fuel smoke. This is just do to an unsteady fuel flow and uneven fuel pressure while it clears the rest of the air. In just a few seconds it'll run as nice and smooth as ever. All good.
You can start cracking injectors and bleeding them by turning over the engjne, but it'll change little. You still won't get all the air out. If you do it anyway, have some more copper crush washers for the injector returns handy. Eventually one (or more) will have been recrushed one too many times and will develop a leak and need replaced. Again, just don't bother. No good comes from it. It decreases the smoke and unsteady phase a bit, but it is more work and can need crush washers or leak. Not worth it.
If you go a couple hundred pumps by hand and aren't getting any fuel or resistance, double check your valve, then tap the starter and go for a couple hundred more. It is unlikely, but there is an engine rotation where the pumping can be problematic.
Hope this helps.
Attachments
Similar threads
- Replies
- 0
- Views
- 258
- Replies
- 4
- Views
- 507