Minor Gel Coat repair advice

The friendliest place on the web for anyone who enjoys boating.
If you have answers, please help by responding to the unanswered posts.

Dougcole

Guru
Joined
Jan 21, 2008
Messages
2,167
Location
USA
Vessel Name
Morgan
Vessel Make
'05 Mainship 40T
So lately I Have been trying to teach myself the dark art of gel coat repair. I'm not planning on big projects, but I would like to be able to do small ones, like screw holes and small gouges myself. I'm getting better at, but I'm still inconsistent and have a way to go.


My repairs look better than a screw hole anyway. Or that's what I keep telling myself, LOL.


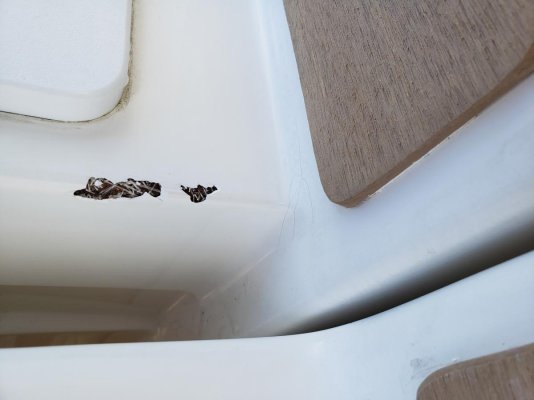
Below is an example of one of my worst attempts. Obviously, I am off on the color (needs a tiny drip of black mixed in, I think) but the biggest problem is the spot on the top right. I keep getting this problem where the edges of a chip or hole don't fill in smooth and after sanding you can see the outline of the hole, even with a perfect color match.


I have been using a chamfer bit to drill out the hole prior to putting in the gel coat. Do I need to drill it out more maybe?


Thanks in advance.


Doug
 

Attachments

  • Gel coat repair.jpg
    Gel coat repair.jpg
    11.4 KB · Views: 301
Hard to see from the pic. I have found the key is to first try to match the color, then overfill the repair area and wet sand with very fine paper to blend it in. The sanding is the most important part. I may have some pics if I can find them.
 
Yeah, it was tough to get a good pic with my phone.


I've been pretty careful with the sanding. I overfill, then go 220, 600, 800, 1200. I follow that with rubbing compound on my high speed buffer, then polish on the buffer, 3M finesse it (if it needs it) and hand wax. I can get the repairs to shine, but the edges of the holes keep bleeding through.


Maybe I am too aggressive in the start of my sanding routine?

I would not start with anything more than 400, if that. Here is a recent repair. Sorry they appear sideways.
 

Attachments

  • 20191004_123249.jpg
    20191004_123249.jpg
    73.4 KB · Views: 42
  • 20191007_111743.jpg
    20191007_111743.jpg
    71.4 KB · Views: 39
Last edited:
I would not start with anything more than 400, if that. Here is a recent repair. Sorry they appear sideways.

Those look great.

Did you sand/grind/open up the void at all before filling them?
 
Yeah, it was tough to get a good pic with my phone.


I've been pretty careful with the sanding. I overfill, then go 220, 600, 800, 1200. I follow that with rubbing compound on my high speed buffer, then polish on the buffer, 3M finesse it (if it needs it) and hand wax. I can get the repairs to shine, but the edges of the holes keep bleeding through.


Maybe I am too aggressive in the start of my sanding routine?

I think your technique is too persnickity.
If I had a surface that was perfect, but for the screw hole, I wouldn't expect perfection for the repair. If the surface was 40 year old gelcoat like mine, a repair will stand out if it is perfect, but if you used no finer than 400 grit on it, it disappears completely. Yours should end up somewhere between.


So you're saying sand it to 400 then buff? Or no buffing?
 
Best tips I picked up is using old fashioned mylar? Overhead transparency film.
1st trick - When mixing colors mix on a piece and the clarity let's you place it over the area to be matched and it really helps the comparison.
2nd trick - cut a piece slightly oversized for the repair area and hinge it with painters tape. After filling use the hinged piece to cover the patch and press it into the repair and tape it down. It leaves a flat or curved contour to match the substrate and the surface is super smooth. Little or no sanding needed once you get used to the right fill.
 
So you're saying sand it to 400 then buff? Or no buffing?

You will know what it needs, by the results you see. If the rest of your gelcoat is more perfect than the patched piece, buff away till they are the same. Or Not.
 
Go get a preval sprayer, they cost about $12. First, go ahead and fill as you have been doing, til just shy of level.

Next, put a drop of the uncured gel on the surface somewhere and put a piece of clear scotch tape over it. It will make it easier to see if the color is a close match. If a little too white, try a little yellow, brown or green are often the colors you need, but this is the dark arts side of things. Part of the reason that you can see the color so easily is by filling and sanding flat, you create a perfect contrast where the edge meets. Even a good color match will be seen that way. What you need to create is a blend.

So sand around the area you pre-filled that has now set up. You can use something as aggressive as 100 grit, just knock the shine off there should be no shiny gel. Over sand by a couple inches, sanding lighter towards the far edges, but there should be no shiny gel in this area. It really only takes a moment to do this sanding, it is not really aggressive. The peaks and valleys create the blend.

Back to the sprayer, thin the gel until it will spray and not clog, Think milk-ish, cream is borderline usually. It just needs to spray evenly, you are going to block sand so the texture of the spray will be extremely forgiving. Now add the catalyst and if your gel does not contain “wax” you will add some. Ask your gel supplier for the “wax” and solvent.
Now simply spray feathering toward the edges. Wait a few minutes and add another light coat or two if you need more build. Just don’t spray gel on any shiny unsanded areas.

Then block sand as you have been doing, and run through the grits. Even your current color match will be fairly hard to see.

First time you do this it may seem overwhelming. You may go too fast in one part, too slow in another etc…. If you have to sand it all off, you will realize how even that was not terribly too much work and will start to realize the basic process is actually pretty quick and will get the hang of it pretty quickly. Second try, will be much easier and go quickly.

This is about as much as I can explain. You need to take a run through for the feel of it and let the process teach you as you observe. I think you will be surprised how close you come, even on the first go, even if it does not really go to plan. It’s a good skill to pick up as you won’t be afraid of digging in when you need to.

As for getting a perfect color match….that’s truly the dark arts. The blending process is the best bet to get “close enough”. If you truly figure over time how to get to an unnoticeable color delta, go into the gel business and charge whatever you want!


+1 for the Preval sprayer. Spraying is the way to get it done right. Not easy to learn but once you get the hang of it is gets easier. Nice thing is once you have your color mix and start spraying you can do multiple repair areas at once.


Don
 
Those look great.

Did you sand/grind/open up the void at all before filling them?

I did not. There was enough depth to hold the gelcoat so it didn't seem necessary. I'm no expert by any means. Be sure to keep the surface and paper wet while sanding lightly by hand.
 
Main problem I have is color match is perfect initially but not 3-5 years later. New and old gelcoat oxidize and age differently. Often the color mix components the manufacturer used aren’t those you are using. With aging that becomes apparent.
Think whites are the worst. Your eye and brain pick up the most minor discrepancies.
 
The gel coat will darken slightly when it cures. About 1/2 of a shade is how I would describe it.
I would wet sand to about 1000 grit then use a polishing compound to finish it off.
That’s how I did all of my finish gel coat work.
Hope this helps
 
I second reviewing boatworkstoday on Youtube. He will demonstrate the technique for big and small holes and gelcoat matching- many videos to watch and learn from.
 
Gelcoat repair is dark art. Like drywall taping, the repair should go well past the damage area so that it tapers in to the original surface at a very gentle angle. This way, you avoid the exposure of the original holes.
When colour matching: First dewax, clean and buff a nearby area of gelcoat. Mix your colour (no catalyst) as you believe appropriate then smear a drop onto the cleaned area. Pour over it a capful of acetone. It will flash off instantly but will give you enough time to see colour discrepancies. You should be seeing the colour of the cured product, but only for a split second. Adjust your pigments and try again. Only add thinner ( I prefer Duratec) and catalyst once you have it so that when acetone is poured on top the new gelcoat "disappears".
I also recommend the Duretec gloss gelcoat additive. It stretches the gelcoat by adding 50-50. The finish levels much better, cures to a high gloss and requires less finish work. I wont do plain gelcoat again.
 
Just starting to fix a few dings and finding this most informative, keep the tip’s coming.
 
Back
Top Bottom