Making your own replacement Bimini

The friendliest place on the web for anyone who enjoys boating.
If you have answers, please help by responding to the unanswered posts.

ksanders

Moderator Emeritus
Joined
Feb 24, 2011
Messages
6,282
Location
USA
Vessel Name
DOS PECES
Vessel Make
BAYLINER 4788
I’m starting on my second major canvas project on the boat. First was a cockpit enclosure, now is a Bimini.

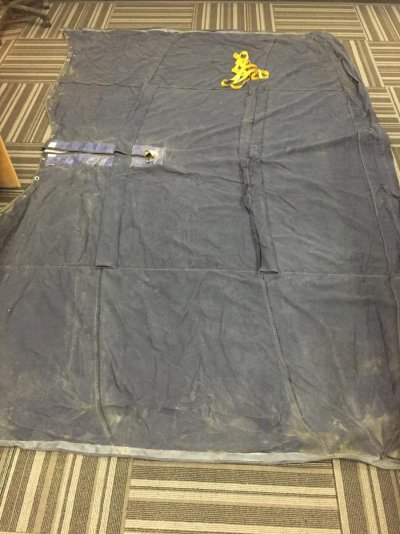
I have an old Bimini top that fits perfect and is in pretty good condition.

I have it laid out on the floor and the construction looks like a patchwork to me, with lateral seams along each bow, and fore-aft seams as well.

To me it looks almost like someone built the thing from fabric scraps :)

Laid out on the floor, it seems perfectly flat, with no “depth” to it. Meaning no loose spots, making it a 3D unit.

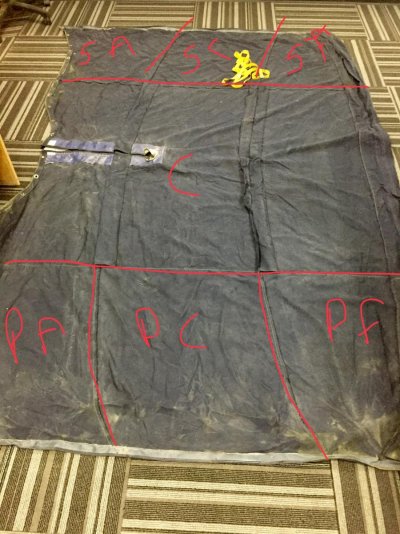
My goal is to replace it, adding a “zipper flap” along the front and side edges so that I can add side and front panels next season.

With our weather in Alaska turning to crap, and this perfectly good Bimini sitting on the floor, is there a reason I can’t just sew up two widths of Sunbrella, and make a new top of the same size with the bow pockets in the same place? Basically using this one as a pattern?

Would I be better off to rip out the lateral seams (the ones that run along the bows) and use those as patterns, then sew it up?

Has anybody else been through this? If so what did you do and how did it work out?

Thanks!!!
 

Attachments

  • 37F264A4-794A-4C70-8D77-5405A7EE683F.jpg
    37F264A4-794A-4C70-8D77-5405A7EE683F.jpg
    149.3 KB · Views: 94
Here’s how the seams ended up being layed out

I think I figured it out. The side pieces are curved to match the bimini bows, and thge center is one big piece. The whole design is very efficient fabric wise, but it sure seems to use allot of seams.

I am beginning to think that I might be better off to wait for a nice day and start fresh with a pattern.
 

Attachments

  • 59FAF3EA-35AC-478B-9B17-6E496E34A5CC.jpg
    59FAF3EA-35AC-478B-9B17-6E496E34A5CC.jpg
    176.3 KB · Views: 84
Last edited:
Kevin
Many of the biminis I have seen were constructed from the narrower 47" Sunbrella and have more seams. I think this is to be more efficient w fabric.
I have done as you suggest start w a double width...in my case I used 60" wide and had one center seam. You can do the same w 3 pieces wide w the narrower.
The only part that wilk need a dart to follow the curve of the bow should be at the outside edge where the bow curves.

If the top fits well you should be able to use it as a pattern by openning the seam at the outside edge of the bow until it lays perfectly flat.
How you piece together the bulk of the material shouldn't make a difference.
If you make a pattern it would start q one large sheet so where you place seams is flexible and usually based on material efficiency.
Have you looked at the online videos for biminis?
It is also possible to remove the bows and set them up onshore to do patterning if that would help...
 
Thanks very much!

I’ll follow your suggestion. As long as I get the curves toward the edges, I can make the bimini from 3 pieces if I want.

Now that I know why they did it the way they did, it makes a bit more sense.
 
I guess the only watch out is...
If you use 3 strips fore-aft best to make sure the seams are inboard of where the darts will be that form the curve. Its hard to have a seam in that area and get it ti lay flat...much easier w single layer.
 
Some of these materials look different from a different direction so you might want to cut all the pieces in the same direction.
 
Some of these materials look different from a different direction so you might want to cut all the pieces in the same direction.

Good call - they also may stretch differently, so biasing all of them the same would be a good idea.
 
When I made a new 10' wide by 9 foot long bimini top., I used 60" wide Sunbrella. One center seam, the fabric running fore and aft. So when the top is tensioned, it does not pull on any stitched seams. The only stitched seam would be for the tubing.

I also unconventionally made the top by using a 1/4 " vinyl covered galvanized cable in the ends, with the material put over this and glued with PL premium construction adhesive. I bet you could use 5200 too except takes too long to set the glue, maybe. Ideally a glue that is clear or more closely matches the top color would be ideal.

Then I drilled holes every 4 or 6 inches, and tied the top to the tubing.

The top was salvaging what was damaged in a storm.

Example here
20170428_184353.jpg


I ended up simply gluing every seam, even gluing in some large patches where the original fabric had torn or stretched. Glued sunbrella actually does work, it holds up through several storms..

You can see the large patches it needed. The inner bow tubing sleeves are entirely glued to themselves and the top.


I just could not figure out the end pockets, so went with the steel cable and holes and no grommets, just glued construction then tied onto the tubing. Using that steel cable, the ends simply can never come apart. The fabric would have to tear.

So it was an experiment that succeeded.
I like it, would probably make a new one the same way.

The cord is a polyester, not nylon. It has not stretched. It has been up since July 2017. The top survived a knock down when the front bimini tuning eyes pulled out because those damn set screws are no good. I drilled holes into the tubing and ran in SS 1/4 by 28 thread bolts.

Came to the boat and saw this one day, I heard there was a bad wind storm heavy gusts. Due to relying on set screws.

20170619_194134.jpg


The glued top survived without coming apart. It was hard to untangle this twisted wreck.
 
Last edited:
I’m thinking that I’m overthinking this.

What I have is a bimini that attaches to the radar arch at the aft, then has a total of three bows.

What I think I’ll do, is use the old bimini to pattern the part that attaches to the radar arch, and the bow pockets

Then I can install it, and sew darts into the two front corners to keep the fabric from gathering at those corners.

The intermediate two bows have really narrow bow pockets side to side, so the fabric was always just laying on top of the bows, and not following their contour.

The front bow pocket is pretty much the full width of the bimini, but I can make it a bit shorter allowing the darts to not interfere.

What do you guys think of this plan???

Worst case is I’ll have to make a little modification to make it perfect.
 
Some colors of Sunbrella even come in 80" width. I ordered a piece 80" to make a bra for a windshield on a previous boat. The original bra was made up of 5 pieces, I was able to make it from 1 piece of 80".

Another idea would be to put a hardtop on the bimini frame. Then you have a straight edge on both sides and a gentle curve on the front. You can use keder awning strips to attach the side curtains to the hardtop. Easy. I have done this on 2 boats. On my current boat, I attached the hardtop to the top of the radar arch. Hardtotop.com makes plastic hard tops that are easy to get shipped. No connection, just a satisified customer.
 
Here is a photo of our current boat with the hardtop.
 

Attachments

  • IMG_0106.jpg
    IMG_0106.jpg
    174.6 KB · Views: 85
I replaced our bimini top (and windows) earlier this year. Ours was 60" width centre section with two 46" sections on either side, seams running fore and aft.
Even though sailrite and other online sites say you should not use the old one as a pattern I did so, mainly as it was so unwieldy at 12'x12', it was winter, and due to my inexperience. If I had to make it again I would create a new pattern - just like everyone suggests :) . I had to do a number of rounds of adjustments to make it fit really well (which it does now). In hindsight I think it was due to the difficulty of getting the old and new fabric stretching exactly the same.
 
Last edited:
Sailrite has some very helpful videos available on making your own Bimini. While it is best to pattern new, because the old may have shrunk/stretched....I think if you watch the video to recognize pitfalls....you can be successful.

We are doing ours this winter as well. We will pattern new, so if we don't succeed we can always put the old one back on! :ermm:
 
Kevin
Have you looked at book ir video on making a bimini?
Sailrite video covers exactly what you are doing...aft attached to arch.
The end detail has multi pieces that form the drop down portion...it usually is not just the top piece fitted & finished. Especially important if you want to add side / front curtains.
Otherwise I think your plan should work.
The Sailrite Quick Fit kit will help hold a pattern or partially completed top in place while marking up or installing snaps. Not sure if you have obe from previous project if not they are very handy for lots of projects.
Are you planning on zips in the bow pockets?
If not I wpuld recommend them...saves a lot of work removing top for cleaning & retreating.
 
Last edited:
Kevin
Have you looked at book ir video on making a bimini?
Sailrite video covers exactly what you are doing...aft attached to arch.
The end detail has multi pieces that form the drop down portion...it usually is not just the top piece fitted & finished. Especially important if you want to add side / front curtains.
Otherwise I think your plan should work.
The Sailrite Quick Fit kit will help hold a pattern or partially completed top in place while marking up or installing snaps. Not sure if you have obe from previous project if not they are very handy for lots of projects.
Are you planning on zips in the bow pockets?
If not I wpuld recommend them...saves a lot of work removing top for cleaning & retreating.

Yes, I’ve watched the videos, very helpful!

On this one the drop down will be a whole separate unit attached to the rear of the radar arch, so that’ll be easy. I’ll just use track and keeder for that, like I did the cockpit canvas.

Yes, I love the quick fit, if it’s what I’m thinking of being the little nails on snaps, with the plastic holders, very nice. I also have the super duper snap tool, the big alumanium job.

Yes, sewing in zippers in the pockets is in the plan. I cannot imagine why they built my old top without them.

The goal here is to start with the top, then add front and sides.

At this point, with one more trip to the boat before the snow and winter sets in I’m going to try to pattern this new. If that does not work out weather wise, I have the old top and I’ll pobably use it as a pattern, but leave the front corners unfinished so I can take them in during final fitting.

I also have Nauga soft on order along with some foam, to do the helm seat, along with the pilothouse cushions. :)
 
sdowney717 mentioned gluing Sunbrella on his very inovative repair. Funny but I have had trouble gluing it. I thought it might be the "fabric protector" it comes coated with, like Scotchbrite. Anyway, gluing didn't work at all for me and I tried several types of fabric glue.
 
sdowney717 mentioned gluing Sunbrella on his very inovative repair. Funny but I have had trouble gluing it. I thought it might be the "fabric protector" it comes coated with, like Scotchbrite. Anyway, gluing didn't work at all for me and I tried several types of fabric glue.

The PL worked fine. It does desire to swell, so I weighted it down.
Plastic cereal bags it wont stick to. Then before it is set I worked out the wrinkles, but you need some experience with this adhesive. You dont want to move it if it is past a certain cure stage. Once past the sticky stage, it turns crumbly, most definitely do not move it then. On a humid hot day the adhesive will cure in a couple of hours. Otherwise I left overnight especially for the glued in cable. Did one side at a time, used standard bricks to weight it down.

My only remaining sewed seam is the center seam that joins the 60 inch wide pieces, plus the outside hem is sewed. This was a trial repair to see if I could fix the old top by gluing which has been successful. And I actually like the look it being tied onto the bows. I thought about grommets for the holes, but has not been a problem. The steel cable gives it continuous support along the entire length of tubing. So the blue polyester cord pulls on the cable, not the cloth. I used an iron to fold the hems, so no exposed sunbrella edges, they are folded under and glued too. The glue prevents the cloth from unraveling.

Here is an album, I also repaired the tubing where it had bent during a storm when owned by the prior owner. I made a notched putty knife to spread the glue. In the more recent storm, it even snapped off the SS 5/16 bolt hat holds the main bow. So I thought to tap it bigger for 3/8, but the taps all shattered. SO I ground the hole clean, and silver brazed in a bronze screw. Back to 5/16.

Can you view this album?
https://photos.app.goo.gl/G7w2xrmeSciWJhUa2

I used PL premium 3x strength. I have wondered about other types of adhesives like the PL 8x which is grey color, or 3M 5200.
 
Last edited:
Back
Top Bottom