rgano
Guru
- Joined
- Oct 8, 2007
- Messages
- 4,995
- Location
- USA
- Vessel Name
- FROLIC
- Vessel Make
- Mainship 30 Pilot II since 2015. GB-42 1986-2015. Former Unlimited Tonnage Master
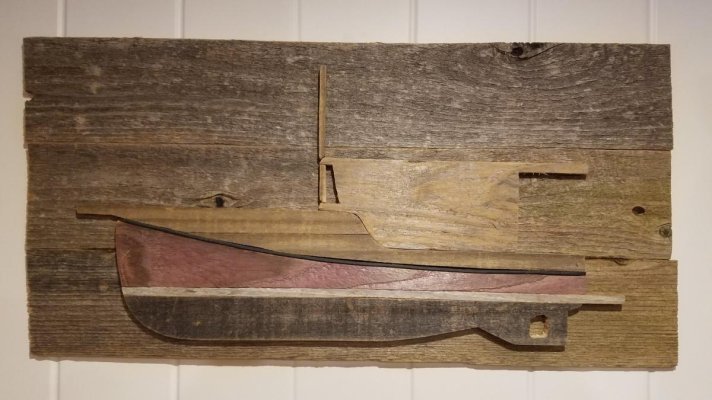
Few have the patience or desire or skill to make ship models from scratch, but I once had all three. For those who wish there are numerous places on the internet which advertise completed models of various makes of boats and some will build to suit, but the prices are sporty.
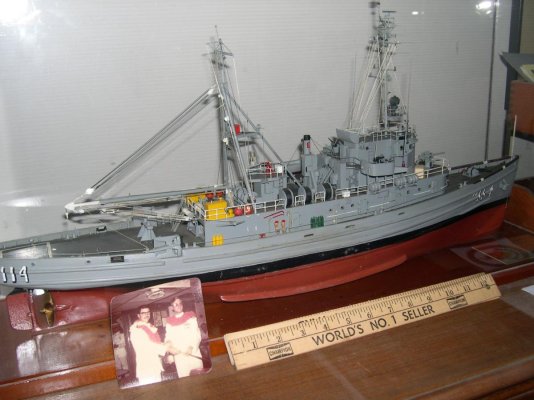
I was assigned to command of USS Tawakoni (ATF 114) in September of 1976. The ship was homeported in Pearl Harbor, Hawaii and a part of Service Squadron Five. Very soon after I took command, several other captains of salvage ships in Service Squadron Five and I were invited to the home of our squadron commander, Commander Boerner. There we were treated to the sight of a number of model salvage ships he had constructed, all under glass cases. They were exquisite in detail, and we all marveled at his skill. Having gone through the usual spate of plastic models as a kid and slowly graduating to more difficult wooden models when I was bored going to long Navy training schools, I began to form a plan.
Salvage ships, being relatively small lend themselves to a workable scale and satisfying level of detail dependent on the modeler’s skill and inventiveness to make parts. I wanted a model in the two-foot length range; so 1/8-inch to the foot worked out well for the 205-foot long ship. The math was also simpler when calculating lengths of various parts.
First up was a visit to the base library (no internet back then) to check out a book or two on modeling because I was not sure how I would fashion the hull, the most demanding part of all. Thinking back to some sailing ship models I had built, I at first considered a plank-on-frame model which could have allowed me to build out the interior showing details of engineering spaces etc. There were limitless possibilities here, but I soon realized I could have been years doing this thing. After all I was a full-time naval officer without butt loads of time on my hands as a commanding officer.
In the end, I elected to build a “bread-and-butter” hull. I had the complete booklet of blueprints for the ship at my command which helped immensely as I made a paper pattern for each of the levels of the hull on pieces of broken pallet wood I had scavenged from the supply warehouse on base. The wood was planed at the Hickam AFB hobby shop not far from my Naval Station BOQ room to a scaled height between levels per the blueprints. As a commanding officer with a place to live (normally the ship because I was not married), I was granted the privilege of being able to live at the BOQ until we deployed. This afforded me some privacy from the crew and relieved the crew of the burden of having the captain aboard at all times.
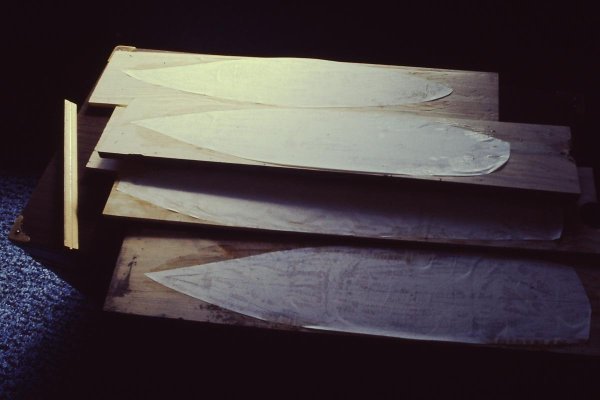
Next I glued the patterns to the wood (first photo) and cut out the shape on a bandsaw. The levels were all glued and clamped to form the rough “wedding cake” or bread and butter hull. Now all the squared corners needed to ne sanded away using a vertical disk sander. Then I patterned ten or so of the ship’s key frames from the blueprints onto modeler’s plywood and cut them out. Back in my room, I used a shoe rasp over a period of a few days to slowly remove wood from the hull while frequently checking for the proper fit of the frames and the marked locations.
Here I received the only outside help I got on this project as my friend and next door neighbor in the BOQ, Stretch Morrill, a US Coast Guard Warrant Officer Four Carpenter (few of them in that rank ever existed) would come over from time to time after I had all the frames fitting against the hull well and grab the hull from me and run his hands over it with his eyes closed in the most intimate fashion. He would point out places where I need a bit more hand sanding to fair it perfectly. Few photos were taken, but the first photo shows the very beginning.
I returned Stretch’s favor helping him at various points in the construction of an eight-foot sailing dinghy which he was constructing in his room. It was a real interesting job when it came time for us to lower it from our fourth-floor balcony into the bed of his pickup, but I digress. This was all the basis of a friendship which endures to this day. We were quite a pair!
Anyway, once the hull was formed and the superstructure started, I needed it painted and fastened to the base I would use to continue construction because it was going to sea with me on a five-month deployment. The paint was obtained from the Tawakoni’s own paint locker and holds up well to this day.
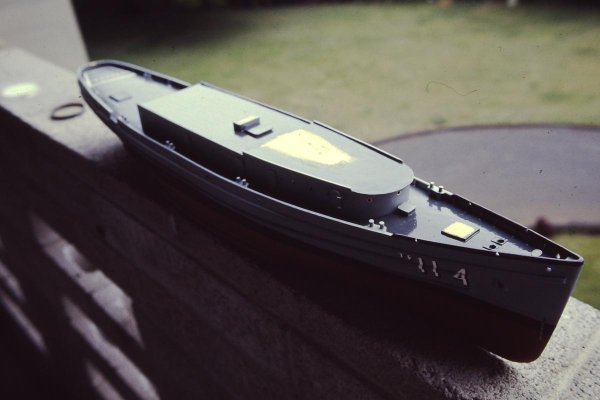
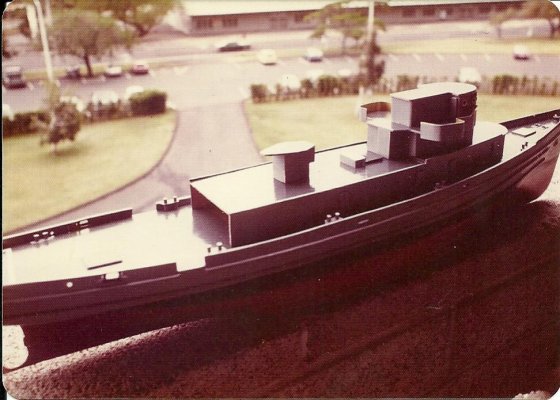
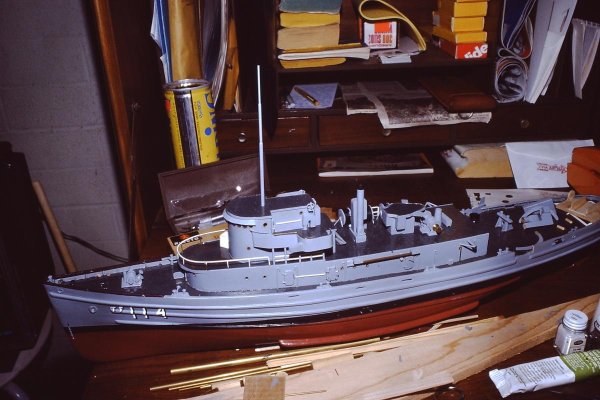
Photos 2, 3, 4 and 5 show the state of completion before transfer aboard ship. Note the four-story drop in the background in the photos before it was transferred aboard ship.
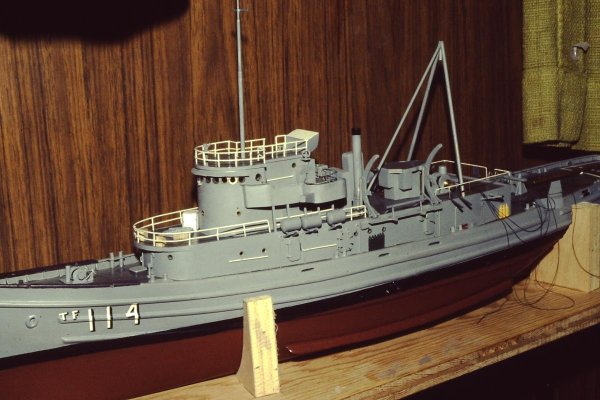
In preparation for deployment, I had a frame bolted to the starboard side of my cabin where I carefully fastened the incomplete model now sporting its unfinished superstructure made of modeling plywood and sheet brass for the bridge wings. Photo 6, ready to deploy to the Western Pacific.
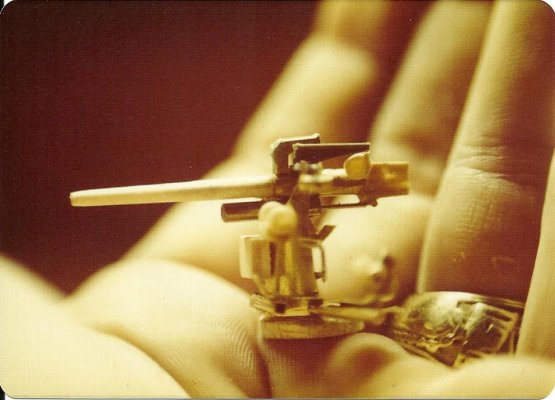
As time went on, I used a lot of brass rods and tubes for various masts and ladders and booms. All the small pieces were attached using super glue while articles like the bulwarks were strips of wood glued on with Elmer’s glue. Once we deployed, I sometimes had to wait for parts to be mailed by my girlfriend (later fiancé and finally first wife) before I could continue. Working on it at sea was often not possible. I remember the propeller (photo 8) and the whaleboat were fashioned from clay while the 3”/50 gun (photo 7) in the photo was made from wood after several attempts.
While the blueprints were essential for the hull and superstructure and masts, there were many changes made to the ship in the years since she was commissioned in 1943, and I was often seen with my tape measure out on deck measuring various ducts and salvage pumps and buoys so that I could go back and scale them before making them out of small chunks of wood.
As the model came together, it was common knowledge amongst the 69-man crew what was going on, but of course they could not see into my cabin, it being a sacrosanct part of the ship. However, the for-noon messenger of the watch was required to find me (usually in my cabin just before lunch) and perform the time-honored ritual of reporting the approaching hour in the following manner. Knock on door and listen for admission; step in covered and salute saying, “Sir, the officer-of-the -deck reports the approaching hour of 1200; all chronometers have been wound and compared; request permission to strike eight bells on time. Here are the fuel and water reports and the noon position from the navigator.” While this ritual was going on, he would be looking over my shoulder at the starboard bulkhead where the model was progressing so that he might make a detailed report to his mates. So here I was allowing time to actually continue past noon while discussing my progress with the lowest ranking member of the crew. ?
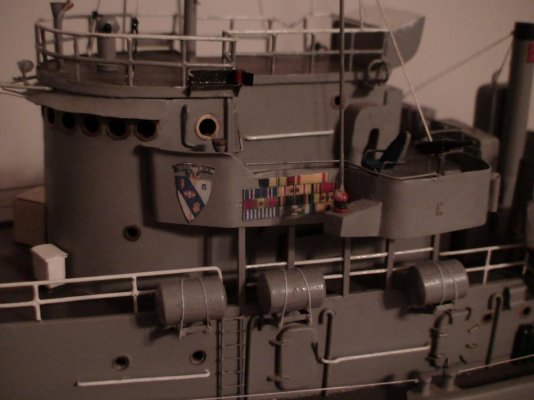
In later internet years I wanted to replicate the ship’s numerous campaign ribbons and battle stars worn on her bridge wings. I went to a navy interest site to find them for the ship all properly grouped. I copied that and printed the grouping on photo paper until I got the right scale, and then I cut it out and glued to the bridge. (Photo 9)
From left, squadron insignia, battle and campaign ribbons, captain’s outside bridge chair, .50 caliber machinegun.
Main mast details requiring a steady hand and super glue.
Watertight door dogs on the main deck were fashion from bent sewing pins.
The model, with the exception of the ribbons as mentioned, was complete by the time we returned to Pearl Harbor from deployment where Stretch bear-hugged me and my fiancé was a bit more delicate. Elapsed time for construction about eight months.
I was assigned to command of USS Tawakoni (ATF 114) in September of 1976. The ship was homeported in Pearl Harbor, Hawaii and a part of Service Squadron Five. Very soon after I took command, several other captains of salvage ships in Service Squadron Five and I were invited to the home of our squadron commander, Commander Boerner. There we were treated to the sight of a number of model salvage ships he had constructed, all under glass cases. They were exquisite in detail, and we all marveled at his skill. Having gone through the usual spate of plastic models as a kid and slowly graduating to more difficult wooden models when I was bored going to long Navy training schools, I began to form a plan.
Salvage ships, being relatively small lend themselves to a workable scale and satisfying level of detail dependent on the modeler’s skill and inventiveness to make parts. I wanted a model in the two-foot length range; so 1/8-inch to the foot worked out well for the 205-foot long ship. The math was also simpler when calculating lengths of various parts.
First up was a visit to the base library (no internet back then) to check out a book or two on modeling because I was not sure how I would fashion the hull, the most demanding part of all. Thinking back to some sailing ship models I had built, I at first considered a plank-on-frame model which could have allowed me to build out the interior showing details of engineering spaces etc. There were limitless possibilities here, but I soon realized I could have been years doing this thing. After all I was a full-time naval officer without butt loads of time on my hands as a commanding officer.
In the end, I elected to build a “bread-and-butter” hull. I had the complete booklet of blueprints for the ship at my command which helped immensely as I made a paper pattern for each of the levels of the hull on pieces of broken pallet wood I had scavenged from the supply warehouse on base. The wood was planed at the Hickam AFB hobby shop not far from my Naval Station BOQ room to a scaled height between levels per the blueprints. As a commanding officer with a place to live (normally the ship because I was not married), I was granted the privilege of being able to live at the BOQ until we deployed. This afforded me some privacy from the crew and relieved the crew of the burden of having the captain aboard at all times.
Next I glued the patterns to the wood (first photo) and cut out the shape on a bandsaw. The levels were all glued and clamped to form the rough “wedding cake” or bread and butter hull. Now all the squared corners needed to ne sanded away using a vertical disk sander. Then I patterned ten or so of the ship’s key frames from the blueprints onto modeler’s plywood and cut them out. Back in my room, I used a shoe rasp over a period of a few days to slowly remove wood from the hull while frequently checking for the proper fit of the frames and the marked locations.
Here I received the only outside help I got on this project as my friend and next door neighbor in the BOQ, Stretch Morrill, a US Coast Guard Warrant Officer Four Carpenter (few of them in that rank ever existed) would come over from time to time after I had all the frames fitting against the hull well and grab the hull from me and run his hands over it with his eyes closed in the most intimate fashion. He would point out places where I need a bit more hand sanding to fair it perfectly. Few photos were taken, but the first photo shows the very beginning.
I returned Stretch’s favor helping him at various points in the construction of an eight-foot sailing dinghy which he was constructing in his room. It was a real interesting job when it came time for us to lower it from our fourth-floor balcony into the bed of his pickup, but I digress. This was all the basis of a friendship which endures to this day. We were quite a pair!
Anyway, once the hull was formed and the superstructure started, I needed it painted and fastened to the base I would use to continue construction because it was going to sea with me on a five-month deployment. The paint was obtained from the Tawakoni’s own paint locker and holds up well to this day.
Photos 2, 3, 4 and 5 show the state of completion before transfer aboard ship. Note the four-story drop in the background in the photos before it was transferred aboard ship.
In preparation for deployment, I had a frame bolted to the starboard side of my cabin where I carefully fastened the incomplete model now sporting its unfinished superstructure made of modeling plywood and sheet brass for the bridge wings. Photo 6, ready to deploy to the Western Pacific.
As time went on, I used a lot of brass rods and tubes for various masts and ladders and booms. All the small pieces were attached using super glue while articles like the bulwarks were strips of wood glued on with Elmer’s glue. Once we deployed, I sometimes had to wait for parts to be mailed by my girlfriend (later fiancé and finally first wife) before I could continue. Working on it at sea was often not possible. I remember the propeller (photo 8) and the whaleboat were fashioned from clay while the 3”/50 gun (photo 7) in the photo was made from wood after several attempts.
While the blueprints were essential for the hull and superstructure and masts, there were many changes made to the ship in the years since she was commissioned in 1943, and I was often seen with my tape measure out on deck measuring various ducts and salvage pumps and buoys so that I could go back and scale them before making them out of small chunks of wood.
As the model came together, it was common knowledge amongst the 69-man crew what was going on, but of course they could not see into my cabin, it being a sacrosanct part of the ship. However, the for-noon messenger of the watch was required to find me (usually in my cabin just before lunch) and perform the time-honored ritual of reporting the approaching hour in the following manner. Knock on door and listen for admission; step in covered and salute saying, “Sir, the officer-of-the -deck reports the approaching hour of 1200; all chronometers have been wound and compared; request permission to strike eight bells on time. Here are the fuel and water reports and the noon position from the navigator.” While this ritual was going on, he would be looking over my shoulder at the starboard bulkhead where the model was progressing so that he might make a detailed report to his mates. So here I was allowing time to actually continue past noon while discussing my progress with the lowest ranking member of the crew. ?
In later internet years I wanted to replicate the ship’s numerous campaign ribbons and battle stars worn on her bridge wings. I went to a navy interest site to find them for the ship all properly grouped. I copied that and printed the grouping on photo paper until I got the right scale, and then I cut it out and glued to the bridge. (Photo 9)
From left, squadron insignia, battle and campaign ribbons, captain’s outside bridge chair, .50 caliber machinegun.
Main mast details requiring a steady hand and super glue.
Watertight door dogs on the main deck were fashion from bent sewing pins.
The model, with the exception of the ribbons as mentioned, was complete by the time we returned to Pearl Harbor from deployment where Stretch bear-hugged me and my fiancé was a bit more delicate. Elapsed time for construction about eight months.
Attachments
-
 1.jpg63.6 KB · Views: 52
 -
 2.jpg65.5 KB · Views: 55
 -
 3.jpg121.1 KB · Views: 53
 -
 4.jpg125.7 KB · Views: 52
 -
 5.jpg129.1 KB · Views: 55
 -
 7 fixed to cabin on Tawakoni8.jpg125.7 KB · Views: 56
 -
 3 inch 50 caliber deck gun.jpg105.7 KB · Views: 53
 -
 11.jpg68.5 KB · Views: 53
 -
 14 battle and service ribbons.jpg81.8 KB · Views: 55
 -
 Tawakoni.jpg128 KB · Views: 58
")