M/T Hatch cover

The friendliest place on the web for anyone who enjoys boating.
If you have answers, please help by responding to the unanswered posts.

ARoss

Guru
Joined
Nov 17, 2007
Messages
637
Vessel Name
My Yuki
Vessel Make
1973 Marine Trader 34
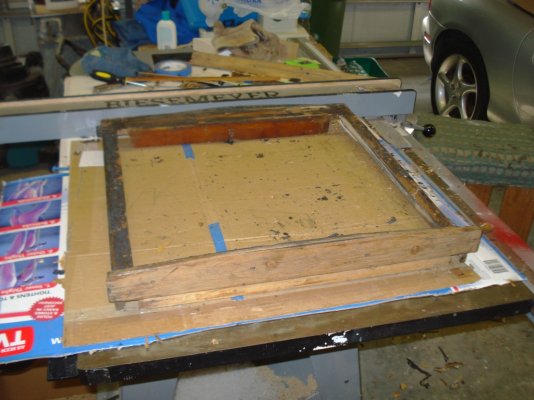
I finally got around to looking at the aft hatch slider on my MT 34.* When the sunbrella cover was off, it* seemed to leak a little... ** ** Seems a PO decided to install a piece of ...(plexiglass? ) * semi-opaque cover in a rebuild of the hatch cover.** About 40 little screws in the plastic top guaranteed it'd leak sooner or later, and now I have found a real mess.. under the plastic top was plywood that had turned to* mush...** the only salvageable pieces are the the original teak frame components.

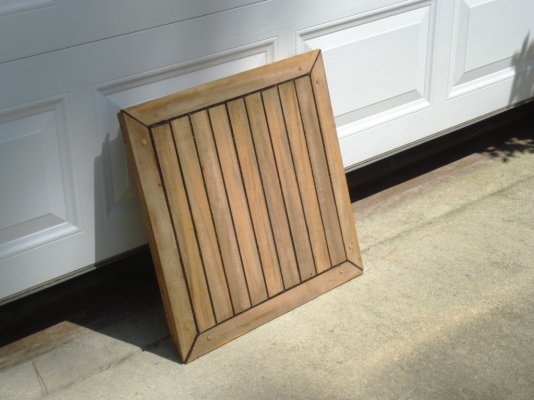
I'd like to* rebuild and cover that* frame with some kind of solid* WATERPROOF* solid panel to which I can attach teak strips* strips** eg..* 1/4"* x 2"* with epoxy or something.


Questions:**
The pics show what I've got, and where I'd like to be.**

!.Suggestions for the replacement base panel?* The PO must have used Home Depot interior 3/4" plywood -- it was almost totally disintegrated.**
2. When I attach the teak strips to the* base* , what adhesive will work best, and since I'd like to have "caulk"* between the strips,* what's the recommended material?* Black 5200?


thanks for input.
 

Attachments

  • hatch 002.jpg
    hatch 002.jpg
    164.2 KB · Views: 83
I would use exterior grade plywood ( not marine $) and coat twice with slow set epoxy. Epoxy the strips down as well and use teak deck caulk for your seams, there are many brands. Do not use 5200 it's not for teak. Right before you fill the seams sand if possible the teak and then wipe good with acetone or denatured alcohol. The key to the caulking sticking is the removal of the oil in the teak.
 
In the southern states PT pressure Treated plywood is common and seems to stand up to wet dry cycles.Would be a good base.

West has an epoxy that is very flexible and would be good as a bedding compound for thin strips of teak. Goop as desired for the "look" on the top surface.

You might contemplate a prism or glass port to allow light into the area as the PO seemed to want.

FF
 
I don't think I'd go with the PT as it is so wet from the factory. The epoxy eliminates the need for the preservatives
 
Pressure treated wood is not a good choice if you plan to use any type of adhesive, including epoxy. The chemicals in the pressure treatment inhibit the adhesion for quite some time. Chuck
 
"Pressure treated wood is not a good choice if you plan to use any type of adhesive, including epoxy. The chemicals in the pressure treatment inhibit the adhesion for quite some time."

This was true long ago when a far far better anti-rot compound as used.

Plywood is made from thin sheets , and does not suffer the huge water retention of solid PT lumber.

The PT ply is ordinarily OK to epoxy as is from the box store , but a person living with past demons might cut it to size , and leave it in the sun for a few hours.

We have not found dimensional shrinkage as it dries out as PT Lumber does.

Exterior ply would suffer the same problem many TT have , any penetration may cause a wet/dry situation , the cause of DRY ROT.

FF
 
Been there.* I had to replace one of my lazarette hatches, due to rot in the plywood to which the teak was screwed.* I did this 13 or 14 years ago.* The only thing I would do differently if I was to do it again, is to build up the black stuff a little and wait a week before grinding it flat.* It shrank a bit.
Marine grade 3/4 plywood, glass over the parts that would remain exposed with a layer of FG mat, then paint.* Attach the teak boards that go around the edges with screws and plugs.* All of the teak is floating in a 1/8 in of Lifecaulk (a two part black rubberry compound made for this application)* mix the two parts and spoon the mix into caulking tubes and use a caulking gun. Spread it with a spatula.
Lay seam cord in the bottom of all of the seams between the boards and fill to overflowing with the black stuff.* After it is well cured, grind the excess off and sand smooth.* Finish with varnish or leave to go grey.* If you want light, inset a piece of lexan (not plexiglass, as the caulking will let go from plexi) Use no screws where they may be exposed.* You don't need screws in the boards that are trapped inside the frame.* A little caulking on top of the screws in the frame, before the plugs go in, will stop any H2O intrusion.* The caulking that the screws penetrate below the teak will also protect the plywood from water winding down the screw threads, but more on top will ensure the water doesn't even get that far.
 
Thanks for the input.* I wound up using 3/8" exterior plywood, glassed with 3 coats of West System epoxy.* Slats were ripped from a piece of 6/4 x 6 teak into 2" x 1/4" pieces.* I pegged and screwed the outside pieces, but the rest are just floating in black caulk.*

Still need to finish with Cetol, but will wait a while until the surface of the new teak dries out a little.


I have thought about a handle too, but it might not fit under the sunbrella cover.* We'll see.


hopefully this will last me a few years.* ...
 

Attachments

  • hatch 006.jpg
    hatch 006.jpg
    164 KB · Views: 72
For future projects, TDS (Teak Decking Systems) is by far the best seam material for teak decking seams over any other sealant. I've used Lifecaulk in the past on seams but I was not impressed with its longevity. TDS is the seam sealant used by Grand Banks and other manufacturers in their factories today. It's one-part and is available from TDS directly (or it used to be) and from suppliers like Fisheries Supply in Seattle, which is where I get it (or from their on-line catalog). The deck seams we've replaced with TDS look years later like they did when we first put them down.

It's also critical to put striping tape (most of the shipwrights I've talked to us 3M automotive striping tape) in the bottom of the groove. This prevents the sealant from bonding to the wood in the bottom of the groove. If the sealant bonds to both sides AND the bottom of the groove, as the planks work, one side or the other will pull away and the seam will start to leak. By preventing the sealant from bonding to the bottom of the groove and only to the side the sealant can flex as the boards move or expand and contract and the sealant will not pull away from one or both sides. This is a critical step no matter what kind of seam sealer you use.
 
The TDS sealant is really great. I use it as well. The bond breaker can be important; I think more so in deep grooves, but I've cauked most of my forward deck seams without it, since they're pretty shallow due to wear over the years. The Lifecaulk folks have a bond breaker, but lots of "pinstripe" tapes can work as well.
 
hardly worth all that work if you aren't going to finish it bright.
 
Back
Top Bottom