Loose Stanchion Screws

The friendliest place on the web for anyone who enjoys boating.
If you have answers, please help by responding to the unanswered posts.

UrsusMaritimus

Veteran Member
Joined
Aug 23, 2019
Messages
33
Location
Canada
Vessel Name
Midnight Sun
Vessel Make
1985 Hershine 42 Sundeck
Evening Folks,

On my Hershine 42 Sundeck, several of the screws that hold the stainless stanchion bases to the fibreglass are loose and will back out again after being tightened.

My initial thought is to pull the screws, make sure the holes are dry, fill with epoxy, re-drill a pilot hole and replace the screw, with some butyl tape added to ensure a seal. That said I’m very open to suggestions if someone sees a flaw in my plan. There is no reasonable way to swap the screws out for through bolts.

Thanks!
 
Don’t know if you will het enough compression to squeeze the butyl tape sufficiently. Usually I use butyl when through bolting and it takes 3 days of tightening to really compress the butyl. Is there any way to through bolt the stanchion bases?
 
I wondered about the compression myself. There really isn’t a way to through bolt, the stanchions sit atop the bulwarks which are solid core under glass.

Maybe something like sikaflex would be better than butyl in this case…
 
What are the bulwarks made of? Can you get the stanchion bases up enough to clean out the old caulk? I normally don’t use 5200 above the waterline but maybe here is an application. Then with the screws bedded in the holes with epoxy maybe the stanchion won’t work loose again, however if you ever have to remove the stanchion hang on…
 
I believe I can move the stanchions enough to do that, and I think the bulwarks are just wood cored fiberglass, but I’m guessing at what the coring material is. The tenacity of 5200 frightens me a bit, but this might be a good application for it. While not entirely impossible, I’d hope not to have to remove them.
 
Last edited:
Is the bulwark topped with teak? I also would worry about ever having to remove the 5200. But it is doable with heat and DeBond. Maybe it would firm up the bases so the screws would hold???
 
The bulwark is just gelcoat, no teak. I think epoxy in the screw holes and a bit of 5200 under the base might be the answer. Realistically, if I need to get the off down the road it’s possible, just difficult.
 
I could do that for sure, but I also want to seal against water intrusion in the future, which might cause the same to happen again.
 
Can uou use a size larger screw by maybe using pan head screws? They may take up some of the slack. Most bases use flat head or oval head screws. By going to pan head you might be able to go a size larger and also get an “O” ring of caulk under the screw head.
 
Good thought on the screws. Would certainly be the easiest solution.
 
Greetings,
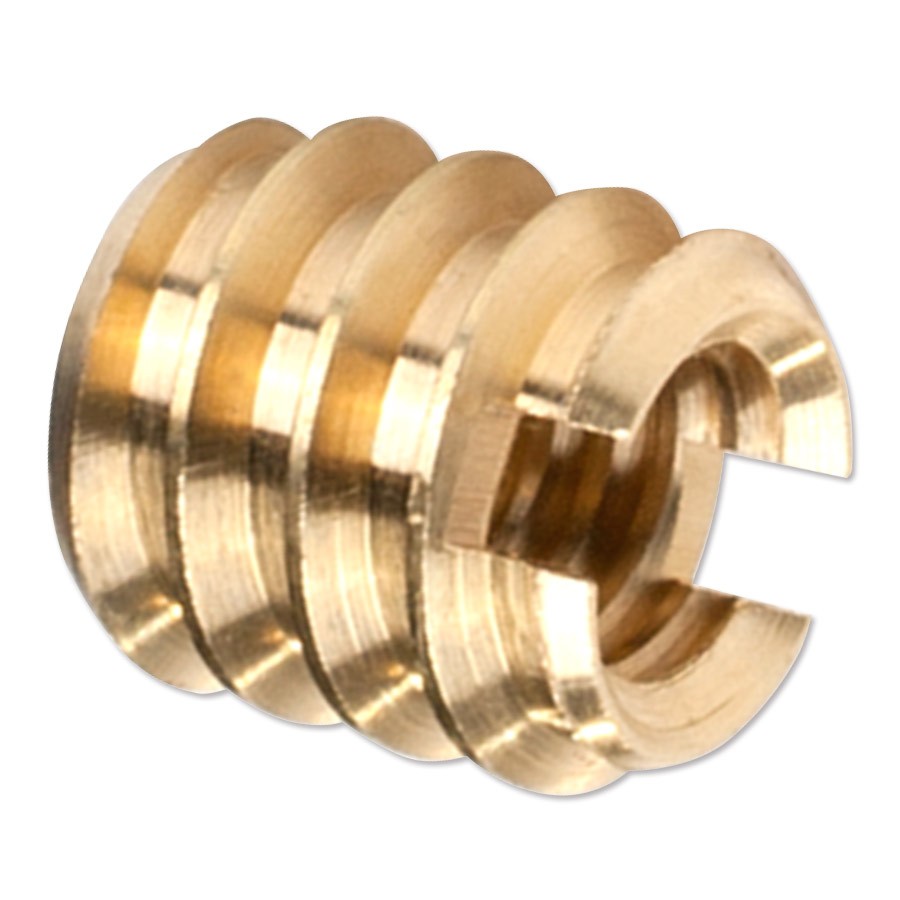
Mr. UM. I've had the same problem although I do have a substantial teak cap rail under the stanchion bases. MY solution was/is to remove the stanchion, drill a larger hole and insert one of these things into the teak:


iu


So far, it seems, to be substantial enough to be able to tighten down the oval head machine screws (internal thread of insert is 5/16-24 ?) enough to squish the butyl tape bedding out. Yes, it does take multiple tightenings to accomplish this.


I re-fastened my bow rail this year and I had to take it completely off to be able to replace all the stripped screws as I couldn't raise individual stanchions enough to do each one individually. Side rails and aft rails I was able to do singly.


Well worth either making or buying an installation tool because if you break off an "ear" or insert the insert crooked, you DO have problems. Alignment IS fairly critical.


I have had occasion to remove a side stanchion again and it seemed to be quite easy. Just pop out the machine screw, re-bed and zip it back in.


Hope this helps...
 
Last edited:
I had the same issue with some rails on top of my flybridge. They actually had some forces on them from the stays holding up my mast. Anyway I epoxied the holes and installed longer screws that had a wood screw thread on one end and on the other end a machine thread. After threading the screws tightly down into the flybridge cap, I slightly drilled out the stanchion bases and installed that with nuts, compressed the butyl well, finshed with cap nuts. Holding well for last few years.
 
The simplest is to drill out the oversized hole and epoxy in a piece of dowel.


This gives a new screw something to grab on to.
 
Exterior (even buried) use of wood wouldn't be my choice....although guilty of doing toothpicks in a pinch.

Good epoxy with chopped fibers would be a substitute..as that is sorta what they use when doing concrete anchors... maybe investigate there what is the current rage.
 
The simplest is to drill out the oversized hole and epoxy in a piece of dowel.


This gives a new screw something to grab on to.

How much oversized and what kind of wood dowel? Then you drill into the wood and apply the screw, correct.

The only problem I see with this is that the screw will cause the wood dowel to crack it and create a means for water to find its way in beside the screw eventually rotting the wood away. This is best for inside out of weather tip IMO.
 
If you only have a few problem stanchions, drill oversize holes, epoxy, re-fasten.
My .02.

A minor PITA but the correct fix.
I'm also guilty of the match stick in the hole, but that won't last.
 
It is just a few, and mostly in the area where the side boarding gate opens. For obvious reasons it gets the most flex there. I do like the idea of the threaded inserts, I think those, bedded in epoxy would seal the hole and hold well at the same time.

Thanks to everyone for the great input!
 
The simplest is to drill out the oversized hole and epoxy in a piece of dowel.


This gives a new screw something to grab on to.

I'd overdrill the hole and epoxy in a fiberglass dowel or tube, then drill and tap that for a machine screw. This is non-rotting material and will seal the wood core (rotting material). I use G10 tube with appropriate OD and ID, tap it, bond it in, then grind flush.
 
That’s also a fantastic idea… I like the non rotting aspect of the solution.
 
It is safer to buy G10 tube, as it is typically made by rolling cloth around a mandrel. G10 rod and most polyester rod is either pultruded or cut out of plate. That makes all the fibers run lengthwise and it splits too easily. You are in BC so may not have access to McMaster-Carr, but they have a good selection - search for Garolite.

I've got hundreds of threaded G10 inserts bonded into places on the sailboat, some of them holding very highly loaded hardware (like 3 tons). There are some tricks to install which I've written up elsewhere. Done right, it doesn't really matter if you use no bedding on the screws at all, since it cannot leak. I won't claim it is the least effort to do, but in my opinion about the best.
 
The simplest is to drill out the oversized hole and epoxy in a piece of dowel.


This gives a new screw something to grab on to.

Instead of using dowels use epoxy soaked teak bung plugs. If its a deep hole use 1 bung on top of another.
 
If your screws are into the core, (not a teak cap rail) I would follow Mainesail’s advice MarineHowto.com. Overdrill or use a keyhole bit to reef out the core-at least 1/4” diameter larger than outer diameter of screw threads. Fill with thickened epoxy (mix it yourself & inject with syringe or much easier, use self mixing cartridge like 3M or Thixo). Once hardened, drill a pilot hole, chamfer the opening and insert screw. You will find that, you must use a larger drill than you might expect. If you can’t turn the screw in by hand, albeit with difficulty, the pilot hole is too small and you will crack the epoxy compromising the core seal. Use butyl or whatever sealant you prefer under the stanchion flange and in the chamfered recess. This method is simple, effectively seals the core and gives a tenacious hold for the screw. I use it everywhere including rehanging 50lb bulwark gates. Dry & solid.
 
" I like the non rotting aspect of the solution."t

Depending on the quality of the sealing material the wood next to anything will rot if it gets wet, then dry.
 
here's the product i use for this task. i reef out any coring and fill the hole flush with it. you can actually drill and tap it if you want to use machine screws, or just pilot drill it and use a good self tapping screw. it will hold a thread just as good, if not better than solid glass will. my son, who worked for nordlund boats turned me on to this product. if you do it right, there's no way for water to get past it. i still use sealant, but it's not as important.
i like to drill and tap, use a stud in the hole and an acorn nut on top. then you can use butyl, or any other sealant you want.
https://www.amazon.com/Plexus-Purpose-Strength-Adhesive-cartridge/dp/B06ZY7KMWD
 
I suggest going to the West System epoxy resin website to see what to do in this situation
 
I suggest going to the West System epoxy resin website to see what to do in this situation

Overpriced epoxy and there are plenty of different ways to do this...some already explained right here.

Nothing wrong with WEST system...just overdone in the boating world.

Using their guides isn't a bad way to get educated...just don't be a slave to their products or remedies.
 
Last edited:
Overpriced epoxy and there are plenty of different ways to do this...some already explained right here.

Nothing wrong with WEST system...just overdone in the boating world.

Using their guides isn't a bad way to get educated...just don't be a slave to their products or remedies.


Amen... very true.
 

Latest posts

Back
Top Bottom