Exhaust elbow & hose replacement project

The friendliest place on the web for anyone who enjoys boating.
If you have answers, please help by responding to the unanswered posts.

Capt. Rodbone

Senior Member
Joined
Sep 6, 2020
Messages
172
Location
U.S.
Vessel Name
SV Stella Polaris MV Sea Turtle
Vessel Make
1978 VanDine Gaff rigged schooner, 1978 Grand Banks Classic Trawler
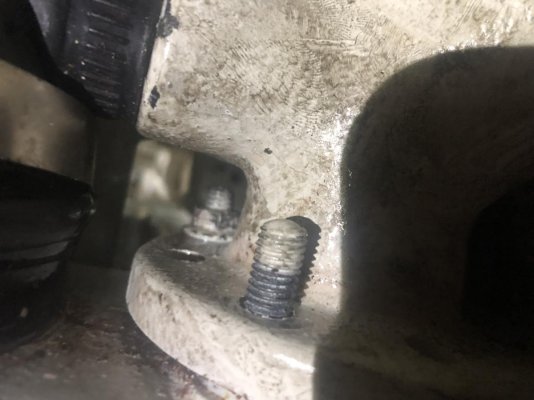
The replacement parts are in and I’ve begun the swap out. TWO QUESTIONS.
1. Do I lubricate the gasket and if so what do you suggest I use?
2. I’m having a heck of a time getting the last bolt off (see pics)I can’t get either end of a wrench around it, nor can I access it from the top with that hose in place. I started taking it loose however it is a bit of a project and I’m afraid I’ll ruin it and then have to order another. There must be a tool I’m not thinking of to use? It was suggested that I Cut most of the exposed part of the threaded bolt off with a hacksaw which should give me enough room where the profile of the ranch will then fit through. I’ve looked for a properly sized ranch with a smaller profile that might fit through that gap and on, but have yet to find one.

Any advice is as always much appreciated.
 

Attachments

  • DDD84635-2AD7-4CF5-8D07-D98F1015635A.jpg
    DDD84635-2AD7-4CF5-8D07-D98F1015635A.jpg
    87.2 KB · Views: 52
  • 37EB80F4-674D-4266-9686-1B0598CCCBFC.jpg
    37EB80F4-674D-4266-9686-1B0598CCCBFC.jpg
    90.7 KB · Views: 45
When I did this job, I took the hose off of the cooler to give me access. I did have to drain it 1st, but it just took a few minutes to drain and remove and another few minutes to refill. And, it was a great opportunity to inspect the core tubes, which I hadn't done for a while. Mine were pretty clean? Any bits of debris could have been cleaned out at the same time. It'll probably take less time than trying to work around it.

In what way are you afraid of damaging the hose?

Also...gasket sealant isn't usually requires or helpful, but it isnt harmful. Whenever I've used it for exhaust, I've used red or copper high heat. But, any engine gasket sealant would actually be fine -- that exhaust usually doesnt get any hotter than the engine, and is often a little cooler. I did my elbows recently and didn't use any sealant at all.
 
Last edited:
Get a box wrench and grind out part of the "box" to get it in there. I did mine that way. Its a bitch but doable. I remember it well. Lol
 
Last edited:
When you re install the clamps on the boots for the heater exchanger be sure to re-tighten the small clamps first. Here is a video that will help with the heat exchanger. 4 minutes and 25 seconds in pertains to re tightening the clamps. Lots of other good videos .

 
Last edited:
The video’s there will be a goldmine

I hadn’t even thought to look there so thank you very much!
 
There are "Flare Nut Wrenches" which likely can get in there.

THey are a heavy duty thick walled almost box end wrench with an opening in the 'box" that will go past the bolt and allow you to grip the nut to turn it. THey are far stronger than a Box end wrench ground out, are less likely to monkey the nut but they look similar.
 
Thanks

I have a set of those at home just not on the boat. Your reply here reminds me I should bring those and swap them out for the regular ones because there may will be places I need them once we start our trip soon.

I’m not confident how ever the profile if that’s what you call it on the wrenches will be in any narrower than what I have so they just won’t fit through that gap. I’m going to give that a try but otherwise it looks like a disconnection of the hose that is above there and to the right. One other person suggested that doing so also allows me to inspect the heat exchanger and possibly even clean out the tubes at that point which should it be needed I’ll be glad I did it in this manner
 
Just take the hose off. Heat it with your heat gun and it should come off pretty easily. If you ruin it by removing it, it was due to be replaced anyway.

pete
 
Judging by the previous post and condition of hoses and such. Remove the boot and clean the heat exchanger. Give the whole genset a good once over.
 
Just take the hose off. Heat it with your heat gun and it should come off pretty easily. If you ruin it by removing it, it was due to be replaced anyway.

To my eye, that's a relatively soft rubber boot vs a hard, reinforced hose. It should be flexible enough to come off easily. No heat should be needed. Really.

The inner clamp tightens around the copper bundle and that part of the boot supplies (or discharges) them with sea water. The outer clamp tightens around the exchanger housing and that part of the boot holds the core in the causing without the two metals directly touching, minimizing corrosion. The coolant that touches both the housing and the core is much less of an electrolyte than salt water, etc, so the isolation provided bybthe boot matters.

At any rate, it is a relatively soft rubber boot vs a hose.

I guess it could be problematic. Or I coukd be misreading the picture. But I don't think so.

I'd advise the OP to look at it, understand how it works, and then pull it apart without heat if at all possible. I don't think an unreinforced soft rubber boot would like heat much.
 
I have a hook like tool for loosening hoses that works very well and doesn’t seem to damage the hose. I was using it yesterday and it works great. Got it at Napa.
 
This sort of thing. Sometimes called a windshield tool, cotter pin tool, a few other names. Works better than anything else I've used for getting tight hoses loose.
 

Attachments

  • 61vsNqMrtyL._AC_SL1500_.jpg
    61vsNqMrtyL._AC_SL1500_.jpg
    52.7 KB · Views: 27
Mine is bigger and shaped like a J, but they both probably work about the same.
 
That heat exchanger boot comes off easy enough without tools. Having watched the video I recollect I did use something to pry around the edge. He uses a flat bladed pry though. As far as the pointy tool, if you aren’t paying close enough attention as to where the pointy end is going, you’ll be buying a new boot. (Luckily I’ve only ever holed the end of a hose I could cut off.)

I’ve started collecting an assortment of spudgers for prying things I don’t want to ruin.
 
Last edited:
We did not use any sealant on our elbow replacement. The new (stainless) elbow arrived with a new gasket/seal.

I recommend adding one of those boots to your spare parts kit. We have not had one fail but it is softer rubber as others have mentioned.
 
This sort of thing. Sometimes called a windshield tool, cotter pin tool, a few other names. Works better than anything else I've used for getting tight hoses loose.

Me too......a good trick is to work the tool under the hose in one spot...which will open a small space.....then put a wd-40 straw against space and give a good shot....the tool will now move around hose easily as wd breaks the adhesion of rubber to metal....if you encounter more tough spots on your way around...just give it more wd shots
 
This is what I use. Overall it is about 9”. Works great.
 

Attachments

  • FED0A83B-8B85-4187-A24E-BBB301CA1B39.jpg
    FED0A83B-8B85-4187-A24E-BBB301CA1B39.jpg
    132.1 KB · Views: 19
Final solution

To all of you kind responders I thought I would Bring this full circle and share what ended up being the solution.
With a hefty punch list ahead of our planned continuation of our cruise I decided to enlist the services of the shop at the marina where we are currently located. I was shocked to see how quickly the generator exhaust elbow and hose installation occurred and when I asked questions the person responsible said he had no issues but he used a 12 point box wrench. I wasn’t aware what that meant until he explained but the set that I have on board is a six point. he said with a 12, it takes a while but he was able to move it just slightly each time until he had it removed.
 

Latest posts

Back
Top Bottom