Crack then a Thunk

The friendliest place on the web for anyone who enjoys boating.
If you have answers, please help by responding to the unanswered posts.

PhilPB

Guru
Joined
Oct 5, 2021
Messages
670
Location
Palm Beach County
Vessel Name
Sun Dog
Vessel Make
Mainship 34
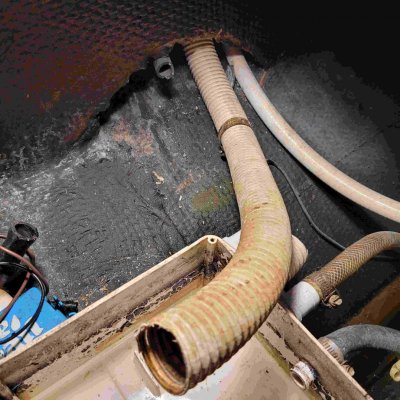
Yesterday, I was removing the shower drain hose from the sump. Immediately after carefully getting the hardened hose off of the sump tank there was a crack, then a thunk. The shower drain assembly, which is hidden under the shower pan and behind a stringer shattered and dropped!

Time for some exploring. The opportunities from owning a 40 year old boat!

At least when I am done I will have a completely new water system from tanks to spigot.
 
Plastic and rubber get brittle with age, plain and simple.

pete
 
On old boats, sometimes 'fixing' really means 'breaking'. At least to start out with. When I start a new project, my wife laughs and asks how many 'new' side projects are going to sprout from this one new project.
 
When I added a holding tank and new hoses for the new Raritan Elegance toilet I was tempted to replace the shower sump hose but after finding NO access to the bottom of shower drain hose connection I decide it was far to much of a PIA and in my case not necessary since all was working properly. Good luck and please post how you solved the issue.
 
Here is a picture of the route for the shower drain line. Currently it gives about 3" high for access. Should just take a little bloodletting. Excuse the funky colors of the picture. When I compressed it the colors changed...the black grossness is still the black grossness...changing sump as well.

Also I'm working on the finish work for the ME install.
 

Attachments

  • Compress_20230310_120027_7382.jpg
    Compress_20230310_120027_7382.jpg
    202.9 KB · Views: 53
  • Compress_20230310_121103_3179.jpg
    Compress_20230310_121103_3179.jpg
    92.6 KB · Views: 44
This is the drain I ordered. We will see if it works:

Scandvik 10307 Low Profile Elbow Shower/Cockpit Drain, 1" Outlet
 
On our boat the sump isn’t just for the shower but everything drains into it, sinks, shower condensate from the A/Cs. It is a large sump and when we bought the boat it had cracked apart. I had one made out of 1/2” welded plastic.
 
Our sump just has the shower and ac condensate.

When installing the ME, I used Starboard as the final layer for the platform. Now we have 1.75" of plywood and glass topped with 1/2" Starboard. I figure 2.25" should be supportive enough.
 
Our sump just has the shower and ac condensate.

When installing the ME, I used Starboard as the final layer for the platform. Now we have 1.75" of plywood and glass topped with 1/2" Starboard. I figure 2.25" should be supportive enough.

Sounds like it will be strong enough. Gotta love Starboard.
 
Immediately after carefully getting the hardened hose off of the sump tank there was a crack, then a thunk. The shower drain assembly, which is hidden under the shower pan and behind a stringer shattered and dropped!

The dreaded crackle-thunk inside my boat is always enough to shiver me timbers! I have a 47 year old....
 
My shower drain is barely accessible. Instead of a sump, I use a Whale Gulper diaphragm pump that I turn on when showering. It's a bit noisy but has lasted for many years. If I needed a separate sump for A/C condensate, I would use one of the small pumps purposefully built for that.

Peter
 
Funnily enough, I'm doing this exact same thing (albeit with better access). The existing shower pan drain isn't bolted in at all and can spin once I removed the hose. Was just trying to add a gray water shower pump and am now having to deal with the flange fitting as well.
 
When we owned our 34 Mainship, I always anticipated having to access the same shower drain but never had to. The drain for the head floor, when water was splashed from the shower or just from general cleaning, just seemed to drain directly into the bilge outboard of the stringer, which was a crappy design. Had I ever needed to access the shower drain, my plan was to put a deck plate in the floor which would allow me to access the shower drain and while I was at it, tee the floor drain into the shower drain ,where both would be plumbed into the shower sump. A bathroom floor mat would've covered up the low profile plate, for the most part.
 
Greetings,
Mr. PB. Whew. I'm glad it was THAT kind of crack/thunk rather than crack/thunk followed by pan-pan, pan-pan, pan-pan, kind of crack/thunk.


iu
 
Greetings,
Mr. PB. Whew. I'm glad it was THAT kind of crack/thunk rather than crack/thunk followed by pan-pan, pan-pan, pan-pan, kind of crack/thunk.

You and me both!
 
So how are you getting to the underside of the shower pan to install the new drain ? Looks like you can’t get your hand and arm into that little opening .
 
Greetings,
Mr. PB. Whew. I'm glad it was THAT kind of crack/thunk rather than crack/thunk followed by pan-pan, pan-pan, pan-pan, kind of crack/thunk.


iu

I saw what you did there!
 
So how are you getting to the underside of the shower pan to install the new drain ? Looks like you can’t get your hand and arm into that little opening .

Contorted, I can just barely get my hand and wrist in there. I can always open up the hole a bit, the stringer is ~ 2" thick. I ordered this drain and if it can fit, it should be good. I figure worse case a warmed bit of butyl tape may work to seal the underside.
 

Attachments

  • Compress_20230311_140845_5991.jpg
    Compress_20230311_140845_5991.jpg
    184.4 KB · Views: 18
Yeah it looks tight. You might want to consider installing the hose on first, then fish the new drain and hose to the drain hole. Shine a bright light into the hole from the shower so you can maybe see your target form the other side. I’ve also used some butchers twine and a 3/8 nut or so as a weight and give that a toss to the light or tape the twine to the end of metal coat hanger or 1/4” all thread rod and fish that to the hole. Then you can pull the string and rod out through the hole with your fingers of long reach pliers up into the pan .
Now tie the other end of twine to your drain with the hose already on and pull it to the hole in the pan.
Hopefully you can get in place right for a water tight seal.
 
Contorted, I can just barely get my hand and wrist in there. I can always open up the hole a bit, the stringer is ~ 2" thick. I ordered this drain and if it can fit, it should be good. I figure worse case a warmed bit of butyl tape may work to seal the underside.
attachment.php

Phil,

I bought the identical drain . . . two of them in fact. Turns out, they're great if you are installing in a metal pan, or a really THIN fiberglass pan, but with a wood pan, you will need a much longer screw than the one provided, AND you will need to seal/fiberglass the raw edges of the wood shower pan to prevent water from soaking into the wood pan and rotting it out. I ended up going another route. The two drains are somewhere LOB. (lost on boat).:dance:

Hi Slow. The pan is fiberglass. Maybe 1/8" thick and smooth gel coat over it. From your experience, as a datapoint for me, this may work....
 
Hi Slow. The pan is fiberglass. Maybe 1/8" thick and smooth gel coat over it. From your experience, as a datapoint for me, this may work....


With a 1/8" pan, those should work just fine. Not bad drains, and good price point, just didn't work for us.
 
attachment.php

Phil,

I bought the identical drain . . . two of them in fact. Turns out, they're great if you are installing in a metal pan, or a really THIN fiberglass pan, but with a wood pan, you will need a much longer screw than the one provided, AND you will need to seal/fiberglass the raw edges of the wood shower pan to prevent water from soaking into the wood pan and rotting it out. I ended up going another route. The two drains are somewhere LOB. (lost on boat).:dance:

It was delivered this afternoon. I called Scandvik and spoke to a great representative about how to install as I had questions about how to seal it on the underside. I think it will work perfectly and will attempt the install tomorrow.
 
attachment.php

Phil,

I bought the identical drain . . . two of them in fact. Turns out, they're great if you are installing in a metal pan, or a really THIN fiberglass pan, but with a wood pan, you will need a much longer screw than the one provided, AND you will need to seal/fiberglass the raw edges of the wood shower pan to prevent water from soaking into the wood pan and rotting it out. I ended up going another route. The two drains are somewhere LOB. (lost on boat).:dance:


Uchhh....this is a picture of the configuration of attempt # 3. SLOW, you were right. Under my thin fiberglass pan is 1" of wood. So far I have gone between big box stores, 3 marine stores, 2 plumbing stores, pool supply store and an auto parts store for parts. The crazy part is for the life of me I can't find any 1" corrugated bilge hose.
 

Attachments

  • Compress_20230317_144347_7786.jpg
    Compress_20230317_144347_7786.jpg
    179.2 KB · Views: 12
I don’t like using the plastic corrugated hose. It doesn’t last well and has a likelihood of leaking when it cracks. I use 1” SaniFlex waste hose. It is smooth bore so it doesn’t trap junk, like hair, and is very flexible. However it is more expensive. Defender sells it by the foot.
 
I used saniflex for all of the holding tank hoses. As flexible and pliable as it is, it isn't flexible enough for this specific application.
 
I used saniflex for all of the holding tank hoses. As flexible and pliable as it is, it isn't flexible enough for this specific application.

Oh well, I use it for bilge pumps and vent hose for the holding tank. But it may not work in every situation.
 
Had to bring the admiral for a second set of hands and it looks like the drain is in. Only took 4 days and a lot of excursions to stores. Mainship, when building the boat certainly didn't care if anyone had to do any followup maintenance later in life. They definitely did their wiring and plumbing before installing the inner pan/liner (I may be using the wrong term)
 
Had to bring the admiral for a second set of hands and it looks like the drain is in. Only took 4 days and a lot of excursions to stores. Mainship, when building the boat certainly didn't care if anyone had to do any followup maintenance later in life. They definitely did their wiring and plumbing before installing the inner pan/liner (I may be using the wrong term)

Not uncommon with builders. Unfortunately.
 
"Mainship, when building the boat certainly didn't care if anyone had to do any followup maintenance later in life."...... Yep,got to agree! Have you gotten to the mid ship shaft being ? If you have the orginal generator install your in for another treat if someone hasn't put a grease hose extension on the bearing. I had to replace the 40 gallon water tank so I added a fitting where the zerk was to accept a grease hose extension. BTW, if you need a fitting ,zerk adapter, I have plenty left over from the package I had to purchase.
 

Latest posts

Back
Top Bottom