Reply
 
Thread Tools Search this Thread Display Modes
 
Old 02-25-2018, 09:00 AM   #21
Senior Member
 
City: Manasquan
Vessel Model: 2007 Henriques 35 Express
Join Date: Feb 2018
Posts: 115
I also removed the oil filter mount, and put it to the side w the filter on. Just plugged the holes. This was a lot less messy than taking the filter off.
Click image for larger version

Name:	IMG_4297.jpg
Views:	66
Size:	173.8 KB
ID:	73260
Moonzy1 is offline   Reply With Quote
Old 02-25-2018, 09:06 AM   #22
Senior Member
 
City: Manasquan
Vessel Model: 2007 Henriques 35 Express
Join Date: Feb 2018
Posts: 115
Get it on a vise, pull the caps and i used a 4x4 wood block and mallet on the fore end of the cooler to get it moving out. It wasnt terribly stuck. Once started, I was able to slide it out by pulling w my hands.

I also bought all new stainless bolts from McMaster Carr for reassembly. Some of the old bolts were beatup and I didnt trust them going back in. $10 for 25 brand new screws. No brainer.
Attached Thumbnails
removingbundle.jpg   insidehousing.jpg   bundleout.jpg  
Moonzy1 is offline   Reply With Quote
Old 02-25-2018, 09:07 AM   #23
Guru
 
LaBomba's Avatar
 
City: Beaverton, Ontario
Vessel Name: Looking Glass
Vessel Model: Carver 370 Voyager
Join Date: Nov 2012
Posts: 1,240
I keep an dedicated 1" wood chisel for scraping off old gaskets and had no issues and peels things off quickly. I personally would never use a sander as they are hard to keep perfectly flat at all times. Wire wheel on a die grinder or dremel would work also IMO.
__________________
Allan
LaBomba is offline   Reply With Quote
Old 02-25-2018, 09:10 AM   #24
Senior Member
 
City: Manasquan
Vessel Model: 2007 Henriques 35 Express
Join Date: Feb 2018
Posts: 115
Quote:
Originally Posted by LaBomba View Post
I keep an dedicated 1" wood chisel for scraping off old gaskets and had no issues and peels things off quickly. I personally would never use a sander as they are hard to keep perfectly flat at all times. Wire wheel on a die grinder or dremel would work also IMO.
Spoke to Mechanic that does these and he said sander is fine due to O-rings, but I ended up using a wire wheel and dremel as you say because it was just was more effective to clean it up.
Moonzy1 is offline   Reply With Quote
Old 02-25-2018, 09:59 AM   #25
Senior Member
 
City: Manasquan
Vessel Model: 2007 Henriques 35 Express
Join Date: Feb 2018
Posts: 115
I sent out the cartridges and cleaned the housing and caps myself.

They did not come back as clean as i would have liked on the air side but I could see though them all. For the remaining black soot that I wanted to remove, I soaked it in SEAFOAM and that went through the air side like a hot knife through butter. Cleaned it rt up.

Then got ALCO METALUBE and lubed everything up and reassembled.

Click image for larger version

Name:	cleanhousing.jpg
Views:	67
Size:	105.9 KB
ID:	73268

Click image for larger version

Name:	alcoappliedtohousing.jpg
Views:	64
Size:	111.3 KB
ID:	73269

Click image for larger version

Name:	aftcartridgejustbeforeinsert.jpg
Views:	68
Size:	144.1 KB
ID:	73270

Click image for larger version

Name:	newcartridge in.jpg
Views:	68
Size:	134.2 KB
ID:	73271

Click image for larger version

Name:	Finishedcoolers.jpg
Views:	62
Size:	141.7 KB
ID:	73272
Moonzy1 is offline   Reply With Quote
Old 02-25-2018, 10:00 AM   #26
Senior Member
 
City: Manasquan
Vessel Model: 2007 Henriques 35 Express
Join Date: Feb 2018
Posts: 115
sorry guys
I cant seem to get these pics flipped the rt way
Moonzy1 is offline   Reply With Quote
Old 02-26-2018, 07:01 PM   #27
Senior Member
 
City: Manasquan
Vessel Model: 2007 Henriques 35 Express
Join Date: Feb 2018
Posts: 115
Pressure tested
Done!
Click image for larger version

Name:	IMG_4436.jpg
Views:	60
Size:	94.7 KB
ID:	73382

Click image for larger version

Name:	IMG_4433.jpg
Views:	64
Size:	140.7 KB
ID:	73383
Moonzy1 is offline   Reply With Quote
Old 02-26-2018, 07:09 PM   #28
TF Site Team/Forum Founder
 
Baker's Avatar
 
City: League City, Tx
Vessel Name: Floatsome & Jetsome
Vessel Model: Meridian 411
Join Date: Oct 2007
Posts: 7,295
Well done!!!!
__________________
Prairie 29...Perkins 4236...Sold
Mainship Pilot 30...Yanmar 4LHA-STP...Sold
Carver 356...T-Cummins 330B...Sold
Meridian 411...T-Cummins 450C
Baker is offline   Reply With Quote
Old 02-26-2018, 07:21 PM   #29
Senior Member
 
City: Manasquan
Vessel Model: 2007 Henriques 35 Express
Join Date: Feb 2018
Posts: 115
Thanks Baker
Been wanting to try this project for a long time
Feels good to have it completed
Moonzy1 is offline   Reply With Quote
Old 02-26-2018, 09:29 PM   #30
Senior Member
 
jimL's Avatar
 
City: Cruising North Towards Boston
Vessel Name: Lemon Drops
Vessel Model: 2001 Grand Banks Europa 52
Join Date: Mar 2015
Posts: 345
Moonzy1,

Thanks for sharing. I wish there was a youtube video for this. I need to do mine as a new owner of a 2005 Mainship, previously owned by one owner. Don't know if the last owner cleaned them up, but I'm feeling I need to before I embark on serious cruising.

Jim
jimL is offline   Reply With Quote
Old 02-26-2018, 09:51 PM   #31
Enigma
 
RT Firefly's Avatar
 
City: Slicker?
Join Date: Oct 2007
Posts: 16,096
Get r done...

__________________
RTF
RT Firefly is offline   Reply With Quote
Old 02-26-2018, 10:08 PM   #32
Guru
 
Dougcole's Avatar
 
City: Carrabelle, FL
Vessel Name: Morgan
Vessel Model: '05 Mainship 40T
Join Date: Jan 2008
Posts: 2,073
Very informative post, thanks for putting it up. I considered doing them myself on my 4LHAs, but in the end I decided to let a mechanic do it. This thread may have saved me a boat buck if it had showed up earlier.
Dougcole is offline   Reply With Quote
Old 02-27-2018, 06:04 AM   #33
Senior Member
 
City: Manasquan
Vessel Model: 2007 Henriques 35 Express
Join Date: Feb 2018
Posts: 115
Quote:
Originally Posted by jimL View Post
Moonzy1,

Thanks for sharing. I wish there was a youtube video for this. I need to do mine as a new owner of a 2005 Mainship, previously owned by one owner. Don't know if the last owner cleaned them up, but I'm feeling I need to before I embark on serious cruising.

Jim
Jim
Happy to help you in any way i can. Perhaps I will make a video when I reinstall.

If you decide to tackle it Feel free to PM me and ill get you my email and cell.

Pop the aft endcap off and take a look to get an idea of its condition.

Disclamer: I am not a mechanic but this particular job is not complicated. A matter of unbolting, cleaning, and reinstall.

There are a couple of things I would do next time to make it even easier. Like pour "SEA FOAM" in the cooler before I removed the cartridge to pre clean the fins. I suspect that seafoam left to soak overnight would likely be all you needed to do to the air side. That stuff cuts through the soot like a hot knife through butter.

I also ordered some matching replacement O-rings from McMAster Carr. They are coming today so I will compare. $10 for 5 vs the 23.00/ o-ring from yanmar
Moonzy1 is offline   Reply With Quote
Old 02-27-2018, 08:15 AM   #34
Guru
 
City: Carefree, Arizona
Vessel Name: sunchaser V
Vessel Model: DeFever 48
Join Date: Apr 2008
Posts: 9,788
Moonzy
You adroitly accomplished two very important things. First the recognition that ACs require servicing. Secondly, the "get-up and go" to move forward

The rest of us, especially Yanmar owners, take note!
sunchaser is offline   Reply With Quote
Old 02-27-2018, 08:43 AM   #35
Enigma
 
RT Firefly's Avatar
 
City: Slicker?
Join Date: Oct 2007
Posts: 16,096
Greetings,
Mr. M1. VERY nicely done. I've heard all sorts of "magical" claims about SeaFoam but your experience is first hand.

MSDS lists the ingredients (SeaFoam) as: Hydrocarbon blend and Isopropanol. Not much different than a lot of other engine "additives".

I wonder if a parts cleaner would work as well? I use this stuff to soak my carbs... https://www.amazon.com/CRC-14101-Car.../dp/B000BXHVQ2
__________________
RTF
RT Firefly is offline   Reply With Quote
Old 02-27-2018, 10:05 AM   #36
Guru
 
Aquabelle's Avatar
 
City: East Coast, Australia
Join Date: Jun 2012
Posts: 935
Quote:
Originally Posted by Moonzy1 View Post
Jim
Happy to help you in any way i can. Perhaps I will make a video when I reinstall.

If you decide to tackle it Feel free to PM me and ill get you my email and cell.

Pop the aft endcap off and take a look to get an idea of its condition.

Disclamer: I am not a mechanic but this particular job is not complicated. A matter of unbolting, cleaning, and reinstall.

There are a couple of things I would do next time to make it even easier. Like pour "SEA FOAM" in the cooler before I removed the cartridge to pre clean the fins. I suspect that seafoam left to soak overnight would likely be all you needed to do to the air side. That stuff cuts through the soot like a hot knife through butter.

I also ordered some matching replacement O-rings from McMAster Carr. They are coming today so I will compare. $10 for 5 vs the 23.00/ o-ring from yanmar
Why would you use Sea Foam BEFORE removing the core if you are still going to remove it anyway? Wouldn't it be easier to remove the core 1st and use Sea Foam once it's out?
Quote:
Originally Posted by jimL View Post
Moonzy1,

Thanks for sharing. I wish there was a youtube video for this. I need to do mine as a new owner of a 2005 Mainship, previously owned by one owner. Don't know if the last owner cleaned them up, but I'm feeling I need to before I embark on serious cruising.

Jim
Aquabelle is offline   Reply With Quote
Old 02-27-2018, 10:13 AM   #37
Senior Member
 
City: Manasquan
Vessel Model: 2007 Henriques 35 Express
Join Date: Feb 2018
Posts: 115
Quote:
Originally Posted by RT Firefly View Post
Greetings,
Mr. M1. VERY nicely done. I've heard all sorts of "magical" claims about SeaFoam but your experience is first hand.

MSDS lists the ingredients (SeaFoam) as: Hydrocarbon blend and Isopropanol. Not much different than a lot of other engine "additives".

I wonder if a parts cleaner would work as well? I use this stuff to soak my carbs... https://www.amazon.com/CRC-14101-Car.../dp/B000BXHVQ2
Perhaps. Cant hurt to try I guess. I hit it w a can of carb cleaner too. It worked but I went thru a lot and the fumes were getting bad.

I used to use seafoam on my outboards and it always did the job. Thats why I had a few bottle around to try.

thanks
Moonzy1 is offline   Reply With Quote
Old 02-27-2018, 10:18 AM   #38
Senior Member
 
City: Manasquan
Vessel Model: 2007 Henriques 35 Express
Join Date: Feb 2018
Posts: 115
Quote:
Originally Posted by Aquabelle View Post
Why would you use Sea Foam BEFORE removing the core if you are still going to remove it anyway? Wouldn't it be easier to remove the core 1st and use Sea Foam once it's out?
Great question.

Because the cooler housing is the perfect container to soak the core without having to buy 5 gallons of seafoam.

You can lay the housing on its side w the inlet and outlet facing the sky and fill ea side up to cover the core w the seafoam.

You need to fill ea side though because there is a metal partition, midpoint on the cooler cartridge (refer to a previous pic) that separates both sides..

you will give the housing a good cleaning this way too.

Id soak it overnight and then blow it out w compressed air into a towel or something.

Ill post a before and after seafoam shot
Moonzy1 is offline   Reply With Quote
Old 02-27-2018, 10:27 AM   #39
Senior Member
 
City: Manasquan
Vessel Model: 2007 Henriques 35 Express
Join Date: Feb 2018
Posts: 115
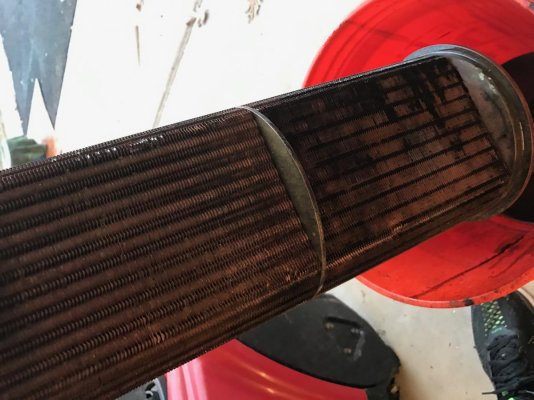
Of you look on the lower left portion of the cartridge you will see it black and sooty on the rt half and then copper clean rt next to it.

And all i did was pour the seafoam bottle through it once.

Now im assuming whatever they used to soak it at the radiator shop loosened it a bit. But maybe the seafoam is just that effective. Either way, an overnight soak should get it very clean.

Click image for larger version

Name:	coolerclean.jpg
Views:	68
Size:	122.8 KB
ID:	73404

sorry pic flipped

im referring to the rt end of the cartridge
Moonzy1 is offline   Reply With Quote
Old 02-27-2018, 12:58 PM   #40
Guru
 
Lepke's Avatar
 
City: Between Oregon and Alaska
Vessel Name: Charlie Harper
Vessel Model: Wheeler Shipyard 83'
Join Date: Jun 2016
Posts: 2,898
Another method for cleaning mating surfaces is a large, fine, flat file. You can span across most openings and caps from several directions, keeping the surface uniform and square. I think is as easy or easier than a sander, and all the debris can be cleaned up instead of flung everywhere. If necessary you can remove small dips and bumps in a controlled way.
Lepke is offline   Reply With Quote
Reply

Thread Tools Search this Thread
Search this Thread:

Advanced Search
Display Modes

Posting Rules
You may not post new threads
You may not post replies
You may not post attachments
You may not edit your posts

BB code is On
Smilies are On
[IMG] code is On
HTML code is Off
Trackbacks are Off
Pingbacks are Off
Refbacks are Off


» Trawler Port Captains
Port Captains are TF volunteers who can serve as local guides or assist with local arrangements and information. Search below to locate Port Captains near your destination. To learn more about this program read here: TF Port Captain Program


All times are GMT -5. The time now is 01:55 AM.


Powered by vBulletin® Version 3.8.8 Beta 4
Copyright ©2000 - 2023, vBulletin Solutions, Inc.
Search Engine Optimization by vBSEO 3.6.0
Copyright 2006 - 2012