Uniflite 42 Double Cabin Refit

The friendliest place on the web for anyone who enjoys boating.
If you have answers, please help by responding to the unanswered posts.
She's looking good!
Any vinylester resin should work.

For what? I'm using all epoxy based products to maximize adhesion and minimize the chances of future blister problems with the best possible sealing.
 
I agree on the epoxy, you don’t ever want to do this again. Also don’t put poly or vinylester resin on top of the epoxy. But you can put epoxy on top of them.
 
Looking good. I used a Roloc to grind the areas on my boat before we painted it. It worked really well. I used a right angle drill and it wasn’t bad. I tried finding a battery powered die grinder, burned up 2 of them before I went to the Dewalt corded drill. Keep up the great work.

The Milwaukee is working really well. Their new brushless tools are much better than the older ones with standard DC motors (I have one of their older dremel style cordless and it isn't nearly as good) . I also purchased the extended 6.0 Ah battery and it runs for a long time on a single charge and barely gets warm to the touch with this type of intermittent usage.
 
That is good news. The battery powered one that I had would get smoking hot at the right anlge gear box. Oh well, glad yours is working well for you.
 
Still making progress although it does not seem like it at times. The work on the starboard side, I had a professional boat finisher stop by and look at the work. He commented that it was very wavy, 'fun house mirror like' and that I wasn't going to be very pleased with the results.

He explained the solution which involves a lot more labor. I purchased some durablock 'longboard' sanding blocks and we've been block sanding the hull. This has made a significant improvement to the fairness of the surface. He demonstrated the techniques and myself and my helper have been working through this work, it's tedious and physically difficult. I can see and feel the difference though!

I had put four coats of Interlux Primekote epoxy primer on the starboard side and we sanded most of it off with this blocking/fairing. That has been completed on the starboard side and I am two coats in on putting new epoxy primer over the faired surface. Still a couple more coats of Primekote before the top coat can go down.

On the port side, I decided to put a high build epoxy primer first so that we could sand that down and not spend so much time applying paint. Interlux Interprotect 2000 HS is a high solids epoxy primer that does not require sanding between coats (Primekote does) so it was significantly faster to get the a good build up of paint applied. The blocking is about 3/4 done on that side now and then it will get the Primekote as the underlay for the top coat.

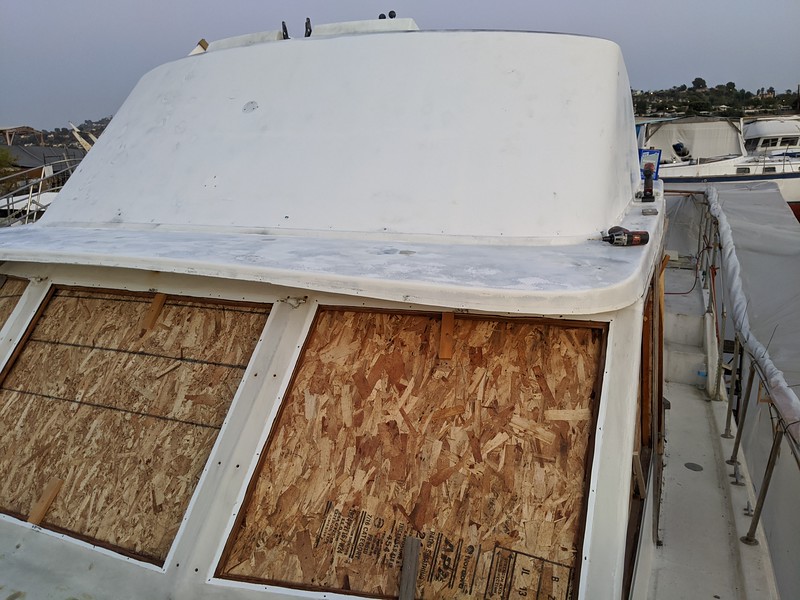
I've also started blocking the cabin sides, flybridge surround and transom, all by hand. My approach continues to refine as we learn the process and get better and find more efficient ways to do the work. I think that the cabin sides will be the fastest work yet (although still a ton of time and work) as we use a refined process. The end result should be very good, at least I hope. The decks will be done last.

Here is the starboard side with three coats of Interprotect HS on it, the Interprotect is grey in color.

i-s9rpkTm-L.jpg


The latest iteration of our process STARTS with block sanding by hand. We clean and dewax the faded, cracked gelcoat and then put a guide coat paint on it. Guide coat is just an inexpensive spray paint that is easily wiped or sanded off, it is applied with just a 'speckle' of coverage.

Next we block sand until we are smooth as we can get or we are starting to run into the fiberglass (running out of gelcoat thickness). The guide coat reveals areas that need filling very clearly.

We apply filler to those areas, block sand again with a second guide coat and the surface is ready for primer paint or it may need another round of filling. If the surface is uneven enough, we may need to put the high build paint on and that's easy to see during the sanding process with the guide coat. Both of the hull sides were in that state.

Here is the flybridge surround with the 'guide coat' applied.

i-wF6bJ6S-S.jpg


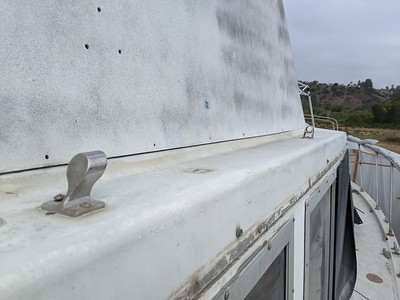
On the cabin sides I removed all the hardware for handholds and snaps for covers and they also received the same treatment and were block sanded smooth, the windows will be remove prior to painting and re-bedded after painting.

The hull construction is interesting, the cabin top is screwed onto the sides and the flybridge is screwed onto the cabin top. The aft portion of the cabin top has some filler that cosmetically covers the screws and attachment point, but does not appear to be structural. The flybridge also has some filler 'attachments' that are not structural.

I've also been working on getting various systems ready for launch, most recently I'm overhauling the aft head and also the aft head vacuum pump. Ordered parts to do all of that and should have the head in good shape soon.
 
Last edited:
When we painted our boat the same thing happened to me. The painter came and stood about 20 feet away and said it isn’t ready. I used a long board and a revealer that we wiped on and when you sanded it would go away on the high spots and stay on the low spots so you could see how smooth it is or isn’t. Good luck it is a lot of work.
 
When we painted our boat the same thing happened to me. The painter came and stood about 20 feet away and said it isn’t ready. I used a long board and a revealer that we wiped on and when you sanded it would go away on the high spots and stay on the low spots so you could see how smooth it is or isn’t. Good luck it is a lot of work.

One thing I've learned is that if you are going to paint a boat that already has a fair surface of gel coat, DO NOT take a power sander to it in any way or at any stage. Get blocks and sand by hand, use a guide coat and you should be pretty close already, you'll save a ton of work by not allowing any power tools in surfaces that are already basically fair.
 
The PO of my boat managed to damage pretty much everywhere on the hull by hitting stuff so I had to grind out the damage and add some glass then fair it out with filler. Lots of power sanding...
 
For what? I'm using all epoxy based products to maximize adhesion and minimize the chances of future blister problems with the best possible sealing.

For filling those blisters.
If not done right, most of them will come back.

20180508-204055.jpg
 
For filling those blisters.
If not done right, most of them will come back.

Yes, I've found a number of areas where repairs were made at professional yards in the past and have failed. No matter the materials used, proper process and application are important.
 
Progress continues, but it feels so slow. Prep work is in some stage of the process on almost every surface of the hull, rotating around as things cure and paint dries. Basically complete with prep on the starboard side now and ready for shiny paint, not sure when I'll actually paint the sides with the final paint.

Since I've never rolled and tipped before I decided to get some practice on some less visible pieces. I have some panels that are on the interior of the flybridge that are removed for wiring access and they needed to be prepped and painted before they get reinstalled. I'm pretty happy with the result. Reflection is the boatyard neighbors sailboat.

i-HML8w3H-X2.jpg
 
Looks great, what paint are you using?
Thank you for all the positive comments!

I'm using Interlux for the finish paint. It's 3 coats of Interlux Prime Kote epoxy primer, sanded to 220, then 2 coats of Interlux Perfection rolled on with a foam roller and tipped with a badger hair brush.

I had quite a bit of dust settle on it, and I didn't strain the paint so I did get a few 'chunkies' that you can see when you get up really close to it (inches). Straining the paint and doing some dust control prior to painting will help on subsequent painting sessions for those issues.

The finish is good, I was hoping for the paint to lay down a bit better than it did, the weather here is at the upper end of the acceptable temperature range and I think that's limiting the flow of the paint. I accidentally over-thinned the first coat and that didn't help.

I'd say the surface finish is close to a factory automotive paint job. I was hoping it would be a little closer to a 'custom' paint job and a true mirror finish!
 
We rolled and tipped a previous boat when we lived in Tucson. It was a pain since we had to get up at 4AM in order for the temperature to be low enough for the paint to flow after tipping. But the end result was magnificent, well worth the effort and tears...
 
We rolled and tipped a previous boat when we lived in Tucson. It was a pain since we had to get up at 4AM in order for the temperature to be low enough for the paint to flow after tipping. But the end result was magnificent, well worth the effort and tears...

I showed up at 5 AM to put on a coat and everything was wet with dew, painting not possible. The small panels I could have managed indoors somewhere but I wanted to adhere to the same restrictions I have on the larger hull to see how things worked.

By the time the dew was dry it was too hot to paint. So I'm limited to evening because of the dew, late enough to get the temp lowered but not so late that I risk the dew settling on it before it cures enough to handle some moisture. Being indoors would make things a lot easier (in some ways) and help mitigate weather issues, but not a possibility in this situation.
 
The boat we rolled and tipped was outdoors so the weather could be a PITA indeed. However dew wasn’t usually a problem since it was in Tucson where the humidity was around 7 to 10% most of the time. We sprayed our current boat and it was indoors in a barn. Way easier to work on and the painting went well after I covered the 3 other boats that were in the barn so they wouldn’t get overspray on them. Actually I probably didn’t need to cover them but I was afraid not to.
 
The boat we rolled and tipped was outdoors so the weather could be a PITA indeed. However dew wasn’t usually a problem since it was in Tucson where the humidity was around 7 to 10% most of the time. We sprayed our current boat and it was indoors in a barn. Way easier to work on and the painting went well after I covered the 3 other boats that were in the barn so they wouldn’t get overspray on them. Actually I probably didn’t need to cover them but I was afraid not to.

What paint did you roll and tip with?
 
It was the Interlux 2part polyurethane that came before Perfection, don’t recall the name right now. This was a long time ago, before 94. It could be very touchy about temp. They said below 85 and they meant it. And we were in Tucson where some nights it never got down to 85...
 
The paint prep process continues. I've pulled all the cabin windows and have been sanding and prepping all of the cabin surfaces for primer. The windows were bedded with Butyl which made removal nice and easy, they will be re-installed with the same. Seems like a never ending process!

i-SRNDVQF-L.jpg
 
What was the culprit on your stuck packing gland?
What kind of corrosion was in there?
 
The bronze of the packing nut was corroded and had expanded the I.D. enough that it was tight to the shaft. I ended up carefully cutting it off, the stainless shaft was in good shape. Not a fun job, I'm glad it's done.

i-j5dRB9r-M.jpg
 
Starting with final paint in some areas, working from the top down, hopefully that helps prevent any drips or drops on lower sections.

I am not able to get Interlux Perfection in any kind of quantity. I had Jet Black on backorder for 3 months which I want to use for trim color, and have had trouble getting more than 1 or 2 quarts of the white at a time. I talked to Interlux directly and was told that there are supply chain issues and they are not able to make some colors right now, and others are in limited production. Given that I faced waiting until more became available or switching to something I can get now. Given that the weather won't hold out much longer for painting, I decided to switch.

I switched to Alexseal Topcoat 501. I like the product quite a bit and it lays down very nicely, plus they have a new additive that allows you to roll without tipping. This has made things quite a bit easier. The DI (Definition of Image) is pretty good, I mean I'd always like it better and it is not as smooth as polished gel coat, but it's at least as good as the Perfection was. I am putting three coats and this paint can be buffed/polished so at some point in the future, I might polish it to get it looking even smoother, but for now I'm going with it as is lays down on it's own.

The process I'm using is 3 coats of the Alexseal finish primer, sanded to 320 to remove the eggshell finish, then 3 coats of the topcoat sanded to 400 between coats (all per Alexseal directions). This picture is after 2 coats, one more to go. The eyebrow in the lower part of the picture is still primer.

i-jM8QK6m-L.jpg
 
The third and final coat of Alexseal went on the flybridge surround. One coat on the eyebrow now, accent color to come this week. The fairing job isn't perfect, but the weather isn't going to hold out much longer for me to do this kind of work outdoors. The Alexseal is fairly picky about the conditions, wind and excessive humidity detract from the finish quality. The third coat went on in almost perfect conditions and it looks pretty good.

i-fSQkrKd-L.jpg
 
I know how much work this is. We rolled and tipped a 30’ boat in Tucson. The weather made it very difficult to do in that it got over 85 degrees by 6AM. We had to be done painting by then. Yours looks beautiful.
 

Latest posts

Back
Top Bottom