Shower Sump Connection

The friendliest place on the web for anyone who enjoys boating.
If you have answers, please help by responding to the unanswered posts.

tenforward

Member
Joined
Sep 11, 2021
Messages
7
Vessel Name
Ten Forward
Vessel Make
Californian 38 LRC Sedan
First post on this forum...

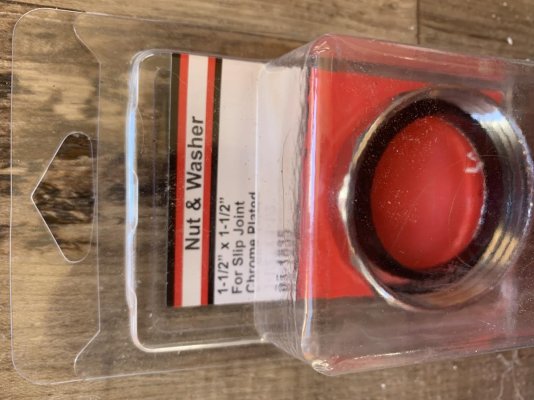
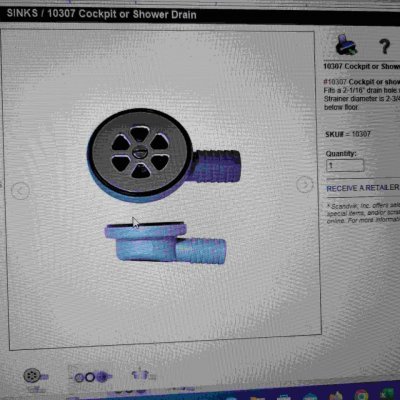
Have a 1982 Californian 38 Sedan and noticed no water accumulating in the shower with the sump pump off. I inspected the VERY small access area to the bilge under the shower and found the sump water hose laying in the bilge. Shower was draining straight into forward bilge. As you can see in attached pics (if i attached them correctly which I am not convinced of) I found a corroded & broken 2 inch flanged & threaded fitting. It appears that this fitting held the funnel-shaped plastic piece and was threaded onto the underside of the shower drain. It is pretty much impossible to see anything in this area so I am going by feel and I can definitely feel threads on the underside of shower drain.

I assume this is original to the boat and am hoping somebody else has run into a similar problem and found a solution as I am at a bit of a loss on how to find a fitting like this or otherwise solve the problem in a space that has room for one arm or half a head to see but not both. Any help would be much appreciated!

IMG_0235.jpg

IMG_0237.jpg

IMG_0238.jpg

IMG_0240.jpg
 
Welcome aboard. Do you have an inspection camera? If not you should get one. There is always a use for one when you are working on a boat. With one you may be able to see what is going on in there. Good luck.
 
Welcome aboard!

I am dealing with this exact problem on my Californian as well and the project is slated for this weekend.

The threaded drain flange you can feel is a standard plumbing fitting (I don’t recall the exact size but I believe it is a sink size). If you take the corroded nut to any decent hardware store, you should be able find a replacement. It will come with the nut and a rubber washer. You will just need to remove the hose from the funnel, put the nut over the funnel, and reattach the hose. Then using your one arm, reach underneath and screw back onto the threads on the drain.

I can get you the details on the replacement nut this weekend as it is already on the boat.

I believe the original and the replacement are both made out of zinc or some other pot metal. Not ideal but it looks to me like mine was original and the boat is a 1981 so it lasted longer than I would expect.
 
Bustlebomb - That is great info and confirms what I thought my hand was feeling under the shower. Hopefully the threads of the drain are in better condition than the nut. If you have a chance this weekend, I'd definitely appreciate the details on the replacement nut and where you got it to save me a little time hunting. Looks like we're nearly neighbors so if you got it local, I'll just go to the same place. Thanks much!

Comodave - I do not have an inspection cam but certainly a good suggestion for this or whatever poor access issue pops up in the future.
 
I confirmed that it’ll work.

It’s a 1 1/2” by 1 1/2” nut for a slip joint

The one I got was a Lasco part # 03-1835 and they have them at Springdale Ace Hardware (Springdale and Edinger in Huntington Beach) but I bet any Ace hardware would have them.

Good luck. Let me know if you ever want to get together to compare Californian notes…

Matt
 

Attachments

  • 314B388D-9CE3-4A9A-88DB-B2C9EF770C83.jpg
    314B388D-9CE3-4A9A-88DB-B2C9EF770C83.jpg
    121.3 KB · Views: 13
Outstanding. I feel like I may have gotten off too easy on this one. Haha.
 
Until you get an inspection camera, you have a phone with cam video. Since your arm can get in there press video and move the camera phone around with light on. May get some good visuals.
 
When this happened on my boat, I replaced my original shower drain with a drain with a 1/2" barb on a 90* elbow. First I hooked up a length of house to the drain fitting, then I seated the drain in the shower basin with sealant. Next day, I connected the hose to the inline pump strainer. This minimized the amount of one-handed work under the shower basin.
 
Last edited:
I recently went through this. I used:

Scandvik 10307 Low Profile Elbow Shower/Cockpit Drain, 1" Outlet
 
This is a picture of what I used. Worked perfectly.
 

Attachments

  • Compress_20230311_140845_5991.jpg
    Compress_20230311_140845_5991.jpg
    184.4 KB · Views: 7
Masonturner - The 38 has the same electrical panel you are describing in the engine room on the aft shower bulkhead. Immediately aft of that, on the subfloor above the bilge, my 38 (and I would assume 34's as well) has a small access panel that can be lifted up for bilge access. It opens up enough space to get one arm in there and make the repair by feel (although it is not particularly easy and expletives will be uttered). Snap some upside down pics with your phone so you can get a view back under there. If that access panel does not exist, I think you'd have to create it as I have seen no other way to access.
 
Forgot to mention, the broken piece of hardware is a 1 1/2" slip joint nut. It holds a pvc drain "funnel" in place which is connected to the sump drain line.
 
Forgot to mention, the broken piece of hardware is a 1 1/2" slip joint nut. It holds a pvc drain "funnel" in place which is connected to the sump drain line.


Sounds similar to what mine looked like. Is the shower drain flange on the pan 2 3/4" od? If so, the low profile skandvik fits nicely.
 
That is certainly a cleaner solution but would be too large a diameter for this application. At least for the drain on my boat. Who knows if they were all fitted with the same hardware though.
 
That is certainly a cleaner solution but would be too large a diameter for this application. At least for the drain on my boat. Who knows if they were all fitted with the same hardware though.

It has a rubber flange. Is the shower drain inset in the pan have a 2 1/16" drain hole? Should be close if its similar to a home shower pan
Being that the drain fixture can seal up to 2 3/4" it may work.
Of course, you need to measure your drain.
YMMV
 
Back
Top Bottom