34 Californian Floor Jack Supports

The friendliest place on the web for anyone who enjoys boating.
If you have answers, please help by responding to the unanswered posts.
TF

Al - Quite the diagram! :thumb:

BTW... you still chat with Craig? He was good addition to TF. Haven't heard from him for quite a while. Just for a little bit after selling his Owens. Say hi for me if you run across him!

Yes, Craig is alive and well after selling his Owens. I'll pass along your regards. BTW, did you see the ER video on this thread? You were asking for an ER photo. It's dark in the aft half but it gives an idea of the size.

That looks pretty good Al. I've got to do mine too. Port side, salon floor is drooping a bit. Think I'll start out with your design concept and adapt it to my setup. Hope you didn't patent it. :blush:

:thumb: Have at it. It's posted here for public use after I stole Duvie's idea and ran with it with the help of friends.
 
Nice to see this thread resurface. Very happy to see again that my no / low cost fix for stanchion vibration reduction worked so well.

So Al, did you fill the other stanchions with sand? How's it working now?

Thanks, :socool:
 
Yes, Craig is alive and well after selling his Owens. I'll pass along your regards. BTW, did you see the ER video on this thread? You were asking for an ER photo. It's dark in the aft half but it gives an idea of the size.

Saw your video on post # 1 ... 5/14/15. Do your floor hatches open easily for stills? :confused:
 
Nice to see this thread resurface. Very happy to see again that my no / low cost fix for stanchion vibration reduction worked so well.

So Al, did you fill the other stanchions with sand? How's it working now?

Thanks, :socool:

I loaded all the struts with sand. It helped a noticeable amount. I'm very pleased with the results of that AND the Soundown carpet underlayment. You get :thumb: :thumb: from me! Thanks, buddy!

Saw your video on post # 1 ... 5/14/15. Do your floor hatches open easily for stills? :confused:

I open the two floor hatches to do oil changes and the such but I have to remove the rugs and carpet to access them. One hatch has a table mount so that hatch also has the pad attached. The pad over the other hatch is loose and easily removed.

My regular ER access is through my fwd door under the steps for most ER checks or the aft lazz from the cockpit to approach through the back door.
 
Okay!
I sat in three aisles at Home Depot today for two hours and came up with some jacks.
No welding or fabricating other than having pipe cut and threaded there at the store.
I had just come from taking measurements in the ER where the floor is sagging around the hatch access.

I have opted for what was available-that being all galvanized steel. Figured its cheaper for a trial run, and it can be coated to control rusting.
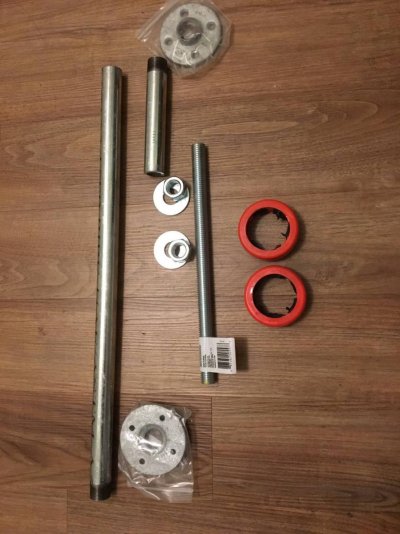
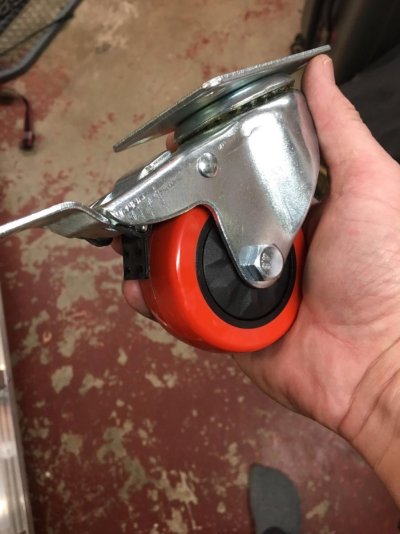
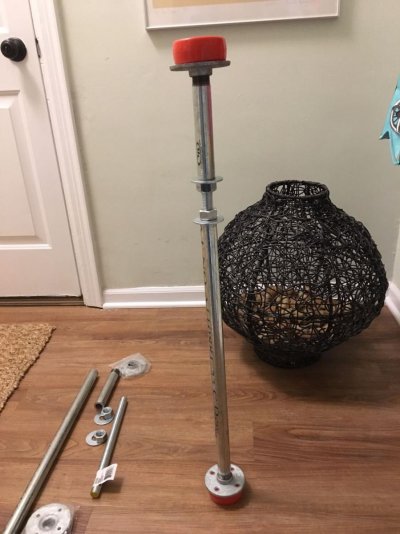
Main sections are 22in and 6in long 3/4 pipe; 12 inch 3/4 threaded rod; two 3/4 nuts and two washers; and two floor flanges. Then I got two casters with urethane wheels that I gutted with a sledge hammer to create an isolator at each end. No two bottom mounting points are the same in my boat, so maybe these will allow a somewhat universal mounting. Hopefully they prevent shifting or slipping of the feet as well.
 
Last edited:
IMG_3629.jpgIMG_3623.jpgIMG_3630.jpg

All the parts
The casters I destroyed
The assbled jack
 
Cost a little under $80 for four jacks. I will post installed pics another day. Going to be traveling a bit.

--Oh yeah, got to get some sand for the tubes!
 
Last edited:
Is this riding on the hull or on top of a stringer?
 
On the stringers
Hoping the urethane will flex a touch to conform and stay put
 
Awesome design, simple and should work very nicely.

You could get a piece of wood and work it down to being a little smaller in diameter or even square or rectangular as long as it was a little smaller in dimension than the ID of the wheel and then attach that to the stringer and/or the overhead frame. It would need to be less than the thickness of the wheel so it doesn't touch the steel flange.
This would act as a male connection to the female wheel/isolator and keep the stanchion from getting out of place without "short circuiting" the isolation.
I would also suggest having your isolator at the top only, and just screw the flange into the stringer. Isolators at both ends are typically not recommended for this application, and it makes the installation more difficult. See post #50 this thread

:socool:


On the stringers
Hoping the urethane will flex a touch to conform and stay put
 
Those are great suggestions. I had originally thought of an isolator on top only, then went with the ‘more is better ‘ idea. Thank you very much! I hate to violate the seal on the stringers, so am thinking I will experiment with some kind of friction pad or adhesive like 5200 once placement is proven successful.
Thoughts?
 
Last edited:
Excellent projects, and thanks all for posting.

Where are good sources for the pipe and threaded rod?
McMaster, Grainger, local job shop?
And is steel the best?
 
I found all my material at Home Depot. Steel is strong so that you may use smaller dia pipe (3/4), but salt could make a mess of it if not protected with paint and waterproof lube.. Time will tell on mine, but I am also in fresh water.
Stainless would be my first choice, but it was not present on the shelf when I went to do this. It was really handy to have all the cutting and threading of the pipe done right there as well. One 10 ft length is all that is needed for four jacks on a 34LRC

KS - HD you visited accommodated cutting and threading service? If so - :thumb:
 
Yep, my HD here in Jackson has a pipe threader set up - of course I have had to explain to a few of their associates how to operate the threader :angel::angel:
 
KS - HD you visited accommodated cutting and threading service? If so - :thumb:

Yes! Her name is Jill, at the Muskegon, MI HD. Did not charge a dime for 7 cuts and six expert threadings!
 
This might sound crazy, but seeing how the post will be in compression if you can find or make a flat place to land the lower flange, what about Velcro. It pulls apart with little effort, but is very strong in shear which is what you are looking for, and a big plus, easily removable if necessary.

:socool:


I hate to violate the seal on the stringers, so am thinking I will experiment with some kind of friction pad or adhesive like 5200 once placement is proven successful. Thoughts?
 
That is a really good thought.
The other day, realizing that the urethane wheel carcases were far to hard for the application, I found some toilet seals that I felt have a more correct density and flex for the purpose. I used the thick seals at the base where mounting surface varies over the stringers and the central watertank.
I then put very thin washer type seals at the top agaist the flat wood frame surfaces -not for custion but to provide better “gription”.
 
FlyWright did you have these built or can they be purchased? I would love to replace the wooden supports in my 34..

Q
 
FlyWright did you have these built or can they be purchased? I would love to replace the wooden supports in my 34..

Q

Maybe you missed post #1?

Fellow TFer Cpseudonym (aka Craig) made them for me out of the goodness of his heart. I posted the spec sheet somewhere in the thread that I made for him to use. Feel free to use it, but modify it for your boat's specific dimensions. These boats were hand made and dimensions vary.

Many metal fabricators can do this...just not as nice and cheap as Craig!

Thanks again, Reverend! :D:thumb::D
 
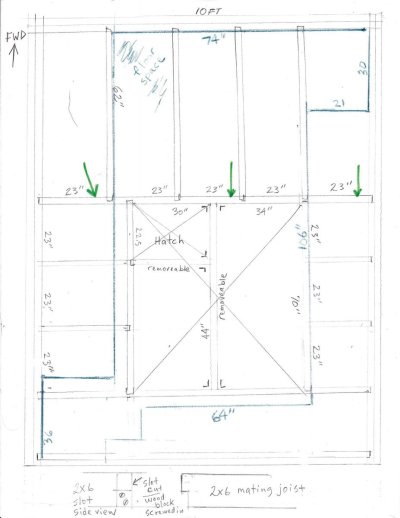
Last weekend I pulled up the carpet in my 42LRC main cabin. Ever since I owned trawler, I knew floor sloped towards engine room hatch/access. Just lived with it. Now with carpet up and taking a look using a long straight edge, I saw the athwartship floor joist (fwd boundary of access hatch) was culprit. I took measurements (attached) and assessed condition to consult with General Contractor friend. The blue lines are the actual floor walking areas above. Those lap joints are not what I expected to see, at original joist connections. Lasted all these years, so could not be too bad.. I was resigned to add a second (double) 2x6 forward of the existing one that has sagged and not up to task (green arrows in diagram). All the fore-aft joist tie into it, so it is kingpin. Seems like it may have been weakened with pass through holes and connection slots.
Aft of hatch are removable floor panels for engine removals. I lifted them up just for fun, to see if it was possible. It was. PO had used modern metal joist hangars for 2x6s in that area, the joist could be lifted out, exposing a 64”x 70” opening. Before I resigned myself to hard job of temporary supports and cutting fore-aft joist (forward of hatch) to slip in new 10’ athwartship 2x6” and connect everything up level with modern metal hangars, and construction screws.
I thought I would check the trawler forum. I found this excellent discussion, and see it is a Californian problem. The vertical supports will definitely be easier, and will now become my fix. The doubler 2x6 idea was not 100% guaranteed to work anyway (may have also needed the lower jack supports in addition). I will follow Knot Salted's Home Depot idea, this weekend because it is fast and cheap.. I will skip the urethane wheel idea for now, will expect some new vibrations perhaps and will consider vibration mounts later. I only plan on two jacks, under the problem joist at top and located on the two bilge stringers between engines below.
Thanks to everyone for sharing. - Jim
 

Attachments

  • 42 LRC Deck Support.jpg
    42 LRC Deck Support.jpg
    84.6 KB · Views: 40

Latest posts

Back
Top Bottom