Headliner Panel Removal

The friendliest place on the web for anyone who enjoys boating.
If you have answers, please help by responding to the unanswered posts.

jethrobd

Veteran Member
Joined
Nov 6, 2007
Messages
45
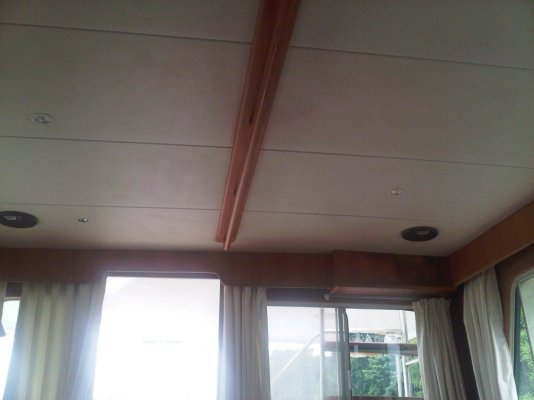
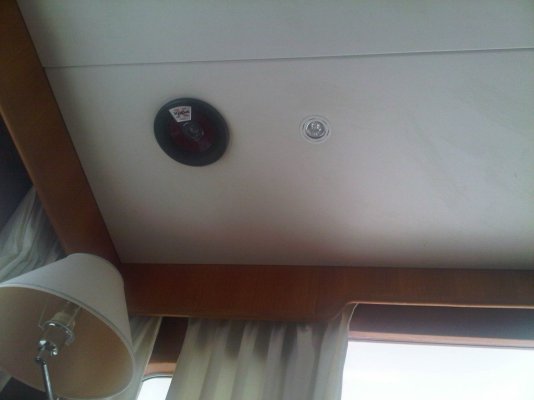
Does anyone know how to remove the main salon headliner panels on a late-model Island Gypsy?* I have a*39 Eurosedan built in 2002, but I suspect the 32's and probably the Halvorsen Gourmet Cruisers are built similarly.

I need to do this both to refinish some varnished trim and also to run cabling from the mast to the lower steering station.* Mark (aka Boogiediver)*told me the panels are lipped and the aft-most panel must be removed first, and then the others successively working forward.* I removed the overhead grab rails and attempted to remove the aft-most panel from the aft end, but the fit is extremely tight. *It did not come off with the application of gentle pressure and I was unwilling to be more forceful for fear of damaging it. *Has anyone*removed these or know how it is done?
 

Attachments

  • ig-39 aft-most salon ceiling panel.jpg
    ig-39 aft-most salon ceiling panel.jpg
    122.9 KB · Views: 158
  • ig-39 port side aft-most salon ceiling panel.jpg
    ig-39 port side aft-most salon ceiling panel.jpg
    102.7 KB · Views: 151
  • ig-39 starboard side aft-most salon ceiling panel.jpg
    ig-39 starboard side aft-most salon ceiling panel.jpg
    112.1 KB · Views: 140
Jeff:

I removed the aftermost two panels on our 2001 last fall in order to do wiring runs for new radar install. Can't recall whether the panels were lipped as Mark said.

First, I removed the 1/4 round molding trim around the edges of the panels (your pics don't show such trim) and removed the overhead grab rail. The screws that held this trim also held the outside edges of the panels (the panels on our boat are vinyl on thin plywood). I think that there may have been a few other screws in places under this trim and maybe under the grab rail that also had to be removed that were hard to find as they were sunken into the vinyl so look carefully for any before doing any pulling.

Then I carefully removed the speakers in the aftermost panel as that gave me holes to into which I could insert my fingers for pulling. I could not get the overhead light fixtures to pull out at this point as they were very tightly press fitted into their holes.

Gentle pulling revealed that the side to side seams and the perimeters of the panel(s), as well other rendom places, were held up with a velcro type material. I just carefully worked away at the panels and was able to eventually bit by bit get the panels to come loose. Yes, they are fitted quite tightly.

Be careful when a panel does come loose as the wires for the overhead lights do not have much length to them. As the panels came down, I cut the wiring to the lights (rewired them later after replacing the panels as once the panels were down I could press the lights out from behind, rewire and reinsert). A second set of hands supporting a panel as it comes down, or goes back up, would be most helpful.

Don't know if your panels are attached the same way as ours, but that's the way I did it.

-- Edited by dwhatty on Friday 10th of September 2010 11:25:31 AM
 
Thanks for all the good info, David. Yes, theres no quarter-round trim on my boat. I think your insight concerning additional screws that may be buried in the vinyl is key. When I tried to remove the panels, there seemed to be something holding them beyond the velcro, and I think that could well be it. (I recently pulled off the trim around the forward cabin hatch in order to rebed it and there were several flat-head counter-sunk screws with very narrow head diameters that were barely visible in the vinyl trim.) The suggestion of using the speaker holes as a means to get your fingers behind the panel is good too, since there's nothing else to grab onto.

How did you run the radar cable? I assume once you pulled the panels, the existing wiring from the mast was clearly visible. Where did it go from there? Is there a channel down to the engine room from where the cables ran forward to the base of the channel that runs up along the left side of the door along the lower helm?
 
"How did you run the radar cable? I assume once you pulled the panels, the existing wiring from the mast was clearly visible. Where did it go from there? Is there a channel down to the engine room from where the cables ran forward to the base of the channel that runs up along the left side of the door along the lower helm?"

Yes the existing cable wiring from the mast was clearly visible. The old cabling did not run into the engine room but ran from the base of the mast forward under the headliner to the instrument "cabinet" overhead of the lower helm, then up to through a hole to the flybridge under the dash. (The old setup had radar only on the bridge). I removed the old radar cabling/wiring starting from the radome end. I connected a long, strong cord to that end of the cabling so that as I pulled the old cabling out, the cord followed it. After the old cabling was removed, I attached the new cabling* to the end of the cord up on at the radome end of the mast and by pulling the cord from below, I gradually worked the new cabling down the mast, then horizontally through the overhead from which the panels had been removed, to the instrument "cabinet", thence up to under the flybridge dash. My new Garmin MFDs and radar are N2K and the radar cabling plugged into the N2K backbone that I installed under the flybridge dash.

From the backbone, the GPS and radar wiring to the lower helm MFD would not fit through the small plastic pipe/hole under the flybridge, that leads into the wiring channel that runs down by the helm door, as it was stuffed with many other wires. So I had to run these wires down through a new hole I made into the instrument "cabinet", then out the stbd side of that cabinet with a new hole, then along the outboard side of the window valence, then through a new hole into the side of the top of the wiring channel by the door. From there I was just able to stuff the wires into the channel and run them down it to under the lower helm dash. I think that I did have to drill a new hole uner the dash to lead the wires through.

Also, I did have to cut the N2K (ethernet?) plugs off to run these wires. The instructions said not to do this but the company that I bought the Garmin stuff from said go for it and gave me clear soldering instructions to reattach them.

The radar cable plug also was a frig to feed at points and I had to enlarge a hold or two.
 
Wow! Thanks for the detailed description, David. I'm planning on reworking my MFD / Radar arrangement this winter/spring, so my plan is to remove as much as I need of the overhead when I haul the boat this fall. That will enable me to refinish the stained woodwork and rerun cabling before I put the overhead back in.
 

Latest posts

Back
Top Bottom