Making a cover?

The friendliest place on the web for anyone who enjoys boating.
If you have answers, please help by responding to the unanswered posts.

wkearney99

Guru
Joined
Feb 17, 2018
Messages
2,164
Location
USA
Vessel Name
Solstice
Vessel Make
Grand Banks 47 Eastbay FB
Anyone made a cover for a dinghy? Getting a factory one isn't going to happen, and local providers seem to have taken a pretty radical increase in their pricing.

I have one I liked for the Avon 310 that's being replaced, so I have a reasonably good idea of what sort of placement for things is worth repeating (lining over handles, outboard, etc).

I have zero experience making a template for something this big. Any tips? Horror stories?

I've got access to a Sailrite machine, and a friend that's good with running it.
 
Check Sailrites website for boat cover projects. They have several that are pretty detailed.
 
I bought a sailrite machine. Dinghy cover is my next project. Have made a number of other covers and the savings just on my window covers paid for the machine. It is not that hard, their videos are great and it is kind of fun.
 
I second looking at Sailrite videos... there are many very helpful..
Do some practicing if you havent used the Sailrite machine before..
For patterning
Some spring clips and/ or tape are handy to hold plastic roughly in place to start. By cutting a "V" shape in the plastic you can tape anywhere in the middle you want. When done simply lift the pattern and fold the V back in place to eliminate tape sticking to anything when no longer needed.
Helpful to have a picture or vision of how you think the cover should look e.g. One piece including the outboard or dingy separate from an outboard cover...

Get some heavy plastic sheet and try to fit it to the dingy. A plier stapler https://www.homedepot.com/p/Arrow-Plier-Type-Stapler-P22/100196410
Is very handy to form darts to "shape" the flat sheet plastic to 3D shapes. Just pinch the plastic together and stapler it to hold temporarily. Try to make symetrical matching darts where more than one is reqd. If not right you can remove staples and try again.
For cut outs I find that some reinforced packaging tape applied to the plastic lets you make cut outs that don't tear.
If it doesn't look / feel right scrap the plastic and start over but sometimes you can tape a "repair" piece in place for a second or third try.
When satisfied you can use a straight edge to mark the darts and actually cut the excess material out. You can also roughly mark shapes / curves freehand using dashes of one color and later on your work surface, making solid lines using a straight edge or flexible guide to get nice straight / contoured lines that are difficult to do in place.
You need to either leave a consistent seam allowance (1/2"? I make a block & stick the dimension you want so its EZ to make a consistent allowance w /o the need to measure each time) any place you will be stitching together (around darts) and if you are going to include a hem for draw string or bungee cord you will have to add that as well.
Different colored Sharpies work well for marking different lines... finished edge, cut lines, fold lines, etc
There is a pretty extensive thread in the Gen Maint section re: DIY Canvas Tips & Tricks that might be helpful as a start / refresher.
When cutting material from the pattern and sewing it helps a LOT to have a large work surface next to the machine so the work piece stays relatively flat and isn't constantly falling to the floor and pulling away from the needle & walking foot.
Lastly... you might consider buying some seconds or close out material from RockfordSupply.com and actually making a "prototype" first. Great practice and I usually find myself thinking of several improvements or things I wish I thought of making my first of a lot of things. The bargain material isn't all that expensive and a good way to learn by actually doing. Then it's only your time invested. Besides a second storage cover might come in handy?
Good luck with the project and be sure to post some pics!
 
Last edited:
Nice tips, thanks!

I wasn't planning on trailering the dinghy, but I may see if I can lay my hands on one for the winter. That'd let me bring it home and allow for easier access for attempting this feat.
 
Anyone made a cover for a dinghy? Getting a factory one isn't going to happen, and local providers seem to have taken a pretty radical increase in their pricing.

I have one I liked for the Avon 310 that's being replaced, so I have a reasonably good idea of what sort of placement for things is worth repeating (lining over handles, outboard, etc).

I have zero experience making a template for something this big. Any tips? Horror stories?

I've got access to a Sailrite machine, and a friend that's good with running it.

I made such a cover last summer, my first time also. I actually used my wife's domestic Singer sewing machine which coped admirably with the thickness of multiple layers of canvas (using needles purchased from Sailrite). My dinghy is a 14' Rendova.

I did not make a template. I was not looking for a "tailored" fit, just wanted something to protect the dinghy and not blow off in the wind. I realized that to avoid low spots which would collect water I would need a skeleton frame to make a "tent" shape. So I made a simple frame with Schedule 40 plastic pipe. This would keep the canvas from sagging and collecting water.

I first sewed two lengths of Sunbrella together so I had a wide enough piece of canvas to drape over the entire dinghy with the seam running lengthwise on the centerline of the dinghy. I then used a grommet to create a hole for the VHF antennae. Once that hole was made the sunbrella draped nicely all around the dinghy. I could then determine where to make my cuts by simply going around the dinghy with some french chalk.

Back at home I laid it all out flat, added enough inches all around to allow for seams and a pocket to house shock cord which I planned to run all around the dinghy. In cutting the sunbrella I found scissors were useless as they created so much frayed material. I realized that it was essential to burn all the cuts in order to prevent fraying. I took my cheapo electric rope cutting heat tool and replaced the straight blade with a curved blade that I fashioned from the copper in a piece of scrap Romex. I hammered this to give it a sharper profile and used it to make all cuts. It was slow work cutting using this tool, largely because every couple of minutes I would stop to let the tool cool down (its only supposed to be used momentarily) but it worked brilliantly. I learned to make all the necessary seams on the Sailrite site where I purchased the Sunbrella, The Sewing needles, the UV protected Thread and french chalk. The one modification I had to make to use the thread was to knock up a spooler on a piece of scrap wood as the spools of special thread would not fit on the domestic sewing machine's spooler.

In the picture below I was still fitting the shock cord which you can see lying on the deck at the bows. The shock cord cinches up the canvas nicely all around the dinghy and the ends of the cord now have hooks which attach to the dinghy tie-down cleats.
4000-albums788-picture7172.jpg
 
Last edited:
I made such a cover last summer, my first time also. I actually used my wife's domestic Singer sewing machine which coped admirably with the thickness of multiple layers of canvas (using needles purchased from Sailrite). My dinghy is a 14' Rendova. I did not make a template. I first sewed two lengths of Sunbrella together so I had a wide enough piece of canvas to drape over the entire dinghy with the seam running lengthwise on the centerline of the dinghy. I then used a grommet to create a hole for the VHF antennae. Once that hole was made the sunbrella draped nicely all around the dinghy. I could then determine where to make my cuts by simply going around the dinghy with some french chalk. Back at home I laid it all out flat, added enough inches all around to allow for seams and a pocket to house shock cord which I planned to run all around the dinghy. In cutting the sunbrella I found scissors were useless as they created so much frayed material. I realized that it was essential to burn all the cuts in order to prevent fraying. I took my cheapo electric rope cutting heat tool and replaced the straight blade with a curved blade that I fashioned from the copper in a piece of scrap Romex. I hammered this to give it a sharper profile and used it to make all cuts. It was slow work cutting using this tool, largely because every couple of minutes I would stop to let the tool cool down (its only supposed to be used momentarily) but it worked brilliantly. I learned to make all the necessary seams on the Sailrite site where I purchased the Sunbrella, The Sewing needles, the UV protected Thread and french chalk. The one modification I had to make to use the thread was to knock up a spooler on a piece of scrap wood as the spools of special thread would not fit on the domestic sewing machine's spooler.

In the picture below I was still fitting the shock cord which you can see lying on the deck at the bows. The shock cord cinches up the canvas nicely all around the dinghy and the ends of the cord now have hooks which attach to the dinghy tie-down cleats.
4000-albums788-picture7172.jpg

I'm a pretty simple guy with fabric, and i think that looks wonderful!

Very functional! I was fretting over making a cover not really understanding how to make a outboard pocket, and you pretty well took my fear away.
 
I'm a pretty simple guy with fabric, and i think that looks wonderful!

Very functional! I was fretting over making a cover not really understanding how to make a outboard pocket, and you pretty well took my fear away.

Thanks Kevin, coming from you that's praise indeed!

In retrospect I could have quite easily added a seam at the bows to eliminate the extra fabric you see bunched up there. The Outboard proved not to be a challenge, it provided a "high point" that, in combination with the schedule 40 "tent frame" prevents dips which would gather water. Also in retrospect I should have added some exit points in the shock-cord pocket. This would have allowed me to use shorter lengths of shock cord to protect specific areas, such as around the outboard. I bought a giant roll of shock cord which was cheaper than WM etc. If you were closer I would gladly give it to you I have a ton left over.
 
My existing dinghy cover is much the same. It doesn't pocket the outboard either. That actually helps maintain a peak and mostly enough tension to help it shed water without a frame underneath. But it does have a lining under it to help mitigate wear to both the outboard and the cover materials.

It doesn't get in the way of criss-crossing the stern lines over it when docked. Which I realize may be an issue with the new dinghy due to the bench seat (which does fold down) and the FCT helm arm (which does not fold down). So I'll have to give those some consideration.

Most of the time the lines are high enough as to not drag on the cover. It's only under very high tides (like we had the past few days) that I get some dragging, but not enough to have abraded the material. I'm expecting the addition of some panels might help avoid that, but won't know until the cover's made and have a chance to observe it in place.

Right now the dinghy rides bow to starboard, which would put the helm at the aft/outside end of the platform. I may rearrange it (and the supporting cradle/chocks) to position it with the helm closer to the transom, to help keep the stern lines from crossing over it.
 
Also in retrospect I should have added some exit points in the shock-cord pocket. This would have allowed me to use shorter lengths of shock cord to protect specific areas, such as around the outboard. I bought a giant roll of shock cord which was cheaper than WM etc. If you were closer I would gladly give it to you I have a ton left over.

This is an excellent bit of detail worth considering. The existing cover I've got seems to also use a single run of bungee cord around it.

That and some hanging triangular tabs with grommet eyes for straps to be run under the dinghy to secure the cover to it. They work, in principle, but they're a pain in the ass to attach given that the starboard side of the dinghy hangs out over the end of the platform, making it largely impossible to get the the cord attached or strung under the dinghy effectively.

I think the cover was designed to be "able" to be used as an in-water cover. Thus it doesn't fully extend down as much as I'd like. I have never used it in-water and have no intention of doing so with the new one. So I'm expecting the make the new cover extend down farther. That should help make it easier to put the cover on, as the higher one now tends to pop loose sometimes while wrestling it into place.

Having separate section of bungee cord might allow for maintaining tension on some of the outside points, while allowing for a looser section inboard to tighten once in place.
 
AlanT. You did a very nice job of it, no question. As a practitioner I am all for the DIY.
As I still work I have to weigh the time to make the cover, cost of materials against the same time earning $$$.
This project is for the retired who have time. IMO
 
I've used a cheap woven poly "blue tarp" as material for the mockup. Holds staples and duct tape. I've also used old sheets (mine or purchased from thrift store) to actually sew a practice run. That allows you to get seam width correct. Don't forget reinforced areas. A second layer of material in wear prone areas can double the life time of the cover. For high wear areas or to reinforce grommets, I use vinyl coated polyester.
 
AlanT. You did a very nice job of it, no question. As a practitioner I am all for the DIY.
As I still work I have to weigh the time to make the cover, cost of materials against the same time earning $$$.
This project is for the retired who have time. IMO

I hear you! The hours I spent making it would otherwise have been spent out spending money not earning it!
~A
 
Before you go to the trouble of making your own cover, check these guys out. I wanted a cover for my Trinka 10 dinghy. So I Googled "Trinka 10 cover". With the upgrade to Sunbrella material it was under $200. The price seemed really low, but non of the canvas guys in my area could get it done before I left this summer. The quality is absolutely amazing and a perfect fit!!! I bought elsewhere a cover vent a telescoping pole to keep the rain from pooling and air circulation to prevent mildew. They didn't need anything from me other than make, model and money.

https://www.slosailandcanvas.com/trinka-10-sailboat-top-cover-boat-deck-cover/

Ted

Ha! The exact model of my dingy is there. $225.00. Go figure. Made is USA
Thanks Ted!
https://www.boatcoversdirect.com/pr..._INFLATABLES_715/RIB-275_ALUMINUM_HULL_43689/
 
Last edited:
Ha! The exact model of my dingy is there. $225.00. Go figure. Made is USA
Thanks Ted!
https://www.boatcoversdirect.com/pr..._INFLATABLES_715/RIB-275_ALUMINUM_HULL_43689/

BTW, the vent and tent pole are great. The vent provides air circulation and the pole keeps water from pooling on the cover. The poles have an adjustable range and a number of different sizes. It requires you to make 1 hole in the cover. The linked Ebay seller is the manufacturer.

https://www.ebay.com/itm/2635515535...CR0lSs26c%2BHQ%3D%3D|ampid:PL_CLK|clp:3663644

Ted
 
Before you go to the trouble of making your own cover, check these guys out. I wanted a cover for my Trinka 10 dinghy. So I Googled "Trinka 10 cover". With the upgrade to Sunbrella material it was under $200. The price seemed really low, but non of the canvas guys in my area could get it done before I left this summer. The quality is absolutely amazing and a perfect fit!!! I bought elsewhere a cover vent a telescoping pole to keep the rain from pooling and air circulation to prevent mildew. They didn't need anything from me other than make, model and money.

https://www.slosailandcanvas.com/trinka-10-sailboat-top-cover-boat-deck-cover/

Ted

Friends ordered a cover for a Boston Whaler Squal from the same place Ted posted a link.Approx $200 with Sunbrella upgrade.
 
Before you go to the trouble of making your own cover, check these guys out.
They don't list Highfield, so I used their website to send them an inquiry.
 
If you can get a Sunbrella cover for $225 then jump on it. Though they will probably be sewn with poly thread which doesn’t last very well. It will save you lots of work since the Sunbrella will cost at least that much. However it isn’t very difficult to make your own and it is a good project to start on.
 
If you can get a Sunbrella cover for $225 then jump on it. Though they will probably be sewn with poly thread which doesn’t last very well. It will save you lots of work since the Sunbrella will cost at least that much. However it isn’t very difficult to make your own and it is a good project to start on.
I dont disagree that factory covers are often a bargain vs custom or even DIY.
IMO you don't need to pay the premium for Sunbrella for stuff like dingy covers, etc.
I have had very good success with other acrylics and polyester / acrylic blend fabrics available from RockfordSupply.com. they are roughly 1/2 to 2/3 the price of Sunbrella. Their bargains are generally VERY attractively priced and often a decent selection of fabrics & mesh.
A dingy cover is also an excellent learning experience if anyone has an interest in other more challenging DIY canvas projects.
 

For the Highfield CL360 (with or without console) models it says
This boat application requires special attention.

Please contact our knowledgeable team members by phone at 1-866-626-8377, Live Chat, or email info@boatcoversdirect.com for further information about this Carver boat cover. You may also consider a cover by ShoreTex or Westland, which would provide a custom or exact fit for your specific boat.

And I've already e-mailed them for more info.
 
I dont disagree that factory covers are often a bargain vs custom or even DIY.
IMO you don't need to pay the premium for Sunbrella for stuff like dingy covers, etc.
I have had very good success with other acrylics and polyester / acrylic blend fabrics available from RockfordSupply.com. they are roughly 1/2 to 2/3 the price of Sunbrella. Their bargains are generally VERY attractively priced and often a decent selection of fabrics & mesh.
A dingy cover is also an excellent learning experience if anyone has an interest in other more challenging DIY canvas projects.

My concern is finding something that doesn't end up with a half-assed fit like so many other covers I've suffered using in the past.

Something that has a bit of extra material to aid in putting it on would be nice for a change.

Instead of something made so tight it keeps popping loose from one end while you're wrestling to fit it on the other. Or something too large that ends up a billowing mess that flaps around and gets pulled loose every time there's a storm or more than slight breeze.

I don't have any specific love for one material over another. Navy blue is my starting point.

I'm also probably going to have a panel made with the boat's name & port on it. This to get around the problem of how much the transom is blocked with the dinghy on the platform.
 
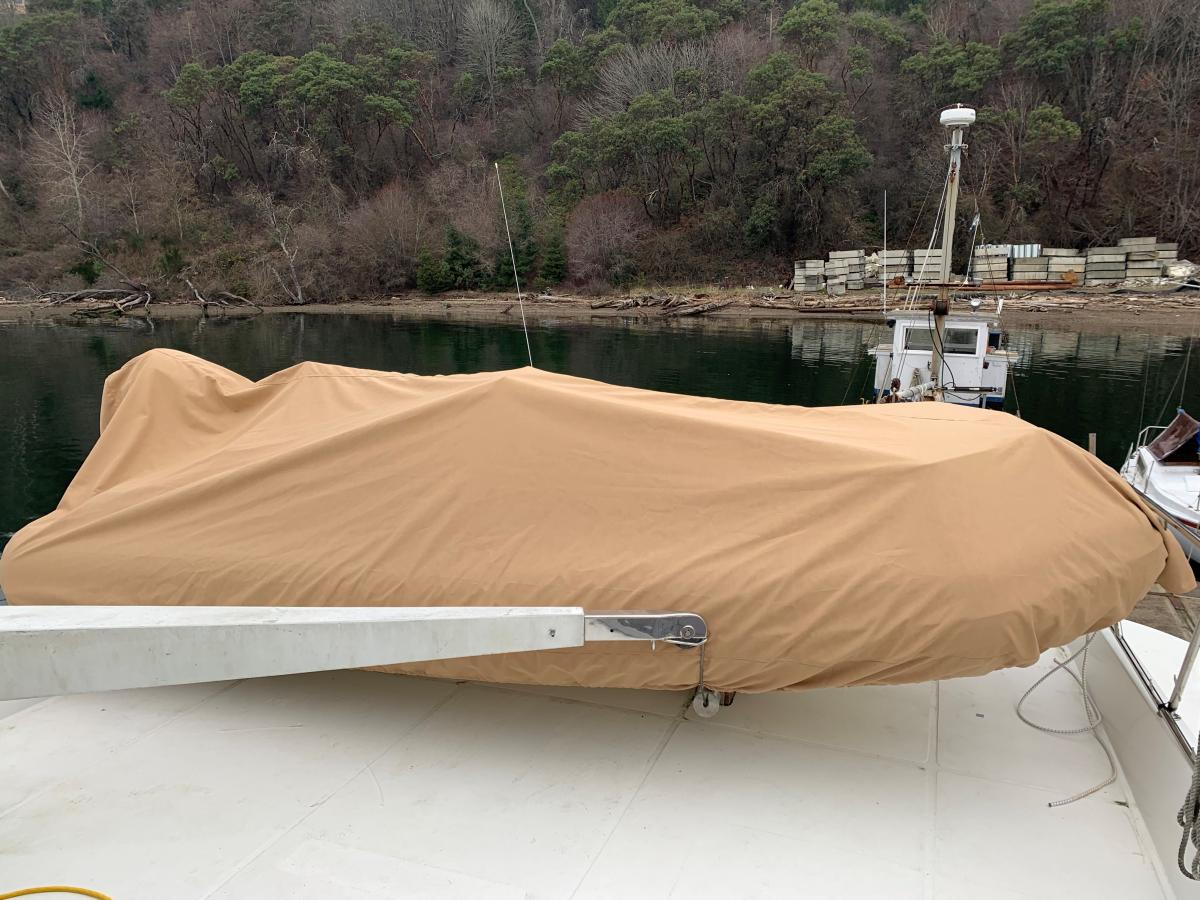
As a follow-up, Carver's INFCC13BN 13' blunt-nose dinghy cover fits on a Highfield CL260 relatively well. $228, shipped to Maryland.

https://www.boatid.com/carver/13-6-...le-mpn-infcc13bn-p10.html?singleid=3508671898

The are pix of it straight out of the box, with nothing other than the stretch-cord around the hem of it holding it in place. It has a number of tie-down loops around the perimeter, but I'm not using any in these pix.

It's made out of Sun Dura material. Gray wouldn't be my first choice, but that's what was available. It's got enough material to stretch from bow to stern (including most of the outboard) without popping loose. And not so excessive as to flap around too much.

It'll be a good starting point. I'll likely sew in a few vinyl patches on the underside to reduce wear. High points like the wheel, outboard cover and maybe the cleats/handles. The cover on our Avon had a few of those.

https://www.boatid.com/carver/13-6-...le-mpn-infcc13bn-p10.html?singleid=3508671898

The funny part was while I was putting it on there was a HUGE flock of what I think were starlings alighting nearby at the marina. And of course right there and then, at least three of them pooped on the just-applied cover.
 

Attachments

  • carver cover on highfield CL360.jpg
    carver cover on highfield CL360.jpg
    166.6 KB · Views: 13
Back
Top Bottom