Leaking Forward Deck Hatch

The friendliest place on the web for anyone who enjoys boating.
If you have answers, please help by responding to the unanswered posts.

HiDHo

Guru
Joined
Feb 22, 2012
Messages
1,371
Location
USA
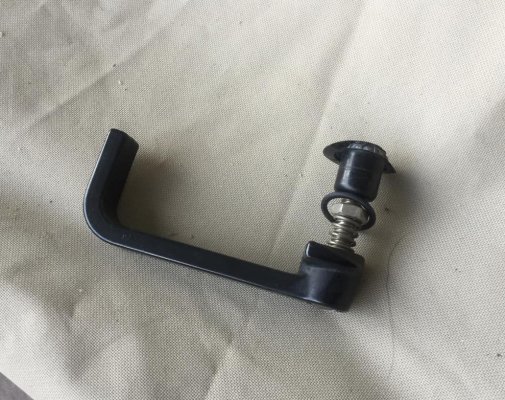
I think the caps on the dogs need replacing. Has anyone rework the hatch dogs ?
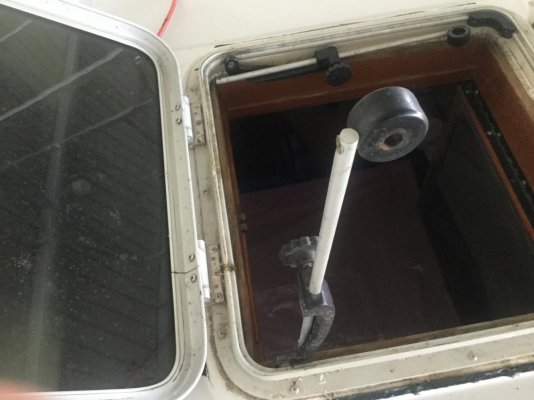
My hatch is a Bomar copy with hinged aft side, tinted sky light and forward dogs. It has had a hatch cover on it so the sky light is in great condition as is the hatch seal. The dogs have a circular rubber seal on the sky light.
 
The deck seal and rectangular hatch seal are good. The circular rubber caps that seal to the sky light on the dogs bolt are both showing exposure to the elements and deterioration. Covering them with black sealant is and option.
I’m hoping someone has rebuilt the dogs rubber sky light seals,maybe with the Bomar repair kits or others.
 
Last edited:
Pull it apart and see what kind of seals it used. For turning dogs, might be o-rings which you could easily source from anywhere. (McMaster Carr, etc..)
 
I knew when I saw clear silicone chalk over the hatch dog flanges on the sky light that nothing good was going to happen when I disassembled them. The outer dog flange on the sky light has been destroyed by age and weather.
I was hoping one of the Manatee owners had reconfigured the dog flange sealing parts. The inside matting part is the black cylindrical piece on the hatch strut. There is one o ring under the exterior flange.
I guess my first attempt to rebuild these dogs would be to grind off the broken exterior flange and try using a s/s washer.
The hatch it self is worth repairing, stout frame, true knife edge, clear sky light and good rubber seal.
Any and all suggestions welcome.
 

Attachments

  • 11AEC1BB-2DB4-44F5-BAA7-58E0D4029783.jpg
    11AEC1BB-2DB4-44F5-BAA7-58E0D4029783.jpg
    94.4 KB · Views: 20
  • 5DF13700-E11E-4ED6-B229-EF5A1BBBAA1D.jpg
    5DF13700-E11E-4ED6-B229-EF5A1BBBAA1D.jpg
    66 KB · Views: 21
  • FB386A8A-5CF3-4D89-A56E-CE8DD7410742.jpg
    FB386A8A-5CF3-4D89-A56E-CE8DD7410742.jpg
    100.4 KB · Views: 19
Is there a manufacturers name on it anywhere? That would be the best way to get replacement parts.
 
No, that’s the first thing I looked for, it was most likely manufactured by a sub-contractor for Chein Wha.
Here’s a better photo of the dog minus the mating part on the hatch strut.
The round head stainless bolt goes thru a hole in the handle a hex nut tensions the spring against the handle then the bolt goes thru the round mating part on the strut and threads into the exterior flanged piece with an o ring under the flange. The only time the dog seals on the o ring is when it is dogged down tight.
 

Attachments

  • AD803A0F-9F7B-4A6A-B08C-FF54BF9576ED.jpg
    AD803A0F-9F7B-4A6A-B08C-FF54BF9576ED.jpg
    199.9 KB · Views: 15
Last edited:
I found a Bowmar Dog Assembly on Amazon that might work. Unfortunately the photo on Amazon doesn’t show a side view really well. Take a look at it and see what you think.
 
I found it another place on Amazon that you can zoom in on a side view and it looks pretty close to what you have. It costs $39.10 but it is the whole handle.
 
I found it another place on Amazon that has a better side view that you can zoom in on, just look around.
 
If you know someone that has any kind of lathe, the one broken part could be made in a few minutes, a really basic part to make on a lathe and plastic is very easy to machine.
 
Machining a new part is an option, there doesn’t seem to be replacement latches that would work.
 
After checking out machining new skylight flanged fittings that seal using an “ o” ring, I have decided to substitute the “o” ring flanged fitting with a full threaded 3/8 16 316 bolt and fender washer. I’ve dry fitted the new setup and it works. I will seal the bolt and fender washer with butyl chalk. The latch handle will rotate as in the OE on the 3/8 16 bolt and the spring tension to seat the hatch is identical. I will photograph the new assemble once installed.
 

Attachments

  • F0250C62-E404-434E-9DAB-FD46F502E9AB.jpg
    F0250C62-E404-434E-9DAB-FD46F502E9AB.jpg
    199.9 KB · Views: 21
If you know someone that has any kind of lathe, the one broken part could be made in a few minutes, a really basic part to make on a lathe and plastic is very easy to machine.

Get with the times... lol. On the International Space Station there is a 3D printer to make tools needed for a particular job. This technique saves weight and space So if you need for example, a left handed wrench with optional nose picker attached, the machine can make it.

In my area, and trust me I am not in a highly populated urban center, there is a club that works with electronics for hobbyists, but also has a few 3D printers. It costs pittance to join the club. Look in your area for such a club and they should be able to print out the part you need.
 
Thanks for the information rsn48.
I choose to not duplicate the materials used in the failed part, but replace it with easily obtainable 316 stainless steel parts that will outlast the hatch most likely. Having operated a lathe I doubt machining the part including the threaded bore could be done in minutes.
3D printed parts in various plastic compounds can produce in some applications a quality part. My goal was to do the repair using materials impervious to the elements encountered in a marine environment.
 
After a two week layoff with a strained low back I finally got the hatch dogs remodeled and installed today.
I used a hex head 4” long 3/8” 16 full threaded 316 stainless bolt and butyl tape. I ground off the exterior O ring flange that was cracked from exposure to the elements and replaced it with a fender washer. The hatch struts matching black rings fit over the threaded flange boss exterior.
 

Attachments

  • 28359009-E895-4FD5-86B3-83FB390D619F.jpg
    28359009-E895-4FD5-86B3-83FB390D619F.jpg
    84.6 KB · Views: 19
  • F3A69C55-85CE-4642-9469-88FF59465AC0.jpg
    F3A69C55-85CE-4642-9469-88FF59465AC0.jpg
    61.3 KB · Views: 17
  • CAC8309E-47AA-4CBE-9326-DBBE2480CF6A.jpg
    CAC8309E-47AA-4CBE-9326-DBBE2480CF6A.jpg
    78.3 KB · Views: 12
Last edited:
I then seated the fender washer and hex head nut sealed with butyl tape. I next assembled the dogs and adjusted enough tension to seat the knife edge into the hatch gasket. Final test spray with water at different angles and velocities confirmed that the hatch is now water tight.
This job was well worth the effort as it’s placed right over our walk around queen bed. :)
 

Attachments

  • 6CCF99E5-FD61-4B42-A061-290E4802E063.jpg
    6CCF99E5-FD61-4B42-A061-290E4802E063.jpg
    46.1 KB · Views: 18
  • C31C22C2-32C7-4FAD-BDAE-D23426E048CE.jpg
    C31C22C2-32C7-4FAD-BDAE-D23426E048CE.jpg
    91.2 KB · Views: 17
Last edited:
A very tidy job! Fortunately you found a bolt thread size that was a match for the handles. A+ work.
 
Also a nice set of photos to illustrate the scope of the job. I nominate this thread to be saved as a repair solution on the forum. Many boats have this type hatch. You also illustrate that while canvas covers didn't save the part, the plexiglas still looks great.
 
Thanks Swfla, the hatch cover you mentioned is due for replacement. Sunbrella comes to mind but I was wondering what has worked best for others ?
One thing we plan to change though is the long strips of velcro holding the cover in place. This hatch serves as an escape hatch plus ventilation, I tried to simulate lifting the hatch from the inside and found it took more force to detach the long velcro strips than warranted in an emergency. We are going to use maybe three 1” buttons of velcro spaced out on each side of the new cover.
 
Last edited:
Look at outlandhatchcovers.com. They make a plastic hatch cover that stays on the hatch even if you open the hatch. No affiliation.
 
Maybe a new tailored/fitted cover that attaches to the aluminum frame of the lid. It won't interfere with opening at all. Velcro offers many types and styles of velcro products that may work even better than the current style of velcro.
 
Back
Top Bottom