Grand Banks Europa water tank alert.

The friendliest place on the web for anyone who enjoys boating.
If you have answers, please help by responding to the unanswered posts.

cks

Senior Member
Joined
Sep 27, 2020
Messages
192
Location
USA
Vessel Name
Silver Lining
Vessel Make
2003 42’ Grand Banks Europa
Follow up from a previous post regarding my leaking water tank.

Due to the slight upward pitch of the boat, bilge water in the forward portion of the boat collects towards the rear of the 180 galling tank. The shaped tank is mounted just on the other side of the forward engine room bulkhead and under 5’ of the cabin sole. Even if you completely dry the bilge there is water back underneath the tank. As we all know, salt water is not your friend.

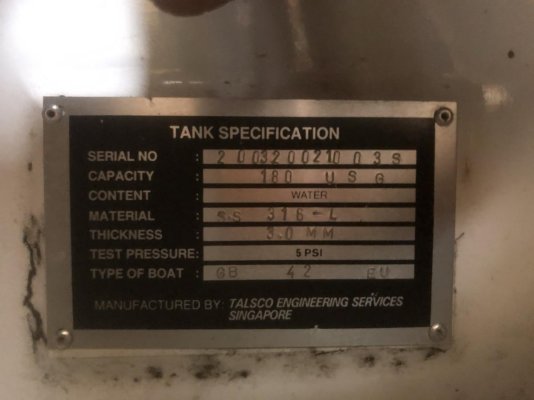
I believe this water situation has contributed to the degradation of a 3mm ( Approx 1/8”) 316 stainless steel tank. The operative word to a stainless steel tag is that it stains less. Otherwise it would’ve been called stain proof steel.

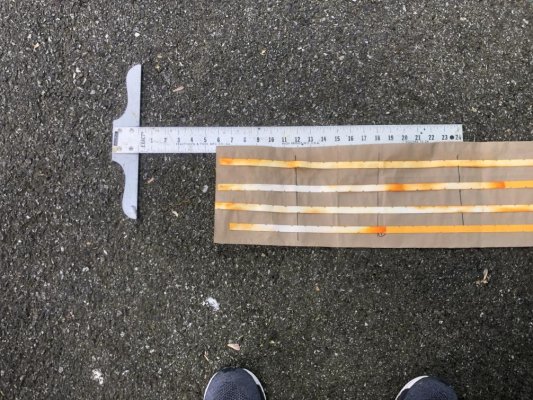
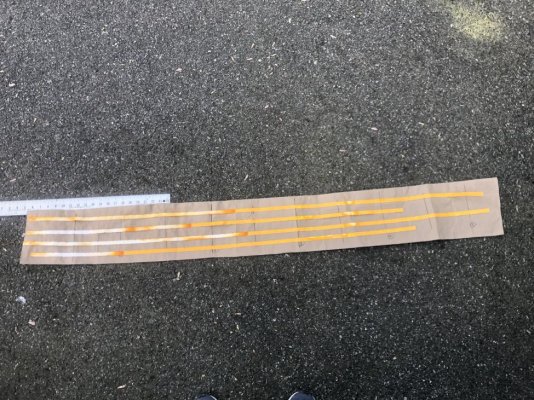
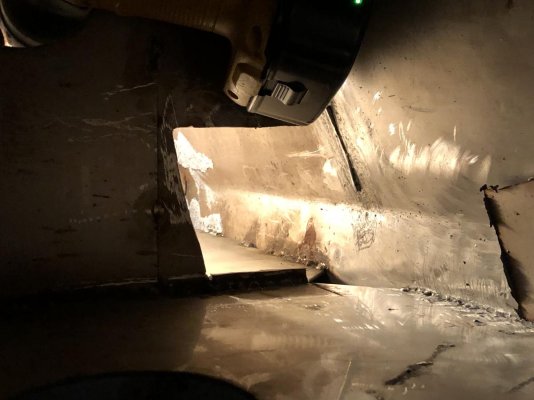
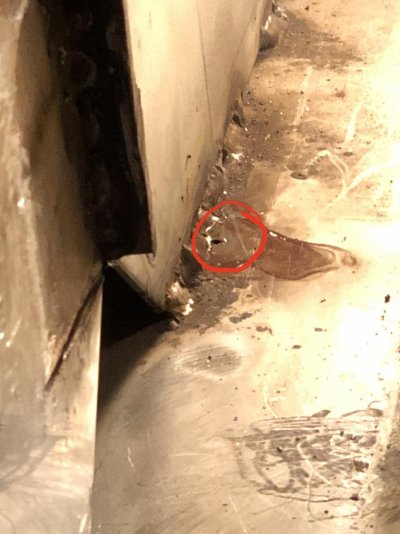
There is no easy access to the underside of the tank. There is no access to the sides of the tank. Since I’m working “blind” I created a water trace with uranine dye strips. I was able to push this test paper almost all the way under the tank, less 6” which is due to a wood support under the aft portion of the tank. Taking this 6 inches into consideration I have determined that the leak is 18” in which is in line with the baffle location. My hypothesis is the bottom starboard side weld of the baffle has developed a fairly good sized pinhole. (dropping 50 gallons/day)

I have marveled about how well designed he Europa is. The attention to detail, etc. The only real fail in the design is the water tanks and it has bitten me in the butt. Even the fuel tanks can be essentially cut out and replaced. Not the water tanks. The tank is mounted between the two forward at the stringers. If you look closely in your engine room you will see these two stringers to which your engines are mounted to. I’ve never paid attention as you go forward towards the bulkhead, the stringers widens from around 24” to 37” to accommodate the water tanks under the cabin.

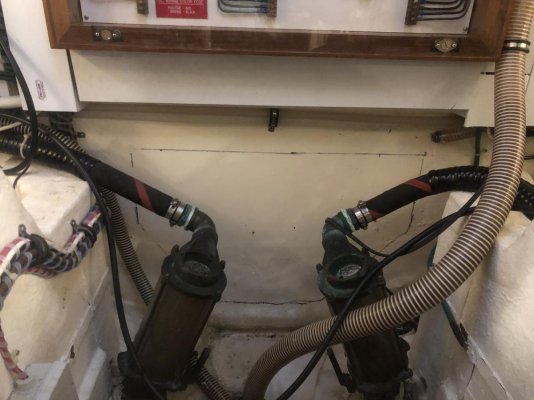
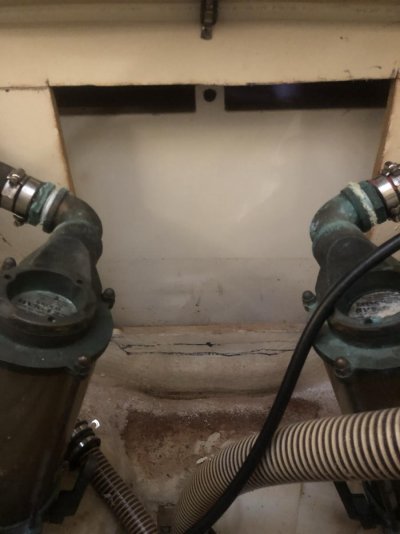
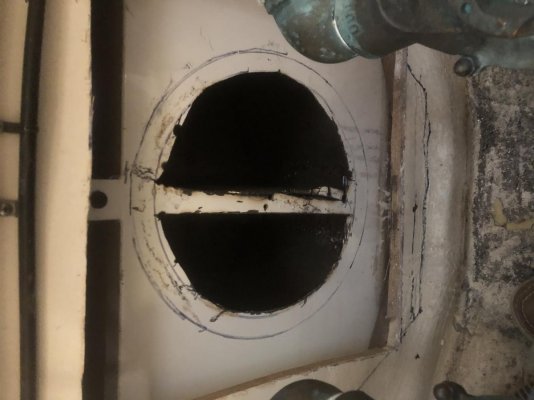
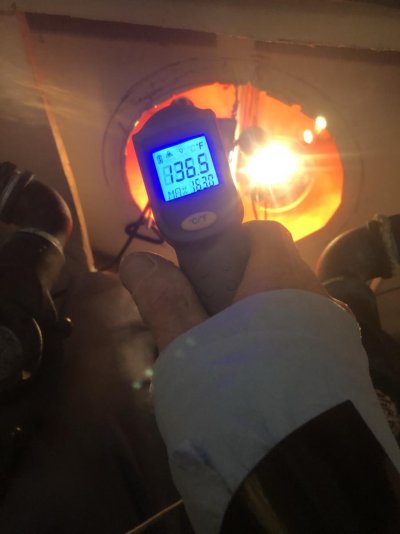
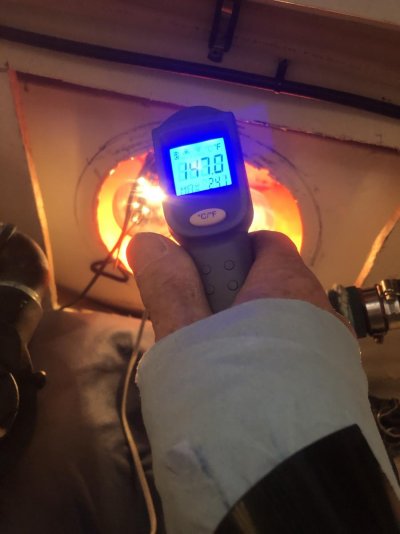
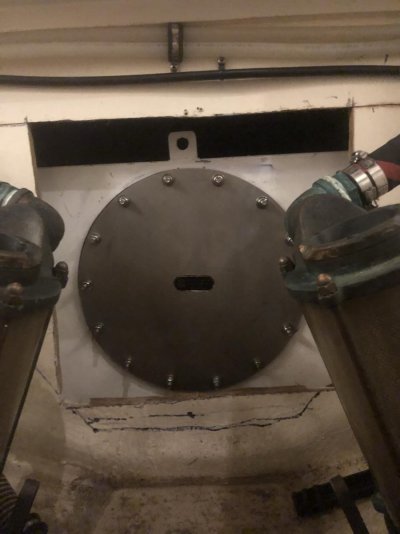
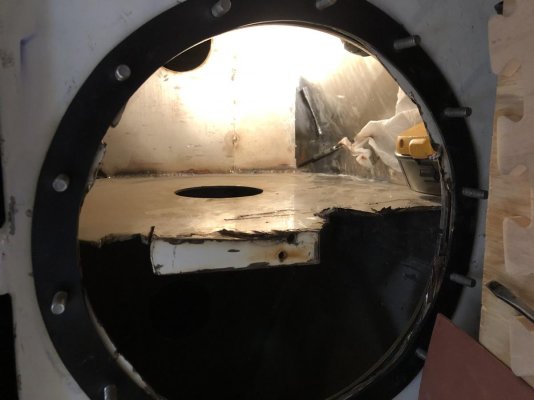
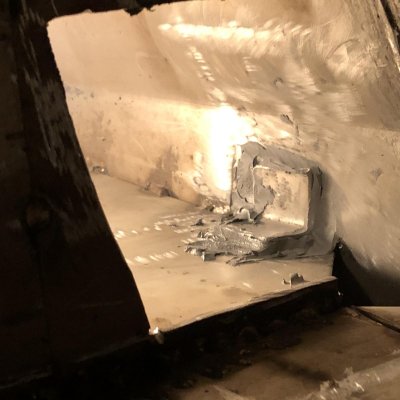
To attack this problem I have cut open a 16“ x 16“ opening in the forward bulkhead of the engine room just below the electrical distribution panel. Tomorrow I will cut a 12” hole to gain access and visibility to the baffle.

Our course of action will be completely dependent on what we uncover.. I’ll add to this post as I move forward.

To it insure I never have water in this part of the bilge again I intend on building a wooden damn to prevent water for getting back there. I’ll most likely use epoxy. My suggestion to other Europa owners, check your forward and bilge pump. If you see ANY water in that part of the bilge please be mindful that there is a lot more that you don’t see and it may eventually compromise the tank. I urge you to take note. Having your main 180 gallon tank drop all its water in 3 days is a very sinking feeling, will cause undo obsession and angst. :)
 

Attachments

  • 3660439E-BB1E-4E63-B3C0-EE650D5888CD.jpg
    3660439E-BB1E-4E63-B3C0-EE650D5888CD.jpg
    203.8 KB · Views: 36
  • 61F938D2-9520-499E-8B72-4505C698E139.jpg
    61F938D2-9520-499E-8B72-4505C698E139.jpg
    201.6 KB · Views: 32
  • 01EBDAFD-1668-4BAC-8E52-1F92284AB533.jpg
    01EBDAFD-1668-4BAC-8E52-1F92284AB533.jpg
    110.3 KB · Views: 34
  • 6A504D29-62EB-4436-B48E-006001DE21A6.jpg
    6A504D29-62EB-4436-B48E-006001DE21A6.jpg
    79.7 KB · Views: 33
UPDATE- Leaking water tank repaired!

After weeks of research I stumbled upon a product from Impco, a subsidiary of Godfrey & Wing. The product is called Alumiseal. AlumiSealâ„¢ – IMPCO
It is a two part sealant with a viscosity close to water. This is an amazing product. It’s safe for potable water application once cured. It is specifically formulated so it will bond to passive metals like stainless steel and aluminum.
I cut a 12 inch hole into the side of our tank to give access to the suspected welds that may contain pinholes. I dried the tank out as best as I could and let it continue to dry out for two weeks. Heat lamps were placed inside the tank to raise the temperature to about 140°. One paints the product on all welded surfaces. By capillary action it will find its way into small pinholes. After two hours with the heat lamps to accelerate the curing process I wiped the inside surfaces clean with a cloth & applied a second coat in case I missed anything. Alumiseal will only cure in the absence of oxygen so it’s easy to wipe clean on the surfaces. With the material in the pinhole itself there’s no oxygen and so it will cure.
After another hour I switched off the heat lamps, left the boat for two days to allow the product to cure and cross link to the inside surfaces of the pin holes.

Upon my return I wiped the inside of that section of a tank as best as I could and filled water up to the hole I cut into the tank side. ( about 4”) OMG!No leaks!!!!

I purchased a 14” access plate system from SeaBuilt to close up the 12” hole. This is a critical part of the repair. This part isn’t cheap but well worth the investment.

Next step will be to close up the bulkhead.

So far the tank is holding water so it’s a wait and see but according to Han Sim of Godfrey and Wing, he is confident the pin holes will not leak again. I can’t speak more highly of Mr. Sim and the folks at Godfrey & Wing. They were extremely helpful and supportive. The same for SeaBuilt.

The total cost for the project, including the myriad of cutting blades and drill bits ��, was about $800. At least an order of magnitude less than having to remove the tank in small sections under the cabin sole, fabricate 3 custom tanks and reinstall.

I have attached a few photos of the project but they really don’t do justice to the completed project
Feel free to pm me if you have additional questions.
 

Attachments

  • F825BA31-C8AA-45D6-994B-6D95D6BBB018.jpg
    F825BA31-C8AA-45D6-994B-6D95D6BBB018.jpg
    89.2 KB · Views: 25
  • 39720D93-DC14-4087-A497-0A51D9F88EC1.jpg
    39720D93-DC14-4087-A497-0A51D9F88EC1.jpg
    55.4 KB · Views: 25
  • 7FDCE24C-BF2C-47AA-A3C2-765CB5984690.jpg
    7FDCE24C-BF2C-47AA-A3C2-765CB5984690.jpg
    66.3 KB · Views: 25
  • C65E4442-519A-48D9-97B0-E759D9751D8F.jpg
    C65E4442-519A-48D9-97B0-E759D9751D8F.jpg
    78.4 KB · Views: 27
Last edited:
Although I'm sorry you had this problem, it was a very interesting read (especially with the photos). Good sleuthing. Nothing put a finer point on it than cutting out the fuel tanks being easy in comparison!

It sounds like there may be a broadish area in contact with a wood support under the tank? As you say that would have trapped any water up against the outside of the tank.

I'm curious about a couple of things on the repair product: One is that it says it bonds to non-ferrous metals (I thought stainless would be ferrous?). The other is what did they have to say about it for potable water tank(s)?

At least now you have a "door" into the area. Whew!
 
The folks at Godfrey & Wing set me back up data to show that the product is suitable for potable water tanks. Once the product has cured ,water will not dissolve any chemicals or other impurities into solution.

Aluminum and stainless steel are passive. I’m not a chemical engineer and so I can’t give you a good explanation. My understanding is there are additives to thisProduct that allow it to properly adhere and cross link to stainless steel.
 
Follow up to my answer. This was a water tank. It is the 180 gallon water tank in our Grand Banks Europa. That access hole that I cut into the bulkhead is the only real access I can get to the tank with some degrees of ease.
I can’t imagine having to cut that tank out from that access vantage point. It’s the only way. That is unless you want to literally dismantle the interior of the boat, including lifting all the teak parquet flooring and walls down below in the cabins. an impossible idea in my mind and I thought of it makes my knees weak.
 
Hi cks. Yes, equally sorry for your issue. And hopeful your "fix" works as advertised. Personally, I'm of the "reef 'em out and replace" school for tankage leaks aboard a recreational powerboat. Knee-buckling expensive, for sure.

However, I must throw out a caution flag for part of your commentary:

To it insure I never have water in this part of the bilge again I intend on building a wooden damn to prevent water for getting back there. I’ll most likely use epoxy...

As you well know, bilges are intended to allow water in them, and to allow free passage of water throughout the deepest portion of the hull to location(s) where it can be easily and completely removed. Should the architect that designed your GB have slept during that part of class, or the builder had his head where the sun don't shine, and failed to provide this free passage THROUGHOUT THE BOAT, thus condemning your tankage to failure, then doom on him.

But not a good idea to attempt to damn off or create a "waterproof" area in some part of your bilge. First off, it just ain't gonna happen. Water will have it's way with you, as he operates in concert with Mr. Gravity, and drains towards the center of the earth. Always. And there's ALWAYS water in a boat. Not necessarily by intention, but it's always there. In your case, perhaps from simple condensation on the exterior of the tank that then migrates to your bilge.

In many, many decades of time spent in bilges of my, and other person's bilges, I've NEVER seen a "waterproof" area in a bilge. Yes, I've seen lots of dry (as in, perfectly, 100% dry) bilges. Never have I seen an un-drained void space in a bilge that didn't ultimately find itself full of water, in need of proper drainage, usually stinking to high heaven, and contributing to exactly the issue that caused your tank to fail.

And yes, there are "watertight bulkheads" on many small boats. But standard practice is to provide adequate limber holes within the bulkheaded area to allow any standing water to drain and be collected and disposed of overboard. To do otherwise is simply a bad idea. If you are trying to bulkhead-off your tank, in an attempt to prevent subsequent moisture intrusion under your tank, you're doing absolutely, unequivocally the wrong thing, and will hasten the repetition of your current problem.

It is highly recommended that you revisit your tankage, with the thought of opening access to the tank (particularly the bottom), and ventilating it properly so any water that does collect there (and it will, for sure) will either drain away, or evaporate quickly. I feel you pain, should your architect and/or builder not made that provision during the build, but I heartily suggest you make best efforts to correct their oversight. Fixing leaking tankage is bad enough the first time. To do so again is simply heartbreaking.

And a final comment, you state your tank is fabricated from 3mm 316 stainless. From what I've seen on other GBs, the water tankage is more likely fabricated from other-than 316. Probably more likely 304, and probably not passivated after welding. Other than custom builds, I've never seen an OEM 316 tank, and certainly not the preferred 316L.

Regards,

Pete
 
You’re right about damning up the bilge. I won’t be doing this. I think the majority of the water comes from air-conditioning condensate. Going to be installing a small condensate pump so the water doesn’t collect in this area.
Regarding the tank. I believe it is 316L ss. Attached is a photo of the plate.
 

Attachments

  • F99BACD9-7A9C-4753-8A14-AF1495847A3F.jpg
    F99BACD9-7A9C-4753-8A14-AF1495847A3F.jpg
    71.1 KB · Views: 33
Hi cks. I certainly stand corrected! Thanks for posting the tank placard. A first for me, and I appreciate the reset. And kudos to GB for not only posting the placard, but using 316L to boot.

Regards,

Pete
 
The root cause of stainless steel tank leakage is typically the welds. Welding always adds more carbon to the steel and becomes open to corrosion issues in the future. If only it was stain”proof” and not stain”less”.
I could tell it was 316L because it was a£€%#&! to cut & drill. I used a lot of blades & bits! (i’m told the fuel tanks are a bear but only because they’re so large. They’re made of cold rolled steel which is certainly easier to cut with a blade & wheel than 316L. I honestly couldn’t imagine myself cutting this tank out. If this didn’t work, or doesn’t continue to hold over the next year or so, I will have a reputable yard do the job. I’m cautiously optimistic that this is the solution.
 
Follow up. Still working on the project.
Grand Banks Malaysia was an excellent resource for me. Stuart, FL was not. The folks in Malaysia really try to think the project through. They had a couple of suggestions. One was to cut a hole in the bottom of the boat under the tank to repair. It’s feasible to do but I’m gonna try another method first. They sent me the mechanical drawing of the tank. They urge me to continue trying to fix the tank rather than cutting the tank.

The drawing was extremely helpful. I mistakenly thought the tank was 5 1/2 feet long. It’s 6 feet long. That made the world a difference when I did a study with paper under the tank to see where the leak was. The data that I collected was misleading based on my assumption of the tank length. Based on my assumptions I thought the leak was in the middle baffle between the end of the tank in the first baffle. No matter what I tried and treated that section of the welds in the bottom of the tank it still leaked. The baffle dimensions helped me pinpoint where I “believe“ the leak to be really coming from. I believe it’s the aft baffle which is 20” inches from the stern end the tank. (Where I have cut my hole)
The tank treatments/additives (NSF safe for potable water) to seal the pinhole did not work. I tried JB water Weld With limited success. I believe I managed to slow the leak down. The JB Weld might have actually touched the pin hole. At least for a while then it slow down after, what I believe, Extraneous matter filled/ clogged the pinhole. It’s still leaks and is unusable.
I haul the boat in three weeks. I will be removing the two Graco BVS1250 strainers down to the shut offs. This will give me a better ability to get further inside the tank and reach the baffle. I plan on using a diamond blade and cutting the bottom section of the baffle out. I will be grinding the remaining baffle down close to the tank as well as light grinding of the interior of the tank around the weld. This is absolutely imperative to ensure good adhesion if the NSF rated epoxy.

I have determined the right product to repair the tank from the inside is manufactured by Belzona p/n 1111. It is expensive. About $300 for 1 kg. It starts to harden up in about 20 minutes which is 15 minutes longer than JB Weld. Very important for my purposes!

It’s made to fix holes in engine blocks. It’s also has a strong presence in the water tank industry for this application.

More pics and information coming next month.
 
A lot of these boats had stainless water tanks. Fleming for example, before around hull 60.
 
Nothing wrong w/ ss water tanks. They are excellent. Unfortunately, every once in a while a poor weld rears it’s ugly head. Unfortunately for me I am the recipient of this anomaly.
 
Thanks for taking the time to post follow-up. It's interesting and good on you for persevering.
 
SUCCESS !!!!!!!!

After investigation all season I have located the hole in the ss water tank in my Europa.
A thank you to Grand Banks Malaysia. The sent me a drawing of the tank which was extremely helpful. I needed to cut the bottom 2" of the aft baffles to look beyond the 20" to the baffle. Cutting this baffle required removal the two Groco sea strainers and purchasing a grinder with a 12" extension. The leak was a located 2" forward of the baffle on the right side about 1/2" from the forward to rear baffle.

There was a distinct hole about 0.05 - .0.625" diameter! Not trivial hole. The entire 180 gallons would leak in 2-3 days!

The final solution was to make a 2' x 2" sq. cold patch using some of the ss tank material from the excess ss when I cut the 12" access hole.

I used a 35 grit grind grinding wheel to rough up the surface of the tank & patch.

It took all summer to locate the correct epoxy. No, it's not JB water weld.
The product is Belzona 1111 epoxy (super metal). It's potable water certified safe.It's not cheap but its worth every penny.

Complete list of items used on this project:
Seabuilt 14" ss plate system: $450 (seabuilt.com)
grinder with extended 12' arm for deep access: $160 (amazon)
std grinder
high quality drill
Misc. items: hardened drill bits, Sawzall blades, 4 1/2" diamond cutting wheels: $300
Belzona 1111 epoxy (belzona.com): $300

Total cost:$1210 (doesn't include other solutions, etc. (add $200)
 

Attachments

  • IMG_5303.jpg
    IMG_5303.jpg
    75.9 KB · Views: 24
  • IMG_5318.jpg
    IMG_5318.jpg
    99 KB · Views: 22
  • IMG_5320.jpg
    IMG_5320.jpg
    111.6 KB · Views: 18
  • IMG_5323.jpg
    IMG_5323.jpg
    114.4 KB · Views: 22
Wow. That sounds like quite the ordeal you had to go through to find the root cause of the leak (and solution) Thanks for sharing all the updates
 
Very nicely done. Congrats.


I'm interested to see that your water tanks are stainless. I had a 2009 '47 EU and its water tanks were aluminum. I suspect they changed to reduce cost, but don't know. Regardless, great job tracking down and fixing the leak.
 

Latest posts

Back
Top Bottom