Another Teak Deck Post

The friendliest place on the web for anyone who enjoys boating.
If you have answers, please help by responding to the unanswered posts.

Oil Gypsy

Veteran Member
Joined
Sep 25, 2019
Messages
53
Location
Canada
Vessel Name
Dauntless
Vessel Make
Grand Banks 36 Classic #248
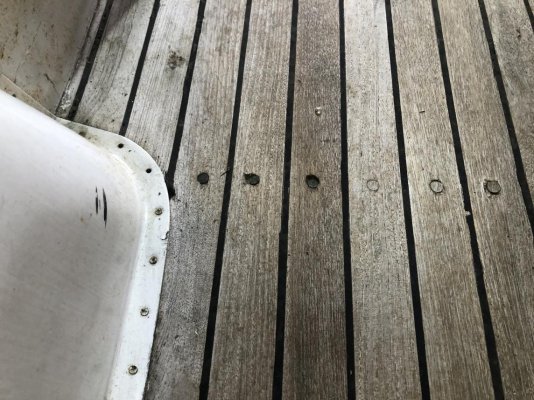
So our 50 year old teak deck is looking really sad, plenty of exposed nail heads and with uneven and missing caulk. Its definitely leaking but luckily its boathouse kept so water intrusion is kept to a minimum.

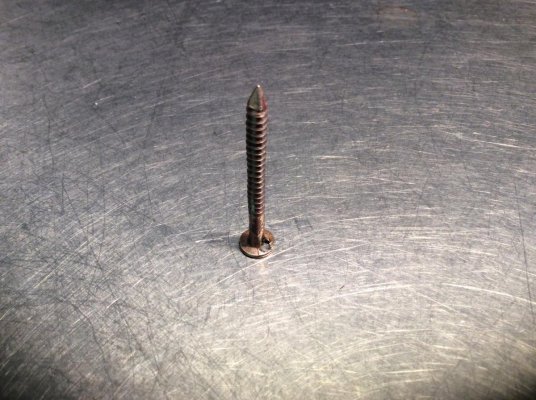
In the short term I was going to cover the deck with duck canvas and then paint it, the old fashioned approach. While removing the windlass switch buttons I had had a really good look at the teak planks, there appears to be over 1/2" remaining, closed to 5/8", much more than I expected. This made me think again. The deck is nailed down with bronze ring nails, it seems as though someone has removed and epoxied in new teak plugs at sometime in the past but they are now less than an 1/8" thick now. There seems to be enough teak left to try to save it.

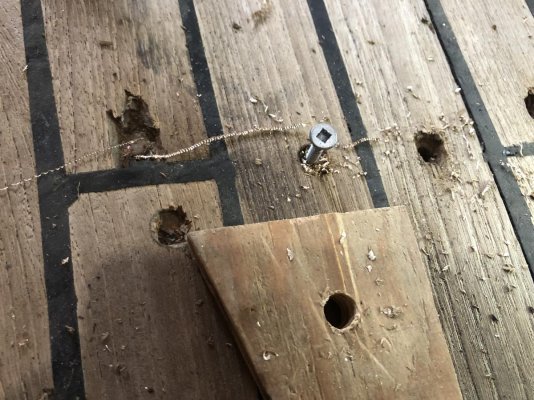
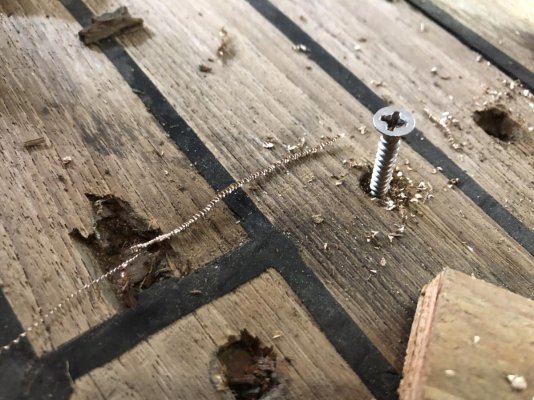
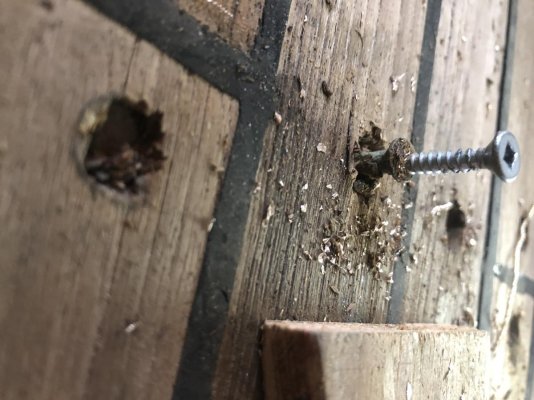
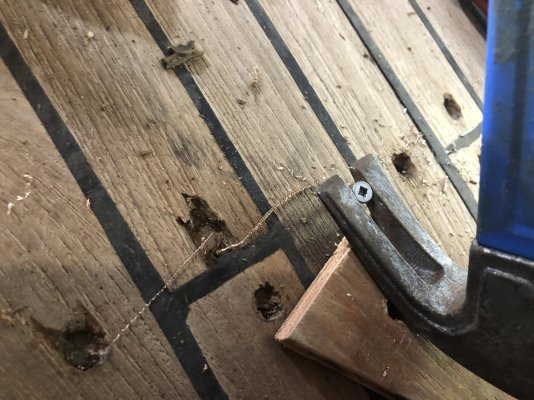
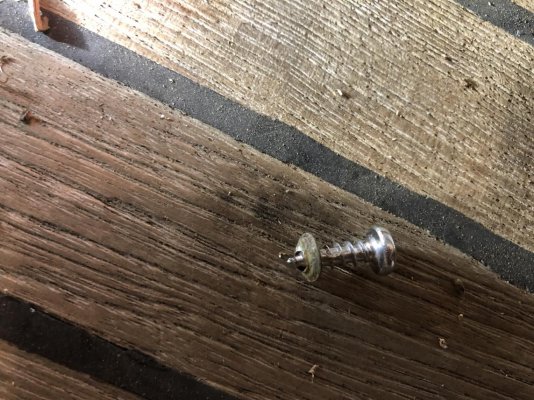
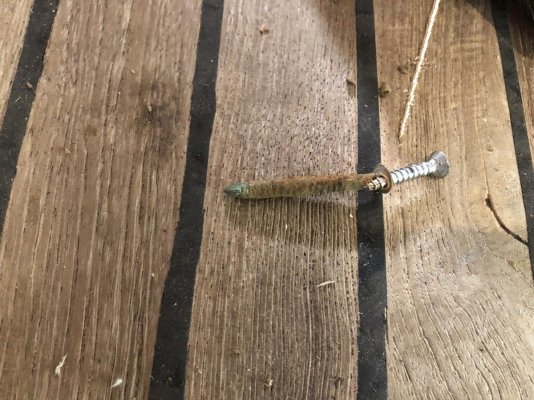
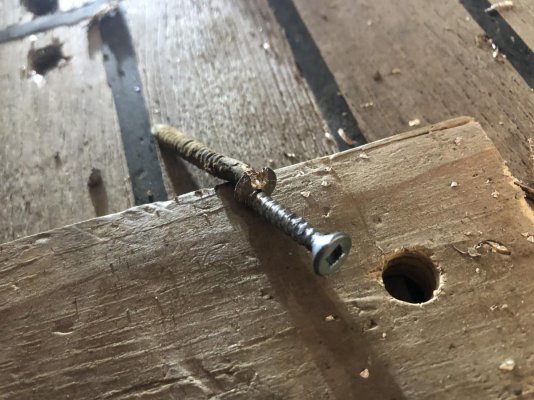
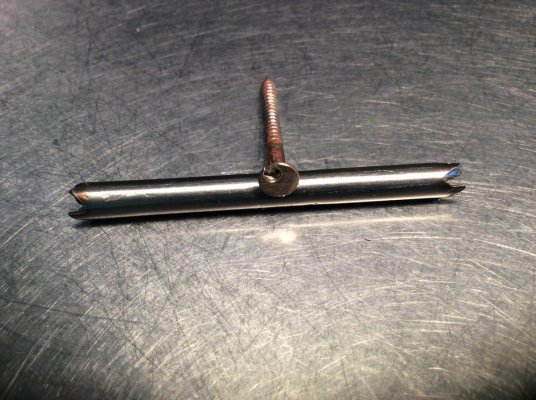
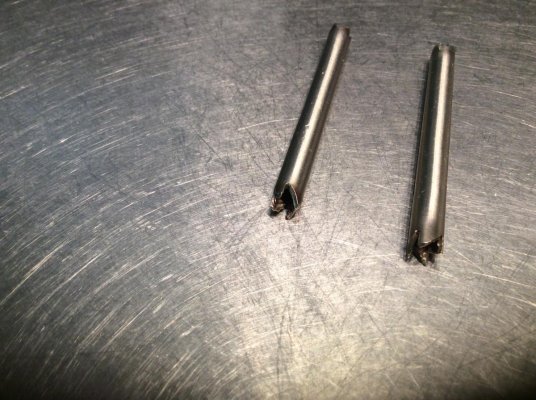
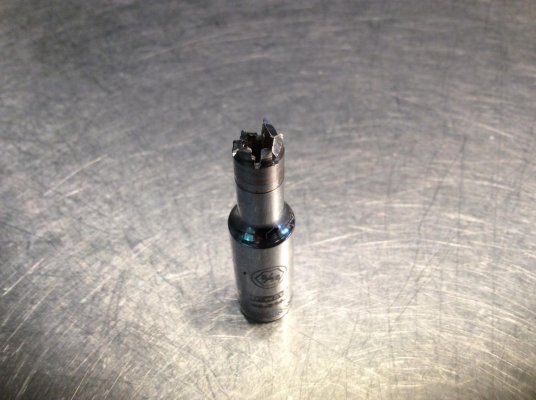
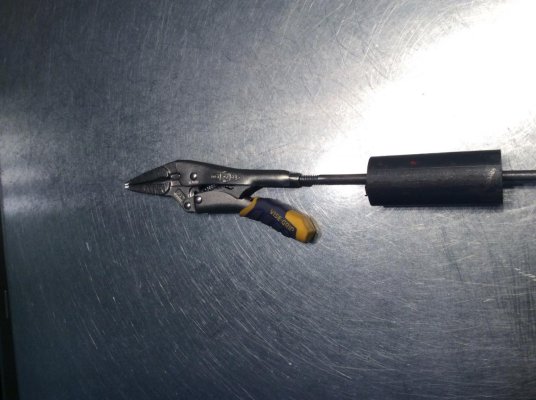
Ive experimented at removing the teak nails by drilling holes in the head, screwing in stainless steel screws and then removing the nails with a hammer. Its slow work, on average each nail takes 10 to 15 minutes. The bronze eats drill bits, they rapidly become blunt. On about 10% of the nails the head pops off leaving the nail shank in place, these I try to pull with needle nose pliers. I've made a tool to fit over the shank of the nail to drill down the outside, trying to make pulling it out easier, it works most of the time but there are a few nails I will have to find another way of removing the shank which appears to have been bent during installation.

My plan is to fill each nail hole with penetrating epoxy to seal off any rot, countersink the holes deeper and then use a larger screw to re-attach the deck, finishing with new teak plugs.

The job is going to take months if I continue in this fashion so I'm wondering if anyone else has found a quicker way to remove the bronze nails.
 

Attachments

  • IMG_2002.jpg
    IMG_2002.jpg
    197.6 KB · Views: 19
  • IMG_2009.jpg
    IMG_2009.jpg
    187.8 KB · Views: 12
  • IMG_2011.jpg
    IMG_2011.jpg
    171.1 KB · Views: 10
  • IMG_2012.jpg
    IMG_2012.jpg
    125.5 KB · Views: 16
  • IMG_2010.jpg
    IMG_2010.jpg
    167.1 KB · Views: 16
  • IMG_2013.jpg
    IMG_2013.jpg
    193.2 KB · Views: 15
  • IMG_2017.jpg
    IMG_2017.jpg
    198.5 KB · Views: 14
When I find a missing bung or see dampness around a bung, I pull the screw, drill out to 3/8 inch all the way down but not through the lower layer of fiberglass, fill with epoxy, and drive in a new bung. Seems like you could do pretty much the same. No need for any new fasteners in my opinion. I only do this one at a time AS NEEDED.
 
I did try pushing the nails deeper but it wasn't a success, they would hardly move , certainly not enough to reset the plugs. If I hit them any harder I was worried about splitting the teak strip.


Ive looked all over the internet and unfortunately cannot find a tool for this task.
 
A good hard 3/8 drill might take care of the bronze nail at the same time?
 
I don't understand why the old nails have to come out. If your filling with epoxy it's going to seal them and reinforce the bond. Once the bung is in your going to have to cut it off or grind it down to make it flush. What am I missing?
 
At the moment all the old nail heads are at the surface or very close to the surface, I want to remove the nails, countersink the holes deeper and then use screws with the heads set deep enough to use new teak plugs.
 
Check out “screw extractor” on Rockler website. It is a miniature hole saw that you drill down around the broken nail/screw. Then pull out the plug. Fill the hole with thickened epoxy and put in new screw.
 
Do you think the nails backed out or the surface under them is going away?

Can you get under the nail head at all when it's in the hole?

For removing screws and nails with no heads I always go with the vice grips. They have a huge selection of jaws on them now.
 
On the early Woodie GB's the decks were secured with bronze ring nails. Mine is a 71 version. So far Ive manage to get almost 100 nails out. If you zoom into the attached photos you can see that they are bronze ring shank nails.
 

Attachments

  • IMG_2013.jpg
    IMG_2013.jpg
    193.2 KB · Views: 23
  • IMG_2014.jpg
    IMG_2014.jpg
    157.3 KB · Views: 17
The Rockler tool is similar to the one I made from 1/4" stainless steel tubing to remove the shank when the nail head pulls off, it works OK and allows me to insert needle nose vice grips to pull the shank out, except when the shank is bent, it then obliterates the teeth. I got three feet of tubing, cut three inches off and cut a serrated edge in one end with a dremel. I was hoping to find something like a reverse Easyout that would go over the shank and grip onto it spinning it loose.
 
I have some of the easy out sockets with teeth that grip in reverse but they are for bolts so they are pretty big. Have not seen any small enough for the broken nails.
 
A couple more pictures, a cleaned up ring nail, some stainless steel tube with a serrated edge cut in it to drill down the side of the shank, the early version made from an old socket (the metal was too soft and it ground down as soon as it touched the bronze nails) and finally a Vise Grip slide hammer that Im going to try next time Im down the boat.
 

Attachments

  • AD95973A-9E94-4F17-B90E-769D620F1B9A.jpg
    AD95973A-9E94-4F17-B90E-769D620F1B9A.jpg
    176.6 KB · Views: 10
  • E9273FCC-3794-4B1A-9076-F222C961896A.jpg
    E9273FCC-3794-4B1A-9076-F222C961896A.jpg
    174.7 KB · Views: 14
  • 4D1E4852-8460-48CB-B1FC-6407A44E9AE5.jpg
    4D1E4852-8460-48CB-B1FC-6407A44E9AE5.jpg
    175.7 KB · Views: 9
  • FCE784CD-8FF9-424C-9D7F-62F5B4805D9D.jpg
    FCE784CD-8FF9-424C-9D7F-62F5B4805D9D.jpg
    106.9 KB · Views: 13
  • 2EA569C8-AD37-4556-AB19-7D0C30D546C1.jpg
    2EA569C8-AD37-4556-AB19-7D0C30D546C1.jpg
    131.9 KB · Views: 20
The Rockler tool is similar to the one I made from 1/4" stainless steel tubing to remove the shank when the nail head pulls off, it works OK and allows me to insert needle nose vice grips to pull the shank out, except when the shank is bent, it then obliterates the teeth. I got three feet of tubing, cut three inches off and cut a serrated edge in one end with a dremel. I was hoping to find something like a reverse Easyout that would go over the shank and grip onto it spinning it loose.

They have them but I don't think you have enough space between the screw head and the hole. Even if you did it's meant more for a twisting grip to back a screw out. It likely wouldn't grip enough to pull straight out. It's called a spiral stud extractor.

Can you get a Jacobs chuck in there? Or perhaps a sliding pin vise? If the head is even close to the surface you might be able to start with the corner of a tack puller and work under it.
 
Last edited:
Diamond coated drills

I needed to extract nails used in chair construction a century ago without creating a big hole to repair. I found "drills" on Amazon of different diameters that had diamond dust instead of teeth. You can drill around the nail shank, perhaps as deep as the nail is long, then easily pull out the nail. I would also use a portable drill press, which uses a hand drill, to ensure a 90o hole.
 
My 1970 GB was having Deck leaks. I found places the caulk was pulling away from the sides of the planks. Once the bad caulk was replaced the leaks stopped even though there was some missing bungs. IMHO if the teak around the nail not soft I would not be pulling nails.
Good luck,
Brad
 
Teak decks

I don’t claim to know all there is to know about teak decks on GB’s. My understanding is, under the teak;1/4 “ plywood covered with a canvas material coated with something. Pulling nails may not accomplish a lot. Taking up the deck the deck means you won’t be boating for sometime?. But then that would save buying that high priced fuel.?
 
For what it is worth. When I researched buying this 1971 GB I found that it and earlier ones used ring nails was to hold the teak down until the bedding they used glued it in place. Newer decks are laid down without that laborious process. A friend who works in the boat world and has laid plenty of teak told me to leave it alone if there are no leaks, no sanding, no sealing.

As mentioned if you have a leak under the deck look for what other than the teak & ring nails could have caused it. Yes if the caulk between planks has separated remove and reseal spot repair. Don't open Pandora's box.
 
When I had a failed teak Lazarette hatch, many years ago, I researched its replacement. What I learned then may, or may not, be what you are facing.
A "Teak Deck" on a wooden boat, could be laid, as others have suggested, on a plywood "sub deck", with canvas between. It could also be laid on framing directly, in which case the caulking is laid in a channel cut into the teak boards, extending only 1/4" in depth. The lower part of the boards are laid touching each other Bond breaking string, like shoelace material, in the channel, caulking above that. Each board may be glued to the frames, each is certainly nailed, or screwed, to the frames. If that is the construction of yours, the nails are required to be replaced. If yours is the plywood, the nails were required before the glue set, but are not required on a refit, as thet glue will continue to be the principal fastener.
 
I needed to extract nails used in chair construction a century ago without creating a big hole to repair..

I also had a chair repair problem. I made these tubular "hole saw" type drills out of automotive brake line because it was smaller in diameter (than the 1/4" sizes I see offered here). Obviously, the tube size depends on fitting over the ring nail shank.
 
Check out “un-screwups”

Very effective removing screws and the smallest might work for nails.

Also look for a nail puller.
 
If I recall correctly, the method recommended in the old Grand Banks Owners forum (IAGBO) was to drive the nail deeper.

The head of the ring nail would be marked with a centre punch and then drilled-out. The nail shank would then be driven deeper with a nail punch.

A new fastener would be added, going in at an angle to avoid the nail shank.
 
I've used the wood river extractors in the pictures with some sucess. Also used some higher quality carbon steel ones made from roll pins. They were better. I used them in conjunction with a foot board to stand on whilst I drilled them out. I then drove in hard Ramin dowels. Redrilled for self tappers and put in oversize teak bungs.
 
So, the nails are all out and the holes plugged with teak dowels that have been epoxied in through to the transverse frames I’m going to resucure the decks with stainless steel screws. In the meantime Ive removed all the caulk, a long and miserable job, and have routed down the grooves to just over 1/4”. Its almost time to start caulking, but I don't seem to be able to find an answer to how much caulk is required. I have almost 900 linear feet of seam to fill. Teak deck systems have a calculator on their web site but the required amount as per this calculator is 30, 600ml sausages. The chandlers who I’m ordering through think this is way too much and think I should reconsider my order. Volume wise, without waste I should get 50ft per sausage (zero waste) which would require 18, 600ml sausages. Allowing 10% waste I should be able to do the job with 20 of the caulk sausages. I’m hoping there is someone who who has done this before who can advise me how much caulk to order. Thanks
 
Jamestown Distributers has a caulking estimate table on their website. It was pretty close when I recaulked my teak decks on our last boat.
 
Back
Top Bottom