Fly bridge soft core

The friendliest place on the web for anyone who enjoys boating.
If you have answers, please help by responding to the unanswered posts.
Doug, my glass guy said it was from the folding table was screwed to the floor. Apparently they just screwed through the skin into the balsa. He epoxied it real well when he did the repairs. He also said the stanchion at the top of the stairs had the same problem. It can't hurt to bed all the penetrations on the upper deck including the round table. If you have the time and skill to do so, I would follow Steve D'Antonio's process and the deck should never have a problem, at least from those water sources.

Yep, that job, unlike AC electrical (lol) is well within my skill set. I think I will start with the folding table.

I assume you removed the entire stair rail? I'm wondering how much play there is under that one stanchion if I remove the screws. It might be hard to get to the holes to bore out the core without taking off the rail. I saw on Stella blue that that stanchion is a problem spot, though mine feels solid with no cracks around it.
 
Y'all are scaring the crap out of me. What warning signs did you get that you were having core issues? Ours checked out fine with a moisture meter (which I know aren't infallible) when we bought it in 2013. I haven't worried about it much since.


I'm thinking I'll pull up the rail from around the stairs and epoxy/rebed the screws with butul tape. When you are talking about the table do you mean the table in the main part of the FB or the small table on the aft FB deck?


Thanks.

Wet core is not necessarily a death sentence. Rick Strand, a composite specialist, did some testing on this a few years ago and wrote a detailed article about it for ProBoat. In short, what he determined was if the core was wet but not deteriorating, the problem could be arrested if no new water, and the mold spores and bacteria it brings with it, was allowed to enter, it could arrest the problem. There are varying degrees of "wet", core that feels dry to the touch, and core that is dripping wet, can both register 100 on the Tramex meter relative scale. 100 on that scale is only 1.5% moisture by weight. If the core is wet and exposed to freezing temperatures, that's another mater as it can expand and delaminate the skins. Some small destructive testing is required to make the determination of just how wet the core actually is if it has registered in the red on the meter.

Once again, proper closeout, sealing the core with an epoxy annulus for existing improperly closed out core, and not re-bedding, is the only permanent solution to this problem.

(Attending the marine Equipment Trade Show Amsterdam)
 
When you say he epoxied it real well, did he reef out the coring and fill with thickened epoxy?

Yes, he dug out a square where the table was screwed down and refilled with thickened epoxy...said it would never leak again.:thumb:
 
Yep, that job, unlike AC electrical (lol) is well within my skill set. I think I will start with the folding table.

I assume you removed the entire stair rail? I'm wondering how much play there is under that one stanchion if I remove the screws. It might be hard to get to the holes to bore out the core without taking off the rail. I saw on Stella blue that that stanchion is a problem spot, though mine feels solid with no cracks around it.

Yes, Stella Blue has some good info on that trouble spot at the top of the stairs. If your deck doesn't feel mushy, you might be okay. I knew right away when I bought the boat that we had a problem to fix; it was obviously soft and mushy when you walked on it.

Speaking of electrical, did you ever see the Red Pearl website and look at the issue with the shore power voltage? I am experiencing the very same issue and plan on installing a transfer switch like they did to boost the voltage. At my home marina I only see about 100 volts but get 120 on the generator and most other marinas.


OK, thanks a ton for the info. My decks feel very sound underfoot. My boat has had a full enclosure on it since new, I wonder if that has made a difference. It only had one owner prior to us, we bought it in 2013, and he barely used the boat. Engines had 160 hours on them and the genset had less than 50. The mattresses were still wrapped in plastic. Basically, the boat just sat on the hard with the FB enclosure zipped up for 8 years so I don't think that area got wet very often. It was pretty darn dirty when I bought it, so I don't think they even hosed it down much.


I don't think I've seen the Red Pearl website, though I would be interested in it if you have a link.


I'm really bad at AC electrical, so TIFWIW, but that sounds like a marina issue not a boat issue, correct?

Having a full enclosure helped, no doubt. Mine had just a bimini with no side windows so rain washed the upper deck unless it came straight down.:whistling:

Sounds like you hit the jackpot with that purchase.

Here is the Red Pearl link: https://sway.office.com/F0aSm8VOnaj0iz58?ref=Link

Hopefully it works.


That's an awesome site, thanks for the link. Man, that is a nice 400, I thought I'd done a lot of work to my boat, but now not so much.
 
Bay Retriever: when the top skin of 'f/glass is re-fixed, how are the seams between the removed skin and the remaining skin being joined? Will they be f'glass taped together or just butt-jointed, with a new non-skid coating covering all the patches? And have you made a decision yet about what non-skid to put over all? KiwiGrip or ...?
 
The edge of the old skin will be sanded and beveled so that new resin and fiberglass can create a seemless transition all around the edges were the skin was cut out. I anticipate that much tech skill goes into finishing, which is something I don’t have time to acquire.
Virtually all of the old non-skid is useable as the old skin was cut out along the transition border. There may be a few small areas where the techs will be laying down/replacing non skid using a diamond pattern template that is common to Mainships.

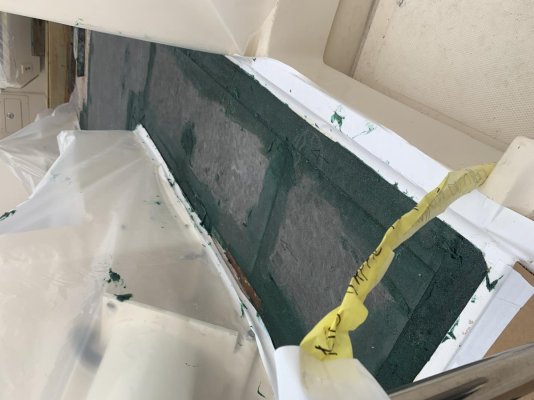
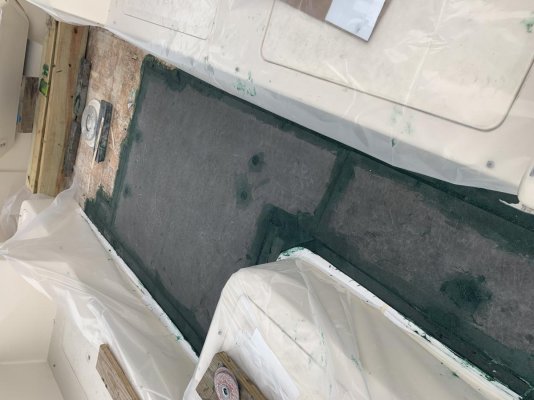
Will try to load a few pics taken the other day after the replacement core had been glued to the flybridge. The replacement core is made of a non-porous material that is light in weight. They hope to get the skin on by early December so I can troll for Rockfish before in-water winterizing before the holidays!
 

Attachments

  • 25ECB0FD-7C30-4DDA-BEDF-97CBA71D566C.jpg
    25ECB0FD-7C30-4DDA-BEDF-97CBA71D566C.jpg
    104.2 KB · Views: 29
  • 36A64F4A-55A0-4BCF-B4A0-DD0DE0353093.jpg
    36A64F4A-55A0-4BCF-B4A0-DD0DE0353093.jpg
    111 KB · Views: 26
  • 842ED0B8-0CF6-41AC-BBB8-5198A6BECA7D.jpg
    842ED0B8-0CF6-41AC-BBB8-5198A6BECA7D.jpg
    143.9 KB · Views: 38
  • 9BA4BDAA-DF40-4673-804F-C0123EBBDE20.jpg
    9BA4BDAA-DF40-4673-804F-C0123EBBDE20.jpg
    118.2 KB · Views: 28
The edge of the old skin will be sanded and beveled so that new resin and fiberglass can create a seemless transition all around the edges were the skin was cut out. I anticipate that much tech skill goes into finishing, which is something I don’t have time to acquire.
Virtually all of the old non-skid is useable as the old skin was cut out along the transition border. There may be a few small areas where the techs will be laying down/replacing non skid using a diamond pattern template that is common to Mainships.

Will try to load a few pics taken the other day after the replacement core had been glued to the flybridge. The replacement core is made of a non-porous material that is light in weight. They hope to get the skin on by early December so I can troll for Rockfish before in-water winterizing before the holidays!

Once you get this done you will have a very fine trawler that I am sure you will enjoy. We love ours.
 
I am not sure exactly how they are going to repair the cut in the glass, maybe I just don’t understand. But if they are not going to lay some glass over the cut, it will eventually start to show. The PO of my boat had the decks repaired in that fashion with no glass over the cut. A couple of years after I bought the boat the cuts started showing. I ground the cut down and laid a layer of 1708 over the cut and refinished the deck. Now it doesn’t show the cut.
 
TMac, I was wondering if you got a chance to go fishing before you laid up? How is the repair going and do you have any other pictures of it?
 
This thread inspired me to take a look at some of these issues on my 400, it's a 2005.


Today I pulled the screws out of the stanchion bases on the rail surrounding the FB entrance. It was mostly good news. On my boat, even with the screws out, the fwd base lays flat on the deck, the aft, midships base rose up perhaps 1/4". Not sure but maybe Mainship addressed this issue post 2004? Or maybe I just got lucky.


Second bit of good news is that the core inside the screw holes was dry and in excellent condition. No signs at all of water intrusion into them.


The bad news? The stanchion bases, like on the other boats I have read about, were just screwed into the deck. There was some white sealant (4200?) under the bases, and a tiny bit of brown sealant (Life Caulk?) on the screw threads but the holes were not potted with epoxy or anything like that. I feel very lucky to not e facing some core rot right now.


I drilled out the holes, filled them with thickened epoxy and will seal the screws with butyl tape when I put them back in.


I also investigated the FB table (the "main" table near the helm, not the small round table on the aft FB deck) as apparently it also has created some problems on MS 400s. I couldn't get the screws out without stripping them, which leads me to believe that they are bolts set in some sort of plate, not just screws driven into the deck. I'm going to come back to those later, but I feel pretty good that there is no rot there either.


I'll tackle the small round table tomorrow.


Thanks to you guys for starting this thread, I feel like I dodged a rot bullet.
 
Thank you again for your original post, BR. It has really helped me out. I know I would have gotten rot there if I hadn't addressed it. Seems like every 400 owner needs to look into this.


I hope your project turns out great.
 
This thread inspired me to take a look at some of these issues on my 400, it's a 2005.


Today I pulled the screws out of the stanchion bases on the rail surrounding the FB entrance. It was mostly good news. On my boat, even with the screws out, the fwd base lays flat on the deck, the aft, midships base rose up perhaps 1/4". Not sure but maybe Mainship addressed this issue post 2004? Or maybe I just got lucky.


Second bit of good news is that the core inside the screw holes was dry and in excellent condition. No signs at all of water intrusion into them.


The bad news? The stanchion bases, like on the other boats I have read about, were just screwed into the deck. There was some white sealant (4200?) under the bases, and a tiny bit of brown sealant (Life Caulk?) on the screw threads but the holes were not potted with epoxy or anything like that. I feel very lucky to not e facing some core rot right now.


I drilled out the holes, filled them with thickened epoxy and will seal the screws with butyl tape when I put them back in.


I also investigated the FB table (the "main" table near the helm, not the small round table on the aft FB deck) as apparently it also has created some problems on MS 400s. I couldn't get the screws out without stripping them, which leads me to believe that they are bolts set in some sort of plate, not just screws driven into the deck. I'm going to come back to those later, but I feel pretty good that there is no rot there either.


I'll tackle the small round table tomorrow.


Thanks to you guys for starting this thread, I feel like I dodged a rot bullet.


Well that is good news. Congrats on no wet coring!
 
Hi Dougcole,

There are many fans of butyl tape for sealing deck hardware. I'm not one of them. If you carefully peruse articles such as https://marinehowto.com/bed-it-tape/ on bedding hardware, the virtues of butyl tape are extolled. I, also, attempted to re-seal deck hardware using the techniques described in the article, with poor results.

In particular, beveling of the gelcoat prior to drilling pilot holes is a great idea, and not only obviates gel coat cracking, but provides an o-ring like sealing surface under each screw hole. And, relieving the core, back-filling with epoxy, and re-drilling to protect the core material is not only sound, but SOP with many quality builders and boatwrights.

However, use of butyl tape as a sealant is questionable, UNLESS the hardware is through-bolted. Screws run into epoxy-filled holes lack the shear strength in the threads necessary to adequately compress the butyl tape. Most of the time, the screws will simply strip the epoxy before the hardware is seated, leaving you with a bigger mess than you started with.

In my very personal opinion, 3M 4200 is the sealant of choice for hardware SCREWED to the deck.

Regards,

Pete
 
I also don’t use butyl on a screwed fitting but rather on through bolted fittings.
 
I agree, 4200 works quite well on screwed fittings. But screwed in fittings should be kept to a minimum with a preference for bolted ones.
 
OK, thanks for the advice re butyl tape, what you are saying makes a lot of sense. I haven't used butyl before, so I was looking forward to trying it, but I'm going to take your advice here. I've done the epoxy back fill technique quite a few times, but now that I think of it, I've always through bolted with it.


Unfortunately, through bolting in this application isn't really applicable without making an unsightly mess in the cockpit ceiling. Mainship should have glassed in a tapped stainless plate under the bases, but they didn't, at least not on my boat. Oddly, they did put a plate under the rail bases on other parts of the boat.


I'm trying a little different technique for the screws. You bevel the edge of the hole, then fill it and wait until the epoxy is about 70% cured. Then put a little WD-40 on the screws and carefully screw them into the epoxy. Leave the screws in place until you get about a 90% cure and back them out. The idea is that it "taps" the epoxy, which should, in theory, make for stronger adhesion for the screws. Seemed to work pretty well, though I haven't done the final install on the screws, so I will let you know.
 
Good news Doug, sounds like you are in excellent shape.

My only concern is that you think the fasteners holding the folding table are through-bolted. On mine, a 2004, they were definitely screws. My glass guy removed the table and re-did the coring as shown in the picture and they were screws. Not saying it's impossible but I kind of doubt it has through bolts. I'd be afraid that the coring material was crumbling and not giving the screws enough bite to back them out.

Additionally, I'd like a little more detail about how you did the stanchions, as I would like to do the same thing. Did you do this on the upper deck only or did you also re-bed the lower safety rail on top of the bulwark?

On my boat I want to re-seal the entire lower safety rail and I tried removing one fastener and, if I remember correctly, I thought it was a bolt not a screw. I therefore assumed that MS must have glassed in a tapped plate or nut underneath but now you make me think I might be mistaken. I didn't want to remove the fastener entirely for fear that a nut would fall off never to be seen again. I'll have to take another look when the shrink wrap comes off.

Anyway, if you could answer a few questions I would appreciate it.

-Did you re-bed just the upper rail?
-Did you have any difficulty getting all the screws out?
-Did you remove the entire rail or were you able to do a section at a time?
-What size hole did you drill for the epoxy?
-If you did the lower rail, what kept the epoxy from just dripping out the bottom of the enlarged hole?

Thanks!
 

Attachments

  • Capture.JPG
    Capture.JPG
    34.6 KB · Views: 38
Hey Gary,


So far I have just done the two inboard bases of the upper rail with epoxy. The screws on those two bases (they are screws, not bolts) came right out. I also pulled the bolts on the outboard bases on the upper rail. They were much tougher to remove and are bolts, not screws. That leads me to believe that they are bolted into a plate. They are also in a raised strip on the deck and there was no core material on the threads when I pulled them. I think perhaps that that raised area is solid glass, no core. So I'm going to reseal those bolts but not drill them out and epoxy the holes.


In summary, I think they bolted on the outboard bases and screwed down the inboard bases. Those inboard bases are the problem children, I think.


I can't even spin the bolts on the FB table base, they are for sure in something solid. My guess is that it's some sort of metal plate under the deck. Stella Blue pulled his FB table base out and blogged about it, I'm going to go back and look up his post before I go any further.


Interested to hear what you find on the lower stanchions. I think that the gunnel top is solid glass, but I could be wrong, as I often am.
 
I'm trying a little different technique for the screws. You bevel the edge of the hole, then fill it and wait until the epoxy is about 70% cured. Then put a little WD-40 on the screws and carefully screw them into the epoxy. Leave the screws in place until you get about a 90% cure and back them out. The idea is that it "taps" the epoxy, which should, in theory, make for stronger adhesion for the screws. Seemed to work pretty well, though I haven't done the final install on the screws, so I will let you know.

I've had success with butyl tape, but primarily on window frames. Like anchors, it seems everyone has their own favorite sealant, I prefer (for on deck applications) GE Silpruf, which is a silicone, and polysulfide, the latter was once available from 3M as 101, and now from Lifecaulk. You can read more about these and their individual attributes here https://stevedmarineconsulting.com/caulk-and-sealant-selection-and-use/ Surface prep is so very important.

Disappointing MS used tapping screws for a stanchion, these should be through bolted or fastened with machine screws into a metallic substrate.

The technique you are describing, with the fastener and uncured epoxy, is well-proven. West system describes this in their manual and I've used it many times, however, I recommend you use wax rather than WD as a release agent, it's easier to control and will not have any adverse reaction with the epoxy, and thickened epoxy. In West's instructions, the fastener is placed in fully uncured, "wet" but thickened epoxy, no need to wait for partial curing, which can be difficult to determine in any event. Threads should not be cut or tapped into epoxy. The West technique is described here https://www.westsystem.com/instruction-2/epoxy-basics/bonding-fasteners-hardware/


Thank you very much for your reply and advice, Steve. I will use wax on the threads next time. I waited for the epoxy to start to harden before I put the screws in so that it would be thick enough to hold the crews upright.


I screwed down the bases on Thursday, they pulled down really tight. I used 4200 as a sealant. I'm pleased with how it turned out. The only screw up was that a tiny bit of the epoxy oozed under the masking tape. I guess it's hard to get a clean seal on non skid. Not sure how I'm going to get cured epoxy out of non skid. It's a spot about 1/4 of the size of a dime. Bugs me though.


I spoke with a very experienced surveyor buddy about what is going on with the FB table to get his thoughts. He feels like I should be careful about pulling the bolts if they are in that tight, as the potential is there to break or strip them. He's going to come over for a beer in a few weeks with his certified moisture meter, mallet and good ear. He said he would very carefully check the area all around the table for moisture and if he doesn't find any he feels I should leave it alone. Sound advice, I think, but I'm still not 100% sure.
 
If the fasteners are screwed into an aluminum or steel plate, they may very well be seized, and if they break upon removal that would be a real pain, so I am forced to agree with your friend. Proceed with caution.
 
Doug, I guess I mis-read your description, when you said the table base fasteners wouldn't unscrew, I assumed that they were spinning and not backing out. If they can't be turned, I would leave them alone as that probably means you have a pretty solid core.
 
When he said they wouldn’t unscrew, I took it to mean that he couldn’t turn the screw. If that is the case they may be tapped into aluminum plate. If so the aluminum has probably corroded and if you unscrew them they will probably break off. I would leave it alone until you can no longer ignore it due to core being wet. Then you will have to bite the bullet and maybe break them. If the base is screwed into aluminum plate and they break you could then turn the base a bit and drill and tap new screw holes.
 
Yes, it feels to me like they are screwed into something solid, they turn about 1/4 turn then won't budge, even with a hammer drill. Sheet metal screws in wet core wouldn't do that.

What's throwing me though is that bay retriever and garmstro 55 both found no backing plate under the table, and they have the same boats as I do. I'm going to leave them alone for now.
 
Interesting thread. I have some (hopefully) local flybridge coring deterioration on my old Mainship 34 that I'm tackling this spring. Thanks for sharing.

I'm going to leave them alone for now.

Sensible decision. I wouldn't lose any sleep over it. I would think that rot starting at that base would be easy to detect and remediate, and at that point the base could be semi-destructively removed :)

Pay attention to your surveyor buddy's tapping, and try it out yourself. Keep an eye open for flexing or movement around the base. Tiptoe around that area in bare feet every now and again. There may never be an issue, but if there is you'll find it while it's still local, I think.
 
Back
Top Bottom