Reply
 
Thread Tools Search this Thread Display Modes
 
Old 11-12-2020, 11:42 AM   #1
Member
 
City: Oak Harbor, WA
Join Date: Sep 2020
Posts: 18
36 Universal Litton Project

Hi all,
My first post other than the Welcome mat. My significant other and I purchased a trawler at an auction in September. Engines are good and fuel tanks have been replaced, but decks and house have a lot of rot, particularly around the windows which I understand is common with these boats, so a lot of work ahead. Took it 30 miles up the coast and pulled it out at a yard in Anacortes end of last month.
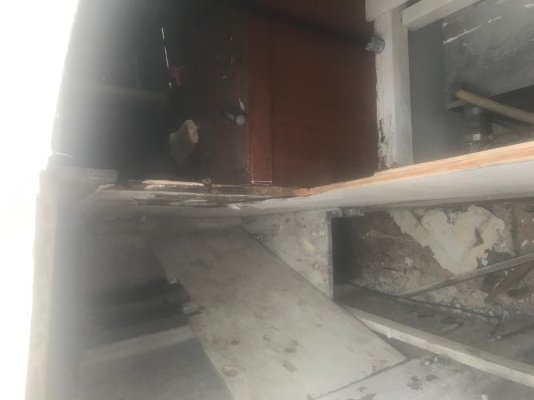
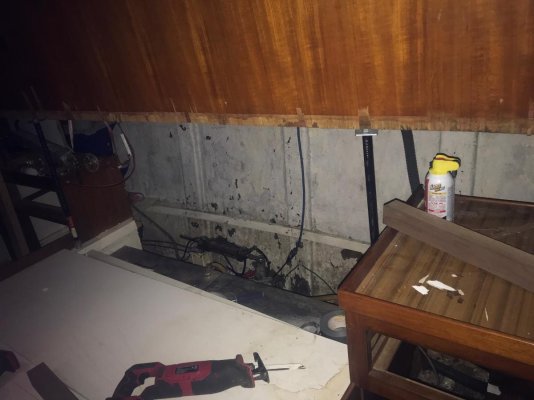
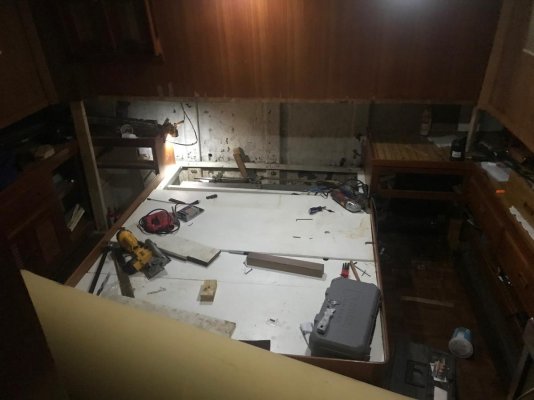
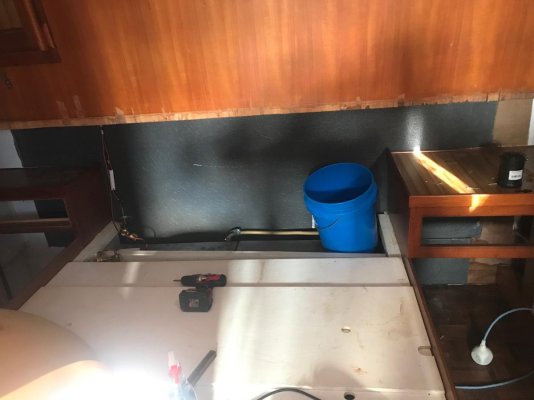
I have removed much of the interior plywood in the aft cabin. Before I started, I noticed that the side decks in this area seemed to slope inwards towards the cabin, versus sloping outward toward the scuppers. As I removed the interior, I found that the side deck stringers seemed to be supported on their inward end only by being nailed to a rotten piece of plywood. This plywood "beam" would have also supported the weight of the cabin top which is set down on top of the deck and then bolted together. I am thinking that these items together may have allowed the side decks to deflect downward where the cabin top meets the deck? Maybe this is a common occurrence, but has anyone found this before? The pics show the Port side of this cabin. I am thinking I may want to jack up the inside of the side decks slightly to try and get some outward slope back in the side decks, and then install a more substantial beam to support these stringers and the weight of the house top? I will be removing the teak decks in this area in the future as well. Thanks for any comments.
- Ted Click image for larger version

Name:	IMG_20201109_182153913.jpeg
Views:	22
Size:	79.8 KB
ID:	109966Click image for larger version

Name:	IMG_20201109_182100580.jpeg
Views:	21
Size:	102.7 KB
ID:	109967Click image for larger version

Name:	IMG_20201109_182050463.jpeg
Views:	18
Size:	72.8 KB
ID:	109968
TrawlerTed is offline   Reply With Quote
Old 11-12-2020, 01:09 PM   #2
Guru
 
Max Simmons's Avatar
 
City: Everett, WA
Vessel Model: Ocean Alexander 38'
Join Date: Oct 2007
Posts: 799
I can't offer advice here, but am impressed with the cajones to tackle this project and looking forward to progress updates!
Max Simmons is offline   Reply With Quote
Old 11-12-2020, 01:18 PM   #3
Member
 
City: Oak Harbor, WA
Join Date: Sep 2020
Posts: 18
Quote:
Originally Posted by Max Simmons View Post
I can't offer advice here, but am impressed with the cajones to tackle this project and looking forward to progress updates!
Cajones or stupidity, not sure which! [emoji23]
TrawlerTed is offline   Reply With Quote
Old 11-18-2020, 11:58 PM   #4
Member
 
City: Oak Harbor, WA
Join Date: Sep 2020
Posts: 18
I've been continuing to remove interior rotted wood in the rear stateroom, especially the wood sandwiched between the lower hull "lip" and the upper "lid" roof that sets down over this lip. They overlap each other about 3-4 inches. All of this wood is rotten and most of it is wet (you may be able to see in the pic... the white next to the wood in the second pic is some caulk on the tip edge of the hull lip). I use a chisel and a shop vac and together they work pretty well to remove this material from this resulting gap. The white down at the bottom of this gap in the third pic is the top layer of fiberglass of the side decks outside. I was originally thinking of replacing this rotted wood in this gap with a piece of wood sealed in epoxy, but would like something even more resistant to moisture. Was wondering if anyone had ever fiberglassed in starboard or something similar?
- TedClick image for larger version

Name:	IMG_20201118_135147801.jpeg
Views:	8
Size:	92.1 KB
ID:	110202Click image for larger version

Name:	IMG_20201118_135216732.jpeg
Views:	8
Size:	91.8 KB
ID:	110203Click image for larger version

Name:	IMG_20201118_150605576.jpeg
Views:	8
Size:	76.6 KB
ID:	110204Click image for larger version

Name:	IMG_20201118_150734394.jpeg
Views:	8
Size:	81.2 KB
ID:	110205
TrawlerTed is offline   Reply With Quote
Old 12-03-2020, 12:05 PM   #5
Member
 
City: Oak Harbor, WA
Join Date: Sep 2020
Posts: 18
So I haven't removed the teak decking yet but am planning to, figuring I would have to recore much of the deck as I understand is normal for an old Taiwan trawler. I got a phenolic hammer and tapped around on the deck but couldn't really detect any soft spots. But I don't know... probably need to remove the teak to really tell with the hammer? So I drilled down several exploratory holes through the teak and top fiberglass layer and into the core in areas where I thought the core would most likely be deteriorated, in the aft deck area and on the side decks towards the aft. The wood core in these holes seems pretty solid; I couldn't really dig much out with the pick I was using. So I was just wondering for the Taiwan trawler owners out there: Is there any of you who have not had to actually recore your decks? I'm probably being overly optimistic here, but was just curious! Thanks.
TrawlerTed is offline   Reply With Quote
Old 12-03-2020, 12:29 PM   #6
Guru
 
timb's Avatar
 
City: Oriental N.C.
Vessel Name: true heading
Vessel Model: marine trader 38 dc
Join Date: Sep 2017
Posts: 572
I missed your original post. I have not removed my teak decks yet. but this month I did cut out an 8' section of the bulk head between the aft cabin and the Laz . I am using coosa board so i don't have to do it again later while tearing it out I found where it has been fixed twice . the rear hatch leaks so i'm making an all in attempt to fix that also .

as far as the deck sag I lifted mine and set it on two pillars .i only lifted it about 1/2" and i could tell it was putting a strain on everything . so i stopped the pillars should stop it from sagging more . 1 still have a low spot on one side and plan to build it up with fiberglass when the teaks decks are removed.
Attached Thumbnails
62777336153__9F32D3B6-2A5A-4E5A-A305-AEC4EA70B001.jpg   62786538761__026D52E0-00B6-4E4A-B152-C29109378686.jpg   IMG_2902.jpg   62828552839__B9860321-6662-427A-89C6-B1AD129F10E8.jpg  
timb is offline   Reply With Quote
Old 12-03-2020, 03:27 PM   #7
Moderator Emeritus
 
Comodave's Avatar
 
City: Au Gres, MI
Vessel Name: Black Dog
Vessel Model: Formula 41PC
Join Date: Jul 2015
Posts: 21,129
To try to answer some of your questions, Starboard will not stick to almost anything, or almost nothing will stick to it so I would not try glassing to it. I agree that the decks should slope down away from the cabin sides so jacking it up is in order. Then support the heck out of it so it doesn’t reoccur. As to the teak decks, a hammer won’t tell you much with the teak still on the deck. I would just assume that the core is wet and rotted. Once you get the teak off try the hammer again. If it sounds good, sharp ringing sound vs a dead thud sound, then fill the screw holes and paint the decks. I love Kiwigrip for the decks, very easy to apply, water based so easy cleanup, and it wears like iron and will hide minor imperfections. If the deck core is bad you will have to replace it. Then glass over it and paint with Kiwigrip.

Good luck with the project, you do have a lot of work to do. If I were doing it I would start with the things that will stop the damage from getting worse. Keep the water out is what you want to stop more rotting.
__________________
Boat Nut:
If you are one there is no explanation necessary.
If you aren’t one, there is no explanation possible.
Comodave is offline   Reply With Quote
Old 12-04-2020, 12:49 PM   #8
Member
 
City: Oak Harbor, WA
Join Date: Sep 2020
Posts: 18
Quote:
Originally Posted by timb View Post
I missed your original post. I have not removed my teak decks yet. but this month I did cut out an 8' section of the bulk head between the aft cabin and the Laz . I am using coosa board so i don't have to do it again later while tearing it out I found where it has been fixed twice . the rear hatch leaks so i'm making an all in attempt to fix that also .

as far as the deck sag I lifted mine and set it on two pillars .i only lifted it about 1/2" and i could tell it was putting a strain on everything . so i stopped the pillars should stop it from sagging more . 1 still have a low spot on one side and plan to build it up with fiberglass when the teaks decks are removed.
So you look to be further than I! Looking good! So you removed a section of your aft bulkhead? Interesting. So I gather your bed is running fore/aft? I'm planning an island bed as well, an extra long full size, but running athwartship... and won't have the space on the sides (12" +-) as looks like you will. Wasn't familiar with coosa board. Was looking for something to place in the gap between the state room top/roof and the boat hull at the deck level to replace the rotted plywood that was there before. My aft deck also slopes towards the house quite a bit, but I think perhaps it is supposed to in that area as I don't have any scuppers along the transom so is maybe supposed to drain back to the scuppers on the sides? I did try lifting the inner edge of the deck and was able to lift a half inch pretty easily... so hopefully I can lift more than that with the ultimate condition.
TrawlerTed is offline   Reply With Quote
Old 12-04-2020, 01:02 PM   #9
Member
 
City: Oak Harbor, WA
Join Date: Sep 2020
Posts: 18
Thanks for the response Comodave. I found an epoxy, Chem-set 6105, that is supposed to bond well with Starboard... but now I am interested in coosa board as an alternative. Yes, my plan is to remove all the rotted material, then get the roof/deck structures/supports set structurally, and then get them and the walls/windows rain tight with fiberglass or whatever else needs to be done. Appears to be not a lot of leak points to deal with, at least so far.
TrawlerTed is offline   Reply With Quote
Old 12-05-2020, 01:05 AM   #10
Member
 
City: Oak Harbor, WA
Join Date: Sep 2020
Posts: 18
Working on the roof/ceiling of the aft stateroom today. And I continue to learn how these boats are put together. There are small 2"x2" beams that span athwartship and are spaced 16"to 18" apart that support the ceiling. These beams are attached to the ceiling with 5 bolts spaced along their span. But the ends of these beams were attached to the plywood that lined the inside of the fiberglass walls/sides of the upper part of the house with only a couple of toe-nailed nails; that was all that supported the ends of these beams!
Still exploring the construction of the roof itself, but it looks like there is the teak decking on top (which hasn't been removed yet), then a layer of fiberglass, then the various scrap pieces of plywood that would normally be the core; however, as you can see in the pics, there is no lower layer of fiberglass, only the underside of the plywood pieces. Not sure what held all this up/together! Click image for larger version

Name:	IMG_20201204_164153573.jpeg
Views:	7
Size:	68.5 KB
ID:	110928Click image for larger version

Name:	IMG_20201204_164245124.jpeg
Views:	7
Size:	116.1 KB
ID:	110929Click image for larger version

Name:	IMG_20201202_174056552.jpeg
Views:	7
Size:	93.3 KB
ID:	110930Click image for larger version

Name:	IMG_20201204_170032238.jpeg
Views:	8
Size:	72.3 KB
ID:	110931Click image for larger version

Name:	IMG_20201204_183245229.jpeg
Views:	7
Size:	79.5 KB
ID:	110932Click image for larger version

Name:	IMG_20201202_173744809.jpeg
Views:	7
Size:	76.0 KB
ID:	110933
TrawlerTed is offline   Reply With Quote
Reply

Thread Tools Search this Thread
Search this Thread:

Advanced Search
Display Modes

Posting Rules
You may not post new threads
You may not post replies
You may not post attachments
You may not edit your posts

BB code is On
Smilies are On
[IMG] code is On
HTML code is Off
Trackbacks are Off
Pingbacks are Off
Refbacks are Off


» Trawler Port Captains
Port Captains are TF volunteers who can serve as local guides or assist with local arrangements and information. Search below to locate Port Captains near your destination. To learn more about this program read here: TF Port Captain Program


All times are GMT -5. The time now is 09:33 PM.


Powered by vBulletin® Version 3.8.8 Beta 4
Copyright ©2000 - 2024, vBulletin Solutions, Inc.
Search Engine Optimization by vBSEO 3.6.0
Copyright 2006 - 2012