You are using an out of date browser. It may not display this or other websites correctly.
You should upgrade or use an alternative browser.
You should upgrade or use an alternative browser.
1976 Marine Trader 36 Europa Sedan project boat
- Thread starter Max1
- Start date
The friendliest place on the web for anyone who enjoys boating.
If you have answers, please help by responding to the unanswered posts.
If you have answers, please help by responding to the unanswered posts.
OP
OP
Max1
Senior Member
- Joined
- Sep 14, 2021
- Messages
- 403
- Vessel Name
- Bermuda Belle
- Vessel Make
- Marine Trader 36 Sedan
Ok guys! Thanks to Peter B's help, I was able to edit all my posts and re-attach the photos. Go ahead and take a look at my posts from page 1 to now and hopefully you will see all the pictures I was talking about! I double checked with another computer with a crappy browser and not logged in and I can see them! at least now I know I am no longer talking to myself...


DNT99611
Senior Member
I am rebuilding the running gear on a boat of mine. When I pulled the skeg off I found it was attached with 6 stainless cap screws that had been tapped and screwed into the glass. Not sure I really like the way it was done but it lasted 40 years in a gillnet boat.
OP
OP
Max1
Senior Member
- Joined
- Sep 14, 2021
- Messages
- 403
- Vessel Name
- Bermuda Belle
- Vessel Make
- Marine Trader 36 Sedan
I am rebuilding the running gear on a boat of mine. When I pulled the skeg off I found it was attached with 6 stainless cap screws that had been tapped and screwed into the glass. Not sure I really like the way it was done but it lasted 40 years in a gillnet boat.
Ah! Skeg. I had to google it but I learned a new word today

Yeah. bolting on a metal bar to the bottom of the keel to act as a "skeg" (see, you can teach an old dog new tricks!
) would be an easy option. I do have some concerns.
Sounds easy enough. Though I have some questions. What diameter? What length?. When I looked at the boat in the fall, I thought of that too but in addition to the above questions, my biggest question is "what is down there?" Is it solid fiberglass? Fiberglass over a wood keel? How thick would it be? I read somewhere on these forums that some keels have concrete down there?6 stainless cap screws that had been tapped and screwed into the glass.
Do I just drill and tap? I suppose if I do, I would also need to ensure the bolts are covered with sealant before being inserted?
Otherwise what other options do I have? Threaded insert?
DNT99611
Senior Member
It would be nice to know how the keel is put together before you do anything. Maybe the builder is still around? I know the boat I am working on had a keel full of concrete. Made replacing the shaft log a real pain. I have spoken with more than one pro glass guy that drills and taps glass all the time.
Ahhhh...what would he turn off and on again, alormaria..?
Everything.
- Joined
- Jun 25, 2008
- Messages
- 10,104
- Location
- Australia
- Vessel Name
- Now boatless - sold 6/2018
- Vessel Make
- Had a Clipper (CHB) 34
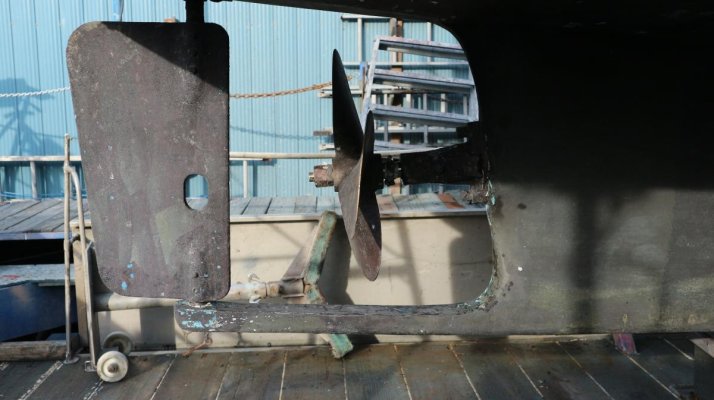
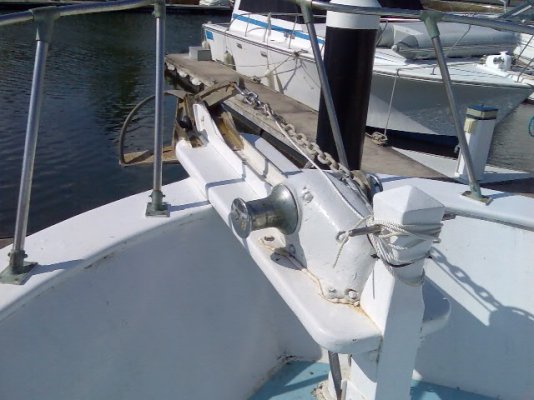
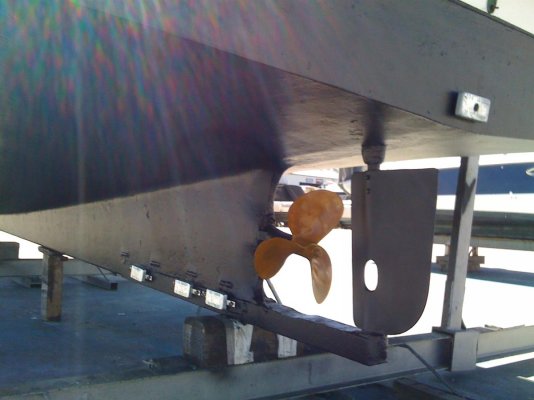
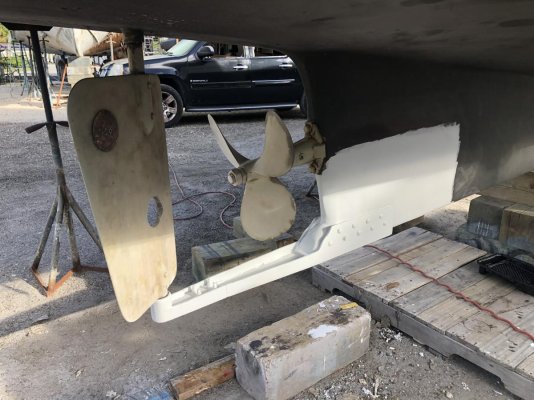
Yes, looks pretty much identical to that of my Clipper (CHB) 34 in post #39. https://www.trawlerforum.com/forums...-36-europa-sedan-project-boat-61650-2.html#39Max - here is a photo of my rudder lower support keel extension in case it is of any help (CHB34). I have never opened my keel, but I think it is fibreglass shell filled with a cement/ballast mix (aka concrete).
Regards,
Nick
The issue for Max is going to be how best to attach something similar to the rather hefty-looking foot mount to hold the bottom bearing for the rudder shaft. He's working on it...
What is hard to understand is how the original foot that his boat once must have had got removed - or damaged enough to have to be removed..?
Last edited:
Nick F
Guru
- Joined
- Sep 2, 2020
- Messages
- 598
- Location
- Canada
- Vessel Name
- Callisto
- Vessel Make
- 1974 Grand Banks 42 Classic, Hull 433
Hi Pete - interesting comparison.
Your keel extension appears to be a separate piece attached to the keel whereas mine appears to be an integral part of the keel (adding no width to the keel).
Obviously Max would have to emulate your style in order to get a strong connection between keel and extension.
Nick
Your keel extension appears to be a separate piece attached to the keel whereas mine appears to be an integral part of the keel (adding no width to the keel).
Obviously Max would have to emulate your style in order to get a strong connection between keel and extension.
Nick
- Joined
- Jun 25, 2008
- Messages
- 10,104
- Location
- Australia
- Vessel Name
- Now boatless - sold 6/2018
- Vessel Make
- Had a Clipper (CHB) 34
The pic might be a bit misleading, especially as the zone of connection is obscured somewhat by the zincs, but mine was clearly part of the keel construction as it was laid.
Rebating a section of the bottom edge the skeg of sufficient dimensions to give a good area of connection, via special cement or bolts might well be possible, however..?
Rebating a section of the bottom edge the skeg of sufficient dimensions to give a good area of connection, via special cement or bolts might well be possible, however..?
OP
OP
Max1
Senior Member
- Joined
- Sep 14, 2021
- Messages
- 403
- Vessel Name
- Bermuda Belle
- Vessel Make
- Marine Trader 36 Sedan
We'll have to get caught up on the status of the Skeg next year.
My plan is to fix it in the spring of the 2023 season. For 2022 the repair I made to the rudder shaft should last me a season or two.
In the meantime I am "all ears" to more suggestions for skeg repair.
I am heavily favouring a metal bar bolted to the bottom shown in the last photo (of another boat in the yard) of this post here:
https://www.trawlerforum.com/forums/showpost.php?p=1067238&postcount=34
Meanwhile... Back to work!!!
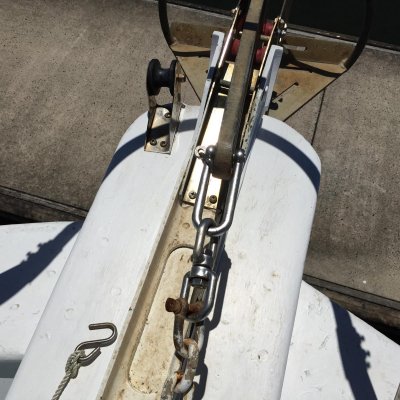
Here is the pulpit. As purchased, it was smashed and pieces were missing.
Fortunately I was able to find them laying about in the bow.
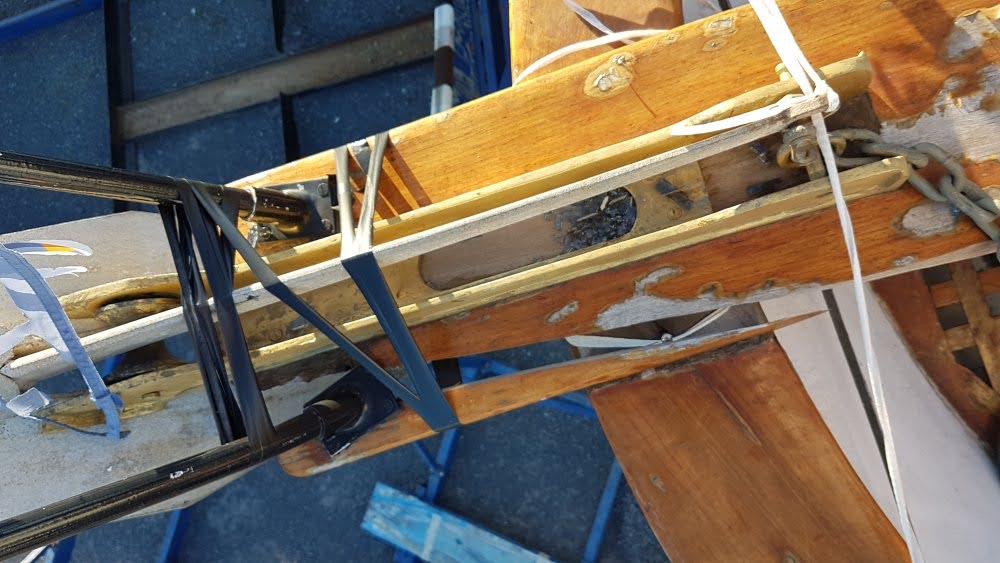
Having crashed a lot of model airplanes in my day, one thing I have found is: If you pick up all the pieces, you ~might~ be able to put it all together again.... "Maybe"...
One thing I found when taking the Pulpit apart so that I can work on it was the fact that the pin that locks the anchor in place was seized solid with paint and other gunk on the pin. I had to pound that sucker out. Which made me realise that whomever had this boat before probably hadn't dropped the anchor in a while. Which begs the question: What would they have done in an emergency?
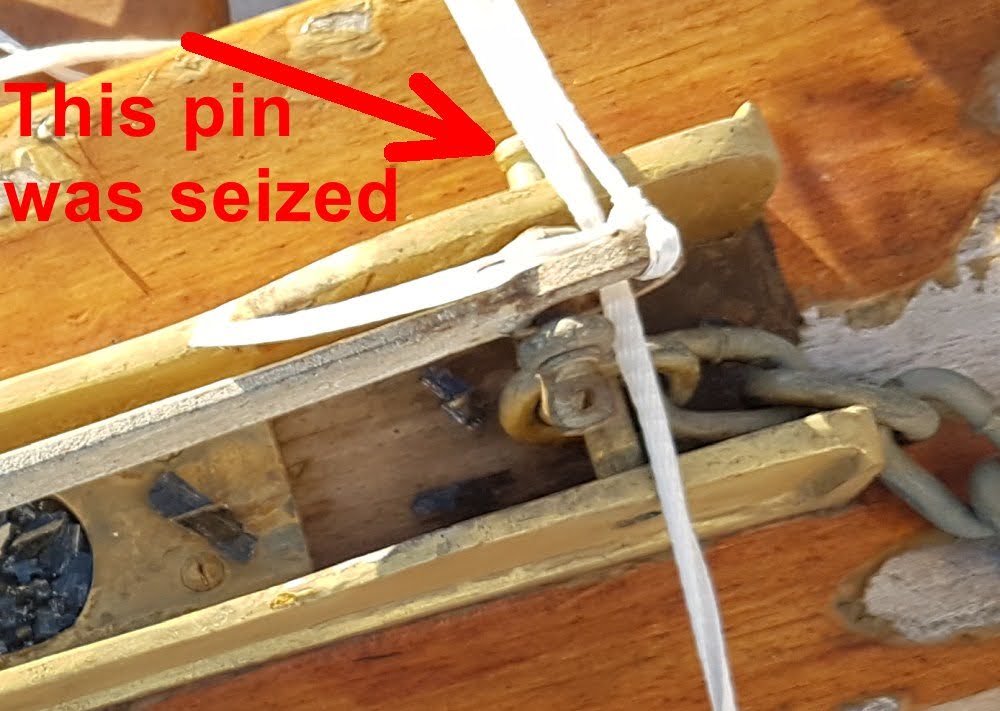
Oh well, I got the pin out, removed the anchor and cleaned the gunk off the pin so it slides in and out easily. Too easily. I am worried this pin could fall out and get lost? I left the pin and other metal hardware on the boat when I took it all apart. I suppose next spring I should drill a hole in the pin and run a short piece of aircraft cable through the hole to keep it from going missing?
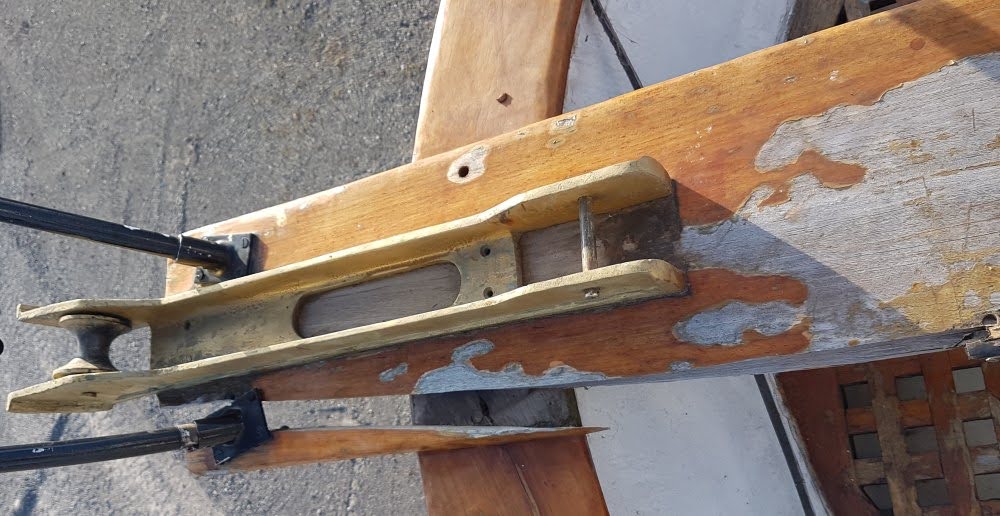
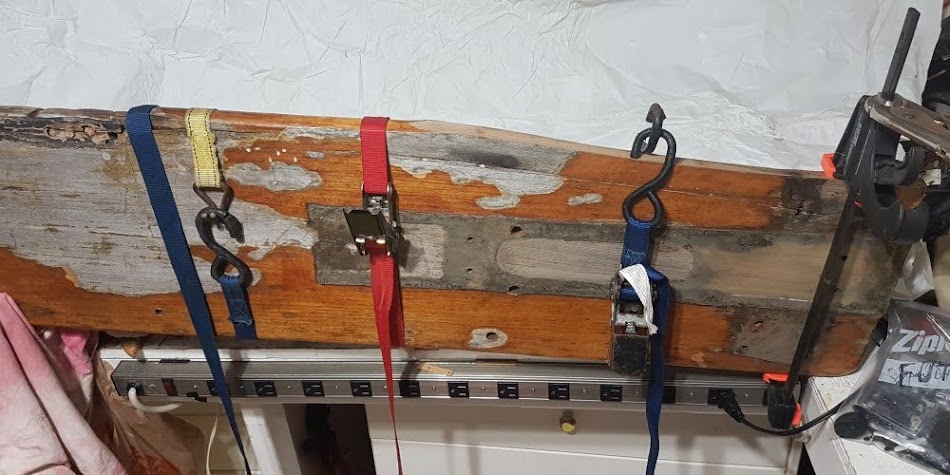
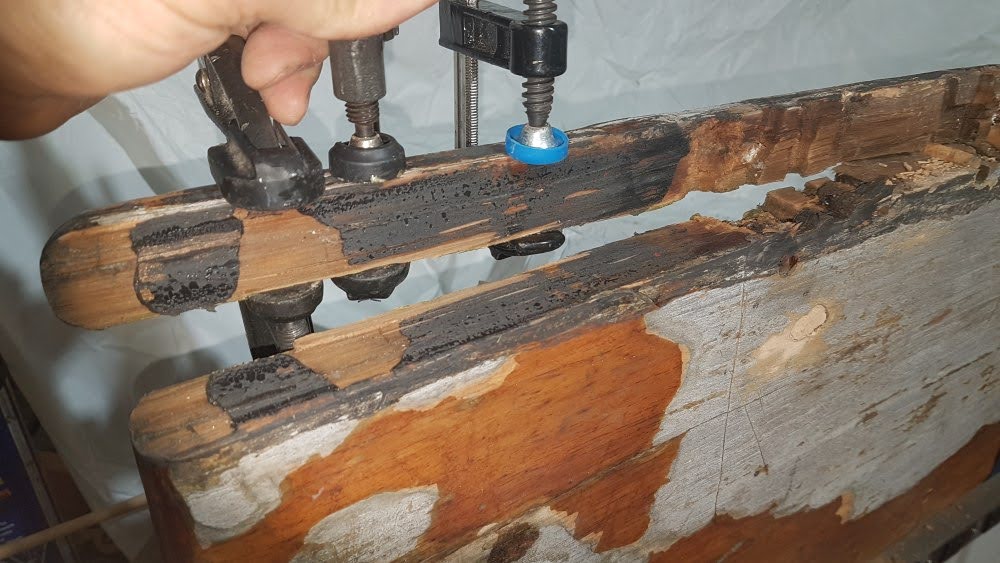
With all wooden pulpit pieces in hand, I brought them home to work on.
It was in 4 pieces. I already glued 2 pieces together before I realised I should take a "before" picture.
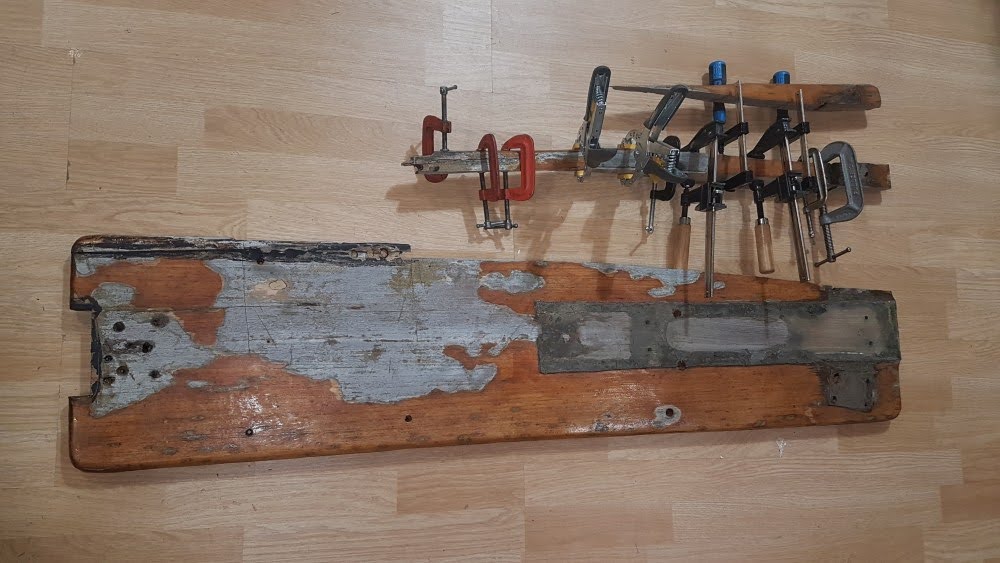

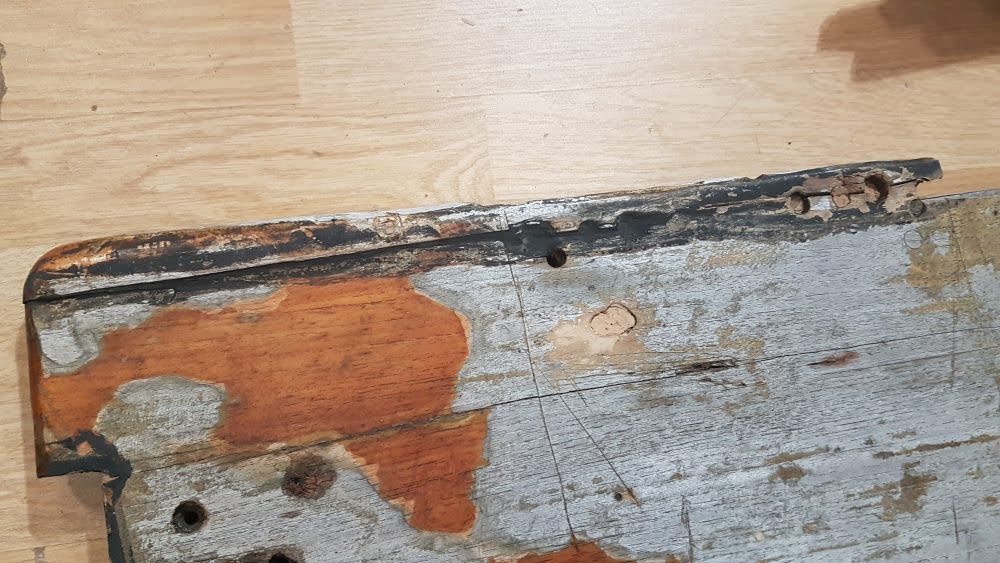
While we are at it, take a look at the previous break that was "fixed" using deck caulk. Yikes!
Perfect alignment!!
My plan is to fix it in the spring of the 2023 season. For 2022 the repair I made to the rudder shaft should last me a season or two.
In the meantime I am "all ears" to more suggestions for skeg repair.
I am heavily favouring a metal bar bolted to the bottom shown in the last photo (of another boat in the yard) of this post here:
https://www.trawlerforum.com/forums/showpost.php?p=1067238&postcount=34
Meanwhile... Back to work!!!
Here is the pulpit. As purchased, it was smashed and pieces were missing.
Fortunately I was able to find them laying about in the bow.
Having crashed a lot of model airplanes in my day, one thing I have found is: If you pick up all the pieces, you ~might~ be able to put it all together again.... "Maybe"...
One thing I found when taking the Pulpit apart so that I can work on it was the fact that the pin that locks the anchor in place was seized solid with paint and other gunk on the pin. I had to pound that sucker out. Which made me realise that whomever had this boat before probably hadn't dropped the anchor in a while. Which begs the question: What would they have done in an emergency?
Oh well, I got the pin out, removed the anchor and cleaned the gunk off the pin so it slides in and out easily. Too easily. I am worried this pin could fall out and get lost? I left the pin and other metal hardware on the boat when I took it all apart. I suppose next spring I should drill a hole in the pin and run a short piece of aircraft cable through the hole to keep it from going missing?
With all wooden pulpit pieces in hand, I brought them home to work on.
It was in 4 pieces. I already glued 2 pieces together before I realised I should take a "before" picture.
While we are at it, take a look at the previous break that was "fixed" using deck caulk. Yikes!
Perfect alignment!!
SteveK
Guru
- Joined
- Jul 5, 2019
- Messages
- 5,075
- Location
- Gulf Isalnds BC canada
- Vessel Name
- Sea Sanctuary
- Vessel Make
- Bayliner 4588
Max I am confused.We'll have to get caught up on the status of the Skeg next year.
My plan is to fix it in the spring of the 2023 season. For 2022 the repair I made to the rudder shaft should last me a season or two.
If it will last a year or two, then why is it important to do it at all.
- Joined
- Jun 25, 2008
- Messages
- 10,104
- Location
- Australia
- Vessel Name
- Now boatless - sold 6/2018
- Vessel Make
- Had a Clipper (CHB) 34
We'll have to get caught up on the status of the Skeg next year.
My plan is to fix it in the spring of the 2023 season. For 2022 the repair I made to the rudder shaft should last me a season or two.
In the meantime I am "all ears" to more suggestions for skeg repair.
I am heavily favouring a metal bar bolted to the bottom shown in the last photo (of another boat in the yard) of this post here:
https://www.trawlerforum.com/forums/showpost.php?p=1067238&postcount=34
Meanwhile... Back to work!!!
Here is the pulpit. As purchased, it was smashed and pieces were missing.
Fortunately I was able to find them laying about in the bow.
Having crashed a lot of model airplanes in my day, one thing I have found is: If you pick up all the pieces, you ~might~ be able to put it all together again.... "Maybe"...
One thing I found when taking the Pulpit apart so that I can work on it was the fact that the pin that locks the anchor in place was seized solid with paint and other gunk on the pin. I had to pound that sucker out. Which made me realise that whomever had this boat before probably hadn't dropped the anchor in a while. Which begs the question: What would they have done in an emergency?
Oh well, I got the pin out, removed the anchor and cleaned the gunk off the pin so it slides in and out easily. Too easily. I am worried this pin could fall out and get lost? I left the pin and other metal hardware on the boat when I took it all apart. I suppose next spring I should drill a hole in the pin and run a short piece of aircraft cable through the hole to keep it from going missing?
With all wooden pulpit pieces in hand, I brought them home to work on.
It was in 4 pieces. I already glued 2 pieces together before I realised I should take a "before" picture.
While we are at it, take a look at the previous break that was "fixed" using deck caulk. Yikes!
Perfect alignment!!
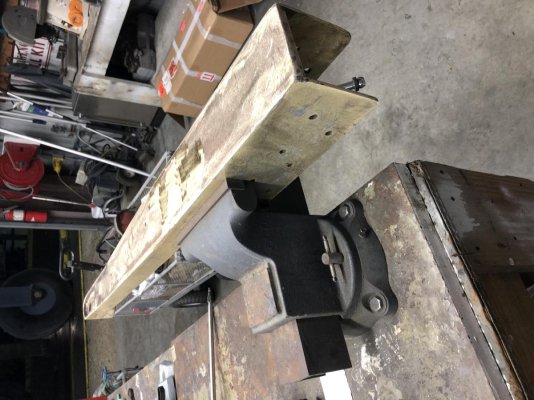
Max, my advice is to just use the reassembled pulpit plank as a template and make up a new one out of a stout plank of good hard timber - this could be teak, but there are stronger timbers out there, some which could look ok varnished, but maybe there is no need for it to be varnished. Mine looks good painted white.
The important thing is for it to be one complete piece of timber, not one reassembled via glues and even metal fixations as well.
The bronze roller assembly however looks much like the original on mine, and I was able to insert a hinged stainless roller assembly inside that, using the sliding bolt you freed up to fix that hinged mount inside the original for added strength.
Attachments
CharlieO.
Guru
- Joined
- Sep 21, 2020
- Messages
- 1,554
- Location
- Lake Champlain Vermont, USA
- Vessel Name
- Luna C.
- Vessel Make
- 1977 Marine Trader 34DC
Thanks for the updates, I always feel like I should take before, during and after pictures. But I don't....yet.
Nick F
Guru
- Joined
- Sep 2, 2020
- Messages
- 598
- Location
- Canada
- Vessel Name
- Callisto
- Vessel Make
- 1974 Grand Banks 42 Classic, Hull 433
[QUOTE: I am heavily favouring a metal bar bolted to the bottom ][/QUOTE]
Max - I think that arrangement (in your photo) looks rather flexible and weak. It would probably hold some fore-aft load, but would not be good for the side loads. Furthermore, these side loads would only be transmitted into the main keel through the vertical bolts screwed into the keel bottom.
I much prefer the look of the photo that Pete posted which (to me) shows a U-shaped piece which engages with the bottom and sides of the keel. With appropriate filler compound (epoxy?) you will get a snug fit that transmits the side loads well. You will also have an extension that is stiff in the vertical direction. Notice the nice long length of keel/extension overlap.
My 0.02c
Nick
Attachments
But for the colours and finished condition, your photo of the recently located and returned rudder in post #34 could be of one of my 2 rudders. Neither of mine have ever been supported from below with a skeg, each of which have a prop powered by a 200 hp engine tossing wash towards it for hours on end, for a total of over 6000 hours to date, each of which is performing as designed, without pause.
Since you say your present solution will do for now, I would suggest that a skeg, since your boat apparently never had one, wouldn't add anything at all to the equation, so we should all stand down and let you get on with other, more urgent matters.
Since you say your present solution will do for now, I would suggest that a skeg, since your boat apparently never had one, wouldn't add anything at all to the equation, so we should all stand down and let you get on with other, more urgent matters.
OP
OP
Max1
Senior Member
- Joined
- Sep 14, 2021
- Messages
- 403
- Vessel Name
- Bermuda Belle
- Vessel Make
- Marine Trader 36 Sedan
Max I am confused.
If it will last a year or two, then why is it important to do it at all.
Fatigue Failure. Over time the unsupported rudder post will flex back and forth. particularly when the rudder is hard over. If you have ever flexed a metal coat-hangar back-and-forth, eventually it breaks. The unsupported rudder-post will break just like a coat hangar will. Flexing is a function of force over area. Its just a matter of time.
I am not sure about this. When I was searching for a replacement rudder, I looked at many rudders from twin-screw boats and found them to be considerably smaller than ones from a single screw- at least for my size boat. All the twin-screw rudders were unsupported. I am not a marine engineer but the differences were obvious. Twin screws did not need supports. Single screws did. My observation of the smaller rudders on twin screws would lead you to conclude that the bending forces that lead to fatigue failure would be considerably less than the larger plate single-screw rudder.But for the colours and finished condition, your photo of the recently located and returned rudder in post #34 could be of one of my 2 rudders. Neither of mine have ever been supported from below with a skeg, each of which have a prop powered by a 200 hp engine tossing wash towards it for hours on end, for a total of over 6000 hours to date, each of which is performing as designed, without pause.
Since you say your present solution will do for now, I would suggest that a skeg, since your boat apparently never had one, wouldn't add anything at all to the equation, so we should all stand down and let you get on with other, more urgent matters.
It could very well be that the unsupported shaft on my boat ~may~ last for decades. Or it could fall off within a couple of seasons. Having researched Marine Trader boats of my size and single-engine, I can confirm that all of them had a skeg. I know this one did at one time. I was fortunate the the rudder fell off within the Marina and was eventually retrieved. If we were in open water and it fell off, we would be doubly screwed; It would be gone for good and I would be rudderless in the open water.
Maybe I should just fix up this boat, sell it for a profit to the next unsuspecting spud and not worry about it...(HAHA.. Just kidding
)
Last edited:
OP
OP
Max1
Senior Member
- Joined
- Sep 14, 2021
- Messages
- 403
- Vessel Name
- Bermuda Belle
- Vessel Make
- Marine Trader 36 Sedan
Max - I think that arrangement (in your photo) looks rather flexible and weak. It would probably hold some fore-aft load, but would not be good for the side loads. Furthermore, these side loads would only be transmitted into the main keel through the vertical bolts screwed into the keel bottom.
I much prefer the look of the photo that Pete posted which (to me) shows a U-shaped piece which engages with the bottom and sides of the keel. With appropriate filler compound (epoxy?) you will get a snug fit that transmits the side loads well. You will also have an extension that is stiff in the vertical direction. Notice the nice long length of keel/extension overlap.
My 0.02c
Nick
What you say below is exactly what I was thinking when I first realised this boat needed a skeg. For me it would be easy to form a U channel to bolt to the bottom.
I much prefer the look of the photo that Pete posted which (to me) shows a U-shaped piece which engages with the bottom and sides of the keel.
But once I looked very carefully at the keel, I realised a U channel would be impossible. There are just too many compound curves at the bottom rear of that keel to make a U channel that would fit. My second thought was to bore a hole in the rear of the keel where it was cut off and insert a bar INTO the keel. A lot of work. When I saw the other boat at the marina with the metal bar, I liked it for its simplicity. To counter fatigue forces, it does not have to be strong int the lateral forces. It has to be strong in the tensile force going aft.
As mentioned earlier, I am not in a hurry to add the skeg this year. It can wait a year or two. In the meantime, I can still be swayed into an alternate skeg arrangement.

OP
OP
Max1
Senior Member
- Joined
- Sep 14, 2021
- Messages
- 403
- Vessel Name
- Bermuda Belle
- Vessel Make
- Marine Trader 36 Sedan
Max, my advice is to just use the reassembled pulpit plank as a template and make up a new one out of a stout plank of good hard timber - this could be teak, but there are stronger timbers out there, some which could look ok varnished, but maybe there is no need for it to be varnished. Mine looks good painted white.
The important thing is for it to be one complete piece of timber, not one reassembled via glues and even metal fixations as well.
The bronze roller assembly however looks much like the original on mine, and I was able to insert a hinged stainless roller assembly inside that, using the sliding bolt you freed up to fix that hinged mount inside the original for added strength.
Too late!
That is probably sound advice Pete, but I already proceeded to fix the breaks. If the fix works, great. If not, it wont be a big deal to make another one later.
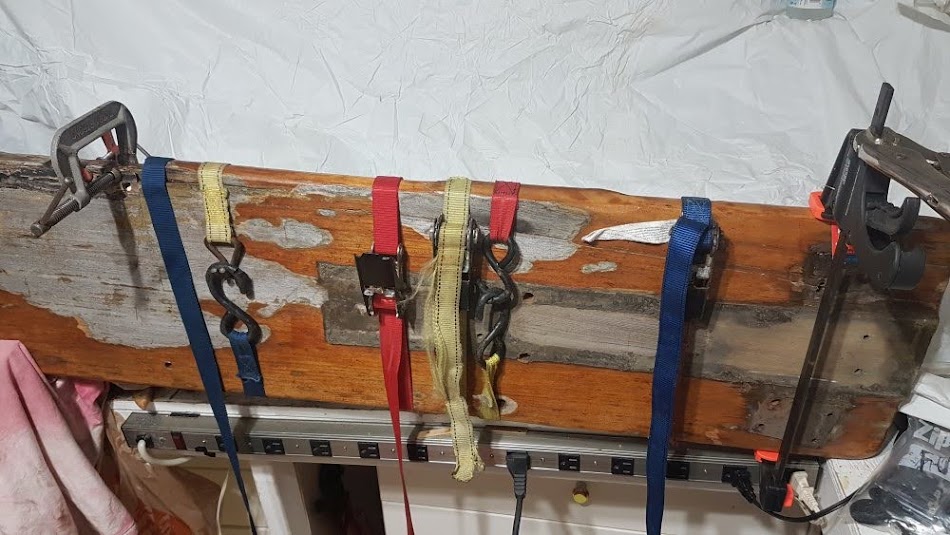
I clamped it in a vise on my workbench and used clamps and ratchet straps to glue the pieces together.
Once the glue set-up I added the final piece:
To add strength I will be pinning the repair using dowel drilled as deep as it can go.
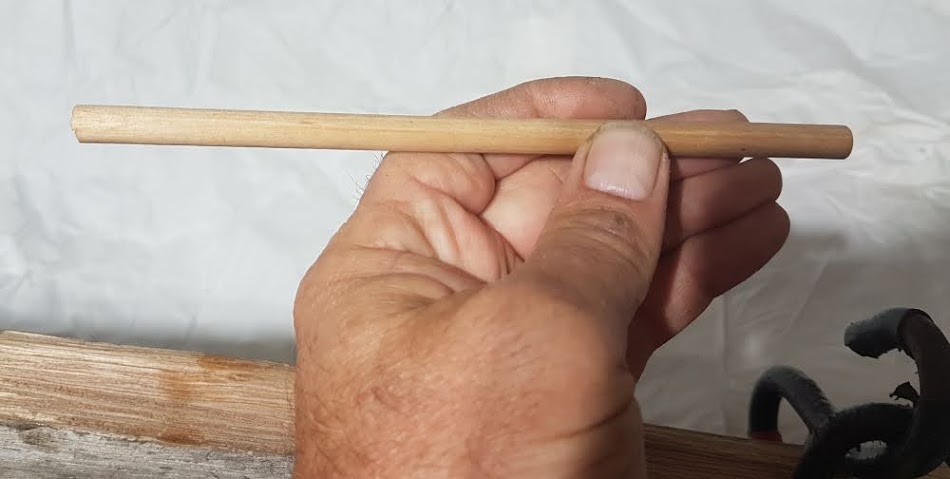
Finding a drill the correct diameter and length was a task. I had to sift though all my drill bits to fine one long enough to go through all the broken pieces and still have enough meat. This is the maximum I can go.

Drilled and glued.

That is just one of about half-dozen I inserted along that break
Endeavor GB 32
Veteran Member
- Joined
- Nov 20, 2021
- Messages
- 94
- Vessel Name
- Endeavor
- Vessel Make
- Grand Banks 32
- Joined
- Jun 25, 2008
- Messages
- 10,104
- Location
- Australia
- Vessel Name
- Now boatless - sold 6/2018
- Vessel Make
- Had a Clipper (CHB) 34
Max, you are obviously VERY handy when it comes to 'doing stuff.' I have to admit, that repair of yours, which is way better, and much more trouble than most, (eg Me), would have gone to, may well outlive the rest of the boat now. But, if not, as you say - easy to still do what I suggested.
Re the rudder foot. As you say, what you have done will likewise probably last for quite a time, but yes, the larger rudder area might ultimately prove to be a bit much for it. I suspect the rudders on the twins are not only smaller in area, but I suspect the actual rudder shafts are relatively stronger as well..?
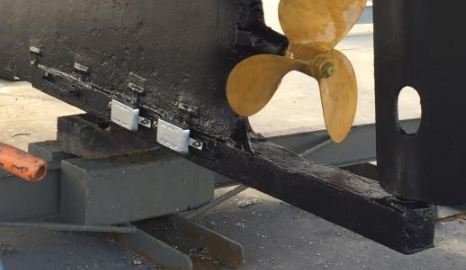
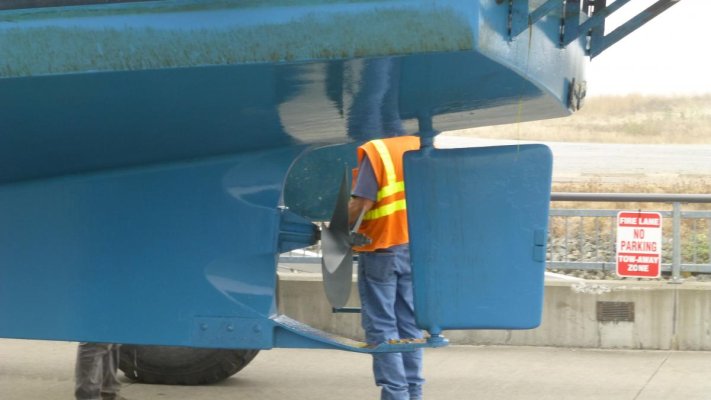
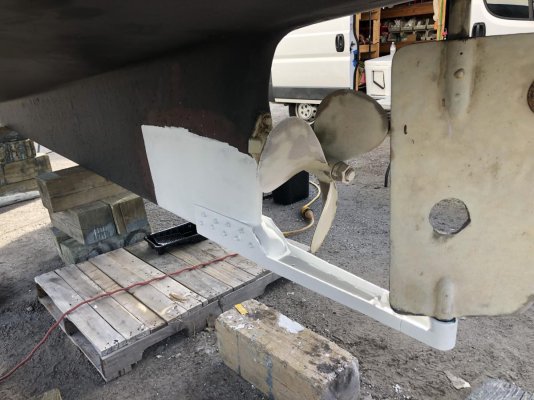
Looking to the time when you tackle this, this earlier pic of a close-up of mine might make the construction clearer than back in the later one where we went over to black anti-foul. You'll note in the pick taken on haul-out how well the Propspeed worked, as that was after three years in the water, and not cleaned during that time.
Re the rudder foot. As you say, what you have done will likewise probably last for quite a time, but yes, the larger rudder area might ultimately prove to be a bit much for it. I suspect the rudders on the twins are not only smaller in area, but I suspect the actual rudder shafts are relatively stronger as well..?
Looking to the time when you tackle this, this earlier pic of a close-up of mine might make the construction clearer than back in the later one where we went over to black anti-foul. You'll note in the pick taken on haul-out how well the Propspeed worked, as that was after three years in the water, and not cleaned during that time.
Attachments
Last edited:
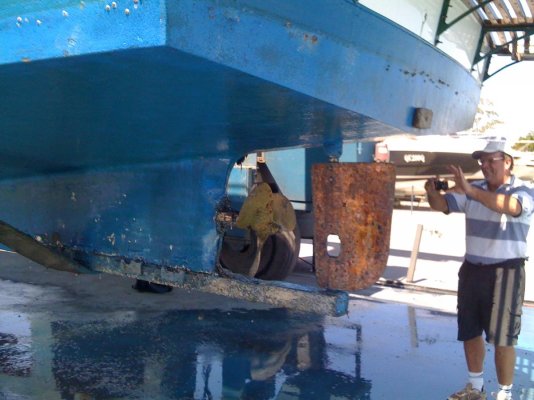
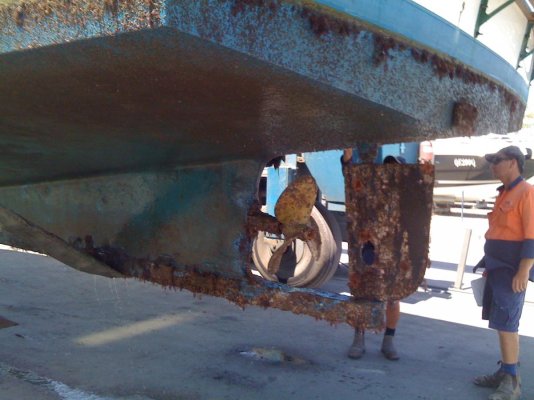
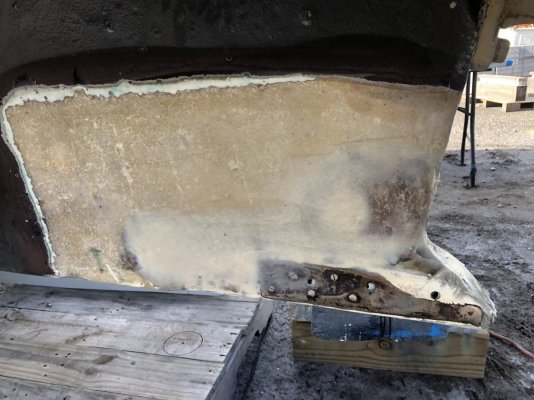
This is our 1974 34 Marine Trader Europe. We removed the shoe to repair rot wet fiberglass.
Attachments
- Joined
- Jun 25, 2008
- Messages
- 10,104
- Location
- Australia
- Vessel Name
- Now boatless - sold 6/2018
- Vessel Make
- Had a Clipper (CHB) 34
That looks exactly like the sort of process Max could follow when he decides to tackle the issue. Thank you on his behalf, (recognising he is so busy on the boat he might not see this for a time), for chiming in with that Unplugged. 
OP
OP
Max1
Senior Member
- Joined
- Sep 14, 2021
- Messages
- 403
- Vessel Name
- Bermuda Belle
- Vessel Make
- Marine Trader 36 Sedan
Thanks for that.This is our 1974 34 Marine Trader Europe. We removed the shoe to repair rot wet fiberglass.
again, my biggest problem is the compound curves on my keel. I ~WISH~ my keel was as flat as those shown in several of the pictures on this thread.
I'll have to take some pictures in the spring when I can get at the keel and share with you guys.
Meanwhile at the pulpit.....
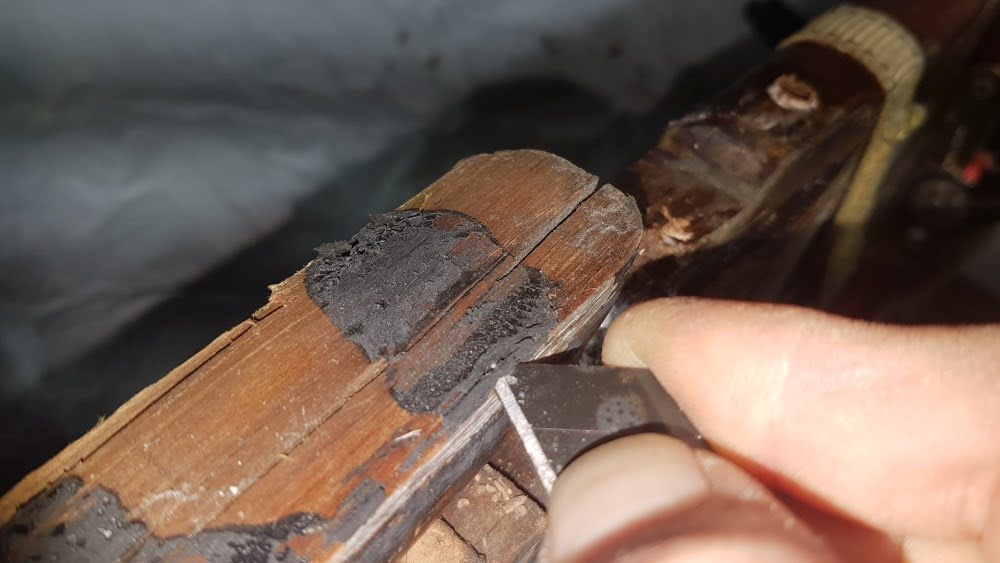
This previous repair has to be broken off and re-glued(with the black goop)
I used a bunch of C clamps to the upper part of this repaired break and used the clamps as handles to rock the wood back and forth repeatedly until I managed to break it loose
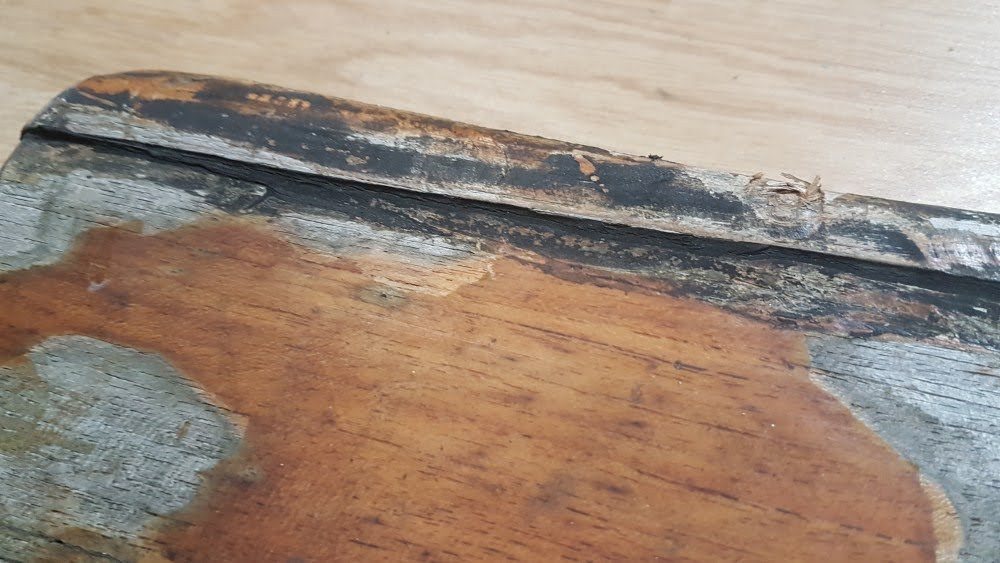
Now the fun part. Scraping of all that black goop from the wood fibres. This stuff feels like it has silicone in it.
(also if you look carefully, you can see the dowelling on a repair further up on the pulpit)
BruceK
Moderator Emeritus
- Joined
- Oct 31, 2011
- Messages
- 13,347
- Vessel Name
- Sojourn
- Vessel Make
- Integrity 386
Max, an impressive repair, and I see it involves fixing a previous repair. I may have missed it, but have you figured out why it failed to avoid the risk of another repair? If it`s just overload then it may be unavoidable unless you reduce the loading or ease off beforehand.
OP
OP
Max1
Senior Member
- Joined
- Sep 14, 2021
- Messages
- 403
- Vessel Name
- Bermuda Belle
- Vessel Make
- Marine Trader 36 Sedan
Max, an impressive repair, and I see it involves fixing a previous repair. I may have missed it, but have you figured out why it failed to avoid the risk of another repair? If it`s just overload then it may be unavoidable unless you reduce the loading or ease off beforehand.
I'm guessing clumsy previous owners. It had to have hit something. Like maybe an iceberg?

Datenight
Guru
Now the fun part. Scraping of all that black goop from the wood fibres. This stuff feels like it has silicone in it.
(also if you look carefully, you can see the dowelling on a repair further up on the pulpit)
Max1
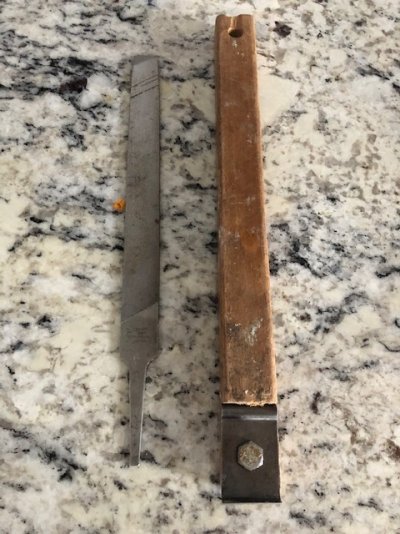
Don't mean to be to be pushy but this is the perfect application for the scraper I mentioned in another thread. It would also do a great job of stripping the old finish. The thought of trying to do that with a razor blade gives me the shivers. I suggest this with the utmost respect.
Rob
(also if you look carefully, you can see the dowelling on a repair further up on the pulpit)
Max1
Don't mean to be to be pushy but this is the perfect application for the scraper I mentioned in another thread. It would also do a great job of stripping the old finish. The thought of trying to do that with a razor blade gives me the shivers
. I suggest this with the utmost respect.Rob
Attachments
OP
OP
Max1
Senior Member
- Joined
- Sep 14, 2021
- Messages
- 403
- Vessel Name
- Bermuda Belle
- Vessel Make
- Marine Trader 36 Sedan
Now the fun part. Scraping of all that black goop from the wood fibres. This stuff feels like it has silicone in it.
(also if you look carefully, you can see the dowelling on a repair further up on the pulpit)
Max1
Don't mean to be to be pushy but this is the perfect application for the scraper I mentioned in another thread. It would also do a great job of stripping the old finish. The thought of trying to do that with a razor blade gives me the shivers
Rob
I'm going to need one of those. Are they hard to find or are they a common item from Home Depot or Lowes?
Similar threads
- Replies
- 3
- Views
- 998
- Replies
- 0
- Views
- 2K