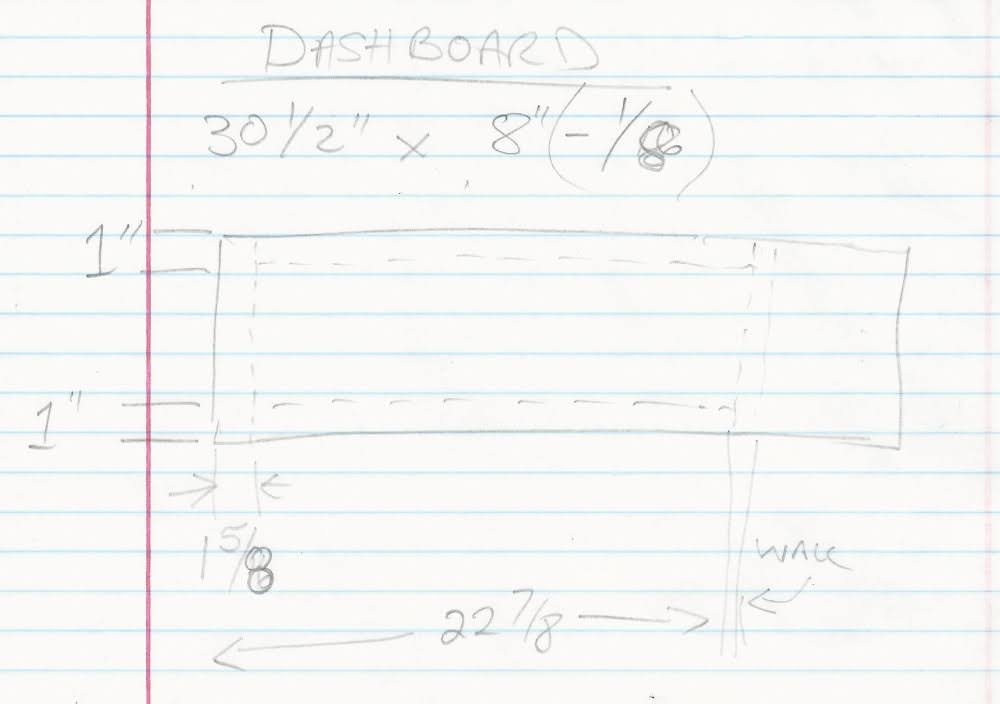
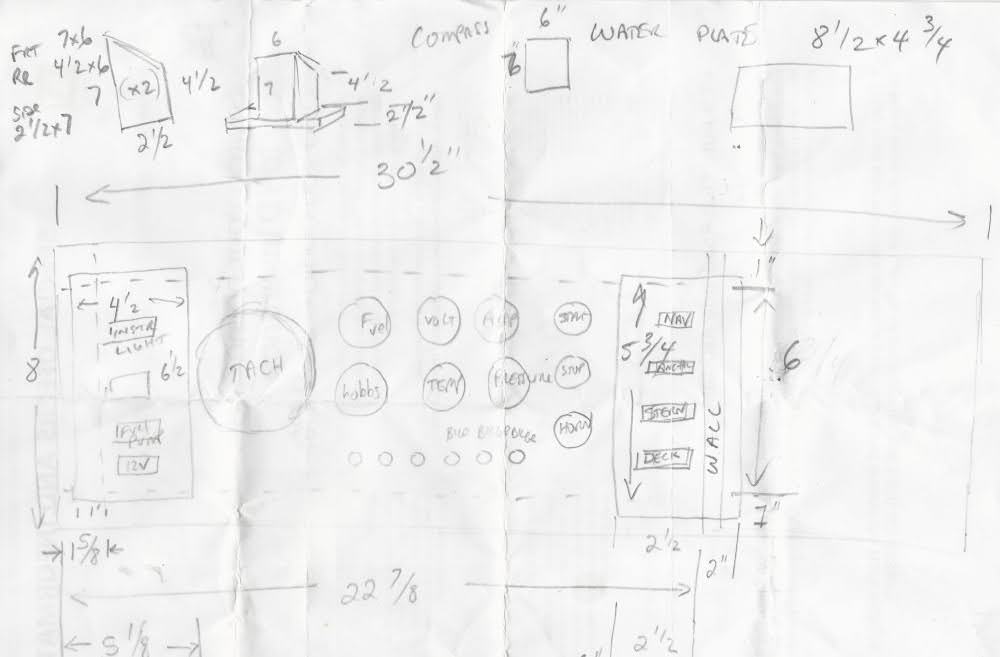
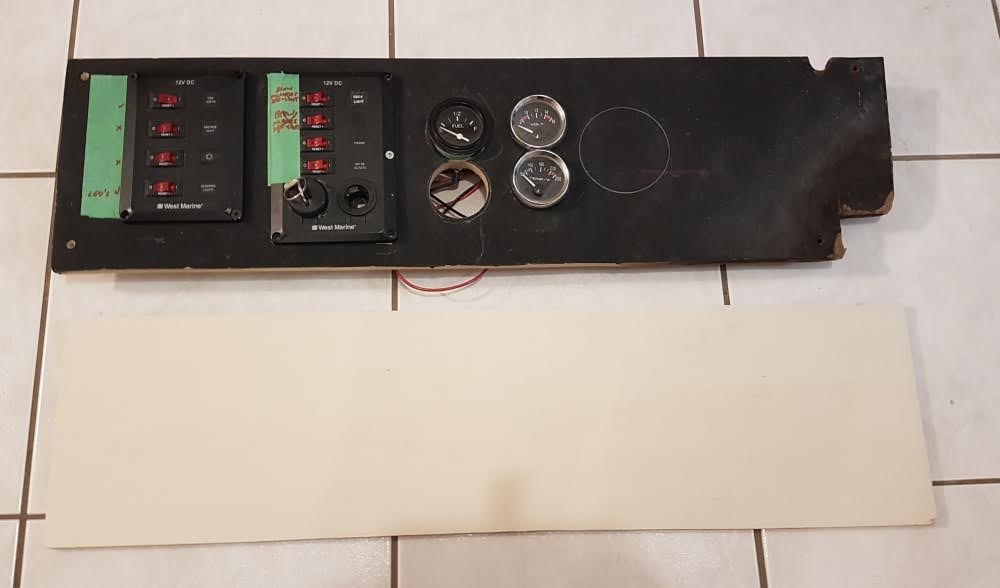
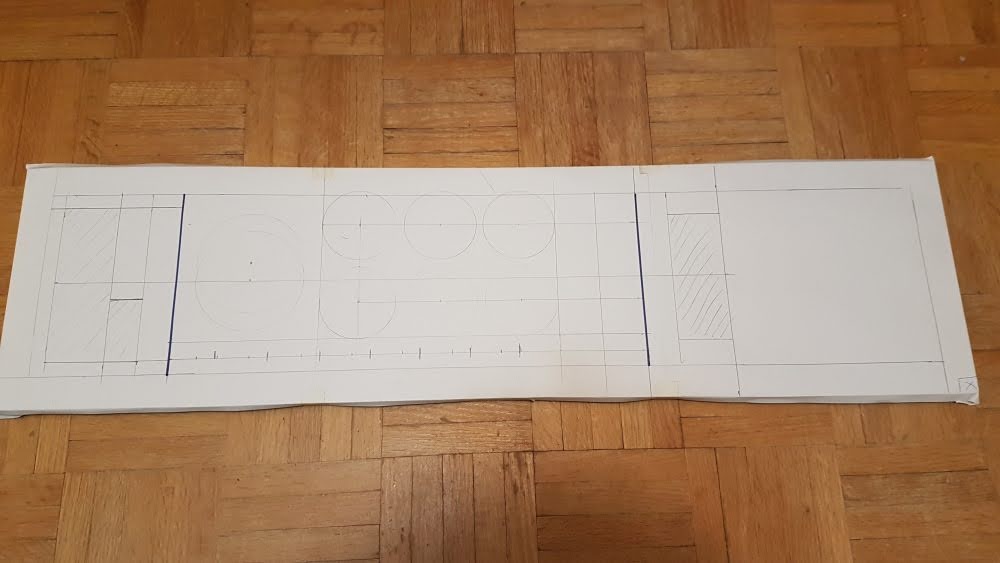
1976 Marine Trader 36 Europa Sedan project boat

The friendliest place on the web for anyone who enjoys boating.
If you have answers, please help by responding to the unanswered posts.
Max1,

Lowes has similar 1" scrapers but not the same. I get mine from Leese Flooring Supply in Manchester CT. https://leeseflooringsupplies.com/

I found this source after a brief search;

https://www.ampro-online.com/items/...JoTOSIHACZD7PR3UPsQc7KlRnJKueCXwaAjNsEALw_wcB

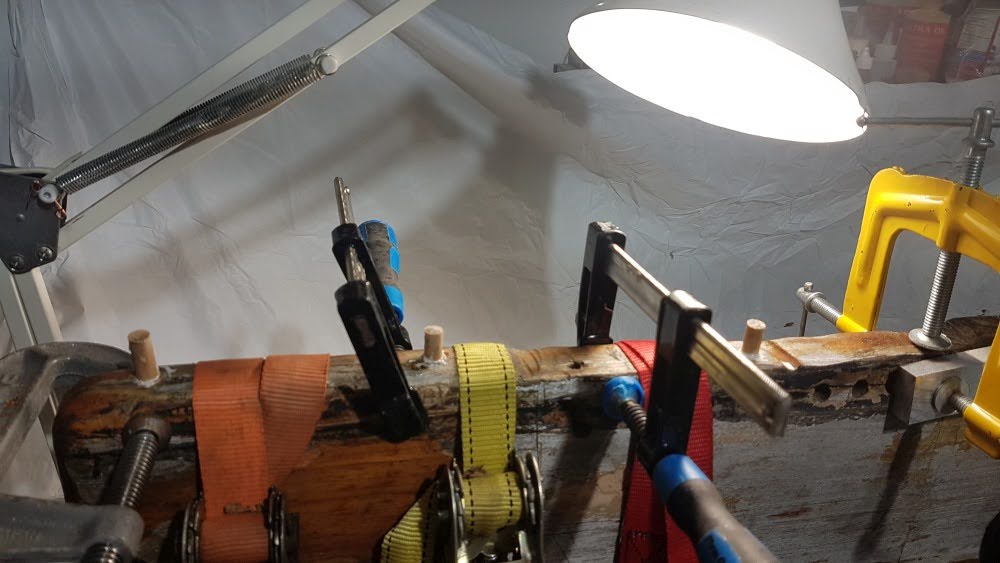
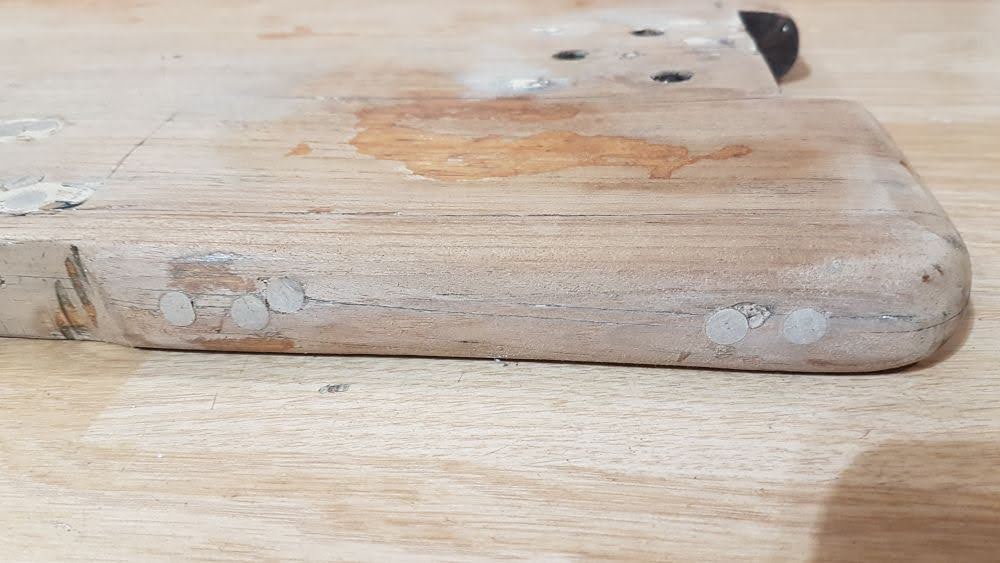
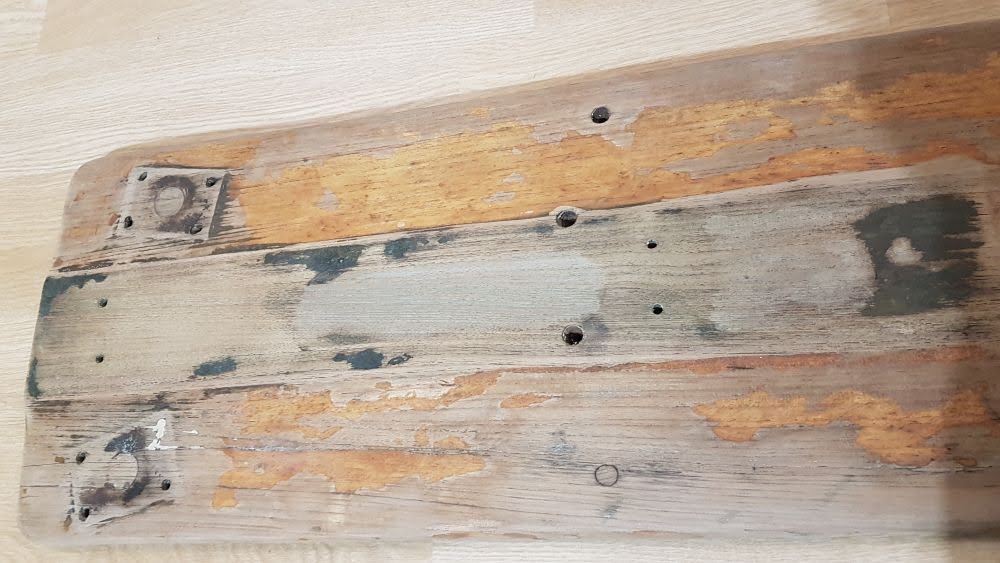
You will also need a file to keep it sharp. Sharpening takes a little practice. Dad taught me to brace the butt on the floor, hand grasping the scraper on top of left foot. Sharpen at about a 45* angle. If you look at the edge after sharpening and don't see a bright line it should be sharp.

It sometimes helps to slightly round the corners of the blade until you gain experience and scrape with the blade flat to the floor or in this case the pulpit.

If I can get someone to video me it becomes much clearer. Will try to do that next week.

Rob
 
Thanks for that.
again, my biggest problem is the compound curves on my keel. I ~WISH~ my keel was as flat as those shown in several of the pictures on this thread.
I'll have to take some pictures in the spring when I can get at the keel and share with you guys.

Max, don't let the curves in your keel worry you too much. There is no real need to follow those completely, as what you want is good connection/adhesion/whatever fixation method used. So flat surface meeting flat is paramount. It is not exactly a frequently seen part after all, so fairing to perfection/streamlining not really a requirement. Strength however is everything. :thumb: :)
 
Max, don't let the curves in your keel worry you too much. There is no real need to follow those completely, as what you want is good connection/adhesion/whatever fixation method used. So flat surface meeting flat is paramount. It is not exactly a frequently seen part after all, so fairing to perfection/streamlining not really a requirement. Strength however is everything. :thumb: :)

OK! We'll discuss it more in the spring when I can get to the keel and show you guys what I am dealing with:flowers:
 
I got the goop off the front part of the pulpit and glued-and-dowelled it back together.
I had to use a lot of clamps to keep the broken piece aligned to the main slab of wood while the straps hold it tight. (reference photo #1 in post #86 https://www.trawlerforum.com/forums/showpost.php?p=1072144&postcount=86)

When the glue dries, it will be ready for sanding.
AM-JKLVI3gMtksSuMzPtft3oU-jjoKyfLMkitRKTjUDpYVU038wSBXR3fKCQVQmUQ7jl3etCKN3lvluJ58j_4dtpjdG3wjaVRGq2LpUQitYRPOOsoOxiPR0uft43Nu9PxaFlq9CDUsze6Wnr3PP5QkC7W4wi=w1000-h563-no
 
Last edited:
There were drill holes all over this chink of wood.
I used dowel and filler to fill all but the mounting holes.
Eventially a windlass will be installed but I dont know were it will fit or how it will fit. So in the meantime, I thought it would be simpler to fill the holes.

Some of the cracks I filled with wood putty. I think I will have to get some teak stain on it once it is ready for varnish.

Then did my best "Daniel-san" impression.

AM-JKLV7kXBBTLoMgvGKlfKN5pl6dY4cYfGvoprxWcqiNOHWHgvk22FhYaq9kZOK7h8zg9kQ7WO4LjhjVV9cmuTuXwleI5j8X7dNFf3-vmie_mlzIpZWtuWcrt31boWEEDN31YEi54IG77jL5wjt0U4Ty-2V=w320-h240-no


"Sandah-flooh! Sandah-flooh"
"yes Mr Miyagi" :p

Here it is all sanded to the best I can for now.

AM-JKLVm38xRmeTqOts48RguK6kpdbrn1mszDmPpCHJ-qFtZZ82SSLJkexm4q3IUtPwXTvcpFLnSiHkuDOqjP8S8sjyHna_n1I2MN3PnCBJ55KDEa6-faaqb3udZDvRDb92JRx77aQ_ATKoVXR-H4JHRLt-j=w1000-h447-no


Here is what the holes/fill look like
AM-JKLUzgDuv85q6rd5BB_MHNW2JDO0Wn_3utGsUlGsKYa_w0ct6QyK573iDcdEDZUAwyj8tfWumrYN78toZettdC6BW1FHHqDPUUePZTkE-_yi19pifWbYzzfyQb-RKb2QbevaeZegWVJMgSruXdVDH8t6m=w1000-h563-no


AM-JKLVTZUf5QzRM28Eg68FO9G3FMpjHpnuUsRXiX-nj6bGCHlxO-WczIWFD2JZGeVTsB2QlVl2lfy2pR-6RC47ZZsndaMUCH7FchwNeDNOXwWnQgCYVOh6E7tGUbjIMHQ7ywIBWtQKyei2mkjV9R2YCiOWy=w1000-h563-no


There are some patches of varnish that I just cant get sanded off.
QUESTION: Can I just varnish over these hard-to-remove patches? Will it pose any problems? Will the remaining varnish patches match the colour of the sanded wood once it's all varnished?

As for the dark patches here, I am not concerned about them because they will be covered by the hardware when it is re-installed into the boat.
AM-JKLXabP-bknJ7LI2cqAJ7cB_pc9kAIai4knpuyPyVc2QFI3nHmzxBrK9AqRnYcv6ku2e5MXCmH2dzWxLKQnr4zxfmlxDOGLefSceZta-BXixHeCVH2mXy8qZEXxgmddrMfxTBf_rArZEFAJHPVQIzJiRr=w1000-h563-no
 
One thing I hate about winter in Canada is it robs you of the willpower to work in the garage when its freezing cold outside. My garage is not heated and there is no insulation. So when its cold, ITS COLD!!!
On a nice day I might find the courage to open the doors and set up my table saw to rip some wood.

A nice indoor activity is building the dashboard.

Here is the dash as it appeared when it was purchased.
Very limited gauges and there is no tach.
AM-JKLWu7pvCPVSfX5lZsNRigYyBgrj5w08dzQCU89TGwUiEWQht2INruchUHjuqzEztmw6eQe8zaXifpAcz_3KguioijCtO2y3r_hIvPnW7-eMvAqwk0afA_UrO5wSBl-Uo4mY1EGaMvoLicbE4i055j_OJ=w1000-h334-no


AM-JKLVMk3DBXdKsjOnjWdWS_Fn_RXeHGhhM1stBilQHjXZLHXf6Sj5s1mKGg_U1eA-gfOT7VKkKzwOug6dmyQU20WnADxSbVNU9Vz9z5dHwJ1T5FT0Cdh5mpY3ypz5va0i3doJj10XyEE4ZJEYuVKjA7y1V=w1000-h459-no


The dash is made out of paperboard and is just crap material.
I wish I knew what happened to this dash from the time Kyle owned it in 2014 to now. (2 other owners after Kyle before it came to me)
To refresh your memory, this is what it looked like in 2014 (Screengrab from a video made by Kyle when he owned it in 2014):
AM-JKLXMKctn2QSYlhF8kP7JWdZWcuU8HlsF5PvsXyzk9F5qtVWVPbhi02EW7fwD-TcIduk6RjvfvpUCHz0h3xRv1OjMB59Vl6Bw13Cuq1XgE2o9HpxX4SXvI6B4KhBnGULACjuEEujeuAPW46nROH7mjIBZ=w536-h952-no

Also there is one push-button located on the front panel. I am assuming this can be used for the engine kill switch. (it was the start button for the engine when we tested it)
I discovered that the key switch has a momentary switch at full clockwise turn. Logic would dictate that should have been the start and the button should have been the kill.
AM-JKLUz61VXMqZfAPgaWPLetweuvfoGeZP5_VCDkwLShCa5isYjh43vWZP5Iyi2umoMm9W1PXM6jom8Q9Fo3M4ZiPvg26RCD06fNFT1mSIhQ4eBthRqehv0cqB4sxtix_0Nxq8scjY6PCwFnJ9yyo5vklG6=w1000-h838-no

The dash looks plain ugly and not well laid out.
Current instruments are:
  • Fuel Gauge
  • Coolant temperature
  • Volts
Where's the Tach? :confused:

My ideal dash will have:
  • Fuel Guage
  • Coolant temperature
  • Volts
  • Tach
  • Hour Meter
  • Amps
  • Oil Temperature
  • Oil Pressure

I would also like to add start/stop and horn buttons
 
Last edited:
EGT is nice to have…. As it will overheat at the elbow first.
 
[QUOTE=
There are some patches of varnish that I just cant get sanded off.
QUESTION: Can I just varnish over these hard-to-remove patches? Will it pose any problems? Will the remaining varnish patches match the colour of the sanded wood once it's all varnished?

Hi Max1,

I is my experience that the old varnish will show up as a different color. You are so close! Look at the thread about the orbital sanders. It has a lot of good information. I know you are not worried about the black spots as they will be covered. However, oxalic acid will often remove a large amount of the black stains.

PM me if you have finish removal questions.

Rob
 
Hi Max,
The patches of old varnish will make those areas look very different when new varnish is applied. I once took a set of nameboards to a cabinet shop to get rid of the ghost images of the old name/hailing port. They ran them through the planer once then the big feed-through sander. No charge (even though I offered) and they looked like new. Ditto on Datenights recommendation of oxalic acid. After all of that work you want the platform to look awesome!
Best,
Scott
 
From Max's Post: There are some patches of varnish that I just cant get sanded off.
QUESTION: Can I just varnish over these hard-to-remove patches? Will it pose any problems? Will the remaining varnish patches match the colour of the sanded wood once it's all varnished?


Hi Max1,

I is my experience that the old varnish will show up as a different color. You are so close! Look at the thread about the orbital sanders. It has a lot of good information. I know you are not worried about the black spots as they will be covered. However, oxalic acid will often remove a large amount of the black stains.

PM me if you have finish removal questions.

Rob

Hi Max,
The patches of old varnish will make those areas look very different when new varnish is applied. I once took a set of nameboards to a cabinet shop to get rid of the ghost images of the old name/hailing port. They ran them through the planer once then the big feed-through sander. No charge (even though I offered) and they looked like new. Ditto on Datenights recommendation of oxalic acid. After all of that work you want the platform to look awesome!
Best,
Scott

Hey, thanks guys!

I took a break from the pulpit sanding for bit. I will get back at it once I distract myself by tackling a few other jobs for now. Also, varnishing in the house is out of the question because we own a parrot and he is very susceptible to harmful vapours. And although my basement workshop also has a ventilator, its so darned cold out, running the ventilator will draw cold air into the house and that will raise the ire of the Admiral.

I will try that oxalic acid. I will add that to my hardware store grocery list :)
I also read that I could try using a heat gun to soften the hardened varnish and scrape it off. I'm also willing to try that. Gotta get me a scraper too..LOL ;)
 
EGT is nice to have…. As it will overheat at the elbow first.

How do I learn more about EGT sensors on diesels? What does a change from normal temperature indicate? IE; If the EGT gets to high, does that mean I am running the engine too hard? Does that mean I need to throttle back? and advice or links to where to learn more would be appreciated.
 
In the fall when we bought this boat, I knew I would need a pair of tach's. I also figured I would need an hour meter.

I ordered two tach's and an hour meter. I ordered the hour meter first. After a little more searching I found that most tach's today COME with an hour meter...Doh!!!:facepalm:

AM-JKLXRxCPEY3FWffsf0Sd2EP1XRSOacWge8-TfcofLQyXQZrJynbesVVCKznR6eaoQvM9r1n6HAc12ntVk5tA0fZEtqYZTbvU6LTUBPvzgU28jcJjovSc9DSp7MwxtF1hOLujErIYIRcfmykffOBK9ncMw=w1000-h624-no


Well, at least i now know the dimensions of all the gauges I will be using.

I also wanted illuminated pushbuttons for start, stop and horn.
I ordered 20mm momentary buttons in green, red and yellow. 1 pair of each so I can install one set in the main helm and one set in the flybridge.
AM-JKLVIOkVDFHqKDokYqtwCFMf-eo4VS6W-a9C3QmKjq2wo_O5sr3opNF8xwHMNgVEOne8H50hHxoZdJbQ0Yhf-4YHC_JmIS2Sw8ZO-Ij2z3EVNN9RzQ4s3BTLVLtE7zBwGe5qAx4tC59G-3LdiSoI-nRMB=w805-h586-no
 
Did I mention I like to make sketches?

The panel dimensions overall dimensions I made when we pulled it out of the boat.
The perimeter of the panel has to allow for approx 1" where it sits on the wood that makes up the cabinet. There is also a dividing wall within the cabinet.
The overall panel will be 30-1/2" wide and 8" high. The dividing wall is 22-7/8 from the left side.

AM-JKLWGD-bd_aD6Aog9nA6obMuycB2dnPu2Phk56RDO3XQF8byXAhSjZ6go4DGu-6oZrI6WvC7wnAql5Q4kpitxszgJMyZpCOPRF0TursKovL94AB6Vi3vhnJMiL082gJQbjqixeapANsU5oXuqr2yifgjB=w1000-h704-no


Using the dimensions of the existing switch boxes, the current gauges and tach, I came up with a concept sketch for what I want to see in the panel. I want to separate the 2 switch boxes, one set with the ignition will be connected to the engine start battery and will power whatever devices can run off the engine start battery when the engine is running. The other panel I will place on the opposite side and will power other electrical appliances that can run off the house batteries.
The guages will be in between these two panels, with the Tach on the left. I plan to make room for 6 guages in two rows. This will be enough for the four I have now and still have room for two more. I also want to fit in the start, stop and horn buttons to the right of the guages.

I also want a set of switches that I can control bilges when I want them to run in manual mode, as well as any other devices as the need comes up. I figure they will fit nicely along the bottom under the gauges.

AM-JKLV4_wOh6XXOWGnClr04Srzqs8NPvw2Hz9G41JAnev1A_SaJYOVy_85B1mf7ekNoyb1dkJtSmRpv1__ClrLhwmZiNuULQ2mDhwSUSOErXScSKPEy4wr79J_iLq0JTNemIyzfLIMlla-sCD4BeyEqrVJF=w1000-h657-no

What do you guys think so far?
 
Last edited:
IMO something does not flow in the gauge layout. Maybe if you lay out the gauges and take a picture. Again that is my first impression.

Not sure what you mean. Do you mean the flow of the 6 gauges? I know I want a cluster of gauges, but I haven't decided what specific gauge goes where.

The only thing I am steadfast about is the position of the two switch panels. I want them on either end to maximise the remaining panel area.
 
In the meantime I got some Russian Birch plywood from home depot. It comes in convenient 2' x 4' sizes. Seeing as I only need 8" out of the 24" length of the panel, I will have lots left over. I figure I can screw up a few times before I get it right...LOL:blush:
It has a nice finish. I think I might like to stain this with teak stain once I get it all done.

For now I simply cut out a panel from 2x4' slab per the dimensions.
It already looks 100 times better than that crappy paperboard that is there now.

AM-JKLVAVZ9gtzXeRC8U8BVcyn5AduvcMypGxZfHGOskfe2iR3iAIR3qqKHB-hksHBhb56gS0domGGm7W0HwehSNvEZFItkrbindXcZWuqkzZUO6Jc3kI2EJHM_WZhKtuTOojMds2PYwLZLZkQ4EuYL50i0m=w1000-h588-no


(post photo edit- I'm sorry I took the picture on a white tile floor. You can hardly see the new panel. I should have put it on a darker background. Oh well.... live and learn.)
 
Last edited:
Max, JMO.
Try the drawing with the tach center. you have 9 other circles. surround the tach. Here is mine, I have twins, each tach is surrounded by 4 smaller gauges
gauges.jpg
 
Not sure what you mean. Do you mean the flow of the 6 gauges? I know I want a cluster of gauges, but I haven't decided what specific gauge goes where.

The only thing I am steadfast about is the position of the two switch panels. I want them on either end to maximise the remaining panel area.

I like to have the most important gauges center and together. The oil pressure and temperature are what I consider the most important. Volt meter and fuel gauge are checked only occasionally so they can be set out of center view.
 
Hi guys. I played around with some of your suggestions but this console is looking really tight.

I am going to stick with what I have planned for now. I still have a big piece of that Russian birch ply left over. I can always make another dash in a few years when I get bored and have nothing to do...LOL

I took the new panel and used it as a base for a paper template to lay out the gauges.

My first try I laid it out as shown in the concept sketch.

One thing I did not consider was the positioning of the switches.

On the concept sketch I had them on the bottom. But with the exact-scale template in hand, I realised that a line of switches on the bottom would put the toggles right in my way, making snagging a switch too easy.
AM-JKLW2ELYS-xZbnMHdrcNEp_xgIac8hXGIU7F6EfBRCBNWjKMIzWOjTY72mhqFyHsFPK7F3LPaqo_6HzWA9SPmyV8MhrVCdZ5KotehMZbLI8Fmzbd4UzcXEusBlzwgwwZ4F6QSXCQa7pDBQotclVP_Jiwb=w1000-h563-no


I erased the switches and centre dials and flipped them around. Switches on top and dials on the bottom.
I think that will work better.
AM-JKLVne7BxLdmB3xplS8jIotOaI8A9bIxR57UOuBmXqBG2DSJMzl1O9XXDcm5zEPnRVAicS7PGKbKoM6mZVOU0sQID4f9du_BJiw2CM1YQ_phwslsxXf7hJFuDO8E_UsxIvvvQgv29gt-T02viFlHjgc6u=w1000-h563-no
 
Last edited:
Pilot holes drilled into the board using the template I made...
AM-JKLU-1ajD_3g_DfNHS2rBoNB_JmI9oaFAjfMO6UMTidxAIoVK9NaOlOxTr6sttvr1GfN4fInWYIg7VDqs99dB30WVECbgJmlFZOe50lA7tlWYiH29utxEsvF5sAknRnVIQEWdfevmZoBzAeqILX20OxUX=w1000-h563-no
 
Hi Max
A lot of people swear by the heat gun approach but I never had much luck with it.

Random orbital and 40 grit will get it done!

I commend you're getting that ancient polysulfide caulk off - which was all the rage when our boats were built - turns into black iron after 50 years.

:)
 
Hi Max
A lot of people swear by the heat gun approach but I never had much luck with it.

Random orbital and 40 grit will get it done!

I commend you're getting that ancient polysulfide caulk off - which was all the rage when our boats were built - turns into black iron after 50 years.

:)
Thanks. To be honest, I recently tried heat-gun on the last little bits. Total failure. I assumed it would soften and scrape off. I felt like i was trying to scrape concrete. That stuff is so old it must be rock hard!!

I have a bunch of jobs for varnishing but cant do it in the house. Canadian winters means its still freezing cold in the garage. So I put those jobs aside for the time being. When spring gets here and it warms up to varnish outside, I will give 40 grit a try!
 
Last edited:
Meanwhile, I CAN use a drill and holesaw in the basement.

I discovered that standard hardware store hole-saws are either too big or too small for the standard gauges. Nothing in my collection will work :(
AM-JKLV78pDi-7n3GMcgWCIeA-PxBjs7I4YlBvLLsyokMxxfs4ErRH0ZwwHChUAKkQhKkh4c_TxqPUP811snRQjuwCY7zIHi5skaem4DjZD50waoCjrZE2s4WeKLDJVz36zuwlA8R_COFGf757SAwGcIZQz-=w800-h450-no


I hunted around online and found that they sell a specific size hole-saw that beekeepers need to install plastic cooling vents in ther beehives. These plastic vents require a 53mm hole. That should work perfect for the instrument gauges. I ordered one up last month and she looks like it will do the job.
AM-JKLUryahpjKAUXFdMbm49ffaRUcDD29uQoCcIoln29ZmLdmuPcy25-78nTxCWs8os9Om78rriRlar38G4gyLbEX5ftj2-xB2PVEiGfeXSA85_X2a31DISyGMvW1ouNzPP7DhAx7YQcv3fEpM2U23Ldnv_=w800-h597-no


The larger hole for the tach is big enough to be done done with a jigsaw
 
Last edited:
What brand gauges did you get? I just replaced the tachs and synchronizer gauges on my boat with VDO ones. The issue is programming the new ones. I wanted to have the hourmeters set to the correct hours. You can’t do it, it has to be done by a distributor. Also need to program the tach pulses for your engine. I sent mine to Lauderdale Speedo and they did both tachs for $65.
 
EGT measures the temperature at the exhaust elbow. You drill a hole in the top of the elbow, tap it, and screw the sensor in. It's resistance based just like all the other sensors.

If the raw water flow stops for any reason EGT will go up. Fast! Engine temperature will start to rise after that.


On our venerable old Ford Lehman's overheating is the #1 cause of premature death.

I thought about building a new dash for the Sea Moose but I have so much crap mounted at the lower station now I'd have to put it up high, and as I'm hopefully leaving in June for an extended cruise I'll just have to live with it. You're doing an awesome job, can't wait to see the finished product.

Here just south of you in Michigan it's winter one day, threatening Spring the next, a small electric heater in the salon and I can get some things done.
 
Teak deck replacement????

Hey Max!,
Smack in the middle of ripping out and replacing (with what!!!?) my aft teak deck... stay tuned. Good for you. Go for it. I have a feeling we will be in touch with several common elements on the list!
 
Thanks Peter!
We've already been out to pat the boat twice this winter. We miss it so much.

Fortunately, I have lots of photos of what we have done so far, as well as many small projects to work on at home.
So for the rest of this winter, I will keep myself engaged on this thread by posting those pictures as well as the at-home projects :)

I'm hoping I can continue to find your posts. In the recent past I have taken on a 34 Mainship project boat and brought her back to her former self after which someone wanted her enough to offer to buy it. I am now working on a 34 Albin which I plan to do the same.
Maybe I don't have all the issues you have but I have an equal number of my own.
Please keep posting your progress.
 
What brand gauges did you get? I just replaced the tachs and synchronizer gauges on my boat with VDO ones.
Right now I am re-using the gauges that came with the boat.
The tach is the only new gauge.
The only gauges I have on hand are Engine Coolant temp, Voltage and Fuel.

I have room for 3 more gauges. I have an ammeter but it only goes to 40A and I am not thrilled about having all that wire run from the battery to the meter and back just so I can read amps. I can tell how the battery is doing just by looking at the volt meter. After reading replies here, I have decoded that one will be used for an EGT sensor (see below)

EGT measures the temperature at the exhaust elbow. You drill a hole in the top of the elbow, tap it, and screw the sensor in. It's resistance based just like all the other sensors.

If the raw water flow stops for any reason EGT will go up. Fast! Engine temperature will start to rise after that.


On our venerable old Ford Lehman's overheating is the #1 cause of premature death.

I thought about building a new dash for the Sea Moose but I have so much crap mounted at the lower station now I'd have to put it up high, and as I'm hopefully leaving in June for an extended cruise I'll just have to live with it. You're doing an awesome job, can't wait to see the finished product.
Yes!!! That is one thing I was wondering about. The impeller that came off the engine was destroyed. It is obvious to me that these things can suddenly crap out and the only way I knew to check it was to look out the back of the boat and see if water was flowing. An EGT sensor is what I want! Can anyone suggest where I can get an EGT?
Here just south of you in Michigan it's winter one day, threatening Spring the next, a small electric heater in the salon and I can get some things done.
Man, we can't wait to get back to the boat. As soon as the overnight temperature is above freezing we are heading over to the boat. The boat does have a diesel heater, and we did use it last fall up until the day the boat was wrapped.

Hey Max!,
Smack in the middle of ripping out and replacing (with what!!!?) my aft teak deck... stay tuned. Good for you. Go for it. I have a feeling we will be in touch with several common elements on the list!
Thanks! I will eventually have to tackle the aft deck on my boat as well. Share what you got when you get there :)

I'm hoping I can continue to find your posts. In the recent past I have taken on a 34 Mainship project boat and brought her back to her former self after which someone wanted her enough to offer to buy it. I am now working on a 34 Albin which I plan to do the same.
Maybe I don't have all the issues you have but I have an equal number of my own.
Please keep posting your progress.
Will do! :)
 
Last edited:
To check the condition of the water flow in the exhaust get an exhaust alarm. Borel Manufacturing makes a great one that is simple to install and you don’t need to drill and tap the elbow.
 
To check the condition of the water flow in the exhaust get an exhaust alarm. Borel Manufacturing makes a great one that is simple to install and you don’t need to drill and tap the elbow.
Thanks! I gather this is different from an EGT sensor?
 
Last edited:
Back
Top Bottom