DIY rebuilding of diesel engine Yanmar 6LY

The friendliest place on the web for anyone who enjoys boating.
If you have answers, please help by responding to the unanswered posts.

Waterant

Senior Member
Joined
Oct 3, 2018
Messages
269
Location
Canada
Vessel Name
DORA
Vessel Make
2002 Mainship 430
By popular request (whooping 2! people expressed some interest) I will document the rebuild process of my Yanmar 6LYA-STP engine for my own records and in case it will help someone in a similar situation.

After many hours of deep research (thanks, YouTube) i learned some tips and tricks to make this rebuild successful and enjoyable.

Disclaimer: I'm not a professional mechanic, and this is my first rebuild, so use this information at your own risk. :socool:
A professional mechanic will suggest you send the engine for rebuild to a good machine shop. It will take months and cost you more than a good used engine, but mechanics have to eat too.

Quotes I was getting for a rebuild started from $25k which is around the cost of a used engine like that. And there are not that many used 6LYA engines available (pretty much 0 at this time). And, a "lightly-used" engine is a very loose definition and you can end up with having to do 2 rebuilds.

Why this rebuild was started:

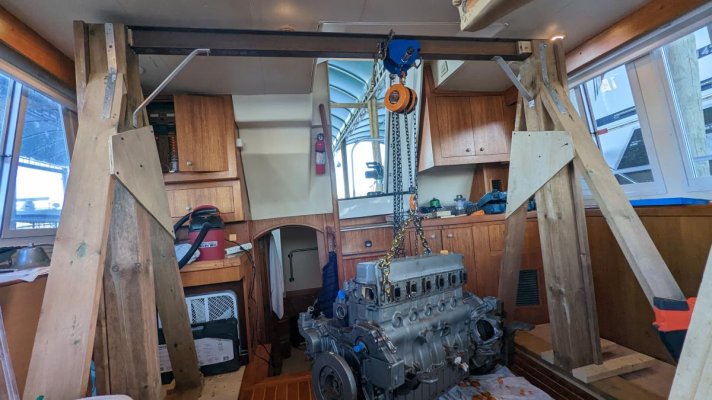
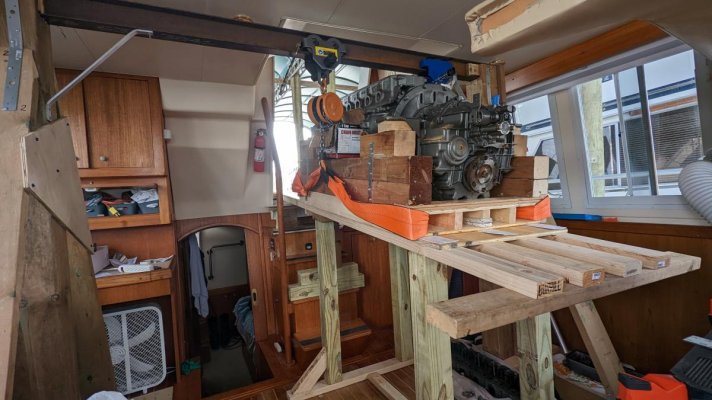
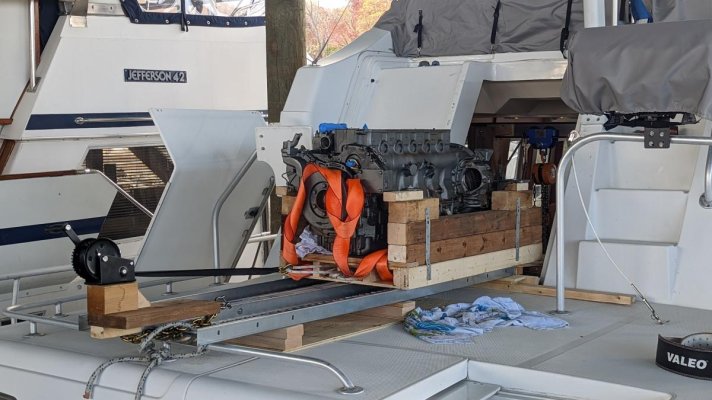
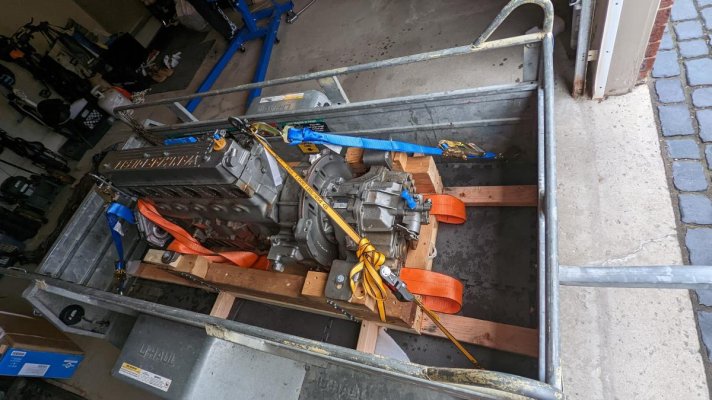
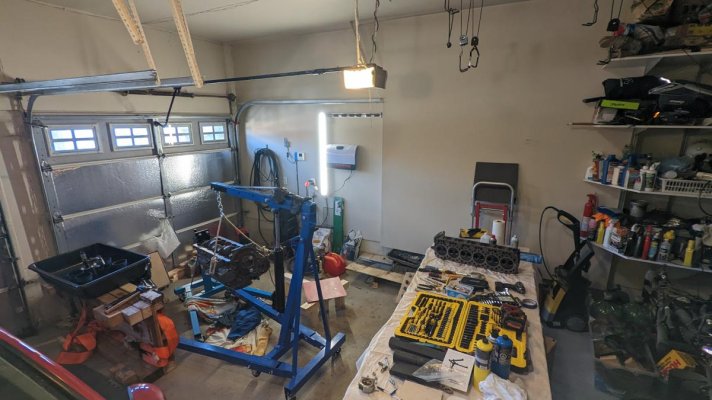
The engine was seized when i got this boat (2002 Mainship 430). It could not be rotated or slightly moved by a 3' breaker bar on the crankshaft nut. Applying more force would probably break something.

To get this over with, someone will probably ask, "why on earth did I buy a boat with a seized engine?"
- i was bored. as simple as that :dance:

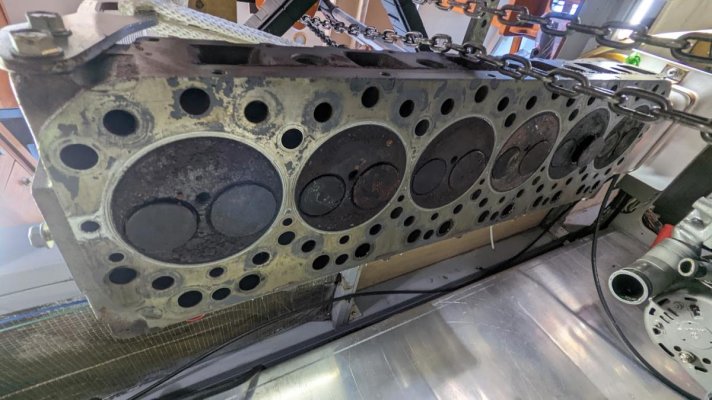
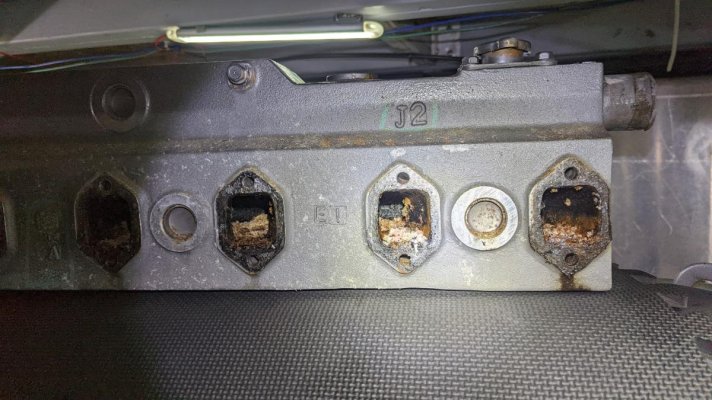
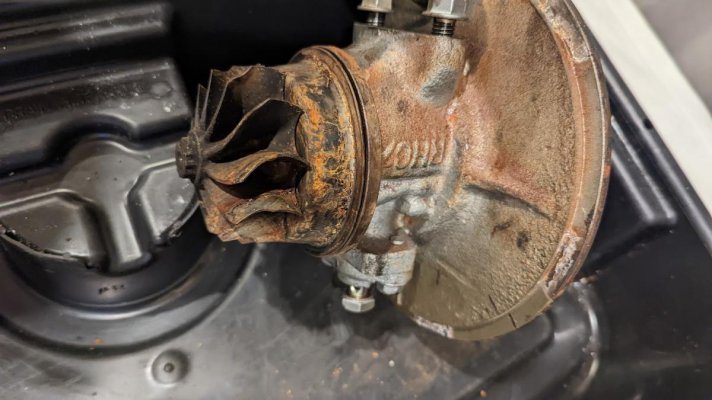
From what I found so far, the water got into the cylinders from the poorly designed exhaust via turbo and air inlets (see photos). The engine was left with the water inside for a long time, so the pistons and valves rusted to the block.

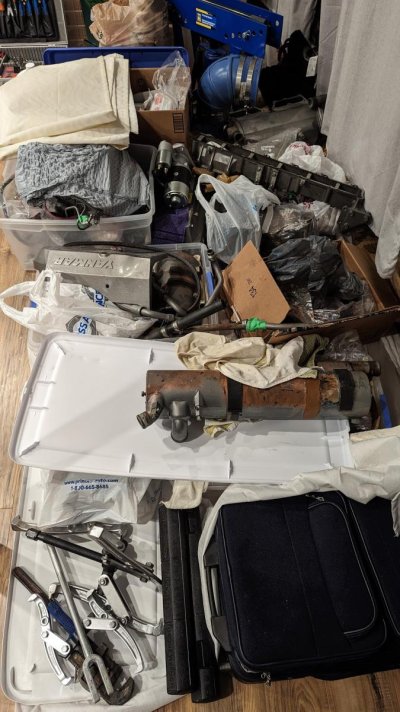
Removing the injectors (and later removing the head) and soaking the cylinders with Mystery oil for 3 months did not free them up.

After taking the engine apart to the bare block, I did not find any damage to the pistons or rods, so it looks like the engine was not started with the water inside, which would cause it to hydrolock and do some physical damage.

any questions - ask
any comments - post

if you notice I'm doing something wrong, let me know - i appreciate all the help and would not be able to do this without you.

Until the next post ...
 

Attachments

  • PXL_20220927_130937987.jpg
    PXL_20220927_130937987.jpg
    154.3 KB · Views: 74
  • PXL_20220927_130621685.jpg
    PXL_20220927_130621685.jpg
    121 KB · Views: 61
  • PXL_20220925_232726453.jpg
    PXL_20220925_232726453.jpg
    147 KB · Views: 73
  • PXL_20220925_230119185.jpg
    PXL_20220925_230119185.jpg
    136.7 KB · Views: 68
  • PXL_20220903_113524749.jpg
    PXL_20220903_113524749.jpg
    102.4 KB · Views: 68
Ok, have you removed the block from your boat?
I would do more than just use a drill motor and a hone to remove the rust.
Does that engine have removable liners? Did the crank and cam sit in water?
A competent machine shop is your friend in this situation.

The head and block can be made as good as new so avoid shortcuts.
The turbo internals may be toast but the housing may be reusable.

Have the rods measured professionally to be sure they're not bent.
Hydrolocking can compress them almost invisibly.

The pistons may be reusable if the block/liner doesn't need boring.
The injectors obviously will need rebuilding.
 
Last edited:
Ok, have you removed the block from your boat?
I would do more than just use a drill motor and a hone to remove the rust.
Does that engine have removable liners? Did the crank and cam sit in water?

This engine has sleeves/liners. I already got old ones out. After i clean them up some more and see if the damage is more than the surface rust i may be replacing them with new sleeves.

Shafts were not sitting in water and seem ok with some surface rust only on crankshaft and no damage or any wear on the bearings. i did not fully clean and measure them yet. this is still an outgoing project.

A competent machine shop is your friend in this situation.

the few shops with good reviews I called so far are not interested in doing small work and want to do a full rebuild only with a very long lead time. i did not call the shops with bad reviews. I asked Yanmar tech support for recommendations, they sent me to a local rep here in Ontario, Canada who said he can suggest only the shops who does a full rebuild
i'll keep looking but i may be on my own here.
 
Fortunately this is not rocket science. I hope you can find a 1- or 2- man
shop that will measure those rods and advise you along the way. I've been
spoiled by living in an area that is well supplied with competent machine shops.

You're going to need to clean up and hot tank the head and get the valves
done. You'll need a shop for that anyway.

I would price a set of replacement liners. Any visible pitting is too much.
Don't assume you can use new rings right out of the box. They must be fitted.
 
Last edited:
For rust on iron parts, investigate Evaporust. It does a remarkable job of removing rust without harming anything else. The only safety warning it has is don't let your your kid fall in the bucket and drown. You can apparently drink it, wash your eyes out with it, or remove rust with it. The only thing I've found to be careful of is make sure you fully immerse a part. If it sits partly in for awhile, it will develop a waterline at the top of liquid.
 
What is the expected budget?
 
A decent machine shop should be able to inspect the head for you, you may luck out a bit on the head based on it's height relative to the water ingress. I would have the crank inspected, replace the liners myself and proceed based on the crank condition.
 
As an owner of two of these engines, I will be watching your progress. Good luck!
 
Fortunately this is not rocket science. I hope you can find a 1- or 2- man
shop that will measure those rods and advise you along the way. I've been
spoiled by living in an area that is well supplied with competent machine shops.

You're going to need to clean up and hot tank the head and get the valves
done. You'll need a shop for that anyway.

I would price a set of replacement liners. Any visible pitting is too much.
Don't assume you can use new rings right out of the box. They must be fitted.

Can you elaborate what you mean by the rings must be fitted?
 
I assume there are oversized pistons available? If so, just get the liners bored oversized once you get the new pistons by a good machine shop. Send the head along too and have them service the valves. Check all bearings with Plastigage and if worn, replace after having the crank inspected, otherwise reuse the original bearings. Be meticulously clean and put it all back together with a new turbo and redo the exhaust routing.
This isn't rocket science.
 
I think he means the rings gap must be measured and adjusted to fit
 
For rust on iron parts, investigate Evaporust.

good old Evaporust :thumb: I'm on the 3rd gallon of it now.
i use it in my new shiny ultrasound cleaner to "super clean" everything i take off the engine. great thing.

i start with 20 min of ultrasound cleaning with 1 to 3 parts of simple green and distilled water and after that 20 min in Evaporust both at 40C temperature.
so far, all the parts come out looking like new without any physical cleaning. I'll post some photos when i get to this part.
 
Can you elaborate what you mean by the rings must be fitted?
Referring to new replacement rings, there is a specification for the end gap,
i.e, the gap when the ring is fitted perpendicular to the bore. New rings will
often be supplied a few thousandths long to accommodate variation in bore diameter.

lwarden: 'I assume there are oversized pistons available? If so, just get the liners bored oversized once you get the new pistons by a good machine shop.'
Waterant may be able to re-use his pistons if they are in decent shape.
I would go whichever way has the fewest headaches and least cost.
 
Last edited:
What is the expected budget?

So far, I have spent around $1k on building the gantry crane in the boat saloon to raise the engine, reinforce the floors, build a platform to move the engine to the deck, and rent a trailer for a week to get it home.
This expense I would have even if I used a shop for a full rebuild.

$1.5k on the engine shop craine, so i can take it on and off the trailer and move heavy things around in the garage, engine stand so i can rotate it to work on it, 20L ultrasound cleaner, and some tools i did not have.

I'm getting quotes from part suppliers for the parts I will be replacing. So far, it looks like the total for parts will be around $4000, which includes all the gaskets, new bearings, new liners ($1200), rings, a new V-pulley, which i butchered while trying to remove from the shaft, a new starter, and a rebuild kit for the turbo, and shipping this all from Japan.
 
I assume there are oversized pistons available? If so, just get the liners bored oversized once you get the new pistons by a good machine shop. Send the head along too and have them service the valves. Check all bearings with Plastigage and if worn, replace after having the crank inspected, otherwise reuse the original bearings. Be meticulously clean and put it all back together with a new turbo and redo the exhaust routing.
This isn't rocket science.

Right. Easy peasy.
The engine had only 280 hours so there is no wear, just rust damage.
The pistons are in "like new" condition after cleaning and i plan to keep them and replace the liners and rings. seems to be an easier and probably less expensive way to go considering i did not find any shops around i would trust with boring the existing liners and trying to find larger pistons that will fit properly.
 
A decent machine shop should be able to inspect the head for you, you may luck out a bit on the head based on it's height relative to the water ingress. I would have the crank inspected, replace the liners myself and proceed based on the crank condition.
The ocean came into the engine through some of the exhaust valves.
There is no likelihood the internal passages and valve seats, etc. are ok.
 
Last edited:
Right. Easy peasy.
The engine had only 280 hours so there is no wear, just rust damage.
The pistons are in "like new" condition after cleaning and i plan to keep them and replace the liners and rings. seems to be an easier and probably less expensive way to go considering i did not find any shops around i would trust with boring the existing liners and trying to find larger pistons that will fit properly.
Measure each piston.
It is not unheard of for pistons and liners to be matched.
Hopefully Yanmar's will be interchangeable. My only Yanmar was a 12hp single!
 
Engine removal

So far, removing the engine from the boat was the most challenging part of the project, which took several days in preparation and two days for execution.

The major challenge was a small door we had from the cabin to the aft deck. The engine fits in this door with 1" clearance on each side and only 4" of vertical clearance, which is not enough for a boom crane to get inside and get the engine. And the engine is not in the middle of that door. :confused:

It may be different for your boat, and if you are lucky, you have a huge hatch in the aft deck so the engine can be picked up by a crane from the shore or wide and high saloon doors to use a boom truck to get inside, raise the engine and take it out.

But nothing is easy on the boat, and our process can help you to find a way for your boat configuration.

The whole engine removal process was done in several stages:

  1. Reinforce the cabin floor by adding horizontal members and vertical supports between them and stringers on the bottom of the hull. Total of 8 with 4 vertical supports per engine side.
  2. Build the gantry crane in the cabin with two 5' bases of out 2x6" (left and right), two 4x4x73" vertical support posts (height of those posts should've as high as possible with clearance to the sealing just enough to fit the I-Beam which is 7" high), steel I-Beam between them, 2 diagonal supports between I-Beam and posts, 4 diagonal supports between posts and the bases, 2 trolley carts, 2 chain hoists on each cart.
  3. Rise the engine to the cabin floor using an extra-long chain hoist. The normal hoist was too short to lower down enough from the top of the i-beam to the chain attached to the head brackets on the engine.
  4. Move the engine to the side of the cabin so you have enough space to build the platform which leads out of the cabin to the deck
  5. Put the engine on the base, which is strong enough to support it, with hoists attached to the sides of the base.
  6. Build a platform that will be used to slide the engine on its base out of the cabin to the deck
  7. Raise the engine on the base with 2 hoists attached to the left and right side - this was required in our boat to fit into the vertical clearance of the aft cabin door, move it over the platform and lower to the platform.
    - to fit into the aft door vertically, we had to remove the head. It's possible to keep the head, but the inclination angle of the platform has to be pretty steep.
  8. Use one of the chain hoists to pull the engine and base on top of the platform from the cabin to the desk
  9. Take it from the deck to the trailer or truck with any heavy equipment your marina has.

The cost was around $1k.
The major components were:


Attachments

  • Reinforced saloon floor.jpg
    Reinforced saloon floor.jpg
    122.2 KB · Views: 74
  • Gantry crane in the saloon.jpg
    Gantry crane in the saloon.jpg
    106.9 KB · Views: 67
  • Engine raised to the saloon floor level.jpg
    Engine raised to the saloon floor level.jpg
    123.6 KB · Views: 69
  • Engine moved to the side and put on the platform.jpg
    Engine moved to the side and put on the platform.jpg
    128.3 KB · Views: 62
  • Platform with engine raised by two pulley to get it up to the i-beam.jpg
    Platform with engine raised by two pulley to get it up to the i-beam.jpg
    120.7 KB · Views: 67
  • Platform with engine is moved above the ramp.jpg
    Platform with engine is moved above the ramp.jpg
    123.7 KB · Views: 63
  • Engine is moved out of the saloon.jpg
    Engine is moved out of the saloon.jpg
    104.1 KB · Views: 72
  • Engine is on aft desk.jpg
    Engine is on aft desk.jpg
    119.2 KB · Views: 68
  • Picked up from aft deck.jpg
    Picked up from aft deck.jpg
    144.4 KB · Views: 63
  • Engine is secured in the trailer.jpg
    Engine is secured in the trailer.jpg
    143.2 KB · Views: 66
Last edited:
Seems to me you did the hard part already. If liners and rings are less expensive than pistons and boring and the pistons are good, by all means go that route. Seems you are off to a good start and imagine all you will learn from this project. That is a low hours engine so hopefully there won't be many more surprises.

Carry on...
 
Looks very similar to how I did the engines in our last boat except that I had to use a steel vertical support on one side and I didn’t take the engines out of the salon. Looks like you have a good handle on it, although I wouldn’t attempt the rebuild. You have more guts that I do. Good luck.
 
I have the same engine! If you where locale I would love to help you with this.

I rebuilt my 327 engine from my 69 Camaro back in 77. Today, I still might be able to do it. But what your doing, I don't think I could! Again, I wish you luck with it!
 
The ocean came into the engine through some of the exhaust valves.
There is no likelihood the internal passages and valve seats, etc. are ok.

My bad, I was forgetting to think, listen or look at all of the pictures.
 
Your cost estimate and the money spent already prove the old adage:

BOAT : Break Out Another thousand

pete
 
Your cost estimate and the money spent already prove the old adage:
BOAT : Break Out Another thousand

That's not a cheapest hobby to have but I'm glad I'm not into horseback riding on yellow unicorns or surfing on whales ? while dropping on them from a helicopter - that would be really expensive ?
 
I didn’t take the engines out of the salon.

That was an option I was considering and would save some time and money on getting the engine out of the boa and dragging it home.

but the boat is 9 hours of driving from home, commuting would be a bitch;
it's cold now in Virginia to work on the boat without a lot of heating required and marina management would not be happy about this.
I was still hoping to give it to a shop to rebuild at that time.
And this will probably ruin the saloon floors as fluids are flying everywhere even if you are careful and put some protection under the engine.
 
I have the same engine! If you where locale I would love to help you with this.

Thanks, I appreciate it.

what your doing, I don't think I could!

I'm sure anyone can do this. After you start, you do not have much choice but to get it done.
One friend who works as a machine tools mechanic like to say "if someone assembled it, it can be disassembled".

getting everything back together looks a bit overwhelming at this time but we'll cross that bridge when we get to it.
 
That was an option I was considering and would save some time and money on getting the engine out of the boa and dragging it home.
but the boat is 9 hours of driving from home, commuting would be a bitch;
it's cold now in Virginia to work on the boat without a lot of heating required and marina management would not be happy about this.
I was still hoping to give it to a shop to rebuild at that time.
And this will probably ruin the saloon floors as fluids are flying everywhere even if you are careful and put some protection under the engine.
Once the block deck is cleaned off, use a straightedge and a strong light
to check it for flatness. They'll check the head when it gets serviced.
Now would be the time to correct any issues.
 
Last edited:
Once the block deck is cleaned off, use a straightedge and a strong light
to check it for flatness. They'll check the head when it gets serviced.
Now would be the time to correct any issues.

thanks. yes, it's on the agenda.
 
Workspace

To do this project, you need a decent amount of space to keep the parts and work on the engine. I started by using half of the two-car garage and took over the whole garage. :whistling:

A one-car space may be enough, but it will be tight to move the engine crane with a head around the engine block on the stand and the workbench or table.

And you need to keep somewhere all the units you removed from the engine. For this particular engine, there are a lot of them: Oil cooler, Intercooler, Turbo, Water cooler, Gearbox, and lots of small and large hoses and tubes. Plus, the head, flywheel, crankshaft, camshaft, pistons, rods, bearing, and all the other guts must stay somewhere until they are ready to go in again.
This is not something you can do in your kitchen, so plan accordingly.

My setup:


Attachments

  • workspace.jpg
    workspace.jpg
    116.5 KB · Views: 53
  • Some of removed parts.jpg
    Some of removed parts.jpg
    141.9 KB · Views: 56

Latest posts

Back
Top Bottom