Groco SV Series Seacock Help

The friendliest place on the web for anyone who enjoys boating.
If you have answers, please help by responding to the unanswered posts.
Joined
Nov 16, 2011
Messages
3,585
Location
USA
Vessel Name
Catalina Jack
Vessel Make
Defever 44
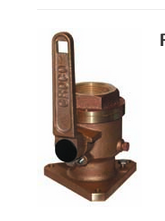
Repair kits for these cone-type SV models have been long out of production. I have two SV seacocks still in service and three others that have been abandoned in place. Of the two that remain, both still work although they are difficult to rotate open and closed. I have no idea of whether this is normal but probably not. I could have a yard install new ones in my seachest as there is plenty of room but as long as these two still work, I am reluctant to spend the money. One of them supplies the raw water wash down pump so it is not critical anyway.

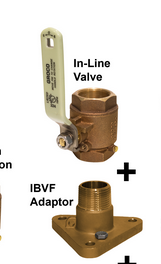
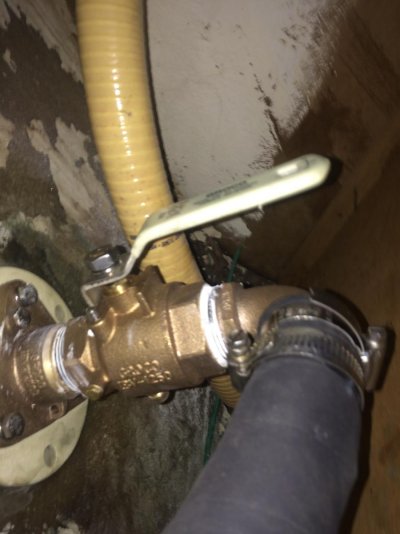
An alternative I have been thinking about is to fit a bronze ball valve to these seacocks downstream of the valve and simply leaving the old seacock open permanently.*I see nothing ill coming from doing so but your opinions are sought.
 
A good tapered bronze sea cock can easily be nade servicable again.

The nut holing the taper is loosened and with a push or a tap the cone will come loose.

Clean everything with a plastic pad , us obtain the fine style valve grinding compound , a dab will do and move the plug with the handle while pushing on the threads for the nut.

In a very short time the surface will be lapped, the valve grinding compound is removed , and the unit reassembled with water proof grease .

Seldom more than 10-15 min to refresh a seacock.
 
Last edited:
Indeed. What FF says. I am a big fan of these old school seqcocks. My Californian had them. They were seized when I bought it. At haulout I had the yard disassemble, clean, and Hine them. Good as new. Much more metal to them than newer valves and they wear with the taper, requiring only adjustment vs wearing out or failing.

I guess these hings are all getting old now, so a good inspection is worth the attention, but I wouldn't replace without a reason -- they might still have more life in them than whatever you'd replace them with.
 
I believe that the SV series has a rubber plug as opposed to a bronze cone. Please correct me if I am wrong.
 

Attachments

  • groco sv seacocks section.pdf
    1.2 MB · Views: 58
Cigatoo is correct, the SV uses a tapered rubber cone. If they're hard to turn, you might be able to take them apart, smooth out the cone a bit if it's got any rough spots, lubricate with a rubber safe grease and reassemble. If that works, great. If not, then it's probably time to replace.


Depending on what you'd replace them with, it's not necessarily crazy expensive. The Groco BV valves are nice, but pricey. They (and others) have less expensive but still good quality seacocks, however.
 
I believe that the SV series has a rubber plug as opposed to a bronze cone. Please correct me if I am wrong.

Shoot. Indeed. If this is an SV, you are correct. It is a rubber plug. I would then recommend replacing it.

As for putting another valve downstream of it...I wouldn't want to do that, just because it leaves more that isn't helping, but could fail.
 
Thanks gkesden. My question was indeed about the wisdom of placing another valve downstream. Failure. What failure could happen? That is what I am trying to determine. I am not seeing that leaving the old valve open is inviting a future problem. What am I missing?
Shoot. Indeed. If this is an SV, you are correct. It is a rubber plug. I would then recommend replacing it.

As for putting another valve downstream of it...I wouldn't want to do that, just because it leaves more that isn't helping, but could fail.
 
Thanks cigatoo. The expense of new valves is not what is putting me off. We are live aboards. To have new valves installed would require putting the boat on the hard for a couple of weeks at least. We have nowhere else to stay while the work is being done so my inquiry is about the efficacy of another solution that can be had while the boat is in the water. I am not interested in doing a scab job. I wouldn't do that for anything on my boat. But, if adding a downstream valve is not an unwise solution, I am seriously considering doing so.
Cigatoo is correct, the SV uses a tapered rubber cone. If they're hard to turn, you might be able to take them apart, smooth out the cone a bit if it's got any rough spots, lubricate with a rubber safe grease and reassemble. If that works, great. If not, then it's probably time to replace.


Depending on what you'd replace them with, it's not necessarily crazy expensive. The Groco BV valves are nice, but pricey. They (and others) have less expensive but still good quality seacocks, however.
 
Thinking about it, if these valves are in a sea chest, you can probably change them in the water. Pull the top of the sea chest and you can likely come up with a way to hold the fitting in place and plug it at the same time to allow you change the valve in the water (assuming the thru hull installed into the sea chest is in good condition).
 
Wow, you guys are doing a lot of good thinking for me. The seachest is just fine and very accessible. Unfortunately, over the years, enough weight has been added to the boat such that, when the seachest cover is removed, sea water pours over the top, just barely but it does. This is an issue common to DeFever 44s. I could empty the water tanks and fuel tanks and see what happens. That might be enough. Another problem though is that those old Groco seacocks are glassed in.
Thinking about it, if these valves are in a sea chest, you can probably change them in the water. Pull the top of the sea chest and you can likely come up with a way to hold the fitting in place and plug it at the same time to allow you change the valve in the water (assuming the thru hull installed into the sea chest is in good condition).
 
Worst case, if you do have to haul to swap them, if you can figure out the whole project ahead of time, have everything you'll need on hand, etc. you can probably do it all in a day on the hard. Arrange to haul in the morning, do the swap, then re-launch the same day.
 
Greetings,
Mr. cj. What about renting some air flotation bags and buoy the hull to above the inlet of the seacock? Might be cheaper than a haul out and you can stay aboard.
Just don't let them deflate or slip out from under...glug, glug, glug.


iu
 
You asked, "What about putting another valve inboard of the SV seacock and then just using that new valve and leaving the SV open?"

I see that as a potential problem. Here's why:

1) You can't just attach the new valve to the seacock directly (even if the threads matched, that would be too fragile and easy to break off).

2) So if you use a length of hose now you have something that can fail between your (new) valve and the path of water into your boat that the new valve would not shut off.

3) You could say "but if that hose fails I still have the original SV seacock" except by your design you won't be exercising it, so who knows if you "have" it at your disposal or not.

We had the SV's in a cruising boat and faced the same issue with the rubber plugs. At that time (early 2000's), we were able to find enough NOS rubber plugs in well-stocked chandleries to keep them maintained, but the writing was on the wall.

I would replace with new seacocks when they become problematic (or before, if you want to do them all in one go). Last time I did the research, I chose the Groco BV (after looking into body material, ball material, handle, where manufactured, etc.), but there were a couple other ones I also liked. I'd check it all again now before choosing as that was over ten years ago.

Not saying what you should or shouldn't do, but you asked it as a question of did anyone see an issue. I responded as if they were on my boat.

Frosty
 
John, another issue with putting a new seacock on an old through hull is that the threads don’t match and will have a shallow grip. Rod’s MarineHowTo articles on seacocks detail this. Wish I had a better suggestion, but a short-haul with some aggressive sandpaper or a file might get you a couple more years out of those rubber plugs. Failing that, if the yard’s not busy and you can stay in the slings, it would probably take less than a day to remove the two old seacocks/through hulls and install new.

The downside I see of adding a new seacock to the existing one is the added leverage you’ll create if something falls on it. I forget the exact numbers but a seacock is supposed to handle a continuous load of so many pounds over so many minutes.
 
What about putting something over the open end of the sea chest on the bottom of the hull to stop water from coming in while you replace the thru hull? Maybe a piece of plywood with butyl tape on it to seal the gap. Then run a cable up through the plywood and through the sea chest to keep it in place while you work on it. Then just pump out the sea chest. Maybe seal the plywood with epoxy to help protect it. But you should only need it to last a couple of days so a piece of 3/4” plywood should last that long before delaminating. Good luck.
 
Have you talked to Groco? They were very helpful when I phoned them. Pay attention to what they say about lubrication. They recommended Molykote for me and basically nothing else.

Jim
 
Thanks, gus, for all of your thinking. The problem with several of the replies is that the offending seacocks are glassed in. They cannot be simply removed and replaced. They must be cut out, glass work done, then new seacocks. That is why I mentioned earlier that one choice may be to decommission the old and cut in new seacocks above.

I did just give these two valves some exercise - stiff, bit still working. Yes, that hose above the valves needs some attention.
John, another issue with putting a new seacock on an old through hull is that the threads don’t match and will have a shallow grip. Rod’s MarineHowTo articles on seacocks detail this. Wish I had a better suggestion, but a short-haul with some aggressive sandpaper or a file might get you a couple more years out of those rubber plugs. Failing that, if the yard’s not busy and you can stay in the slings, it would probably take less than a day to remove the two old seacocks/through hulls and install new.

The downside I see of adding a new seacock to the existing one is the added leverage you’ll create if something falls on it. I forget the exact numbers but a seacock is supposed to handle a continuous load of so many pounds over so many minutes.
20210310_171549.jpeg
 
I am planning on paying Groco a visit soon, in person. They are located on Kent Island (MD) where the boat will be soon relocated.
What about putting something over the open end of the sea chest on the bottom of the hull to stop water from coming in while you replace the thru hull? Maybe a piece of plywood with butyl tape on it to seal the gap. Then run a cable up through the plywood and through the sea chest to keep it in place while you work on it. Then just pump out the sea chest. Maybe seal the plywood with epoxy to help protect it. But you should only need it to last a couple of days so a piece of 3/4” plywood should last that long before delaminating. Good luck.
 
First and foremost, I have total sea chest envy. Love that feature on your boat.

Back to topic at hand. I'd swap out the old cone seacock for modern. A couple years ago, Groco introduced an adapter flange that solves the problem of straight thread mushrooms to tapered thread NPT valves. I'd go with that. Here's a 3/4" but other sizes are available of course

https://www.groco.net/ibvf-750

Probably need to do it at next haul since your current are glassed in.

If you're dead set on refreshing your current rubber cones, problem is the rubber has swelled into the opening and is no longer evenly tapered. You can plug the inlet and remove the cone and sand down. But frankly, it's probably time to replace with new.

Good luck.

Peter
 
Back to topic at hand. I'd swap out the old cone seacock for modern. A couple years ago, Groco introduced an adapter flange that solves the problem of straight thread mushrooms to tapered thread NPT valves. I'd go with that. Here's a 3/4" but other sizes are available of course

I have never understood the attraction of these, and especially in this case where the op doesn't have any valves to re-use.

I'm asking for your reasons not to challenge you, but because I respect your opinion.

What bothers me about them is you still have the union of two threaded portions on the "wrong" side of the valve. So that material on each piece almost has to be thinner than a solid seacock. And it's threaded.

But mostly, what do you gain? I suppose if you had a boat full of valves you could mate to them you could save money, but with a boat full of Groco SV's that won't be the case. Yes, you could switch valves later without putting in a new base, but it's not that one does that very often (in another 30 years when a new quality seacock goes bad you might want to check the through hull anyway).

I guess I could imagine some cramped space in which it would solve an an installation problem, but otherwise.... am I missing something?

Edited to add:

Groco BV vs. Groco IVBF
 

Attachments

  • groco bv.png
    groco bv.png
    30.1 KB · Views: 174
  • groco ivbf.png
    groco ivbf.png
    38.6 KB · Views: 175
Last edited:
Frosty, good questions. I installed 13 of the IBV valves, flanged adapters, backing plates and through hulls below the waterline and see few, if any, disadvantages. The valves and adapters are very robust, heavy castings. Because the threads match on both sides of the adapters, the threaded connections between the through hulls and flanged adapters and between the adapters and valves are deep and strong. I also really like Groco’s thick composite backing plates, which can be epoxied to the inner hull, won’t swell with moisture and provide the studs that the flanges bolt to. They essentially double the thickness of the hull where the adapter and through hull mate up. With the backing plates and adapters, there’s also no need to drill three more holes per seacock through the hull to secure the seacocks. Lastly, it’s at least theoretically possible to change out a valve without hauling if you can temporarily plug the through hull from the outside. (Haven’t tried this and, as well built as this gear is, I doubt I’ll have to.) Had them in since 2015 without a hint of a leak or seep. Would definitely do it again.
 

Attachments

  • 5767B719-D2DF-4910-BE2C-14DD9ECFE3CA.jpg
    5767B719-D2DF-4910-BE2C-14DD9ECFE3CA.jpg
    154.8 KB · Views: 11
  • D4F6B679-3B71-4C75-9ABD-733481CE5DFA.jpg
    D4F6B679-3B71-4C75-9ABD-733481CE5DFA.jpg
    147.8 KB · Views: 12
  • 0ADD9B2D-C13D-470B-87FC-856FC782C10B.jpg
    0ADD9B2D-C13D-470B-87FC-856FC782C10B.jpg
    84.1 KB · Views: 12
Angus,

Thank you for your perspective. Your parts layout is so nice and tidy looking :)

I had seen those backing plates, (tho they were not in existence last time I replaced seacocks, so I made my own out of fiberglass board with a hole saw and drill/tap.

A couple points though:

I also really like Groco’s thick composite backing plates, which can be epoxied to the inner hull, won’t swell with moisture and provide the studs that the flanges bolt to. They essentially double the thickness of the hull where the adapter and through hull mate up. With the backing plates and adapters, there’s also no need to drill three more holes per seacock through the hull to secure the seacocks.

This is exactly how I did mine, but with the BV seacocks. What I mean is that I made my own fiberglass backing blocks (used pre-made fiberglass sheet from McMaster Carr), epoxied them to the inner hull, and they were tapped for the seacock fasteners, so no holes through the hull for those.

So for those points, the BV can be the same, because that's about the backing block/installation. One could now use those Groco backing blocks instead of making them.

The ones you installed still do have the ability to come apart which the BV don't, so there they are not equivalent.
 
I have never understood the attraction of these, and especially in this case where the op doesn't have any valves to re-use.

I'm asking for your reasons not to challenge you, but because I respect your opinion.

What bothers me about them is you still have the union of two threaded portions on the "wrong" side of the valve. So that material on each piece almost has to be thinner than a solid seacock. And it's threaded.

But mostly, what do you gain? I suppose if you had a boat full of valves you could mate to them you could save money, but with a boat full of Groco SV's that won't be the case. Yes, you could switch valves later without putting in a new base, but it's not that one does that very often (in another 30 years when a new quality seacock goes bad you might want to check the through hull anyway).

I guess I could imagine some cramped space in which it would solve an an installation problem, but otherwise.... am I missing something?

Edited to add:

Groco BV vs. Groco IVBF
I was slow to warm up to them too - what problem are they solving? The traditional seacock lasts a long time, why separate the base from the valve?

I would lean towards the separate pieces just because eventually the valve will need to be replaced. Won't be soon, but someday it will. Not having to replace the flange base would make it much easier.

I just turned 60 and just had my thru hulls replaced with the traditional groco seacock. They are slightly more compact than the separate assembly or I would have gone that route. But either way, they will outlive me. Not a huge preference, but the separated are a bit more serviceable.

Peter
 
The rubber plug seacocks I have seen usually have a T handle opposite the operating lever.

This pushes on the rubber plug to make it water tight.

The T handle must be loose a turn or two before any attempt to change the valve operation.
 
Angus,

Thank you for your perspective. Your parts layout is so nice and tidy looking :)

I had seen those backing plates, (tho they were not in existence last time I replaced seacocks, so I made my own out of fiberglass board with a hole saw and drill/tap.

A couple points though:


This is exactly how I did mine, but with the BV seacocks. What I mean is that I made my own fiberglass backing blocks (used pre-made fiberglass sheet from McMaster Carr), epoxied them to the inner hull, and they were tapped for the seacock fasteners, so no holes through the hull for those.

So for those points, the BV can be the same, because that's about the backing block/installation. One could now use those Groco backing blocks instead of making them.

The ones you installed still do have the ability to come apart which the BV don't, so there they are not equivalent.

Sounds like a very good install. The flanged adapters were a selling point for me because, on our boat, the only thing holding the valves and through hulls together were a few mismatched threads—there were no bolts and no true seacocks. According to Rod Collins, they are (or were) still made that way—one fitting is NPT and the other NPS—and only engage a few threads when connected.

https://marinehowto.com/seacock-thru-hull-primer/

I didn’t the want to repeat that mismatch. The flanged adapters provide the correct mating threads for both components. I could not wrap my head around why anyone would market components that didn’t mate properly—especially for such an important application. True, you don’t read about many failures resulting from this and maybe Groco has changed the thread patterns in recent years, but they were still dissimilar when we were upgrading.
 
Okay, guys, there is a 100% consensus that I need to install new valves. I will be doing so, soon. I have plenty of real estateon the seachest wall above those two decrepit valves. I have learned here that the installation is really not that much of a big deal especially with the great access I have. Thanks so much, everyone, for taking the time to provide your insights.

One last question: what are your thoughts on installing them while in the water. I can glue the backing plate in place, get the flange ready to bolt to the plate with the ball valve mounted, drill the center hole for the water intake, and quickly, very quickly bolt the assembly to the backing plate. Crazy idea?
 
The mismatch is only an issue when threading a plain ball valve onto a thru hull without the adapter. If you use a proper flanged seacock, they've got straight threads to match the thru hull. The adapters do give you the ability to replace the valve itself more easily, however.
 
One last question: what are your thoughts on installing them while in the water. I can glue the backing plate in place, get the flange ready to bolt to the plate with the ball valve mounted, drill the center hole for the water intake, and quickly, very quickly bolt the assembly to the backing plate. Crazy idea?


Ideally, find a way to keep the sea chest from overflowing too much with the top off. Then have a helper hold a bowl over the spot you're drilling to minimize water ingress. Come up with a way to hold the thru hull from turning while tightening everything that also plugs it to avoid a ton of water coming in. 4200 and 5200 will cure underwater, so you will have no trouble sealing the thru hull. Once you've got the thru hull coated in sealant and the tool/plug ready to go, pull the bowl, shove the fitting in and then assemble it all.


Should be possible to do that without too much mess. And then get the old seacocks shut off, confirm they're sealing properly and plan to remove them at your next haulout.
 
Belay my last message with respect to doing the work in the water. As it turns out, the boat is going on the hard for some other work. I will mount the backing plates beforehand and have the yard drill the center hole and mount the flanges and valves. Can't be any more than one hour of labor.
 
Belay my last message with respect to doing the work in the water. As it turns out, the boat is going on the hard for some other work. I will mount the backing plates beforehand and have the yard drill the center hole and mount the flanges and valves. Can't be any more than one hour of labor.


Don't forget about installing a thru hull in that center hole for the flange piece to screw onto.


And while you're on the hard, it might be worth assessing how much work it'll be to cut out and glass over the old valves so you don't have to worry about them.
 

Latest posts

Back
Top Bottom