AMS 40' bottom job

The friendliest place on the web for anyone who enjoys boating.
If you have answers, please help by responding to the unanswered posts.

waddenkruiser

Senior Member
Joined
Jul 7, 2012
Messages
188
Location
Europe
Vessel Name
Sømarken
Vessel Make
AMS 40'
Three years after we purchased her we put our 39 years old AMS 40' for the first time on the hard. Idea was to get a quick bottom paint job done by a reliable ship yard and to be back into the wet elements after 2-3 weeks latest.
Hull looked well after pressure wash, no blisters, no defects, nothing.
ImageUploadedByTrawler Forum1459896036.927860.jpg
BUT the next day identified at the intersection of the hull and the shaft tunnels on both sides suspicious wet areas while the rest of the hull was perfectly dry. Scratched with a screw driver, suddenly some water came out - out of what?
ImageUploadedByTrawler Forum1459895309.316167.jpg
ImageUploadedByTrawler Forum1459895829.370020.jpg
Decided to get the complete underwater hull blasted in order to apply five layers of epoxy (Gelshield) before renew the anti fouling. The PO did that 10 years ago but only in the waterline area.
Again no blisters, no defects.
ImageUploadedByTrawler Forum1459895605.222427.jpg
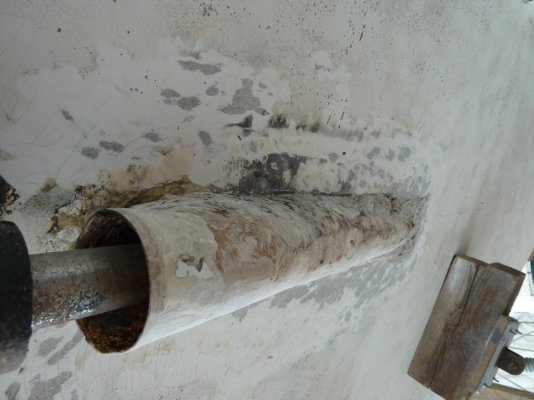
Knocked on the suspicious areas around the shaft tunnels - sounded hollow and consequently decided to open it.
ImageUploadedByTrawler Forum1459895663.598797.jpg
ImageUploadedByTrawler Forum1459895708.607505.jpg
ImageUploadedByTrawler Forum1459895744.228079.jpg
Obviously 39 years ago the Taiwanese ship yard (AMS hulls were built in Taiwan while the boats were equipped / completed in Hamburg / Germany) made a very poor job in that area by applying the GRP layers not tight enough to the surface of the shaft tunnel / hull intersection.
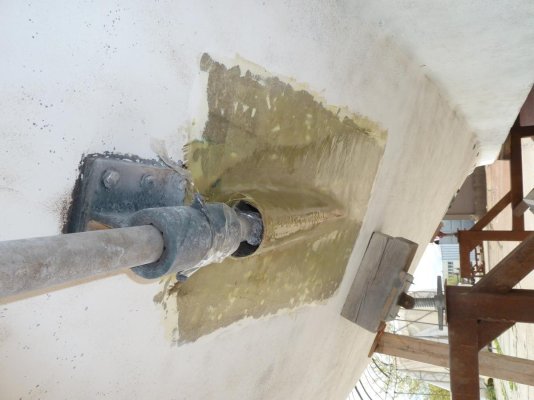
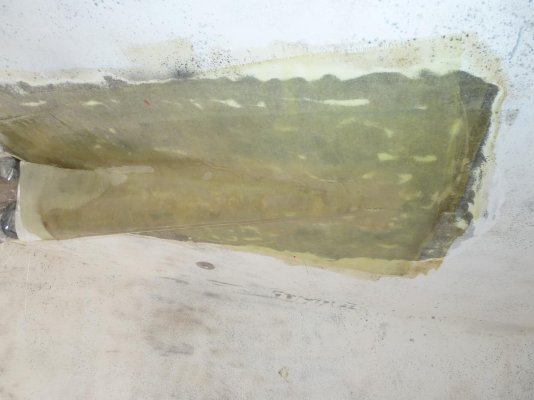
These areas are now properly rebuilt by the yard before the epoxy layers will be applied.
Will cost time and money but we definitely want to get rid of this issue.
However, taking into account her age she seems to be very robust. No other issues identified beside both hull / shaft tunnel intersections.


best regards / med venlig hilsen
wadden
 
Last edited:
Update: rotted material removed. Now it has to dry some days.
 

Attachments

  • P1050056.jpg
    P1050056.jpg
    109.7 KB · Views: 1,683
  • P1050057.jpg
    P1050057.jpg
    119.9 KB · Views: 119
Update: The rebuild of the hull / shaft tunnel intersection has started. After filling with epoxy they applied already some GRP layers.
 

Attachments

  • P1050067.jpg
    P1050067.jpg
    106.2 KB · Views: 174
  • P1050075.jpg
    P1050075.jpg
    98.8 KB · Views: 249
Thanks for posting this mr. wadden. Will you be pulling the shafts and/or replace the cutlass bearings too?
 
Of what advantage are these shaft tunnel extensions?
Some kind of whack job protection as in if the hull hit something, less shaft exposed?
Or underwater streamlining effect? Cant be too much help?

Encasing the entire shaft would stop parasitic water drag on a shaft.
 
Last edited:
Will you be pulling the shafts and/or replace the cutlass bearings too?

Actually I don't intend to pull the shafts and change the bearings. Clearances seem to be o.k. Engine / shaft alignment to be checked anyhow when back in the wet element.


best regards / med venlig hilsen
wadden
 
Of what advantage are these shaft tunnel extensions?

I raised the same question to the designer and former owner of AMS (he is in the 70s and has retired some years ago). His answer: Just for the ease of cleaning the hull from mussels.

These tubes are just an outside extension, not directly connected to the inside part of the shaft tunnels or stern tubes but "stuck" on the hull. He imposed them to avoid the larger elliptical "mouth" in the hull which results from the angle at which the shaft leaves the hull. He made the experience that inside of the elliptic breakthrough a lot of mussels are accumulating over the time ...
I'm an engineer and from a fluid mechanics perspective these extensions are looking sound and reasonable. Therefore I decided to keep and rebuild them (cutting them off and live with the elliptical "mouth" and invest every three years some time to get the mussels out there would have been an acceptable option) - although there positive effects may be neglected in the speed range we are under way.


best regards / med venlig hilsen
wadden
 
The repair is looking good. Post a pic of the bottom job when your done. :)
 
Update
Work progresses slowly due to cold + windy + rainy weather. Unfortunately we are talking now about end of May / early June to be back swimming again.
Anyhow rebuilt almost done, some grinding work left. And then we have to wait for some warm and dry days to get the epoxy painting job done.
ImageUploadedByTrawler Forum1462388120.464510.jpgImageUploadedByTrawler Forum1462388144.952556.jpgImageUploadedByTrawler Forum1462388177.773587.jpg


best regards / med venlig hilsen
wadden
 
We will hopefully come to an end with our bottom job soon. After preparing for the paint job the first two layers of epoxy (International Gelshield 200) have been applied. Now the residual pores (caused by the sand blasting) in the surface have to be filled followed by three additional layers of Gelshield.
ImageUploadedByTrawler Forum1463988597.267271.jpgImageUploadedByTrawler Forum1463988718.743058.jpg


best regards / med venlig hilsen
wadden
 
Nice looking good
 
5 layers of epoxy (Gelshield) and the prime coat for the anti fouling are applied. Next week anti fouling to be painted. Then we can address some other small issues on deck.
From now on we are in the schedule we originally intended: Renew anti fouling and make small repairs all within two weeks. Unfortunately the hole story took ten additional weeks due to the rotted spots we identified. Long time and hell of money ...
ImageUploadedByTrawler Forum1464333161.925788.jpg


best regards / med venlig hilsen
wadden
 
Last edited:
Thanks for this very interesting post and the comprehensive photos. I am not familiar with AMS boats...could you post a wide-view photo of the vessel please?
 
Thanks for this very interesting post and the comprehensive photos. I am not familiar with AMS boats...could you post a wide-view photo of the vessel please?


ImageUploadedByTrawler Forum1464362341.198646.jpg
Don't have a better pic handy ...


best regards / med venlig hilsen
wadden
 
Great looking boat Wadden. You just may have more fenders deployed per foot of boat than Mark Pierce's Carquinez Coot in that photo. :)
 
Great looking boat Wadden. You just may have more fenders deployed per foot of boat than Mark Pierce's Carquinez Coot in that photo. :)

Did we have to take it that far?
I can't say to much. I'm on my out to spend 15 days pulling a Pulse 12 (metal detector) and we pulled out all the ropes and fenders on the deck to wash. I know at one point there were 18 fenders hanging off the port side.
 
THX.
Pic was taken when we purchased her and shows all fenders we bought together with her. Can't remember why all of them were deployed at that moment. And I have to admit that we have now two really big balls in addition to protect the bow. If under way all four balls are stored at stern around the gang way. Somebody approaching us from stern might think of us as a "fender carrier" in front ?


best regards / med venlig hilsen
wadden
 
Story of our intended to be a quick bottom job prior to this years boating season still doesn't come to an end although it takes up to now 3 month:
Yesterday she was craned back to the wet element. After some minutes I noticed some water in the bilge. Checked the stuffing boxes and had to adjust one. Pumped out the bilge and made a round to inspect all seacocks. And identified water drainage at the depth sounder, the log and one seacock just beside the two sensors. All located mid ships close to the keel. Obviously the sand blasting guy did not take appropriate caution in that area (to do so one must crawl on elbows and knees under the hull so it is very likely that he didn't do that) and damaged the outer seal of the through hull fittings.
Unfortunately the crane had already left the yard. My estimate was that the drainage would some up to some 20 liter per day, so not really something to be fundamentally scared about. But no idea how this drainage would develop if the hull starts to "work" in the sea. Since we finally wanted to start the boating season the yard suggested to apply "Leak Hero". It is advertised as a magic sealant wax working even if applied under water.
We tried and failed. Water pressure seems to be too high, draining water built up bubbles under the wax and finally the previous drainage rate reestablished. So I advised the yard to reorder a crane and get that job done on their own expense.
This time it won't cost my money but it will certainly cost me additional time of the boating season to be spent in the garden ...


best regards / med venlig hilsen
wadden
 
Hard to imagine sand or any other kind of blasting disturbing a good seal under a thru hull.

Often a well sealed one has to be sledge pounded, heated, or fine wire cut and it is still a sruggle to get out.

Either way...ensure they are reinstalled correctly....

Usually if they don't leak right after reinstalling and caulking correctly...they won't.
 
Hard to imagine sand or any other kind of blasting disturbing a good seal under a thru hull.


Agree. But they were bone dry before the bottom job.


best regards / med venlig hilsen
wadden
 
Agree. But they were bone dry before the bottom job.


best regards / med venlig hilsen
wadden
Only thing I can think of is..... the sealant was imperfect and the ring of extra sealant around the lip of the thru-hull and or paint was sealing it till it was blasted off or disturbed.
 
All thru hulls have been renewed during a refit ten years ago (so documented by the PO). With the exception of the three now failed all others are tight and seem to be in good shape. Should add them to the list for next haul.


best regards / med venlig hilsen
wadden
 
Last edited:
Story continues. Yard sent me pics claiming that the thru hulls were likely to fail since outer sealant seems to be applied on AF. Would be in line with psneelds statement above.
Due to business obligations I wasn't able to have a look on it, only these pics. Personally never saw a disassembled thru hull so I'm unsure in the interpretation of the pics.
Want to achieve a fair cost agreement with the yard. Meaning it has to be fair for both of us - a good job has to be payed accordingly IMO.
Therefore my question: Pics might show old anti fouling or rests of a sealant paste?
What is your opinion?
(The other thru hulls are already on the list for next haul)
ImageUploadedByTrawler Forum1466238431.590812.jpg
ImageUploadedByTrawler Forum1466238462.931984.jpg


best regards / med venlig hilsen
wadden
 
Last edited:
Want to add: All thru hulls have been renewed ten years ago by a reputable yard specialized on sea going yachts and small commercials.


best regards / med venlig hilsen
wadden
 
Would appreciate any of your wise opinion on the pics above:
Do we see rests of old anti fouling or rests of a sealant paste?
I would like to believe the second. Otherwise I would have to conclude that craftsmanship is on a bad way ...


best regards / med venlig hilsen
Wadden
 

Latest posts

Back
Top Bottom