Removing a thru-hull

The friendliest place on the web for anyone who enjoys boating.
If you have answers, please help by responding to the unanswered posts.

meridian

Guru
Joined
Aug 21, 2011
Messages
1,014
Location
USA
Vessel Name
Meridian
Vessel Make
Krogen-42
I have a 1.5" thru-hull that I want to remove. The core is solid about 1” thick. Does the following sound feasible?
1. Remove the fitting. 2. Cut a circular groove in the sidewall of the hole. 3. Fill the hole with thickened epoxy. The idea is that the epoxy that fills the grooved area will lock the plug in place.
 
That is way too risky.

The usual way of filling a hole would be working from the outside.
Grind the outside of the hole at about a 12 to 1 slope till you get close to the inside.
Then cut a pile of fiberglass circles all different diameters starting with about 1" larger diameter the final hole size on the inside and working your way up to the newly faired out sloped outside with some extra diameter to spare. Each piece can be slightly larger than the the one below it by about 1/2" Make at least 2 pieces for each size. This may sound like overkill, but it is considered the proper way.
Sometimes, repairs can be done similarly with the only difference being that you grind the outside down to about a 3/4" depth and then do the same grinding routine on the inside of the boat if you have decent access. This will give a patch from both sides.
Be prepared for lots of grinding and sanding.
The layers should be made by using the glass and epoxy. It is highly recommended instead of the logical choice of glass and polyester resin, even though the original hull was probably made with glass and polyester.
I would use fiberglass mat for most of the trip and glass cloth for the last 2 layes or so. This will make fairing out a lot smoother.
 
Last edited:
Tont B is describing the right way to fill a hole in fiberglass. It's in the books if you want more detail. Something about a "secondary bond".

The easy way is to leave the thruhull in place and cap it off on the inside. There are a couple different ways to do this, depending on whether the truhull is threaded or barbed.
 
.........The easy way is to leave the thruhull in place and cap it off on the inside. .......

That is probably what I would do if it were me. I am at work and didnt have time to mention that. The little bit of drag created by the outer lip of the thru-hull is not worth the trouble to mess with. If you have never messed with fiberglass before, it is REALLY not worth the trouble and could possibly result in sinking your boat of you made a major mistake.
Fiberglas work is easy and with experience, you can actually work relatively clean. But one error in not knowing if the resin is about to set up or not could cause a catastrophic joint failure.
 
The reason I want it out is I need the space to put a holding tank.
 
I don't think you have to make the hole a solid laminate...you can still have it cored...you just have to epoxy a properly scarfed core in (depending on the core whether it can/shuld be done) then do properly scarfed skins on top and bottom.

But for a 1.5" thru hull...depending on overall hull thickness, I may just go solid...
 
Last edited:
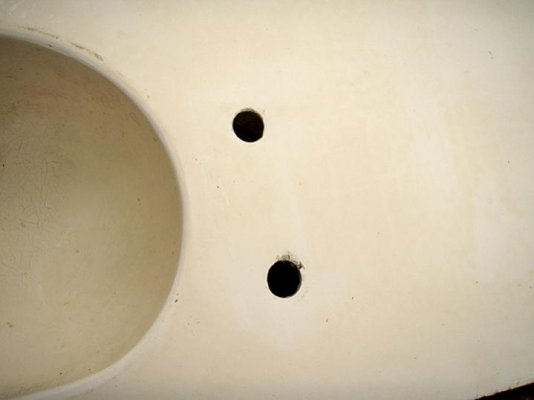
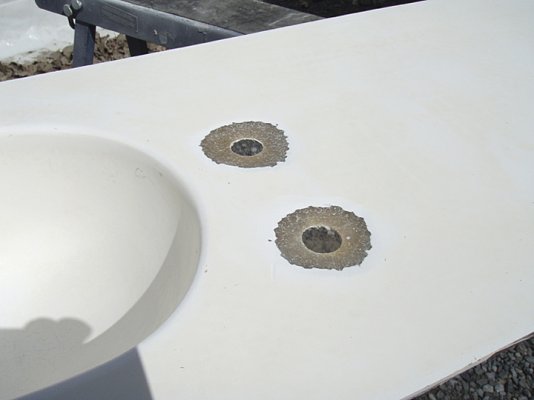
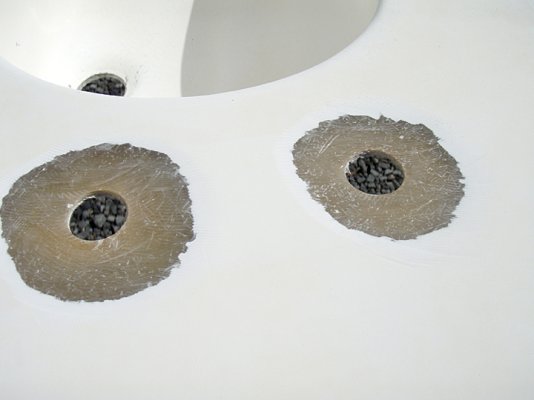
I am just in the process finishing glassing in 3 unused thru hull transducer holes. I was my first hole patch, but not my first glass/epoxy experience. It was a time consuming but not hard process. My holes were about an 1 1/4 diameter thru an approximate 3/4' solid bottom. I followed the attached article pretty closely, with a couple of enhancements. Namely I put each of my round pieces of mat or cloth on a paper plate that had the diameter written on it. I sorted the smallest to the bottom of the stack for each hole, the largest, first layer applied was on top. I bought a nice but cheap ($18) digital scale, capable of 1 gram resolution from Harbor Freight. This proved to be the easiest method I have ever used for getting the ratios right on various size epoxy batches. I used clear plastic throw away cups for mixing. I put the resin and hardener in plastic bottles with ketchup type squirt caps. These let you add by the drop without waste or mess. About 6~7 drops = 1 gram. I would zero the scale with the cup on it. I would then add 3 to 7 grams of hardener, and then resin till the scale read 6 times the hardener wgt. Ex: 3g hardener = 18g total or 7g hardener = 42g total. This method is far more accurate than the WEST system pumps and allows you make a very small batch or a large one with the same accuracy. I presoaked the glass circles on their paper plates. I would do 5 or 6 at a time. I used slow hardener in approx 60 deg weather so I had time. I would stack the presoaked glass plates in order of application. Largest first. The best tool I found for saturating the glass and working out the air bubbles when applying the layers is a 2" chip brush with the bristles cut about a half inch long. The short bristles are stiffer and allow you tap out the air and move resin from place to place as you do it. I would pour the mixed epoxy on the patch circles like you would syrup on a pancake. I would then tap with the brush to get uniform saturation. The brush worked far better than the laminating roller. You are working upside down and air bubbles still want to go up. The short stiff brush did a better job of popping the bubles. For grinding the holes I used my 4 1/2 angle grinder with a 24 grit disk. It cuts fast. To control the very nasty dust I use an old forced air furnace squirrel cage blower. It creates a hurricane of wind. I place it so it about 4 ~5 feet from where I am working. It blows away the dust before it can land on you. Working with safety glasses in a short sleeve T=shirt I never got a bit of the itchys. Prior to ginding the conical holes, I groung off the bottom paint in about a 15 inch circle around the hole. Then use a template to draw accurate concentric circles every inch of diameter or so up to the final hole diameter (7.5" in my case) These help in getting the hole round and and the taper straight. I ended up with about 22 layers in each hole. My mat and cloth was pretty thin. One more thing, It is counterintuitive at least to me that the layers of glass run from largest to smallest. That is the right way though. It has to do with how the layers rest on each other rather than extend beyond the edge of layer below. This provides a stronger bond than having epoxy resin bridge the gaps.
 

Attachments

  • hole patching.jpg
    hole patching.jpg
    204.8 KB · Views: 203
  • hole patching 001.jpg
    hole patching 001.jpg
    196.5 KB · Views: 162
  • hole patching 002.jpg
    hole patching 002.jpg
    201.8 KB · Views: 157
Last edited:
A lot of the techniques are up for debate. Depends on whose rationale you like better. A start with the small disks first and work my way up. My rationale is that I have more bondings onto the hull as opposed to the larger one first. With the larger piece first, you are trusting your entire patch to the one piece. Again, it's up for debate so I guess either way could be correct.
My laminating technique is as follows: Always lay down a piece of visquene to cover your work surface - epoxy willl not stick to visquene. If at all possible try to figure out a way to have some kind of plywood or whatever covered with the visquene pressed agains the inside of the hull hole. This will allow you to press out and work the fiberglass from the outside without falling through the hole.
I use a roller and brush combination, but mostly a 'laminate roller". It is a hard nylon type of roller with ridges. This will press the resin (and the bubbles) out of the fiberglass after it has been saturated and thus prevent too much resin from being applied. I saturate each disk of fiberglass on the visquene, then use the roller to squeeze out the excess. Then pick up the piece and apply it over the hole. Carefully work it with the brush to spread it out as best you can then immediately apply the next larger size disk over it using the same technique as above.
The main thing you are watching for is that the fiberglass becomes invisible when wetted out. If any white at all is showing, it will have to be ground off before the next layer is applied.
Let the first 2 layers cure out over night. The next day you can grind it some and fair it out for the next three layers. I usually do 3 layers at a time, wait a few hours and add 3 more layers. I don't like to do more than a total of 6 layers per day.
Just continue the process. Glassing/grinding.
Got to get back to work........byeeeeeeee
 
If you plan on doing this removal and patching yourself, you will need more instruction than what anyone can provide on a web forum. West System has books and a DVD (available at most marine retailers) that will guide you through the process.

What's important here, and what the folks are trying to tell you, is, you can't just fill a hole in your hull with epoxy (or anything else) and expect the patch to have the same strength as the rest of the hull.

Take their advice.
 
I filled a rougly 1.5" through hull hole during our recent haulout. Not knowing that I required instructions to do this I simply blundered through the project, as I have done for most of my life I might add. Family motto: real men don't need no stinkin' directions.

FWIW my blundering included dremel cleaning of the hole and roughening of the edges. Our hull is solid so no worries about coring. After the dremel work I taped a margarine tub lid over the hole from the outside. Then I thoroughly wet the sides of the hole with unthickened West System using fast hardener (it was cold out but above whatever magic temperature I found online for using West System epoxy). Because I was holding up the bottom paint crew I used a heat lamp to pre-warm the area and kept it on during the cure. I cut some pieces of glass cloth roughly in circles - maybe 6 or 8 pieces. For the outside layer I mixed some white pigment in the resin, put the resin in the hole from the inside of the boat and saturated a couple of layers of cloth in the pigmented resin. Then I changed to unpigmented resin and saturated the balance of the cloth that I had cut up. Then I filled what remained with resin thickened with colloidal filler. Then I went outside and realized that my margarine tub lid was allowing some leakage which I had suspected because I couldn't hold a level from the inside so I added duct tape and then added more filler from the inside. The effect of that failure to hold the lid tight to the hull was that my patch ended up maybe 1/8" proud of the hull which in hindsight was probably a good thing because I was able to fair it to the hull once everything cured. Which it did remarkably quickly because of all the heat I had applied combined with the volume of resin in such tight confines. So far it hasn't popped through the hull so I'm guessing that it may have worked out.

I love West System - I'm sure the other systems work too but West is the one I'm accustomed to. A couple of things I have learned though - first its important to wet dry areas with unthickened resin prior to doing any kind of bonding. That way the unthickened resin can flow into the voids and mechanically attach to the surface. Depending on the circumstances I have been known to briefly warm the resin in the microwave to further thin it to promote penetration (on really dense wood for example). Ideally if I have time I will wet the surface and let that coat cure before proceeding. I forget how many days you have to form a chemical bond to newly cured West System but if you do it within 24 hours it will chemically bond to the wetting layer. My second piece of advice is to buy the West System pumps. I keep a gallon jug of resin and a quart of each of the three hardners, each with its own pump. They live in a tupperware box in the engine room so that they are immediately and easily accessible without being able to make a mess. With the pumps you don't have to worry about getting the mix right.
 
It really isn't rocket science....jump in after a quick review of some of the basics...pracdtice a few small batches on other projects before your bottom if you have NO experience.

As far as the glass layers...remember it's only for strength not bonding...so it really doesn't matter to much as long as there's glass in there for a small patch like a thru hull hole.
 
Bob. I think you might have gotten lucky so far, but I would not be comfortable with that patch.
BTW, I only use West System epoxy. It is very consistent in performance.
I use the pumps also and I highly recommend them. I cant begin to tell you how much furniture I have repaired with West System.
If you ever take on a major project, i suggest to everyone to buy their videos. Their free technical info is also great.

West is also the most finicky and doesn't wet out as nice as some of the other majors. A pro glass guy from Cape May and I were comparing notes the other day as he gave me advice about my bottom relamination project.
 
Care to elaborate?

For a 1.5 inch hole it's probably fine if I read your fix correctly...3 layers of glass on inside and 3 on the outside... with thickened plug inbetween. Not the strongest but it obviously keeps the water out. A direct hit on it may disloge it...but I would be more worried about getting hit by a meteorite. :D
 
I get more than a little tired of internet experts who try to make simple projects complicated. I've been messing with fiberglass for close to 40 years now & I still don't know much about it. What I do know is that for simple repairs - like plugging a 1-1/2" hole - its not rocket surgery and anyone who suggests otherwise is being silly or worse.
 
I get more than a little tired of internet experts who try to make simple projects complicated. I've been messing with fiberglass for close to 40 years now & I still don't know much about it. What I do know is that for simple repairs - like plugging a 1-1/2" hole - its not rocket surgery and anyone who suggests otherwise is being silly or worse.

That's the beauty of the internet...if you go to it for advice...you certainly get the full spectrum of advice. You learn pretty quickly who are the guys with lots of book/forum reading and those that have been elbow deep in it for awhile.

So you pick and choose and verify the best you can...weight it carefully with your own experience and go forward. Sometime if nothing else to let a pro do it if you still feel uncomfortable and the fix would be expensive or deadly.

The best is when you say you did something that's barely on subject and you get blasted and the thread now is about how stupid you are...:eek:

The internet has definitely lessened my TV watching...beats the crap comedy shows they pass off today.:thumb:

But even the armchair guys know a thing or two in SOME categories....:D
 
Last edited:
I get more than a little tired of internet experts who try to make simple projects complicated...............

I get more than a little tired of my neighbor's barking dog or the people flying through the neighborhood ignoring the speed limit and stop signs. The beauty of the Internet is, one mouse click will take you somewhere else or you can turn off the computer and go boating.

The OP asked for advice and that's what he got, advice. He got conflicting advice but that's to be expected on the Internet.

From my point of view, if this repair is below the waterline (he didn't say), I would follow the instructions that West System provides in their booklets and DVD. Doing this incorrectly could result in the boat sinking

I'm not going to get the book out and copy it word for word, but basically, it requires grinding out a large area around the patch and using several layers of fiberglass cloth and resin. This is to insure a good bond that won't fail and fall out.
 
That's the beauty of the internet...if you go to it for advice...you certainly get the full spectrum of advice. You learn pretty quickly who are the guys with lots of book/forum reading and those that have been elbow deep in it for awhile.

Which is why I never use "advice" from an Internet forum to make decisions about anything important. I go to one or more pros who I've learned over time know what they're doing and what they're talking about. Engines, powertrains, electronics, electrical, props, and so on-- always the established pros.

The only exception are a couple of retired shipwrights on the GB owners forum, but these guys and their experience and accomplishments are known to me independently of the Internet.

I will pass on things I've learned from pros or very experienced people I knw or have met or from from direct experience on a forum like this, but as far as I'm concerned anyone who actually acts on anything I say here without checking with a known professional on the subject in their area is a fool.

I have occasionally gotten information from a forum that steered me to investigating a particular product or techique. But for the most part forums like this are interactive entertainment. Advice is generally worth exactly what you pay for it.
 
Last edited:
Which is why I never use "advice" from an Internet forum to make decisions about anything important.
.................
I have occasionally gotten information from a forum that steered me to investigating a particular product or techique. But for the most part forums like this are interactive entertainment. Advice is generally worth exactly what you pay for it.

It's not that bad.

Many times, someone will have a source for materials that others are unaware of or a different way of doing something that the OP was unaware of.

Then there are personal experiences cruising, or with marinas or vendors. The good and the bad.

But, you will have occasional folks posting really bad advice based on "I have been doing it that way for years and nothing bad has happened to me."

We were all beginners at one point and needed help.
 
But, you will have occasional folks posting really bad advice based on "I have been doing it that way for years and nothing bad has happened to me."

You're right. I've found forums to be very useful for learning about products I didn't know about, and gems like Keith's suggestion to use GoJo as fender/shorepower cord cleaner. This one continues to pay off big time as just last weekend we cleaned the bottoms of all our fenders that had gotten filthy from the soot and ash floating in the water of our marina from the big fire.

But for things like electrical issues- particularly electrical issues--- or engine issues or hull, shaft, V-strut, prop, rudder, etc. issues the suggestions on an internet forum are not something I'm going to actually act on. They may be right, they may be wrong, or they may be one of many ways to accomplish something. But since the members of a forum are total unknowns other than what they write, everyone's credibility is up for grabs (including mine). So I will always use a pro when it comes to things that really matter. Like removing a through-hull from a hull.:)
 
Here's an example of the techniques described in this post. I wanted to refinish the bathroom counter top (molded fiberglass). While I had the thing in my hands, decided to move the faucets (sink and shower controls) to a more convenient location. So I had four holes to patch before I could make new ones.

1. Original state
2. After some sanding
3-4. Grinding the holes
5. Light cardboard used as backing plate
6. Glassing
7. Some putty to complete the surfacing
8-9. Final results
 

Attachments

  • P4054398.jpg
    P4054398.jpg
    36.3 KB · Views: 79
  • P4064406.jpg
    P4064406.jpg
    20.5 KB · Views: 77
  • P4064408.jpg
    P4064408.jpg
    172.7 KB · Views: 82
  • P4064409.jpg
    P4064409.jpg
    181.8 KB · Views: 82
  • P4064413.jpg
    P4064413.jpg
    178.4 KB · Views: 74
  • P4064416.jpg
    P4064416.jpg
    192.3 KB · Views: 82
  • P4074418.jpg
    P4074418.jpg
    20.6 KB · Views: 84
  • Q-3.jpg
    Q-3.jpg
    138.9 KB · Views: 72
  • Q-5.jpg
    Q-5.jpg
    135.8 KB · Views: 67
Last edited:
Back
Top Bottom