Installing new Vent on pilothouse with crown

The friendliest place on the web for anyone who enjoys boating.
If you have answers, please help by responding to the unanswered posts.

boatruptcy

Senior Member
Joined
Oct 19, 2017
Messages
217
Location
usa
I want to add some 10"x10" opening hatches on my hardtop - Albin 28 tournament express. The hardtop has a crown, haven't measured but I would imagine at least an 1" over 10". Does anyone know where i could order some custom shims or starboard that was ripped from 1" to nothing to level the install area? Any other ideas?


12802161.jpg
 
Put a solar panel up there instead of a vent SMIRK
 
I've got one already, I need some fresh air when it's 8,000 degrees in the summer and only the middle window opens.
 
I've got one already, I need some fresh air when it's 8,000 degrees in the summer and only the middle window opens.

Put the doors on the hooks and go really really fast. :D

They do make those vents in various sizes too.
Leaving a 1 inch border may reduce the strength of the hard top too much. Maybe 2 smaller ones would be better?
Which way are you going to have them open, hinges fwd or aft?
 
Last edited:
Yeah, I'm going with the smallest but it's still too much to mount as is. Need to find a way to build up the top or add shims, hoping others have run into this before.
 
I've got one already, I need some fresh air when it's 8,000 degrees in the summer and only the middle window opens.

Don't they make oblong ones?
Maybe they hinge on the sides. I don't know.
 
I put 3 10X10” ventilation hatches on our cabin top a couple of years ago. Fortunately the camber wasn’t enough to matter so I just screwed them down. But if your camber is too much then you will have to do something about it. I was putting a stern thruster on the transom and it has a camber side to side. I put wax paper on the thruster tunnel and buttered it up with thickened epoxy. Then I bolted the top and bottom down to squeeze out the epoxy. After the epoxy went off I removed the bolts and took the thruster off. The epoxy filled in the gap between the thruster tunnel and the transom perfectly. Maybe you could do something similar with the hatch.
 
I meant to add that this is probably not a good place to use Starboard since it is really difficult to get caulk to stick to it.
 
I use butyl when I can through bolt the item. I don’t use it when I am screwing the item down. I am not sure that screws will compress the butyl enough before the screw strips out.
 
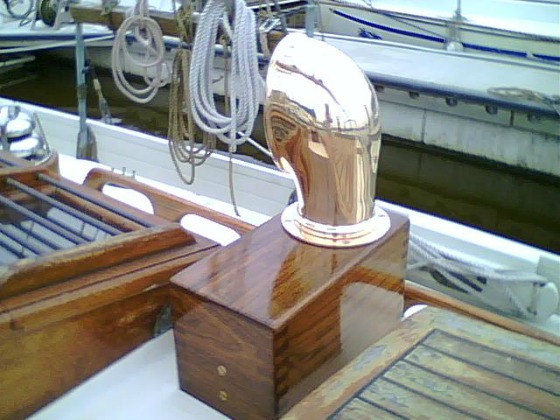
I would measure the actual radius that you have before attempting to find a solution. 1:10 would be a fairly aggressive radius. You could mill a teak box which holds the hatch flat and square on the top and is milled to follow the radius on the bottom. Similar to the box the dorade is mounted on in the pic from RTF in post #8.

Honestly, if you have the front window open all the way and the side windows open, an overhead hatch probably isn't going to do much for you. The only benefit I could see is I don't like having the windshield open underway, so the overhead hatch would help that issue, though again, with an openable side window, I'm not sure how much that will help.

I'd be concerned that the amount of labor will far outweigh the benefit.
 
Yeah, going down there today to measure, maybe it's not as pronounced as I thought. Teak box isn't a bad idea, thanks.
 
I was way off thankfully, only 1/4" of crown over 10", should be able to center hatch and make up 1/8 on each side with butyl.
 
..

Pics
 

Attachments

  • 20191205_132506.jpg
    20191205_132506.jpg
    102.5 KB · Views: 39
  • 20191205_132735.jpg
    20191205_132735.jpg
    70.9 KB · Views: 42
  • 20191205_132931.jpg
    20191205_132931.jpg
    71.9 KB · Views: 44
Use a thin piece of plywood and a tick stick and pencil attached to the stick to give the actual shape. That would give an accurate shape to work to.
You could do an initial cut sort of approx. to the curve to make the tick stickline easier.

Or do as Commodave suggested. It would not need to be epoxy as the same can be done with filled polyester. The kickoff can be adjusted by the amount of hardener used.

Use either material then gelcoat or paint to suit after smoothing the filler out.

I have used Butyl tape to good effect in similar applications where the item is screwed down, not bolted. I use a mess of clamps and pressure pads to apply pressure slowly to get good contact and then leave a thinner layer.
Your hatch would be a good candidate as the clamps can be used all the way around. Maybe just take the lid off as you work using just the frame.
This way the screws are not expected to squeeze the tape. They only hold and maintain the position.
 
Greetings,
Mr. b. What about a dorade vent(s)?


iu

I had one made for the exhaust over the stove. I had the box made of starboard with starboard cleats for inside corners and then, screwed together.
A pox on exterior teak. :nonono:
 
I also need additional vents in the pilothouse. I found the opening windshield on other Manatees to be great ventilation, but a bug collector too. I’m thinking Seriously about the dorades, reversed at the base of high pressure area near the windshield, probably with screens. Darned SS dorades are high-buck items though.
 
Once you get the hatch holes cut, tape off the flange of the hatch with wide painters tape, mount the flange in the hole and build up the gap with thixo and let it set. Then remove the hatch flange an smooth any gaps with more thixo and clean up the surface. Let it cure, and mount the flange. If all you have is a 1/4" gap on two hatches, one tube will work. Each tube comes with two nozzles. Leave the first nozzle on it once you have both hatched sealed up, and then once you get the flanges off, switch to the second nozzle and continue with the cleanup of the coaming around the hatch.
Don't torque down the bolts when you initially mount the hatch or you'll warp the flange and that won't end well. Just tight enough to stop any movement while you fill the gaps between the deck and the flange. You probably want to sand down the inch or so under the flange, so the thixo epoxy will have something to stick to.
https://www.amazon.com/TotalBoat-Thixo-Fast-Cure-System/dp/B00X6AM06I
 
Greetings,
Mr. OD. Expand your mind, man. It was an easy example I could find on the interweb. Make the dad-gummed base out of lasagna, if ya want.


200.webp
 
A flat hatch on a curved surface may need a stand off. It will help keep water out and leaks down if done right.


DSCN2756.jpg
 
If building a Dorade vent the down pipe inside should be larger than the cowl vent diameter , especially if screens are installed.

For still air a second opening directly above the down pipe can help, although some folks simply hinge that section as its faster to secure in a thunder bumper.
 
If building a Dorade vent the down pipe inside should be larger than the cowl vent diameter , especially if screens are installed.

For still air a second opening directly above the down pipe can help, although some folks simply hinge that section as its faster to secure in a thunder bumper.

My custom hood, over the stove, has a grease trap screen and a very quiet rheostat controlled, variable speed fan. It is so quiet, I leave it running to encourage ventilation when the boat is closed up.
It exhausts via a 3 inch Dorade vent on the upper deck.

Please note the word, "custom". We all know what that means. OUCH OUCH OUCH.

I do hope the next owner appreciates all the 'custom' additions I made.
I have put a lot of "perfume on the pig". :D:facepalm:
 
I hope you post your results with some pictures! I've been thinking of putting a hatch in the pilot house top of my Albin 28 also. My major concern, besides the camber of the top, is whether sunlight coming through the hatch at certain angles will make it hard to see my MFD mounted above the helm.
 
Will do, just got the vent yesterday. Going to get the nerve up to blow a hole in the hardtop. I don't think camber is issue.
 
Before I drill a hole through the boat, I tape a rare earth magnet where I think the hole should go. Then go to the other side and let another rare earth magnet find the location of the first magnet. That way I can confirm that there are no unexpected surprises when I cut the hole. I can make sure that there isn’t an obstruction that will cause a problem when I go to mount the device.
 
Back
Top Bottom