Exterior teak

The friendliest place on the web for anyone who enjoys boating.
If you have answers, please help by responding to the unanswered posts.
Joined
Oct 18, 2019
Messages
20
Location
Canada
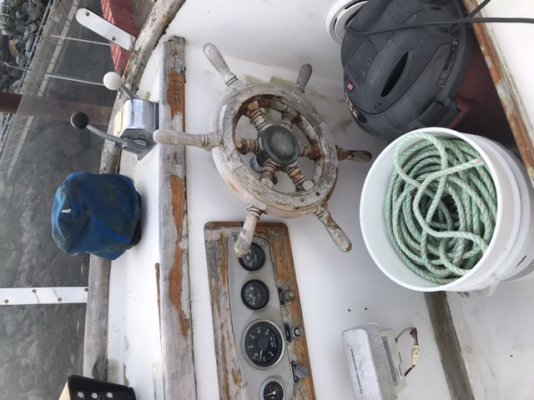
I havnt decided 100% for sure how I am going to finish the extremely weathered exterior, however I do think I’d like to remove as much as possible to work on in my shop. What do you guys think? Is this even feasible? I mean, drilling the wooden dowels and extracting the screws. What should I expect? Broken screw heads every other hole? I’m such a newb but am very handy. I appreciate all the advice?
 
http://www.trawlerforum.com/forums/attachment.php?attachmentid=96019&stc=1&d=1572797630
 

Attachments

  • 576EA2C2-4891-4AA6-9452-0C34C6CF9C84.jpeg
    576EA2C2-4891-4AA6-9452-0C34C6CF9C84.jpeg
    106.3 KB · Views: 70
I’ve done both. If you are at least partially covered it is easier to leave most everything in place. You can strip with a heat gun all winter, sand as the weather starts to break, and then varnish as the weather gets warmer. If you remove everything you have to reinstall everything and then seal and varnish the bungs. Better to spend time fabricating a decent cover, shed, or the like. A good enclosure pays off year after year.
Obviously things like the wheel can come inside.
 
If you can sand it, it will come back to life. If you feel you need to remove it to properly sand it then yes remove it. I would try sanding in place first. Removal often causes more damage than it solves.
 
We are going with paint on our exterior teak, tired of messing with varnish. I would not remove the teak but rather refinish it in place. One of the things I do when sanding in place is have about a 6” wide putty knife and put it in between the teak and fiberglass so I can sand right up to the edge of the teak without damaging the fiberglass. I can do most of the sanding that way with a DA sander and then use a multitool to get the tighter places.
 
Tough call. Too cold to paint outside this time of year. If you remove the pieces keep in mind you still have to finish over all the plugs when reinstalling: chisel off a bit high, sand down flush, etc. That can mess with finishing boards in the shop.

But if you plan for that it can be done. Pulling the boards means you are committed to cleaning up and rebedding all the boards and screws, filling all the joints with sealant. That is good weather work, or else water just gets under the finish again where it has not been completed.

Easy to pull the wheel and do that in the shop, just a massive sanding project for you when its snotty outside.

If you have any cracks those will need to be closed up too.

I found that my electric detail sander with the small triangular pad saved a lot of time and resulted in a better, more uniform finish. Also the 3M pro grade foam sanding pads are magic.

Feel for 'ya, as I have around 100 feet of teak railing/coaming and 13 wood window frames that keep me busy! I do get a lot of nice compliments on the results.

Ya do stuff like this because you'll be satisfied looking at it next season, not just for compliments. Plan for a early win with the wheel or something else you can pull to do in the shop, that will keep you motivated.

Looking forward to seeing the results!
 
Greetings,
Mr. I. Well, bung removal is pretty straight forward. Screw removal is the second issue that may or may not be easy. Re-bedding and re-bunging is not really a problem either. The biggest issue IMO is removal of the teak pieces without breaking or damaging them after removing all the screws. This is what will be the most frustrating and will probably take the most time.


Depending on how and what the teak was bedded in originally (or what the DPO might have used to "fix" things)it will take some creative thinking.


Start on a smaller, out of the way piece and see how it goes. As mentioned, the wheel is the easiest to remove. I refurbished a similar wheel on a former boat and I suggest after you get the bronze ring off one side and before total disassembly, get a number stamp and mark ALL the joints. Do so under the ring (out of sight) and it will make reassembly much easier.


https://www.amazon.com/Supatool-Ste...=2025&creative=165953&creativeASIN=B07MTRPBBH
 
I would remove the helm, all the rest refinish as it’s installed. Tip, buy a one foot section of floor sanding paper which has a heavy backing in what ever grits you need. It will cut thru the weathered teak faster than sand paper and last longer.
 
Looks like you are due for rebedding. If so, bite the bullet and remove it all.
 
In place IMO, the one pia is sanding the edge, get Spackle blade about8"
hold on edge of the wood protect the glass sand away
 
Every winter I take a few pieces home to refinish in my shop. I did the doors one year, hatches another year. I took my upper station wheel off and did it last year, it was a challenge getting it right. I even polished the brass which was pretty much a waste of effort.

I debated taking the handrail off but in the end just removed the stainless rub rail. On a previous boat (wooden Chris Craft) I removed and refinished the toe rails, bad idea, too much work and wood damage.

When I removed my teak upper deck I played with a number of ways to remove the bungs and screws. None worked very well. I ended up ripping it apart with crowbars.

If you figure out how to remove bungs without damage to the wood let us know. I have a number of window frames which should come out for refinishing and refitting.

pete

removal of 3/8 bungs with a 1/4 or thinner chisel worked well for me. Then when the screws won't turn, a thin dremel across the screw head allowed me to get them with a slot driver.
 
Back
Top Bottom