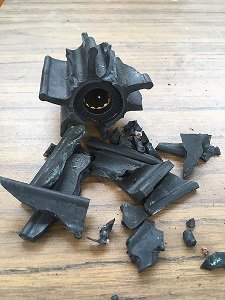
Toasted impeller

The friendliest place on the web for anyone who enjoys boating.
If you have answers, please help by responding to the unanswered posts.

Lou_tribal

Guru
Joined
Jan 20, 2016
Messages
4,375
Location
Canada
Vessel Name
Bleuvet
Vessel Make
Custom Built
Today we went to the boat to winterize the engine. I started the engine and began to pour the antifreeze in the raw water strainer... 2 minutes later the strainer was not emptying anymore while the engine was running?????
Stopped the engine and decided to check the pump impeller and found this:
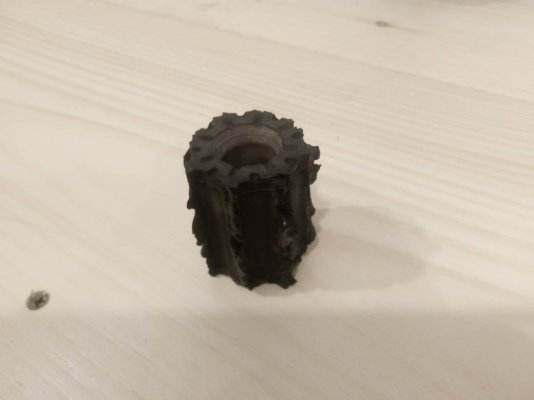
IMG_20191014_195845.jpeg

Quite happy to have found this on the ground and not in the middle of a cruise!
Today has been my first impeller replacement, quite a PIA and more if I have to do this in the water so I will replace it every spring from now on!

L
 
One of my engines has the impeller hidden very well. You almost can’t even see the pump. I found a tool that is an aluminum funnel that you insert the impeller into and then slide the tool into the pump with the impeller inside it. Hold the impeller in place and pull the tool or sleeve out. I got it at impellertool.com. No affiliation but a great idea. Makes my bad impeller fairly easy to change.
 
Make sure find all the pieces
One piece of the impeller was stuck in the outlet and kept the junk in the pump housing, but I will check in the oil cooler and heat exchanger just to be sure.

L
 
impeller pieces.JPG

Thought about glueing humpty back together again to see if I found all the pieces. Quickly moved on to simply checking all the coolers. Note to self: Open Seacock BEFORE starting engine.
 
One of my engines has the impeller hidden very well. You almost can’t even see the pump. I found a tool that is an aluminum funnel that you insert the impeller into and then slide the tool into the pump with the impeller inside it. Hold the impeller in place and pull the tool or sleeve out. I got it at impellertool.com. No affiliation but a great idea. Makes my bad impeller fairly easy to change.
As it was my first replacement I was not sure how to fit the impeller in the housing. I ended using a hose clamp, this was quite an easy and cheap trick. Gradually tight the clamp, push the impeller blades on the side and continue to tight the clamp, push the impeller in the housing up to the clamp, remove the clamp, a last push and done.

L
 
Plastic wire ties work great too. Some dish soap on the impeller and it slides right through them and into the pump housing.
 
The hose clamp works really well. Good thinking. Over time I just got comfortable enough to grease the first two thirds with superlube and push it in while simultaneously twisting until you feel the splines meet and match. Doesn’t matter if you twist the right direction. Once they start, you can clamp, tap or usually just push them the rest of the way. First time, it seems hard, after awhile you get the feel for it.

Buy a stainless removal tool for the next time instead of using two screwdrivers to make this an easy job. I replace mine every 1.5 years. They can usually go longer, but I avoid the duct tape the pieces back together routine as much as possible.
 
Interestingly, a good portion of the impeller failures I've seen on my engines have been at winterizing time. Seems like it usually happens as the impeller starting to go, but still pushing plenty of water, so no symptoms are noticed. At winterizing time it pulls an air bubble through, loses prime and that's that.
 
Greetings,
Mr. L. Well, it's all good. You learned something AND you got to work on your boat in a non critical place when YOU wanted (not that you really wanted to but it had to be done sometime).


I've used the gear clamp technique before and it does work. I have also cut a plastic "sleeve" the width of the impeller out of a water bottle and put that between the clamp and the impeller. I've greased it well before tightening the clamp. The greased impeller slides much more easily on the greased sleeve than on a single or even double gear clamp. Sort of like a poor man's piston ring compressor.


iu


One advantage of using clear plastic is you can see where the impeller is with relation to the housing AND it's cheap.


EDIT: Mr. rs. interesting you should say that. I started to winterize our "northern" boat (Mercruiser 350) and blew up the water pump just this past weekend. I think I'm going to change over from a belt driven water pump to a crank driven pump.
 
Last edited:
I bought a Jabsco impeller puller. It came with a T handle screw. On my engines I can’t get the T handle to turn so I bought some all thread (metric of course) and cut a short piece, put double nuts on it and now it works great getting the old impeller out. Then I use the impeller tool to insert the new impeller and it is pretty easy to change the impeller.
 
Lou, you lucked out.

I found chunks in the downstream side of my raw water strainer, from previous owner.
All good now, change those things at least every other year.
 
Definitely a good idea to have an impellor removal tool.
It is easy to damage the face of the pump body when prying with screwdrivers.
Annual replacement is cheap insurance, and it keeps you familiar with the process so that when you loose an impeller in the middle of the night on a rough passage, you know the drill, and have everything you’ll need on hand.
 
Tony Athens (on his forum at sbmar.com) suggested a method to help with impeller removal. He suggests: taking off the pump cover (to access the impeller); spraying WD40 into the open pump; then bump the engine (short push of start button); spray pump again; bump again; then remove impeller. Apparently this will break any "bond" that might exist (rubber vanes sticking to the pump body) and should make impeller removal easier.
Confession: I haven't tried this yet, removing mine this coming spring. Two seasons ago, I just put a new pump on instead.

Regards,
Tom
 
""Make sure find all the pieces"

With any impeller pump the practice of installing a Y strainer AFTER the pump is the only way to solve this problem with ease.

Finding and installing the parts might be a great winter project.

The OP wrote " I started the engine and began to pour the antifreeze in the raw water strainer.".

Draining the water , stating the engine dry and adding anifreeze could be the cause of the impeller failure.?
In m case I guess the impeller started to break apart a while ago. When starting the engine to pour the antifreeze the pump ran dry no more than 5 seconds.

L
 
I found wet /dry shop vac very helpful at removing pieces.
Suck at pump discharge... blow at outlet of cooler...
Repeat until no pieces are found.
You can back flush with a hose but it's a lot messier.
 
I've tried zip ties and hose clamps... latter works sorta kinda, but still awkward... and I had to use at least 2, preferably 3, on each impeller... gradually removing one at a time as the thing moved inward.

There's an impeller installation tool: Impeller Installation Tool

I was a bit skeptical, but used it last time, and it really does work like a champ. No relation, just satisfied customer.

Our impellers are threaded in the center, so screwing a bolt inward pushes against the hub and draws the impeller out. Sherwood sells a threaded T-handle removal tool, but I don't have room for the T-handle ends to swing past hoses and so forth, so... I got the right bolts from McMaster-Carr, and use a battery operated ratchet. Easy.

-Chris
 
When you try to remove the old impeller don't use pliers on the blades, they will just pull apart. Easiest and most simple removal is to use two screwdrivers on opposing sides, pry with both at the same time and off it comes.

pete
 
I've tried zip ties and hose clamps... latter works sorta kinda, but still awkward... and I had to use at least 2, preferably 3, on each impeller... gradually removing one at a time as the thing moved inward.

There's an impeller installation tool: Impeller Installation Tool

I was a bit skeptical, but used it last time, and it really does work like a champ. No relation, just satisfied customer.

Our impellers are threaded in the center, so screwing a bolt inward pushes against the hub and draws the impeller out. Sherwood sells a threaded T-handle removal tool, but I don't have room for the T-handle ends to swing past hoses and so forth, so... I got the right bolts from McMaster-Carr, and use a battery operated ratchet. Easy.


-Chris


That installation tool looks pretty slick, about how much do they cost?
 
I think the one for our size was something like $120-130-ish. Seemed a bit much, but I thought I'd give it a try... and it did really make things easier. I can't see one pump very well (working upside down) and both pumps are cluttered with hoses so it wasn't easy to get other solutions -- and my hands -- in there at the same time with enough ooomph. Took maybe 30 seconds to insert a new impeller with that tool.

-Chris


OK thanks. That does seem pretty high. I've learned to pull my pumps to for an impeller change as there is barely enough clearance for the impeller alone, much less any sort of tool. I can see how it would make putting the new impeller in easier, but since I've got the pump on the bench anyway, I don't think it's worth over $100.


Maybe for the generator. It's a much smaller impeller and I can do it in place.
 
When you try to remove the old impeller don't use pliers on the blades, they will just pull apart. Easiest and most simple removal is to use two screwdrivers on opposing sides, pry with both at the same time and off it comes.

I have twin 4 cyl, very space limited. I install 2 drywall screws and then use a pair of small vise grips to walk the impellers out. Quick and no risk of marring the surfaces.
 
Space is not an issue for me as I need to remove the pump to replace the impeller. May look a big job but this quite easy in fact.

L
 
Alcohol based anti freeze hardens and swells Neoprene impellers, as I found out when my toilet impeller locked up early in the new season (a few years ago). Nitrile impellers don't have the same issue, so if you have the option for nitrile that's something to consider. The engine has plenty of power to turn hardened (and swollen) impellers that a DC toilet doesn't, but the impeller is still compromised.

My winterization practice uses all alcohol based anti freeze, fresh and salt water systems, since flushing glycol based fluids through and spilling them out on the ground or into the water isn't acceptable. Toilet has a nitrile impeller, raw water pump gets a new impeller every other year.
 
Maybe for the generator. It's a much smaller impeller and I can do it in place.

I didn't get one for the genset; I can mostly just squeeze that rascal in by hand...

-Chris
 
My winterization practice uses all alcohol based anti freeze, fresh and salt water systems, since flushing glycol based fluids through and spilling them out on the ground or into the water isn't acceptable. Toilet has a nitrile impeller, raw water pump gets a new impeller every other year.

Interesting. I've always understood glycol (both ethylene and propylene) to be quite biodegradable. The only catch is that ethylene glycol is highly toxic to mammals (and probably others) until it breaks down (which is why it's not used as winterizing antifreeze).
 
OK thanks. That does seem pretty high. I've learned to pull my pumps to for an impeller change as there is barely enough clearance for the impeller alone, much less any sort of tool. I can see how it would make putting the new impeller in easier, but since I've got the pump on the bench anyway, I don't think it's worth over $100.


Maybe for the generator. It's a much smaller impeller and I can do it in place.

I bought one from impellertool.com. As I remember it was in the $40 range. It is well worth it even if it would have been more.
 
I don’t worry about which way I install the impeller. Once its in and buttoned up I crank the engine which then has all the impeller vanes spinning in the correct direction. I use right angle pliers to remove the old impeller.
 
For my Sherwood 17000 or equivalent, and inexpensive but effective removal and install, i finally came up with the below recipe.
Removal: a 2 inch long 3/4 machine bolt, 16 thread. It has a 1 1/8" head so bought an open end wrench for that. Bolt was < $1.50. A longer bolt may have saved a bit ofttimes but didn't fit in the limited space on my JD 4045AFM.
Install: lubed shaft and wall of pump with touch of coconut oil. Then lubed tips of vanes with same. One pint was < $7 (will last beyond my boating lifetime). Bought police plastic handcuffs on Amazon. They are 1/2" wide and have smooth edges (less possible cutting than a hose clamp). Since sold as paired handcuffs you get 2-for-1 and they were 6 for about $11 anyways. Also they now are sized to my impeller so can be re-used.

Total cost about $19 for lifetime of removals and installs, plus cost of a 1 1/8 wrench or socket of your choosing.

Can email pics if interested.
 
Back
Top Bottom