Help with wood railing repair/restoration

The friendliest place on the web for anyone who enjoys boating.
If you have answers, please help by responding to the unanswered posts.
Joined
Feb 25, 2015
Messages
645
Location
USA
Vessel Name
Branwen
Vessel Make
Hatteras 48 LRC
I have a wood railing around the bow with a gate on each side. I've always been aware that the gate hardware on the starboard side is loose. I tried to tighten the two screws that hold the hardware firm and noticed there wasn't much wood left for the screws to hang onto. I then took off the loosest piece of hardware and discovered there isn't much wood left.

My initial thoughts of filling in the weak spots with an epoxy wood filler and reshaping may not be sufficient. I'm not confident that there's enough wood left for a filler to hang onto. Would a reasonable approach be to cut off nearly everything that goes inside the hardware and attach a replacement to the remaining railing with long, countersunk screws, possibly one screw on each side with a third in the middle? Is there a better approach?

Thanks for your help.

Here's the railing with the latch hardware on:
RailingWithLatchHardwareOct2019.jpg

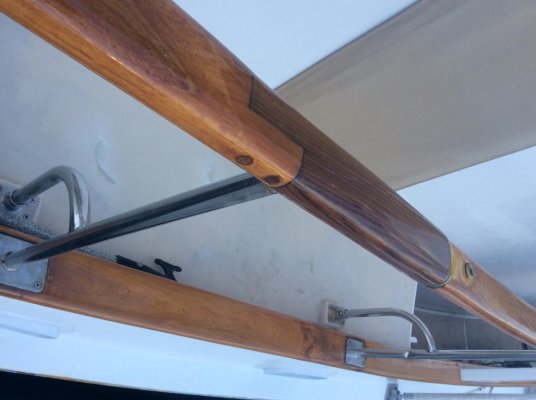
This shows the top of the railing with the hardware removed:
RailingTopBeneathLatchHardwareOct2019.jpg

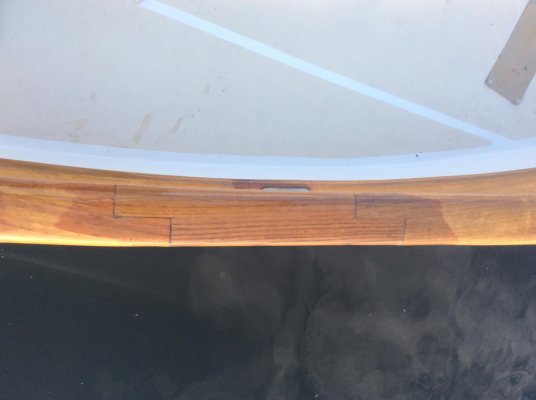
And this is the bottom of the railing with the hardware removed:
RailingBottomBeneathLatchHardwareOct2019.jpg
 
I think you could fill the hardware with Marine-Tek and push it onto the wood. You can later insert screws from the bottom. You might consider long screws, countersunk through the notch in the chrome piece. (It's not chrome or stainless but probably plated brass or bronze, pretty soft for drilling) I would use "Git-Rot" on the wood first, it basically turns rotten wood into fiberglass.

pete
 
Greetings,
Mr. GB. Yup. What Mr. PM suggests is probably the best long term solution without replacing that section of railing. Pre-drill holes before re-inserting screws. I think the original fastening system with two screws from underneath should do quite well without adding extra screws. Oh, and fill the old screw holes with Marine-Tex before you slide on the gooped up hardware.
 
I don’t think that I would fill it with Marine Tex and stick it on. The problem with that is you will never get it off again. I would use an epoxy, Marine Tex is fine, and reform the ends of the wood until the hardware will fit again and then reinstall in the normal way. Then you will be able to remove the fittings if you need to. We just removed our rail fittings this year and refinished the rails and polished the fittings and they now look beautiful.
 
Maybe now that I think about it, I might put a lining of saran wrap or something similar and then fill it and stick it on. After it has gone off pull the fitting off and peel the saran wrap off. That way you have the best of both ways.
 
I had a similar problem with one end of a lift out section of wooden gutter/drain around the lazarette. I tidied up the rotted end and attached a piece of roughly shaped teak with screws and epoxy. I then sanded the end to the finished shape required using my Dremel. I think this is better than just remaking it in epoxy "bog", as we call fillers here.
 
I had the same problem, tried epoxy, just came off as wood continued to rot. Eventually cut back to good teak, spliced in whole new 12” section, shaped, varnished and attached hardware. Will try to get pic in morning and post.
 
I had the same problem, tried epoxy, just came off as wood continued to rot. Eventually cut back to good teak, spliced in whole new 12” section, shaped, varnished and attached hardware. Will try to get pic in morning and post.

That is a good illustration of what to expect of the "bodge in place" method.
You need to get rid of, not just fill, all of the rotting wood. If that can be done within the wood that is covered by the fitting, you get lucky and nobody will see it. As that is unlikely, be prepared to see the new join, so make it pretty, drill through the new, into the old, for a long pair of lag screws to hold the new wood in place and give it some strength. Then bodge away and re-attach the fitting.
 
If you want to fix it do it right. Cut the wood to remove all the roten part. Get a new piece of wood, make an assembly using a "trait de jupiter" join (sorry don't know the name in english, kinda like a lightning strike). Use epoxy to glue it and form the end to go in your end hardware.

L
 
I might predrill for screws and polyurethane or epoxy to attach an extension. The screws can probably be backed out and epoxy filled after serving as clamping and before snapping for the fitting, if needed. Dowels are another option, but I like screws for compression without the ability for a good external clamp.
 
Why not put something like a small "rebar" into the area sticking out to provide grip and foundation for the epoxy wood filler. You might even use two of them. Get very long screws, drill holes and insert the screws coated in epoxy. Let it set then you are good to go.
 
That’s a Hatteras. Take care of it Do it right. Have a shipwright scarf in a new piece if teak.
 
Another way would be to cut the bad wood off square with the end of the fitting. Put 2 dowels into the end of the rail. Take another block of wood slightly larger than the rail end drill the 2 holes for the dowels into the block of wood. Glue it all up and once it is set shape the block of wood to the shape that fits into the fitting.
 
Thanks for the great ideas and lessons in wood working.

I'm leaning towards a combination of the suggestions:

  • Hollow out a new block of wood to roughly fit over the existing wood that's worth saving - all rot removed
  • Fill the hollow in the new block with an epoxy-based putty or epoxy with a thickener added
  • Slide the new block with filling over the surviving wood
  • Secure in place (1) with the epoxy filling only, (2) add dowels before sliding in place, or (3) add lag screws through the new block into the railing and countersink the heads
  • Shape the addition so that the hardware fits securely and screw in place
I've already ordered a teak block and will add the repair to the off-season project list. I may have to do 4 of these repairs and will hopefully experience design and skill improvements as I go. If not, I'll throw up my hands in failure and hire it out.

A reason for the rot underneath the hardware is water intrusion at the wood-hardware interface. Any suggestions on what to use or how to prevent/reduce water seeping in beneath the hardware?

I agree with Cigatoo's sentiments and intend to do the best repair I can, which I'd try to do on my boat no matter the manufacturer. If I can't do it well, I'll hire someone who can.

LouTribal, my layman's interpretation is that the "trait de jupiter" joint is a variation of the scarf joint.

Sealife, I'm sure your pictures will be helpful, and your lessons learned on a similar repair are valuable. Thanks for sharing both.

It'll be a while, but I'll document the work, and let you know how my plan works out. Your adjustments and advice are still welcome and appreciated.

Greg
 
That’s a Hatteras. Take care of it Do it right. Have a shipwright scarf in a new piece if teak.


anything else is a half ass repair that will fail, possibly creating a MOB
 
I am by know means a shipwright, wood working is my least favorite. But Sea Life is no dock beauty queen, so I’d rather use the money saved on DIY for more important things. I used screws, then covered with bungs. Only difference might be I have a 2” wide stainless plate that runs under the entire railing giving some extra strength to repair. In the photo that isn’t the gate hardware, that was an original splice that rotted. I didn’t spend a lot of time trying to match the teak shades, as I find they seem t blend as sunlight fades them. These repairs were just made.

I see you are in MD, I am located in Fells Point if you are ever in the area.
 

Attachments

  • 68EECC4B-8163-4131-A579-7134E59DB408.jpg
    68EECC4B-8163-4131-A579-7134E59DB408.jpg
    94.6 KB · Views: 44
  • 1CE32827-1C1F-4E23-9CCA-F68ACCC579D9.jpg
    1CE32827-1C1F-4E23-9CCA-F68ACCC579D9.jpg
    86.9 KB · Views: 46
  • AC5C53E4-8234-40C5-94BD-6F4955C5BD8E.jpg
    AC5C53E4-8234-40C5-94BD-6F4955C5BD8E.jpg
    65.3 KB · Views: 47
You have had plenty of suggestions on how to make the repair, most are on point in terms of decent options..What you pointed out in your last post was the cause..Unfortunately the original design is flawed..The only way that system could work is with the use of composite rails..You will never keep water intrusion out of that type of union...caulking, coatings, all will require regular inspection..
 

Latest posts

Back
Top Bottom