Window rot.

The friendliest place on the web for anyone who enjoys boating.
If you have answers, please help by responding to the unanswered posts.

ghost

Guru
Joined
Nov 16, 2012
Messages
1,189
Location
USA
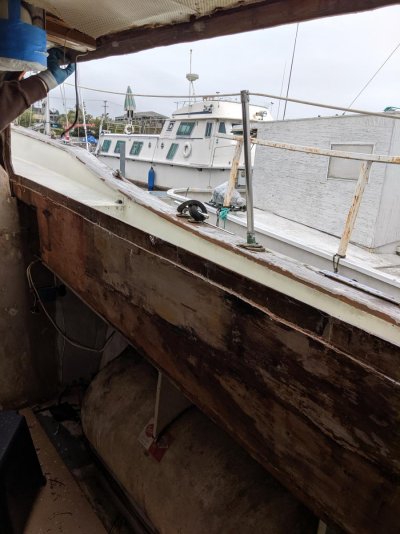
Full disclosure, I’ve been aware that I’ve had both window leakage and knew the wood under the wallpaper was soft for about 3 years now and progressing. On Saturday, this projects number finally came into rotation.

Peeling back the wallpaper, eeewwwwwwww. Multi master scraper and the really wet stuff is out. This was plywood bonded to a thin layer of glass then gel coat on the outside. I don’t want to use the scraper as I get towards good wood as I’m afraid I’ll upset the gelcoat if I get too aggressive. So I think next week I’ll “sand” the rest of the wood out with a rough flat carbide blade on the multi master.

If anyone can think of a better method, feel free to suggest.

The window will have to come out and runs about 7 feet into the aft cabin. Some investigation suggests this is the only bad spot.

Also, stopped by Edensaw and found some nice Myrtlewood. When the nasty part gets done, the Myrtle will become the countertop in this head.

Let the winter project list begin!

IMG_0798.jpg
 
I have a right angle drill that I use for grinding. I use 3M Green Corps Roloc Discs, 3'' - 50 Grit DISC ROLOC 50GR 3 25/BX GREEN on the drill. With the right angle drill I can have very good control of the drill and the grinding is easy to control without going to far. I have used this for several hundred fiberglass repairs. It would probably grind out your bad wood without going through the fiberglass. Then I would trim the interior wood to fit and glue it in with thickened epoxy.
 
When you decide to stop, getting close to the thin layer of FG, or well into solid wood, think about applying CPES before any thicker epoxy, to be sure the rot is stopped.
 
I'd get it as thin as I could easily, treat it with a thinned epoxy that can soak in, and go from there. When I put the plywood back I'd probably butter both it and the glass shell with thickened epoxy, which should accommodate the minor variation. I wouldn't leave any mush, but I also wouldn't risk cracking the gel or breaking through over thin bits of good wood.
 
Ghost,


We have the just completed a version of this on our 1963 Willard 36' motorsailor. We were going for the fuel tank solution and exposed similar situations on removing the salon interior. We wanted to not do all the interior wood and also not worry about leaking. We decided to isolate the window mounting from the wood/glass sandwich construction of the cabin with ring of Coosa board epoxied to the exterior glass layer. When we get the pre-rainy season critical path items done we can work on the interior skin.

We took the interior clamp ring off, marked a line about 2" away from the window all four sides.Then the window came out and we cut through the plywood and in our case an internal layer of resin and glass to the inside of the skin. We used a Fein saw, vacuum and ear protection. Then we went at it with chisels, carbide scrapers and effort till we had NO wood within 2" of the opening. Trish mixed a slow cure WEST and structural fiber adhesive that I spread on the shaped Coosa corners and pre-cut Coosa strips around the window opening. When this cured we trimmed/scraped as necessary, scraped old caulk and adhesive off the window, filled the recess in the extrusion with butyl tape, put butyl tape on the flange and carefully put it in the opening. Our windows are 81" long and fit tightly in fore and aft at the same time they had large gaps in the lower corners. We believe these are replacement windows from the 80's. We installed the clamp ring to put the squeeze on the flange butyl. Then we removed the clamp and packed the aluminum to epoxy/Coosa gap with more butyl tape, pushing it in with tongue depressor/mixing sticks. Where we could not get butyl tape in, we filled in with gun grade DAP Butyl-Flex. Then we used plastic parallel sided shims under the aluminum window clamp for its final installation. We trimmed the excess butyl around the exterior aluminum frame and caulked to the exterior cabin side with 3M Fast Cure UV 4000. so far, so well.
 

Attachments

  • IMG_20190907_133931.jpg
    IMG_20190907_133931.jpg
    126.9 KB · Views: 47
  • IMG_20190907_103852.jpg
    IMG_20190907_103852.jpg
    138.1 KB · Views: 47
  • IMG_20190906_174322.jpg
    IMG_20190906_174322.jpg
    141.6 KB · Views: 48
You guys are all doing it right! I love CPES, will use it to stabilize the remaining old wood and on the new too. Love the work to create an epoxy plug around the sealing faces, not sure if I’ll go that far now or wait until I replace all of my aging windows, which is probably next year. I’m in covered moorage, so I have some flexibility.
 
Back
Top Bottom