Mainship 400 waste holding tank replacement

The friendliest place on the web for anyone who enjoys boating.
If you have answers, please help by responding to the unanswered posts.

Todd S

Member
Joined
Aug 12, 2019
Messages
6
Location
USA
Anyone replace their holding tank?
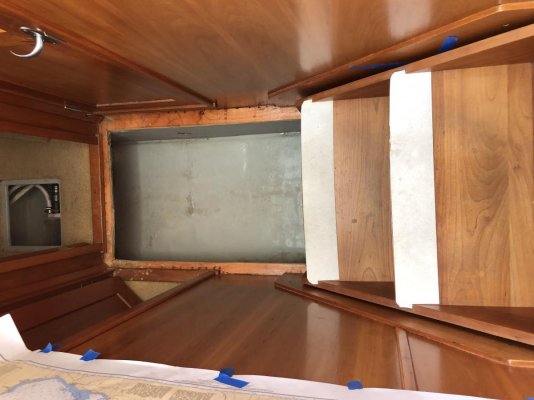
I have crack (1/2” separation) on the side of the holding tank and it obviously needs to be replaced. I can’t see how to remove the tank or put the new tank into place without tearing up the floor and creating a new structure for the floor above the tank. Would certainly appreciate if anyone knows a way to remove it & replace it without tearing up the boat? Thanks.
 
Don’t have any specific info on your Mainship, but when you get ready to order a new tank, I highly recommend Ronco. They make great tanks and have hundreds of stock shapes and sizes. They will put the fittings where you need them. If you need help cutting on your boat, I love cutting on other peoples boats...
 
I see you've just joined us today...welcome aboard!

Removing the tank is the easy part if you have a Sawzall...putting a new one in is the only problem. The easiest solution for that may be a new location for the tank...boat builders almost always put 'em in the worst possible places...too far from the toilet or without any access to replace hoses when necessary etc.

As Dave said, Ronco Plastics Ronco Plastics marine Tanks is your best source for a new tank. They make TOP quality thick-walled water and waste tanks for a very reasonable price and have more than 400 shapes and sizes, over 100 of which are non-rectangular, and they install fittings in the sizes and locations specified by the customer when they make the tank.

--Peggie

Peggie,
I’ve looked at Ronco’s website and cannot find the size of the tank that requires replacement. The current tank is 48”L x 23 1/4”W x 9”H.
Any suggestions?
 
That is not an optimal tank size being only 9” tall. When you pump out and leave an inch or two that is a significant part of the tanks capacity. Is there somewhere else that you can get a taller tank. That way when you leave that inch or two it isn’t as large a percentage of the tank.
 
A correctly cut diptube can reduce the remainder to an inch at most...assuming that he has enough clearance above the tank for a diptube.

So, Todd...does your existing tank completely fill the space, or can you go a little higher and/or wider and therefore shorter... What make/model is the toilet? How many toilets? If more than one, are both connected to the same tank? If so, what's the distance from each?

--Peggie
 
The existing tank essentially fills up the space. The area in the boat where the tank is located adjacent to the bathroom located underneath a hallway floor going from the master state room in the bow to the main cabin area. There is 1 toilet (Dometic) & 1 tank. The space the tank is located is 54”L x 24”W x 11”H.
Tank has 5 access ports. 3 - 1.5” dia. ports on tank short end (towards stern) for pump out, macerator, & from vac pump from toilet. 1 - 1.5” dia. on top (towards stern) for tank fill gauge, which consumes approximately 1” of overhead clearance, and 1 - 0.5” dia. port on opposite short end (toward bow) for vent line. I see my only recourse is to cut out the floor directly over the tank and then build up a structure to support the floor over the new tank.
Any other insights or suggestions are welcome!

Todd, I think you have correctly apprised the situation. I can't believe there is any way to get the tank out and then replaced without removing the floor above, if you want to put it in the same spot. I wish it were otherwise, I have the same boat but no cracks (yet) knock wood.
 
Is the floor above the tank carpeted or teak and holly?

On tank replacements like yours, I cut a precise hole over the tank big enough to get the tank out, new in and have enough room to make connections.

I screw 1" X 2"cleats around the underside of the opening for the cut out floor to rest on.

Carpeted floors are easier but a teak floor can be made to look good around the opening. The teak flooring on production boats is usually a thin teak and holy plywood panel over 3/4" plywood. I rout the opening edges so teak trim, the same thickness can be glued down around the opening and lid to give it a finishing surround.

If increasing tank capacity, I make a cardboard or plywood mock up of the new tank to make sure it will fit in the space in addition to manuerving through doorways and halls.
 
Same boat here as well. I'm afraid you, and me when my time comes, will have to cut out the floor.


A couple of thoughts.


1. Maybe go from the sender on the top of the tank with an internal float to a sender that attaches to the outside of the tank? I'm going to make this switch soon as my float is stuck and there is no access to the top of the tank. This would free up at least an inch of height and you could make the tank a little bit bigger.


2. Put in a much bigger vent line and run it forward to a through hull below the anchor locker. Or maybe two vent lines, on going forward and the existing one to the stb side.


3. Replace the hoses to the vac u flush tank and the pump out while you have the tank out. It will be the best access you ever get. They will need to be replaced anyway.


I wish you the best.
 
Is the floor above the tank carpeted or teak and holly?

On tank replacements like yours, I cut a precise hole over the tank big enough to get the tank out, new in and have enough room to make connections.

I screw 1" X 2"cleats around the underside of the opening for the cut out floor to rest on.

Carpeted floors are easier but a teak floor can be made to look good around the opening. The teak flooring on production boats is usually a thin teak and holy plywood panel over 3/4" plywood. I rout the opening edges so teak trim, the same thickness can be glued down around the opening and lid to give it a finishing surround.

If increasing tank capacity, I make a cardboard or plywood mock up of the new tank to make sure it will fit in the space in addition to manuerving through doorways and halls.

I agree, make a neat cut to begin with. Make the hole as big as you can so you have room to work. I would also change the hoses while you are in there. Good luck. Any idea why the old tank cracked?
 
The existing tank essentially fills up the space. The area in the boat where the tank is located adjacent to the bathroom located underneath a hallway floor going from the master state room in the bow to the main cabin area. There is 1 toilet (Dometic) & 1 tank. The space the tank is located is 54”L x 24”W x 11”H.
Tank has 5 access ports. 3 - 1.5” dia. ports on tank short end (towards stern) for pump out, macerator, & from vac pump from toilet. 1 - 1.5” dia. on top (towards stern) for tank fill gauge, which consumes approximately 1” of overhead clearance, and 1 - 0.5” dia. port on opposite short end (toward bow) for vent line. I see my only recourse is to cut out the floor directly over the tank and then build up a structure to support the floor over the new tank.
Any other insights or suggestions are welcome!


If you haven't already, you might want to review this thread. Toward the end TooCoys posted a pic of their new tank, and it illustrates the flush fittings Ronco can include, and those can save you some headroom for top mounted innies and outies.

http://www.trawlerforum.com/forums/s31/time-replace-pooper-45311.html

Ronco can also make shorter dip tubes, compared to their standard solution, and we used those. There's pics of those too. I think it can get down to only needing about 2' overhead clearance...

In our project, switching from side-mounted to top-mounted fittings would have increased our capacity in the original tank by about 40%... and since we also were able to install a slightly larger tank, we eventually ended up with about a 60% increase in capacity.

-Chris
 
I've been thinking about this. I think you can just open up the floor in the hallway and pull the tank out. You shouldn't have to cut out any of the floor in the fwd cabin.
 
Thanks for all the great responses & the pics sent. Ultimately, the floor had to be cut out to remove the tank. Currently in process with installation of new tank.
Attached 3 pics.
 

Attachments

  • 16C607C1-0D65-4DE8-BBD7-194EE09B885E.jpg
    16C607C1-0D65-4DE8-BBD7-194EE09B885E.jpg
    103.2 KB · Views: 98
  • AAA5D9D3-FB50-4361-946B-EEB3F1D81F61.jpg
    AAA5D9D3-FB50-4361-946B-EEB3F1D81F61.jpg
    197.3 KB · Views: 84
  • B940F071-98C1-4629-9B66-8DF91DF2DF06.jpg
    B940F071-98C1-4629-9B66-8DF91DF2DF06.jpg
    95.9 KB · Views: 92
That's a heck of a crack. I wonder what caused it?
 
When you replace the floor, I'd make it hatch (2 may be needed due the weight of just one long one)...to provide access to the tank to replace hoses etc. Use countersunk pulls.


This is very easy to do...I had two large hatches installed when I replaced

the sole in the galley and passageway between the galley and the dinette on my last boat.


--Peggie
 
The issue occurred after the last pump out. I believe that the pump out vacuum did it. I assume it flexes under vacuum and became fatigued more and more with each successive pump out. Certainly the tank became concave, over time, on the large top. Ironically, the bottom was flat.

And yes, I will make floor over the tank easily removable so that the tank and all the fittings are easily accessible.
 
Sounds like the vent may have been clogged. It might have created a vacuum in the tank and tried to suck it flat.
 
Good point about vent being plugged. Chances are that was the issue. I’m replacing all hoses as well as the vent line. I obviously will be more careful with that going forward. Thanks
 
Since you are doing all that work, I would seriously consider adding a vent to the other side of the boat. Having a vent to each side of the boat will halp tremendously in getting oxygen into your tank. And don’t use vent filters.
 
The issue occurred after the last pump out. I believe that the pump out vacuum did it. I assume it flexes under vacuum and became fatigued more and more with each successive pump out. Certainly the tank became concave, over time, on the large top. Ironically, the bottom was flat.

And yes, I will make floor over the tank easily removable so that the tank and all the fittings are easily accessible.

When you order the new tank from Ronco Plastics, make sure to order a thicker plastic holding tank. Also two 3/4" to 1" tank vents.

Plastic tanks come is several wall thicknesses. Boat manufacturers sometimes install the thinner wall tank for cost savings. The thin walled tanks tend to expand and contract with pumping out or with Vacu Flush. Eventually cracking or bursting.

Two larger vents will prevent vent clogging and allow higher air flow during pump out.

Thicker tank walls will prevent flexing and cracking.
 
Last edited:
Good point about vent being plugged. Chances are that was the issue. I’m replacing all hoses as well as the vent line. I obviously will be more careful with that going forward. Thanks


I'd bet money that a blocked tank vent is what cracked your tank. All tank vents have two main functions: to provide an escape for air displaced by incoming contents and provide a source of air to replace contents as they're pulled out. When air displaced by incoming waste cannot escape out the vent the tank becomes pressurized, creating increasing back pressure that prevents the toilet from flushing.

Without a source of air to replace contents as they're being sucked out of the tank, the pump will pull a vacuum that'll prevent it from pulling out more than a gallon or two. A particularly strong pumpout can even implode a tank.

Just replacing the vent line may not solve the problem 'cuz 99% of vent line blockages aren't in the vent LINE...the two most common locations for a vent blockage are the vent thru-hull and the other end of the vent line--that end of the hose and the vent fitting on the tank (since you're replacing the tank AND the vent line, that won't apply to you). So before you replace the vent line, clean out the vent thru-hull...use a screwdriver blade, ice pick--whatever works. Or better yet, replace the "vent" thru-hull--which is actually designed to keep sea water out of fuel and water tanks, which is hardly necessary for waste tanks--but boat builders save money by using the same thru-hull on all tank vents--with an open bulkhead or "mushroom" thru-hull. That accomplishes two things: allows more air exchange with gasses in the tank--essential to preventing odor out the vent--and allows you to put a hose nozzle against it to backflush the vent from thru-hull to tank, preventing vent blockages.


--Peggie
 
Thanks for all the great responses & the pics sent. Ultimately, the floor had to be cut out to remove the tank. Currently in process with installation of new tank.
Attached 3 pics.

Is there a sticker on the original tank showing the maker's name and sidewall thickness and so forth?


When you order the new tank from Ronco Plastics, make sure to order a thicker plastic holding tank. Also two 3/4" to 1" tank vents.

Plastic tanks come is several wall thicknesses. Boat manufacturers sometimes install the thinner wall tank for cost savings.

Thicker tank walls will prevent flexing and cracking.

Adding to that, Ronco makes two different thicknesses for many (all?) of their tanks, one usually installed in RVs and the other more "marine."

The Ronco marine-version tank we installed is indeed thicker than our OEM tank was.

-Chris
 
Ronco makes two different thicknesses for many (all?) of their tanks, one usually installed in RVs and the other more "marine.


Ronco Plastics does NOT make the same tanks with different wall thickness for the marine and RV market. They have separate marine tanks (shown as "boat" tanks on their home page now for those not smart enough know what "marine" means) and RV Tanks catalog sections and use different mold numbers for each type. This is the direct link to their marine tank catalog Ronco Plastics marine Tanks and is the only link I ever provide to boat owners or post to boating sites because the specs for marine and RV tanks are not the same. All their marine tanks have a minimum 3/8" wall thickness--typically 50% thicker than most other mfrs "standard" tanks--and reinforced corners...wall thickness begins gradually increasing as needed above 40 gal. to support the weight of the contents (8.333 lbs/gal).


Al that said, it doesn't matter how thick the tank walls are...a blocked tank vent can even split a stainless steel tank.


--Peggie
 
Last edited:
Don't remember how I got there from here, but when we were searching on their website I think we started with gallons and went from there. I think we didn't start with either marine or RV, mostly being focused on dimensions. I do (think I) remember it took me a few minutes to figure out that one of the first search returns wasn't the heavier "marine" version.

Now that you've mentioned it, I just went to look and don't see our tank size in the RV-related tanks at all, now... but I probably have their mold number that I saw back then on the home computer somewhere...

-Chris
 
When you go to Roncos home page, there is a tab for "Boat Tanks"

When you place a Ronco tank order, make sure you draw a diagram with accurate dimensions. They manufacturer the tanks with the fittings exactly to your dimensions.

There are no returns unless it's their mistake.

You might get a better price on Ronco tanks by ordering through a marine sanitation dealer or some other business. There is a hefty mark up on the tanks. I usually discount the tanks ordered through my business.

Buyer pays the shipping fee.
 
Good point about vent being plugged. Chances are that was the issue. I’m replacing all hoses as well as the vent line. I obviously will be more careful with that going forward. Thanks


How did you access the hoses under the shower that pass through the stringer to connect to the tank? Or, did you run them via a new route such as through the washer/dryer space under the stairs? I’m ready to replace my hoses, but I cant see how to get to them where they disappear after coming out of the tank, short of perhaps cutting an access hole in that wall, assuming I can clear the shower.
 
I’m sure how my comments fit in, but here it is!

It’s not necessary to remove the hole floor, only about 10 inches at the stern side. Then move the thank backwards and lift the front end up.
Replace the missing floor with a cover of aluminium plate designed like a stair, to protect the pump.
It will also make it easier to maintain the sensor.


The final solution for the odour problem in MS 400.

I have comments this before, but here is it again.

On ours 400, 2005 the through-hull fitting vent was completely blocket by growings and also by carbonfilter. Furthermore, the existing vent line has a bad design, it's to long and to small with severall watertraps.
The thru-hull vent gear was not a good choice Mainship did. (unfortunately make many boatbuilders the same choice). They're made for fuel vent in order to avoid water in to the tank. The holdingtank-vent shouldn't be blocked. It should be easy to spray in water with a hose, once in a while.
It's very difficult to change the existing thru-hull vent so I drilled a 12 mm hole from the outside in the middle of the water trap in the existing one.
And removed my carbon filter wich had became wet and blocked the air vent. There shouldn't be any filter in the vent line, according to Peggie Hall. I agee with that.

I changed to a bigger vent hose, 1 inch, and made a new pipe fitting into the rear end of the tank. It's qiute easy job to do.
The new vent hose became lot shorter and was mounted upwards with no water traps, witch is essential.
I pulled a second bigger vent hose in to the existing vent pipe in the frontend of the holdingtank to a new thru-hull vent in the front of the boat just under the anchore. It was quite easy to do with only one hole to drill in the removeable plate under the anchor.
There is now a new thru-hull vent in the bow and the existing one on the starboard side, wich together makes a good air flow, like in Peggie Hall's describe in hers book.

Lack of air in to your holdingtank makes the odor. Check the air vent by blowing.

It certainly solved ours odor problems, since some years back.
A good idea is to make the thru-hull vent fitting in the bow able to fit a hose in order to rinse the holdingtank with freshwater from one end to the other through the tank.

Good luck,
boan
 
I agree with the comments as to the vent hose being highly inferior. I was shocked to see that today, and it’s mounted to come out the side of the tank about an inch and a half from the top which means when the tank is full, it runs into the vent line, then the vent hose runs down before it turns back up again. Mainship really missed the mark there. My Hatteras had a 1.5” vent hose and I expected to find that on the Mainship, but no.

As for the replacement of my hoses, I have decided to run new routes, and most of it will be PVC pipe, rather than hose. I’ll use hose at transition points such as joining the PVC to the tank, joining PVC to the vacuum generator, and joining PVC to the hose that attaches to the deck plate at the last point where I have access. That worked very well on the last boat I plumbed that had four heads with the longest run being about 50 feet.

The 1.5” pipe fits perfectly along a little ledge on the side of the washer/dryer without interfering with future removal of that unit for service, and I can stack one on top of the other. I’ll leave the old hoses in place, unless I can yank them out somehow, and spray expanding foam insulation in them to seal them off to keep the coodies inside. That vent is going to get moved to the top of the tank with a 90-degree fitting and I’ll plug the old hole. Yeah, it will be bigger, too.
 
Last edited:

Latest posts

Back
Top Bottom