Tips for hatch/window repair

The friendliest place on the web for anyone who enjoys boating.
If you have answers, please help by responding to the unanswered posts.
Joined
Sep 25, 2018
Messages
542
Location
USA
Vessel Name
Aruna
Vessel Make
Kristen Yachts 50 Pilot House
I have a hatch/window in my cockpit that recently started misbehaving, and after some investigation, I figured out that it needs some TLC. It is a fairly large window that is the primary opening in my master suite.

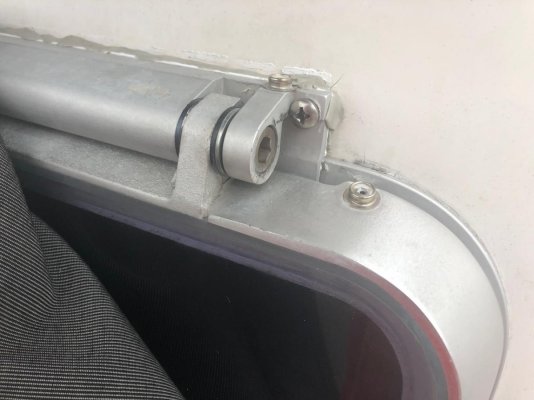
What I noticed is that the plate on the top of the window which forms part of the hinge was coming out from the fiberglass when you attempt to close the window. The hinge itself is composed of a very big spring which needed some lubrication, and improved the situation.

After removing the whole assembly, it looks like over the years the previous owners have used progressively larger screws in the corners of the hinge as the force of the hinge caused them to be pulled out.

I can of course continue this trend, although it will require drilling out the hinge holes a bit more, but I suspect this will only buy me another year or two before having to do this again. I also think two larger screws is an inadequate amount for the size of the hinge and spring. I could potentially drill in a third screw hole under the hinge and use that to distribute the amount of force exerted.

I am not going to replace the whole window - it is a pretty custom size from what I can see, and that would require major surgery to change as there is a single massive sheet of teak on the interior side that I don't want to mess with.

What I am interested in is any general tips for dealing with a window/hatch like this. I am aware of how to handle general portholes and hatches having done replacements on all of my previous boats for various sizes. I'm looking for more specific info on this particular type of hatch as I've never worked with one before.

In the pictures below, please ignore the butyl tape I stuffed in the cracks as an emergency sealant since I was out in the middle of nowhere and my tube of 4200 made a quick exit into the depths before I even got to open it!
 

Attachments

  • IMG_3749.jpg
    IMG_3749.jpg
    93.8 KB · Views: 48
  • IMG_3750.jpg
    IMG_3750.jpg
    79.1 KB · Views: 48
One obvious task is to find out what is making the frame try to pull away from the fiberglass below. Nothing inherent in a hinged, framed system should do this.

There must be something binding on the inside of the hinge as the window/hatch is closed down. Check the sealing gasket seating area and/or interference from any "stiff" parts of the frame, etc. Open and close it slowly and carefully over and over - looking at every contact point around the perimeter as it moves.

There should be no tension on the outer frame from the hatch closing - these forces should be all be contained within the hinge mechanism, gasket, and dogs.

JMHO
 
I would use a machine screw backed by a lock nut and fender washer. I would reseal the window with Sikaflex 295 UV. It is stiffer than butyl, it will help spread the load, and remain flexible to keep the window sealed. Lubes used on the hinge shouldn't damage the seal. I would use a dry lube to help prevent runs on the boats finish.


https://usa.sika.com/industry/en/in...ts_Yachts/01a401/01a401sa02/01a401sa0205.html


https://www.amazon.com/Sika-Sikafle...fc8afc6e19015dfc628890317f6b3c&language=en_US


https://www.amazon.com/WD-40-300052...fcc70fed3ed8062871084f6457fd3d&language=en_US
 
One obvious task is to find out what is making the frame try to pull away from the fiberglass below. Nothing inherent in a hinged, framed system should do this.

There must be something binding on the inside of the hinge as the window/hatch is closed down. Check the sealing gasket seating area and/or interference from any "stiff" parts of the frame, etc. Open and close it slowly and carefully over and over - looking at every contact point around the perimeter as it moves.

There should be no tension on the outer frame from the hatch closing - these forces should be all be contained within the hinge mechanism, gasket, and dogs.

JMHO

The main reason this was happening was the tension on the spring and lack of lubrication. I also believe the spring itself is far too large for the window and mechanism. Based on the layers of sealant I scraped away, this has been an ongoing issue for this window for years, and not something that has recently happened.

Everything else regarding the seals, edges, etc. are in perfect condition. Nothing binds there at all, and there is nothing getting in the way or otherwise. The spring itself seems about 5x the strength that it needs to be for the window. Even when lubricated, it is still pretty powerful, which makes sense since you can leave it open and want it to not slam closed, but I think it is overengineered.
 
I would use a machine screw backed by a lock nut and fender washer. I would reseal the window with Sikaflex 295 UV. It is stiffer than butyl, it will help spread the load, and remain flexible to keep the window sealed. Lubes used on the hinge shouldn't damage the seal. I would use a dry lube to help prevent runs on the boats finish.


https://usa.sika.com/industry/en/in...ts_Yachts/01a401/01a401sa02/01a401sa0205.html


https://www.amazon.com/Sika-Sikafle...fc8afc6e19015dfc628890317f6b3c&language=en_US


https://www.amazon.com/WD-40-300052...fcc70fed3ed8062871084f6457fd3d&language=en_US

Thanks for the suggestions. I should have been more specific about how the window is attached, specifically the hinge in question. The screws go into the fiberglass and then into the medium in between that and the interior teak wall in the master suite. I can't access the back of those screws, so I'm sort of stuck using an attachment type that I can't get to.

To use a lock nut and fender washer, I would have to drill all the way into the master suite, through the beautiful, single piece of teak that spans the whole stern wall, and add those. I have considered this as a last resort considering that you would see the nuts/washers (I would cover them with a nice cover, but still) and this would put most of the stress on the inner wall at that point.

The window frame and related sealant around it is fine for now, I would rather not remove and rebed that. However, I would use Sikaflex or something similar for the hinge and holes. I never intended on using Butyl tape long term - that was an emergency fix.

I am already using a dry lube on the hinge which works well.


Yeah, my idea would require disassembling the interior trim around the window. Another idea is to remove the spring and use a window/hatch adjuster to hold the window open. This may interfere with window screens.
 
The main reason this was happening was the tension on the spring and lack of lubrication. I also believe the spring itself is far too large for the window and mechanism. Based on the layers of sealant I scraped away, this has been an ongoing issue for this window for years, and not something that has recently happened.

Everything else regarding the seals, edges, etc. are in perfect condition. Nothing binds there at all, and there is nothing getting in the way or otherwise. The spring itself seems about 5x the strength that it needs to be for the window. Even when lubricated, it is still pretty powerful, which makes sense since you can leave it open and want it to not slam closed, but I think it is overengineered.

That explains it. Thanks.
 
Yeah, my idea would require disassembling the interior trim around the window. Another idea is to remove the spring and use a window/hatch adjuster to hold the window open. This may interfere with window screens.

Ah I understand. The screws for the upper portion of the hinge don't go into the interior window trim, just directly into the fiberglass.

Good idea on the hinge - I am not sure if I can remove it completely, but I suppose I could cut portions of it out and then use another way to hold it open. That would definitely remove that stress in the future!
 
I would still go with through bolting the hinge. I understand that you may see the hardware but it is a boat and you see hardware everywhere. I would go with some 316 S/S nuts and fender washers. Use an acorn nut with locktite on it instead of a nylock nut. Before you put them on get some good metal polish and polish them to a really bright shine. That way they won’t look bad and your problem will be delt with permanently. I have a whole bunch of through bolted fittings on my sundeck and the nuts and washers are visible when you walk up to the boat. I used 316 and polished them prior to installation and they don’t look bad.
 
I would still go with through bolting the hinge. I understand that you may see the hardware but it is a boat and you see hardware everywhere. I would go with some 316 S/S nuts and fender washers. Use an acorn nut with locktite on it instead of a nylock nut. Before you put them on get some good metal polish and polish them to a really bright shine. That way they won’t look bad and your problem will be delt with permanently. I have a whole bunch of through bolted fittings on my sundeck and the nuts and washers are visible when you walk up to the boat. I used 316 and polished them prior to installation and they don’t look bad.

The more I think about it, the more that I agree this will be the only truly permanent way of fixing this issue. Good idea on polishing them, and the acorn nut which is what I would have used. I don't mind the hardware as long as I can make it look boat-y - was just hoping someone had a magic way I wasn't thinking about :)
 
I agree that it looks way over engineered. If all that spring does is hold the window up when it is opened it could have been much smaller. You could use some epoxy putty, fill the screw holes, then re-drill for the bigger diameter screws. Also add some more screws if that is possible.
 
The more I think about it, the more that I agree this will be the only truly permanent way of fixing this issue. Good idea on polishing them, and the acorn nut which is what I would have used. I don't mind the hardware as long as I can make it look boat-y - was just hoping someone had a magic way I wasn't thinking about :)

If it is done well, lined up straight and not crooked, then there is nothing wrong with it. We added a dock box on our bow for line storage and a seat. I had to through bolt it into the forward cabin. The headliner is about 1” thick. I drilled the holes, reamed the core out, filled with thickened epoxy and redrilled the holes. To compensate for the 1” headliner, I got some 1” delrin round rod. Cut them 1” long and drilled the hole in the delrin. I cut the headliner out 1” diameter and put the delrin spacers on the bolts. Then put 1.5” fender washers on the bolts and put the nuts on. Yes, you can see the nuts and washers but that is all I could do without ripping out the headliner. They don’t look bad as it was neatly done. It is a boat and they have to be bolted together.
 
Good idea on the hinge - I am not sure if I can remove it completely, but I suppose I could cut portions of it out and then use another way to hold it open. That would definitely remove that stress in the future!

Your photo shows a hex screw in the end of the hinge. If you take this out, you can open the hinge and take the spring off.
 
The more I think about it, the more that I agree this will be the only truly permanent way of fixing this issue. Good idea on polishing them, and the acorn nut which is what I would have used. I don't mind the hardware as long as I can make it look boat-y - was just hoping someone had a magic way I wasn't thinking about :)

There are several alternatives to acorn nuts that may be more palatable and not protrude from the surface as much. Google "decorative cap nut" and click the images tab to see some options (a few linked below). Some could bear the entire load, others would have to go on after a load-bearing nut (thin).

You could also bury some of them in teak trim with a bung over the top. I have done this with SS tee nuts before (allows bolt removal from the other side).

https://images.homedepot-static.com...2928/svn/rod-coupling-nuts-802184-64_1000.jpg

https://cdn11.bigcommerce.com/s-37j...tCopp_1__69696.1423153257.jpg?c=2?imbypass=on

http://noahd.me/wp-content/uploads/...ure-or-lighting-accessories-light-fixture.jpg

https://images.homedepot-static.com...dbc1dd1/svn/hillman-tee-nuts-4149-64_1000.jpg

The side benefit of through-bolting is you can completely eliminate any potential for leaks into the core.
 
Last edited:
Your photo shows a hex screw in the end of the hinge. If you take this out, you can open the hinge and take the spring off.
That was my thought...
There has to be a way to disassemble the two halves and inspect the pivot & spring. It isn't apparent how it works from the pics. R side different than L side.
Are there other similar ports on the boat?
If so, how are they working?
Any info on mfg?
 
I agree that it looks way over engineered. If all that spring does is hold the window up when it is opened it could have been much smaller. You could use some epoxy putty, fill the screw holes, then re-drill for the bigger diameter screws. Also add some more screws if that is possible.

Yes I would definitely being adding epoxy into the existing holes. I think my current thoughts are along the lines of through bolting as others have suggested, but would still fill with epoxy and drill out.

If it is done well, lined up straight and not crooked, then there is nothing wrong with it. We added a dock box on our bow for line storage and a seat. I had to through bolt it into the forward cabin. The headliner is about 1” thick. I drilled the holes, reamed the core out, filled with thickened epoxy and redrilled the holes. To compensate for the 1” headliner, I got some 1” delrin round rod. Cut them 1” long and drilled the hole in the delrin. I cut the headliner out 1” diameter and put the delrin spacers on the bolts. Then put 1.5” fender washers on the bolts and put the nuts on. Yes, you can see the nuts and washers but that is all I could do without ripping out the headliner. They don’t look bad as it was neatly done. It is a boat and they have to be bolted together.

Nice! I think this is the route I am going to take - through bolting.

Your photo shows a hex screw in the end of the hinge. If you take this out, you can open the hinge and take the spring off.

Good point. I will look and see if I can. Might not need to if I keep it lubricated and also through bolt the hinge.

There are several alternatives to acorn nuts that may be more palatable and not protrude from the surface as much. Google "decorative cap nut" and click the images tab to see some options (a few linked below). Some could bear the entire load, others would have to go on after a load-bearing nut (thin).

You could also bury some of them in teak trim with a bung over the top. I have done this with SS tee nuts before (allows bolt removal from the other side).

The side benefit of through-bolting is you can completely eliminate any potential for leaks into the core.

Good suggestions! I like some of those designs, and have found a bunch more on my own. Also very good point on the through bolting and leaks, which I would much prefer.

That was my thought...
There has to be a way to disassemble the two halves and inspect the pivot & spring. It isn't apparent how it works from the pics. R side different than L side.
Are there other similar ports on the boat?
If so, how are they working?
Any info on mfg?

The left side of the window has the spring, but there is a pivoting pin across the entire top even inside the spring. I don't have a ton of other good photos I can find in my library - I will be down there later today and take a couple more.

I didn't see a manufacturer mark but I will check again. This is the only port like this on the boat, which is a 1988 Ocean Alexander. I'm sure they used a single manufacturer for a while, so some other folks might know off hand.
 
Looks like your opening post is a repurposed sailboat hatch.


The spring would not be of much use when mounted near vertical , discard it.
 
If you're still looking for another solution, I've had good experience with threaded inserts (helicoil) in fiberglass. You can use the same size screw that's already on there.

Process, if you don't already know:
Drill the hole in fiberglass to recommended size, tap it, dip helicoil in epoxy (thickened slightly so it stays in the gaps), thread into the hole. While the epoxy is still a bit soft, take a screw that's greased up and thread it into the helicoil (don't install the window yet). Once the epoxy has cured, remove the screw (should be easy because of the grease), and install your window.

That said, it doesn't get much stronger than a t-nut behind fiberglass.
 
IMG_3958.jpg

IMG_3960.jpg

IMG_3961.jpg

IMG_3959.jpg

Here are some additional images.
 
My 2 cents...
On the pictures it is obvious you have cracks in the fiberglass where the screws are in. Keep it that way and water will its way in doing its damage. Obviously also this is the result of having screws in the fiberglass that support the spring force.
One advice, remove the whole assembly, sand and clean everything, use epoxy to fill existing holes (that are already damaged), sand and repaint, drill clean holes and bolt the hatch through, use sealant of your choice to get a tight fit that won't leak.

L
 
Just a follow up here:

I ended up using a rot filling epoxy to inject into the whole area to rejuvenate things. After that set, I sanded and filled the outside to ensure the cracks weren't an issue. Then I drilled through into the master suite and filled that in with harder epoxy.

After that all set and was done, I drilled 1/4" holes into the master suite for the through bolts. The bolts had fender washers and nylock nuts on them for now until I adjust the exact tension. I think I will use nut caps on those to clean them up longer term. All of the various screws and bolts were sealed very well.

So far that hatch works far better, and feels a lot more secure, and the seals at the top of the hatch seem to be tighter when closed, which is great.

The water test passed so far - no leaks. I am going to keep an eye on the general potential rot around the window in case it spread down / around.

Thanks for all of your points and help!

Well done!!!:dance::dance::dance:
 
Instead of washers and lock nuts ,,,,,,Sex Bolts.

A sex bolt, (also known as a barrel nut, barrel bolt, Chicago screw, post and screw or connector bolt), is a type of fastener (nut) that has a barrel-shaped flange and protruding boss that is internally threaded.
Sex bolt - Wikipedia

These can be had in SS or bronze and give a very finished interior.


Last edited:

Latest posts

Back
Top Bottom