34 Clipper (CHB) Pilothouse Restoration

The friendliest place on the web for anyone who enjoys boating.
If you have answers, please help by responding to the unanswered posts.
Wish I could remember more. Sorry.


A memory is a terrible thing to misplace, isn’t it, or did I forget something?
 
Mooring

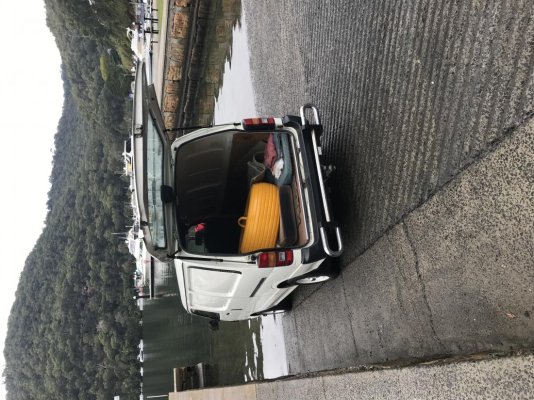
So today’s job was to re-install the mooring tyre. It was looking a bit sad, didn’t have much yellow on it, and the steel eye bolt was wearing a bit thin. It was removed a few weeks ago, towed over to the boat ramp and pushed up into the back of the van to take home. Let me tell you, it was bloody heavy (still full of water).
My dad welded up the steel plates, repaired the damage to the tyre and gave it a new paint job. He did an amazing job.
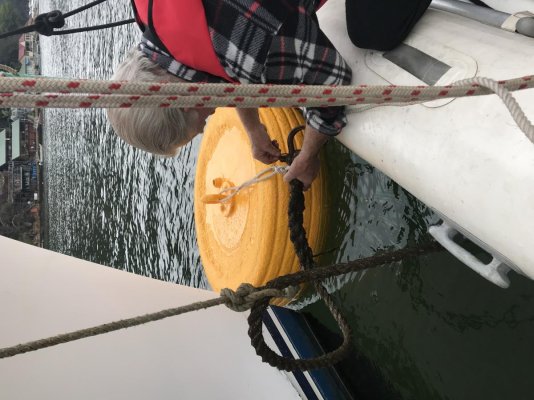
Having a tyre just makes mooring a breeze, especially on your own. For those who aren’t aware, there is a sleeve in the top of the steel plate, when you leave the mooring, you slot a post about 1.8m high with a hook on the top, into the hole in the tyre and hook the mooring rope onto it. Even in a big swell or huge wind, I can simplly drive up to the mooring, walk out the pilot house door and grab the rope from the pole and place it straight over the Samson post. No hanging over the bow with a boat hook hoping to grab the rope on the first attempt. When done, pull out the pole, switch off the motor and make a cup of coffee.
Anyway here are a few pics of it. The wife and kids were extremely keen to watch.
 

Attachments

  • 6B8672E9-45C5-4A89-A3DA-D15120E11435.jpg
    6B8672E9-45C5-4A89-A3DA-D15120E11435.jpg
    198 KB · Views: 87
  • 2632D192-F65A-46D2-805F-0F38101F9244.jpg
    2632D192-F65A-46D2-805F-0F38101F9244.jpg
    152.5 KB · Views: 90
  • A2D2F549-FBF0-4E1A-BEE4-2F02AD5EB4CD.jpg
    A2D2F549-FBF0-4E1A-BEE4-2F02AD5EB4CD.jpg
    148.7 KB · Views: 85
  • 1B8F3A51-F53B-4F5D-93FD-4BBD34185240.jpg
    1B8F3A51-F53B-4F5D-93FD-4BBD34185240.jpg
    83.9 KB · Views: 87
Please excuse the photos I don’t know why they keep loading like this, I’ll try and fix tomorrow
 
May have to do w the orientation of the camera when you take the picture. Mine wind up up-side-down frequently when I use my i-pad. Camera never.
 
Well guys it’s been a busy week.
The local marina has been stuffing me around so dad and I ended up towing the boat to another well known marina on the Hawkesbury but it was a 3 hour journey. Luckily we had a beautiful morning, no wind and the tide was on our side.
As the boat had no steering due to the rear chain needing repair, and the motor wasn’t pumping raw water due to blocked intake, we borrowed a boat and tied along side. I was amazed how well it moved along and very maneuverable too.
As visibility was an issue, I was in lookout while dad drove, but I set up a camera with a small monitor so he could see ahead.
The guys at the marina met us and before we knew it, the slings were on and up she went.
Not a lot of growth considering the 4 years between lifting. The anodes were almost gone though.
The hull was scraped, pressure washed and sanded back, followed by a prime coat and two top coats of antifoul. Great job!
That crane was just incredible to watch. It moved the boat around like a toy.
With all empty tanks and almost everything taken off, she weighed in at 8.5 ton.
I took the opportunity to keep it out of the water for a week on the stand for repairs.
 

Attachments

  • 55866565-C255-4EAF-8A04-90A439E9BF2C.jpg
    55866565-C255-4EAF-8A04-90A439E9BF2C.jpg
    109.3 KB · Views: 71
  • 764A3F79-08C4-4A68-AF77-FB709339FCB7.jpeg
    764A3F79-08C4-4A68-AF77-FB709339FCB7.jpeg
    149.7 KB · Views: 71
  • FC469CB0-818F-4023-BC26-B304F46414CB.jpg
    FC469CB0-818F-4023-BC26-B304F46414CB.jpg
    168.7 KB · Views: 73
  • D7DC74A2-96AB-4F91-9C28-828FE318BA04.jpg
    D7DC74A2-96AB-4F91-9C28-828FE318BA04.jpg
    123 KB · Views: 71
  • 96037A32-CDE5-482A-84A1-E11D1D83A6A5.jpg
    96037A32-CDE5-482A-84A1-E11D1D83A6A5.jpg
    97.5 KB · Views: 75
  • 3CCC2807-DD55-4CD5-B644-09025A7665B2.jpg
    3CCC2807-DD55-4CD5-B644-09025A7665B2.jpg
    108.5 KB · Views: 74
Just a little sneak peek into what’s to come next...
 

Attachments

  • 4122150A-7E96-4338-933B-36C6934846F0.jpg
    4122150A-7E96-4338-933B-36C6934846F0.jpg
    164.4 KB · Views: 108
Just a little sneak peek into what’s to come next...
Amazing job and great thread ...thanks for taking the time to post all your work it is really useful to many of us as well as being interesting. looks like you are at Fenwicks for the lift and hard stand. I keep my boat at Koolewong between Woy Woy and Gosford. Where is your regular mooring?
 
I don’t know if you realize it, but you have a fairly large hole in your bow... What a project. Keep the photos coming, I like the fact that someone is even crazier than me.
 
Thanks guys.
Happy to document it all. It would have been extremely handy if someone else had already done it so I wasn’t flying blind.
Aquabelle it was Fenwicks. Couldn’t have been happier with their work too.
It’s moored at Berowra normally.
Yes rather large hole in the bow, but beats a large amount of spreading rot I guess
 
are you going to be able to use the old skin to add too or do you have to start from scratch? how bad is the beam below the windows? if you do as good with this as the upper deck it will work out great . thanks for documenting . she looks good with the new bottom.
 
Thanks guys.
Happy to document it all. It would have been extremely handy if someone else had already done it so I wasn’t flying blind.
Aquabelle it was Fenwicks. Couldn’t have been happier with their work too.
It’s moored at Berowra normally.
Yes rather large hole in the bow, but beats a large amount of spreading rot I guess
You now have the opportunity to re think that forward cabin's layout and use. Was it a conventional V berth and if yes will you use it as such going forward? Would a properly designed store room, office/desk, head and shower, laundry or whatever better suit the way you want to use the boat going forward ?
 
The original plan was to use the old skin, but the old skin was lucky to be 1mm thick and had stress cracks and buckles all Over it. So I’m starting from scratch. When o sat down and stared at it for a few hours, I looked over how it was built, where the load is and how it is supported. It turns out that the ply walls and ceiling are the structural part. There is small 50x50mm (2x2) framing timbers as well. You can see in my photo the two sticking out from under the windscreen. These should have extended out and been supported on the front ply wall of the cabin. That’s why when mine rotted out, the windscreen dropped and cracked.
The beam under the windows is solid towards the center but non existent at each end. I will be replacing the whole lot and starting again. More info to come soon with plenty of pics.
 
Wow!
Now that is a real project. I am so impressed with your work but just as much with your resolve. Congratulations and all the very best as you progress. Ian
 
Thanks Ian,
Yes massive project but I can’t afford to pay someone to do it, and I’m fairly handy so why not.
Aquabelle, trust me I have spent hours and hours staring at the area and trying to think of a better way to utilize the space. I was tossing up whether to remove the bathroom all together and replace it with a large double bed down the port side and storage down the starboard side, but as I have a family of 5 I think having the Vberth that can be used as single beds as well as a double, and having the larger shower and 2nd toilet would be very beneficial. When you look at the way the lower cabin is constructed, there is absolutely no way to gain and floor space. The Vberth is built on the steep slope of the hull so this area can’t really be made into anything else. If only I had an extra 2 feet in length
 
this is absolutely awesome

Ill get some pics of mine in the next few months. I have been looking so hard to find information on someone who had already done this work! My whole roof is mush with a hasty repair to stop the water leaks by previous owner. Ive already decided to cut up and off the whole roof, reframe it, then fiberglass. Seeing what it looks like before hand gives me a good idea of what ill probably see. Was planning for 5 gallons of polyester, got a 300lb roll of glass already. Just need marine ply and 2"*2" framing studs. Yours looks awesome and i really like what you are doing to the vberth shell as well!! Good job and good luck!
 
Ashel, yes you now know what to expect. Hopefully your framing timbers are in good condition and you can just re-core the roof and fiberglass over it.
With the front cabin I had no timbers left so I had to essentially guess what was there and start again. If I have any advice for you, make a template of everything!
I couldn’t find any 50x50(2x2) here so I ended up buying 42x62 and cutting it down to 50mm in the table saw.
One thing to mention though, not all of the framing timbers are straight. The ceiling beams curve at the windscreen and get a bit straighter toward the bow. The side walls have quite a large curve. I didn’t have success in bending them, so I made a template, cut them into 10mm strips and laminated them together on the template using lots of clamps and west system epoxy. Worked brilliantly!
I started by making the front wall out of 18mm (3/4) marine ply, cutting the curve in the bottom to match the deck profile. It took 1000 measurements to get it right so it lined up with the height of the windscreen, and the correct width. I then cut the sides of the ply on an angle to match the curve of the walls. Next I test fitted the laminated side pieces I hade made up and they fit perfectly.
In these pictures I have everything sitting there in it’s rough position so I could mark out where to notch them all into each other. This is where I am up to. I plan on getting the framing done, then making templates out of cardboard for the side walls, and curve them by laminating a 9mm and a 6mm piece of ply..
More to come when I have time
 

Attachments

  • 8D43635C-E05B-48EE-A040-40A76436CB73.jpg
    8D43635C-E05B-48EE-A040-40A76436CB73.jpg
    137.4 KB · Views: 70
  • C6AABD51-7330-4044-B423-064BD4509355.jpg
    C6AABD51-7330-4044-B423-064BD4509355.jpg
    118.8 KB · Views: 58
  • 8447F8A7-CA87-4DBD-A54A-2B704E99A353.jpg
    8447F8A7-CA87-4DBD-A54A-2B704E99A353.jpg
    168.5 KB · Views: 64
  • D2435649-383C-416A-B45C-9DECC2A717FB.jpg
    D2435649-383C-416A-B45C-9DECC2A717FB.jpg
    113.2 KB · Views: 60
  • E33E26CC-F14A-4EF4-9038-4353B675A06E.jpg
    E33E26CC-F14A-4EF4-9038-4353B675A06E.jpg
    174.7 KB · Views: 68
Last edited:
Nice work!

Keep the pictures coming. Thanks.
 
When I started doing boat repairs back in the late '80s-'90s, I would buy wide boards and try to cut the curved pattern out of them. Then, I picked up an old copy of Wooden Boat Magazine and saw that most home builders were laminating their beams. I tried it one time and knew I had a winner. For me, it was faster than the whittle and fit method. I could go in, expose the beams, make a pattern, laminate them, and work on the rest of the boat while they cured.
 
So true. I tried that too. Cut the curve out of a wide piece of timber, so much wastage though. Laminating is fantastic and it feels stronger too. So strong in fact that I tried driving a self cutting stainless screw through one and it snapped it!
Pre-drill from now on. Haha
It’s messy, and yeah a little bit time consuming but so much easier than steam bending or trying to make it work with a larger piece.
I’m not sure what species they used in Taiwan for the framing timber, but the closest thing I could find here in Australia was Tasmanian oak. A hardwood that has a straight grain, little imperfections and not too expensive.
 
Laminated beams are stronger than solid wood. Steamed or sawn.

Read Gougeon Brothers book on Boat Construction regarding laminated beams.
 
Excellent work on a incredible project.

I am anguishing rebuilding my windows......

Keep posting. I think you have gone farther than any other post.
 
So true. I tried that too. Cut the curve out of a wide piece of timber, so much wastage though. Laminating is fantastic and it feels stronger too. So strong in fact that I tried driving a self cutting stainless screw through one and it snapped it!
Pre-drill from now on. Haha
It’s messy, and yeah a little bit time consuming but so much easier than steam bending or trying to make it work with a larger piece.
I’m not sure what species they used in Taiwan for the framing timber, but the closest thing I could find here in Australia was Tasmanian oak. A hardwood that has a straight grain, little imperfections and not too expensive.


I'm there with ya. :thumb:


Laminated beams are stronger than solid wood. Steamed or sawn.

Read Gougeon Brothers book on Boat Construction regarding laminated beams.


I have that book in PDF format if anyone is interested. It was freely available at one time. I can't find it on their site but all the info is spread around there. The book exceeds the forum limit to post. There's a lot in there.
 
I'm there with ya. :thumb:


I have that book in PDF format if anyone is interested. It was freely available at one time. I can't find it on their site but all the info is spread around there. The book exceeds the forum limit to post. There's a lot in there.

man i would love to read that book, id really appreciate a PDF copy if you can!!
 
The PDF version is still downloadable from google.

Google the book title; Gougeon Brothers book on Boat Construction.

It is the definitive book on wood, epoxy, composite construction.
 
The PDF version is still downloadable from google.

Google the book title; Gougeon Brothers book on Boat Construction.

It is the definitive book on wood, epoxy, composite construction.
:thumb:
 
Went to the boat today with all of the timbers cut, notched and ready to assemble. Unfortunately some rain water had gotten in under the covers and the existing ply right at the bottom against the deck was a bit damp. I didn’t want to epoxy with any moisture.
While I was there I did a test fit, a few small modifications and I am super impressed with how it looks. I also made some cardboard templates of the walls so I can cut them at home to make my life 1000 times easier.
I’ll wait a few days for it to dry out completely before epoxying it all together.
 

Attachments

  • FEF27C48-A8E0-4087-95F5-A47B65D2A652.jpg
    FEF27C48-A8E0-4087-95F5-A47B65D2A652.jpg
    161.8 KB · Views: 60
  • FDB8179F-A7A7-485E-840B-889C73497E81.jpg
    FDB8179F-A7A7-485E-840B-889C73497E81.jpg
    167.8 KB · Views: 68
  • 3FEA0E6B-5A7E-4513-A994-AE533178BC93.jpg
    3FEA0E6B-5A7E-4513-A994-AE533178BC93.jpg
    156.4 KB · Views: 66
  • 870E474F-F07E-49BE-8F08-48DA0856CA62.jpg
    870E474F-F07E-49BE-8F08-48DA0856CA62.jpg
    112.2 KB · Views: 68
Having a fresh properly sealed cabin is going to be nice.
 
Man, I don’t envy all the work you are doing, but it is looking good. Keep it up and you will have a beauty when you are done.
 

Latest posts

Back
Top Bottom