Farrell Trawler Rebuild Project

The friendliest place on the web for anyone who enjoys boating.
If you have answers, please help by responding to the unanswered posts.
Greetings,
Mr. PNW. "I think I have slowed down slightly.." HAH! Every time I see one of your posts I wonder if it will be the "Ta-da! I'm done" one. Amazing progress.

I wish! :angel:

So much more to do.. glass, hydraulics, helms, dashboard, electrical, plumbing, heating, hand rails, cleats, anchor, down riggers, drink holders (haha) .. and on and on... i'm not sure if it ends :banghead:

All small jobs, but tons of details and fiddling. I was hoping to get on the water this summer, and while possible, it may be a fairly unfinished boat and may take another winter to get it fully finished. :(

When I think that way it gets disheartening... but I've made lots of progress that I can be proud of. :D One foot in front of the other. :dance:
 
Nothing exciting, but the show goes on~!

Work on the hinged door frame (starboard). Door will open downwind, the safe way.
IMG_0566.jpg


Reinforcement of the port frame (sliding) - I still don't know how this will come together....
IMG_0567.jpg


Ah yes, this annoying detail. Space for one's head, when stepping from the RPH to rear cabin. Might get this to look like a faux smoke stack, like some other trawlers do.
IMG_0568.jpg


IMG_0570.jpg


Innovative clamping master class..... :thumb:
IMG_0573.jpg

Not my prettiest work, but it should come together.
IMG_0581.jpg


The joint in the middle of the flat piece is a good indication I'm just working with scrap bits now....
IMG_0582.jpg


I might put a big black framed porthole on top of that, if I feel the urge......:whistling:
 
I just ran across this thread and all I can say is "WOW".

The work you are doing is innovative and outstanding craftsmanship. And the number of pictures you are taking to document this project is very very good. Everytime I tackle a project, I don't take enough pictures because I forget or my hands are covered in goop.

It's going to be a great looking boat when done and you should be proud of your skills.

About how much time per week are you devoting to this project? Are you retired?

Are you a pro? or hobbiest?

And your patient answers to some of the questions shows great restraint on your part. I don't know if my answers would be nicely phrased like yours in similar circumstances.
 
Hi Syjos, thanks for the kind and reasoned words. Good questions, but I'm not retired, and I'm not a pro. But I'm somehow making it through with intention, research, planning, effort, and yes, many hours....

Test fitting hinges, starboard door.
IMG_0600.jpg


Sliding door and frame reinforcement, but still no plan for how it stays in place.
IMG_0624.jpg


Mock up of rear helm with controls.
IMG_0636.jpg


Joy! the main helm station is going on! I originally planned in the middle, then drilled higher, and then drilled another set lower, and thats where I liked i
IMG_0638.jpg


Bow vents for the bilge. Hose will go to the bow deck
IMG_0639.jpg


carbon fibre frame and door latch reinforcement
IMG_0641.jpg


Door and latch fitted (tight tolerances, what a PITA), and my patented clamping method for the jambs.
IMG_0642.jpg


epoxied helm, steering pump, old capilano helm
IMG_0643.jpg


Holes on the bow deck for bilge vent inlets.
View attachment 89214
 

Attachments

  • IMG_0633.jpg
    IMG_0633.jpg
    159.2 KB · Views: 43
Last edited:
Was the helm and the rear steering station on the port side originally or is there more to the story?

Ted
 
Was the helm and the rear steering station on the port side originally or is there more to the story?

Ted

Hi Ted, thats a great question (why? because the answer will be long....). Short answer: yes and yes. Long answer to follow....:socool:

Going against the nautical grain, the boat came with port side helms front and rear, and port hydraulic cylinder.

For me to be happy with moving the helms to starboard:

1. the dry stack exhaust would have to relocate elsewhere (for adequate pilot house space), or I go with a wet exhaust. The exhaust exits on the starboard side of the engine.

2. The hydraulic cylinder is also port side, and then hydraulic lines would also have to cross over to the other side. Simple idea, but has consequences in practice - either putting extra copper tubing across the central bilge area, which I want to keep clear for tanks, or running the tubing in strange ways to save the space. Pipes (hydraulic, or exhaust) should run as straight as possible, short as possible, with minimal bends. Or I relocate the hydraulic cylinder, but then thats a whole pile of extra work, plus there is still issue 1.

----------

So I thought about relocating the dry stack exhaust, but that means figuring out a more convoluted path for a 4" diameter pipe that gets to (guessing) 1000 degrees F. More pipe takes up more space- I'm trying to maximize interior space. A relocated pipe will get in the way somewhere else.

I thought about a wet exhaust, but ran into crazy expensive: the custom water cooled elbow, and all the wet parts downstream. Wet exhaust isn't great on a fishing boat when trolling or pulling traps-you smell exhaust when you are fishing. On top of that, there is an increased risk of seawater getting into the engine or boat.

I talked it over with an engineer friend and his advice was stop giving yourself a headache, and keep it simple. .....and so my exhaust pipe has only one 90 bend, and then goes straight up. I don't have the hydraulic copper pipe in yet, but it will end up being less complex and more efficient than trying to change it.

And so, the steering remains port side. :angel:

Its a small vessel with lots of windows, and so I believe I'll have acceptable situational awareness of my starboard side, although the exhaust area does create a minor blind spot.
 
If it was there before and you are familiar with it, that's all that matters. I've been down that road before where to change something relatively simple, you have to change 10 times as much other stuff, and conclude it's not worth it.

Ted
 
My sliding doors rest on high density plastic and they slide with just enough push that they can’t slide in a sea. No “open” latch but a barrel bolt to close. Sometimes the track needs cleaning and a tiny squirt of lube.
 
I would also add a “big” fuel filler with maybe even a fuel chest so you can use the commercial hoses ok.
 
Maybe these pics of my helm door will help. The door slides in top and bottom teak U channels. Bottom track is lined with a hdme plastic strip from TAP Plastics. Last year I replaced both strips (helm door and double aft doors) at about 150 inches for under $10. They seem to last about 5 years. Every 3 months or so I give the strips a spray of WD-40 to keep them slippery.
 

Attachments

  • flip.jpg
    flip.jpg
    117.5 KB · Views: 35
  • flip2.jpg
    flip2.jpg
    126.3 KB · Views: 34
  • flip1.jpg
    flip1.jpg
    165.7 KB · Views: 33
  • flip 4.jpg
    flip 4.jpg
    180.7 KB · Views: 30
Last edited:
I would also add a “big” fuel filler with maybe even a fuel chest so you can use the commercial hoses ok.

Can you describe or supply a link to a 'fuel chest'? (I can't find much of anything on google about them).
 
My friend has one, a box with a flush self-draining lid like a hatch, his box is at least a foot long, sealed and 6 or 8 inches deep with a 4 inch filler neck inside and the box is vented such that spilled fuel goes back in the tank not on the deck nor overboard. You did install water/cr@p drains at the lowest part of your fuel tanks? My boat has 4” fillers but no chest. This way, with a large filler you can see the fuel level and will never overfill even with a high speed hose.
 
Thanks FlyWright, those pictures of your sliding door help. I'm overthinking it.....


Nose vents for bilge
IMG_0645.jpg


Port side forward cabin vent
IMG_0653.jpg


Hydraulic schematic -
IMG_0739.jpg


Grab handles
IMG_0753.jpg


Tools for fools......
IMG_0779.jpg

Practice makes perfect...... more pictures to come!
IMG_0780.jpg


and windows are on the way!
 
I have the exact same vents on my boat however I must tell you it is not a good idea to make them face forward. I know your logic behind this is that as they are wind front facing this will help ventilation but don’t forget that if this ease air to come in it is the same for anything else, including water :)

If you need a proof for this, the PO of my boat got the same idea up to the point he realized he was taking a lot of water in during a storm.

L
 
Did you pack the tubing with sand before you made the bends? Supposed to prevent kinking.

Thats interesting. You are correct in that soft copper tubing is ridiculously easy to kink while handling it.

I hadn't thought of sand, as all the literature on the helm pumps etc. is that everything should be kept as clean as possible

The copper tubing came sealed. Introducing sand would be the antithesis of cleanliness.

And my thoughts on this is that while i have compressed air and could blow the tubes out (and I will), copper is soft, and its possible for sand grains to imbed into the copper when bending and perhaps come loose later, when the hydraulic fluid is introduced. Don't want sand in the steering cylinder or helms. I could be wrong, but it just seems wrong to introduce sand into something that is supposed to be super clean.

I could see using sand for exhaust pipe or other pipes that don't need to be so clean.


....but don’t forget that if this ease air to come in it is the same for anything else, including water :)

If you need a proof for this, the PO of my boat got the same idea up to the point he realized he was taking a lot of water in during a storm.

L

Yup, I fully agree, and an excellent point. So I have two pairs of vents, bilge and cabin.

Bilge vents, I'm not overly worried about a bit of rain water getting in, from time to time. As for ocean water, if I'm forced to make a "rough passage", I will "batten the hatches" so to speak and block the nose vents. I'm a pleasure boater, so I will normally pick my weather windows.

Cabin vents, I will be building "Dorade boxes" (hidden, on the inside), and any water entering will have an escape path, and won't enter the cabin. If i find that my plan doesn't work, I'll turn the vents 180 and reassess.

As you mentioned forward facing is good efficient venting, and I'm wanting to achieve that "passively" if possible. I also want really good venting so I don't have a stinky boat......


Changing the subject slightly.....

Epoxy in a hole that will contain a bolt. The bolt won't contact any plywood.
IMG_0768.jpg
 
Greetings,
Messrs. OD and PNW. Sand is completely unnecessary when using the bending tool pictured. I don't recall ever having a kink in copper tubing when using this or similar tools. MY biggest problem is achieving proper/desired lengths or spans between bends. Never any kinks but sometimes 1/4" too long or too short. Practice it is.


Edit: There was a metallic product the welders, I worked close to, would fill metal tubing with before bending which kept the tubing perfectly round. It melted at boiling water temperatures and left a clean surface. Fill the tube, bend and boil out. For the life of me I can't remember what the heck it was called...
 
Last edited:
Edit: There was a metallic product the welders, I worked close to, would fill metal tubing with before bending which kept the tubing perfectly round. It melted at boiling water temperatures and left a clean surface. Fill the tube, bend and boil out. For the life of me I can't remember what the heck it was called...

Yea, was my first thought but, I could not remember the name either. AND it is reusable too.
I could remember "sand"
 
Last edited:
I have a set of springs in various diameters that is inserted into tubing before bending.

The spring keeps the tubing from kinking.

After bending the tubing, you pull the spring out.

It's function is similar to the mandrel in mandrel bending.
 
Last edited:
Hydraulic lines completed.....

IMG_0773.jpg

IMG_0774.jpg

IMG_0806.jpg

IMG_0807.jpg

Unfortunately the steering cylinder is leaking. :( 
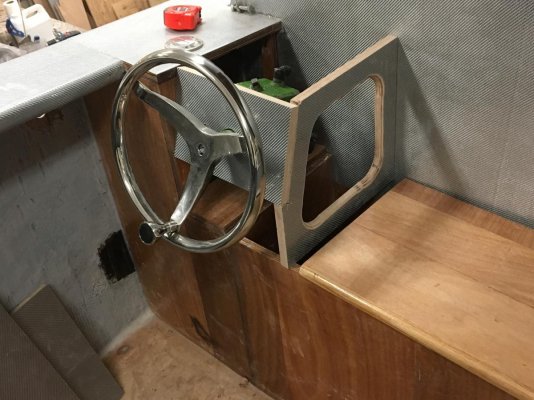
Further inspection of the cylinder shows that there are lots of mini dents in the ram. This is my fault for not protecting the ram (removing the whole thing, or at least retracting the ram) during construction. :facepalm: Many times, things came in contact. :nonono:

Oh well, the cylinder was original to the boat (38 years old?) , so a new one is on the way.....

Windows going in this week....... the local window company will do that work.
 
windows are in!

I like how this is coming together.
IMG_0830.jpg

IMG_0841.jpg

IMG_0844.jpg

Many posts back, someone asked about why the carbon fibre. I think this is (partly) what I was trying to say. Picture = 1000 words. The aesthetic of the black rubber window frames and the black carbon fibre. I like this look.
IMG_0858.jpg

Dorade box in rear cabin.
IMG_0865 (1).jpg
 
Is there a cabinet or something going in below the pilothouse helm? Would have preferred to have seen the tubing go back to the bulkhead then turned down so that a half pipe or something similar could protect the tubing. Apologize for being critical, just hate to see important stuff like that exposed.

Ted

Hi Ted, don't apologize, you aren't being critical. I am appreciative of your interest in my project, and your observations. I benefit from your wisdom, and the others who have also taken the time. :)

Answer is yes. There will be cover/cabinet of some sort. I won't get to that until towards the end of the project. Electrical will also co-exist with the copper below the helm. I'm trying to preserve forward cabin space (head/berth) but have plenty of pilothouse space to play with. I didn't want stuff protruding through the bulkhead into the (small) head area.
 
One other thing I will point out is that none of the windows open. This is why I have the forward facing air scoops to have efficient fresh cabin air venting when underway, and even stationary. And if that isn't enough, well, thats when the doors get opened.
 
One other thing I will point out is that none of the windows open. This is why I have the forward facing air scoops to have efficient fresh cabin air venting when underway, and even stationary. And if that isn't enough, well, thats when the doors get opened.

Your climate is most likely different than mine. One of the few things that annoys me about my pilothouse doors is the lack of any significant roof overhang. Can't have the doors open in any kind of rain or spray (going into seas where the wind drives the spray toward the pilothouse). Also, morning dew will run off the roof to the sides and fall in the open pilothouse door when traveling in the troughs. You might consider a couple of Dorado vents with water traps on the pilothouse roof. I have considered adding a couple of 12 VDC fans to mine to increase the airflow. You probably go fast enough that it wouldn't be necessary.

2019-06-08 12.50.55.jpg

Ted
 
i'm definitely in a cooler climate, but its also wet. Sliding door roof overhang noted -good point. I don't have anything much there, and will have to see how it comes together, and mitigate if water ingress is an issue.

Thanks for that photo, nice radar! I'm trying to keep the pilot house roof clear (for height clearance reasons - trailerable & indoor storage), and will have some sort of quick detach or fold down mast for antennae and radar.

Inside style dorade box in the forward cabin. two car style (rotating louvres) interior vents, one for the fwd cabin, and another on the other side going into the pilot house.
IMG_0954.jpg

Its my own unique design, and has not yet been proven in practice......we shall see.;)
 
See how your vents do. The funnels force more air in which might make a big difference in your boat. Might also be easy to reconfigure your air box on the inside to incorporate a water trap that gravity drains through the back bulkhead next to the pilothouse door.

Ted
 
Back
Top Bottom