34 Clipper (CHB) Pilothouse Restoration

The friendliest place on the web for anyone who enjoys boating.
If you have answers, please help by responding to the unanswered posts.

34Clipper

Veteran Member
Joined
Mar 8, 2017
Messages
90
Location
Australia
Hi guys,
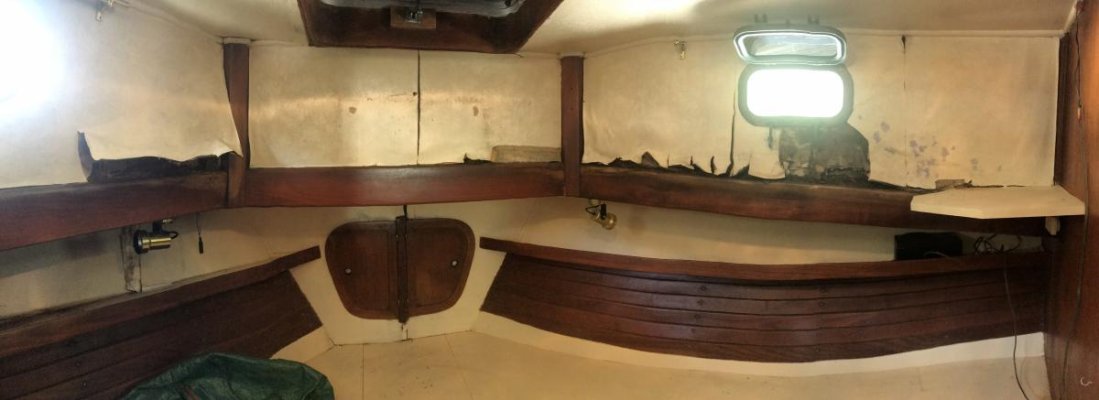
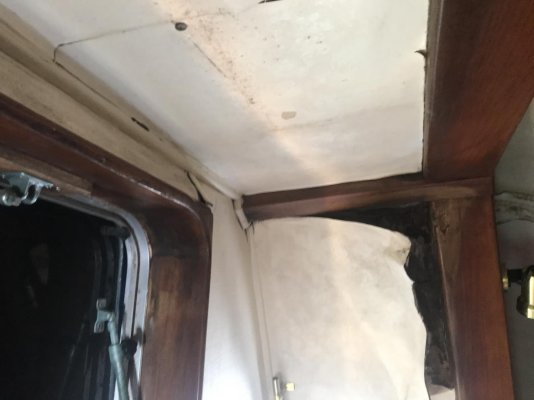
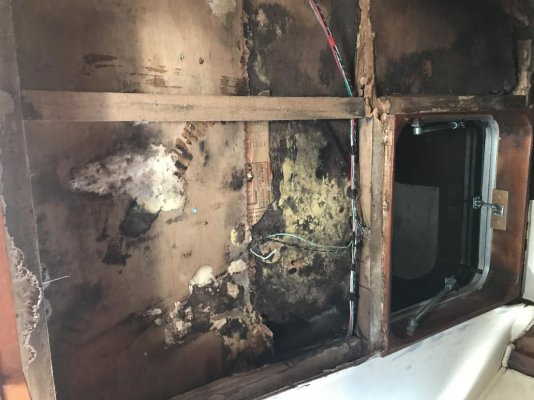
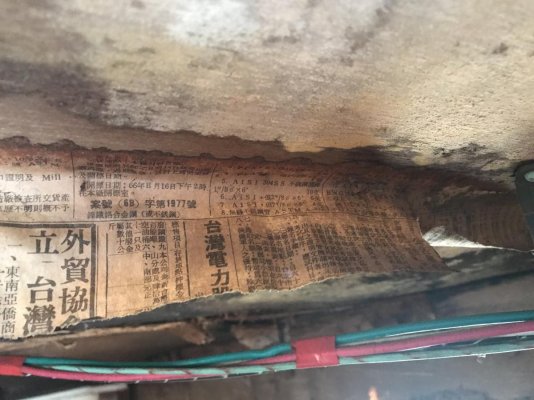
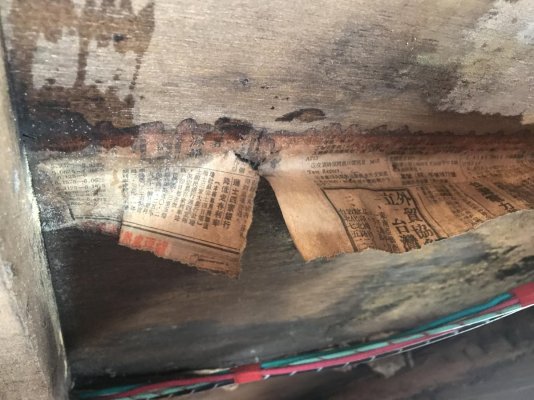
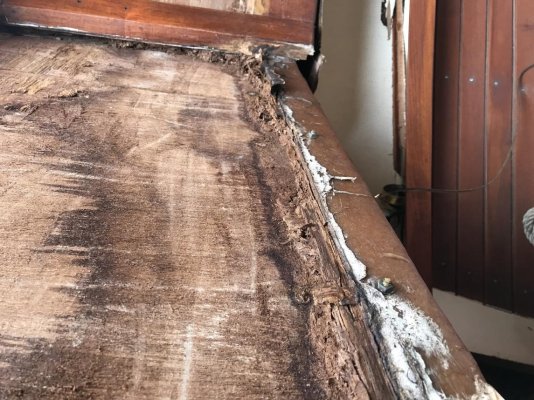
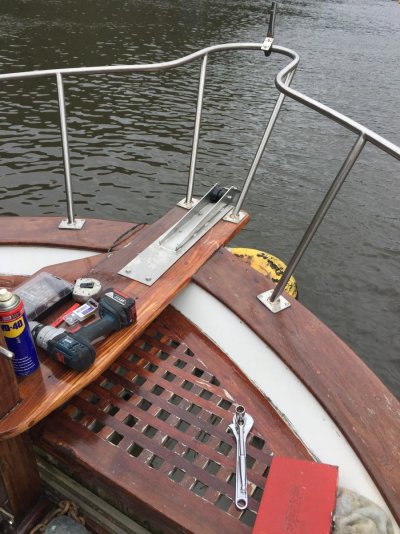
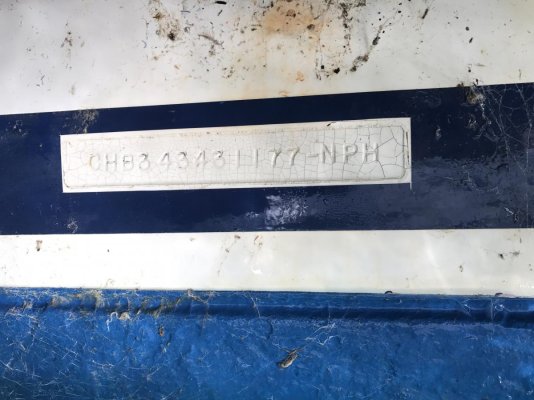
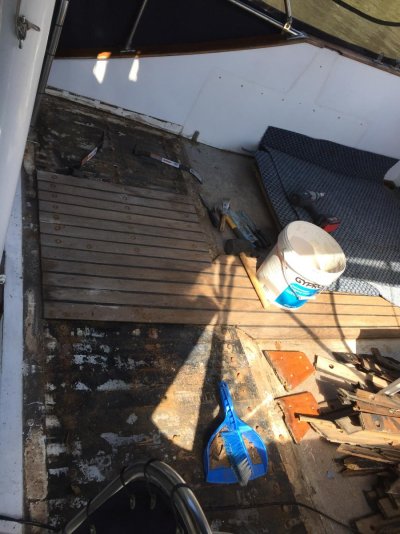
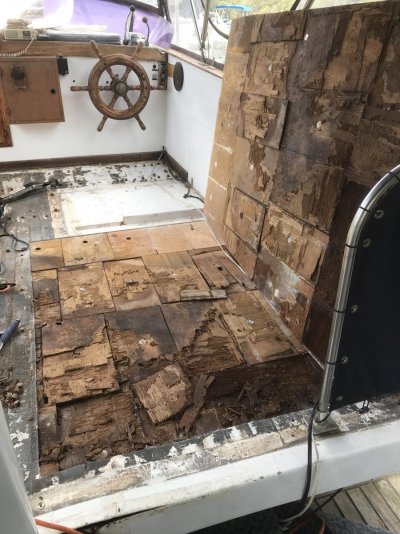
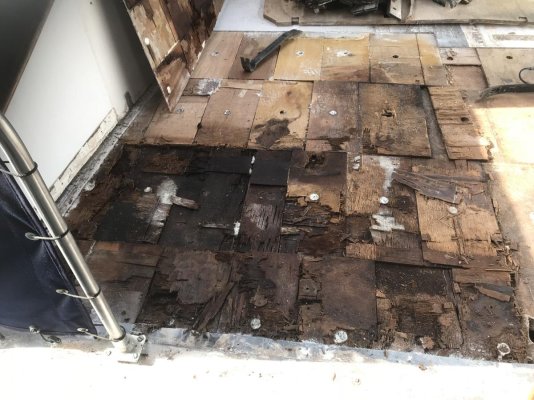
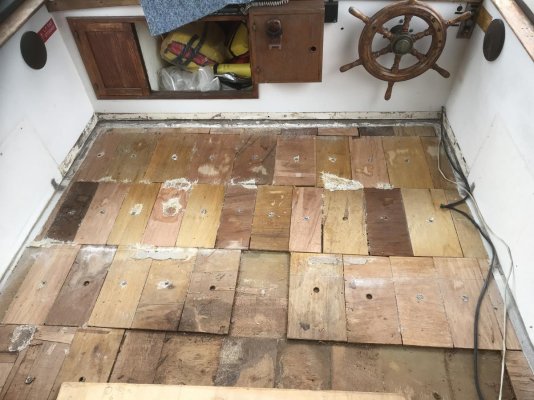
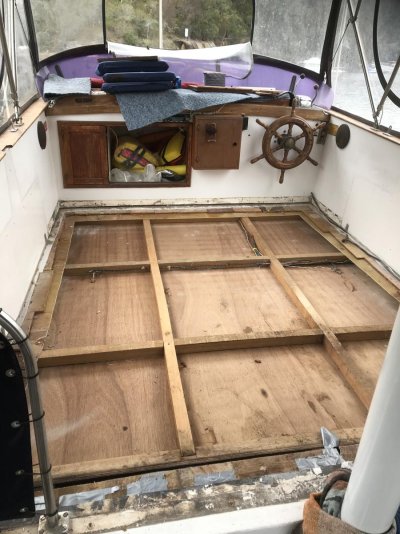
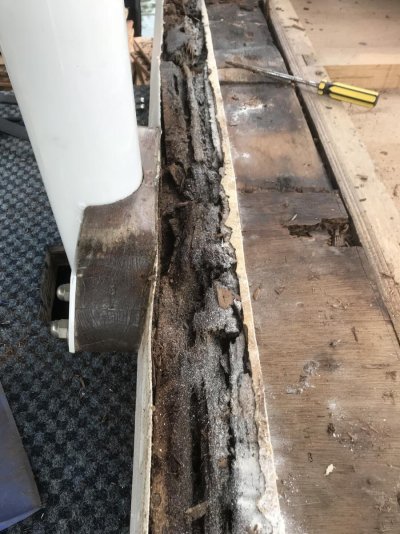
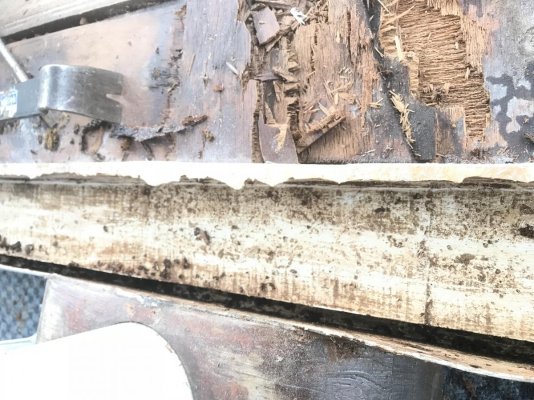
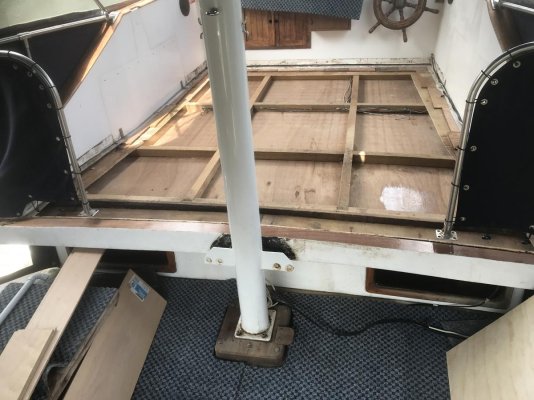
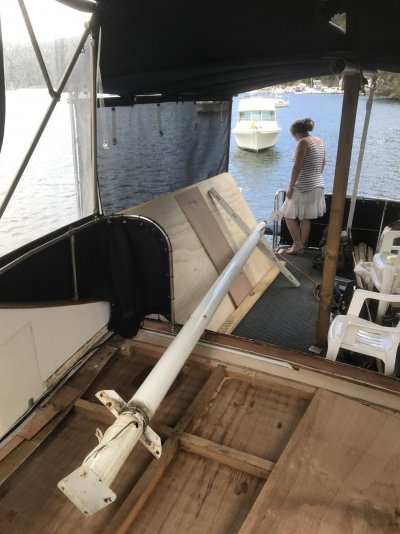
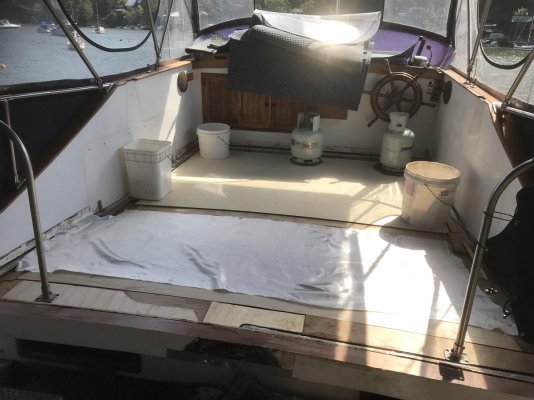
I thought I would start a thread following my restoration/repair of my 1977 34' Clipper (CHB) Pilothouse. This boat has been in my family for 20 years, and I have recently taken ownership of her. The bad news is that it has suffered from all of the common issues with these boats. The front cabin has rotted out, the rear cockpit deck, upper flybridge deck, sections of the top deck as well as under the windows.
This boat has a lot of sentimental value, and I plan on restoring it to its former beauty, while upgrading parts of it to bring it into 2018.
The hull appears to be rock solid, and the 120 Lehman still starts within 2-3 seconds of cranking.
I believe it can be saved if I dedicate a lot of time. I am hoping to do 90% of the work myself to keep expenses to a minimum.
Wish me luck, I know it wont be easy or carried out quickly.
I am hoping to share my experiences with fellow owners, as well as learn a thing or two from you all along the journey. Be prepared for a 1-2 year project.
Tim
 
First job on the list was to replace the bow roller. Unfortunately the original one somehow disappeared, whether someone stole it, or it came loose and fell in the water I will never know. This caused a little bit of damage to the timber from the rope pulling on it, but nothing that cant be repaired.
I purchased a stainless bow roller and had a friend weld it to a larger stainless plate to increase its overall mounting surface area.
In hindsight I should've asked him to drill the holes for me as I burnt out a few drill bits doing it myself. After a few hours it was all mounted up and the mooring rope is now supported nicely and the load is spread over a much larger area.
 

Attachments

  • Bow roller.jpg
    Bow roller.jpg
    117.7 KB · Views: 196
  • Bow roller2.jpg
    Bow roller2.jpg
    179.8 KB · Views: 194
I originally thought the boat was a 1978 model, but after examining the Hull number, turns out it was a 1977.
CHB (Chung Hwa Boatyard) 34 (34 foot) 343 (343'rd boat made) 1177 (November 1977) -NPH (cant work out what the NPH stands for, but I am assuming it is "something" "Pilot" "House".
If anyone knows i'd be interested in hearing.
 

Attachments

  • HIN.jpg
    HIN.jpg
    129.1 KB · Views: 174
Flybridge Repair

So I decided that since I am new to the world of boat repairs I would start somewhere that would be a little forgiving if things didn't go to plan, or I wasn't as capable as I was hoping. As the flybridge deck would be later covered in marine exterior carpet, this seemed the most logical job to tackle. Yes, the spongy rotten deck coring.
I started by removing all deck hardware, screws etc, and then tried
removing the teak plugs and the screws underneath. Haha not happening!!
I used a small hole saw with the pilot drill bit removed, and cut holes around every screw and plug on the deck. This might seem like a simple job but there are hundreds of them. To keep the hole saw from slipping all over the place, I used a conventional claw hammer held down with my foot, and sat the hole saw on an angle in the claw section until the cut was started. This worked perfectly.
Next I used two small lever bars to lift the teak planks from their black adhesive bed, leaving the round holes behind. Some planks lifted in one piece but most didn't. Using vice grips I then removed all of the plugs/screws.
 

Attachments

  • IMG_5196.jpg
    IMG_5196.jpg
    152 KB · Views: 203
  • IMG_5198.jpg
    IMG_5198.jpg
    154.8 KB · Views: 219
The next step was to remove the top fiberglass layer and assess the damage. As you can see from the photo above, the fiberglass edge of the step has split and water was entering into the core.
I used a multi tool with a fine tooth blade, and cut up a section of the fiberglass skin. The top layer was about 3mm thick.
What I found was a dark mush of what used to be plywood. I cant believe how wet it was under there.
After knowing what I was getting myself into, I then cut another large section of the top skin to expose the damage on the port side. It was completely rotted out.
 

Attachments

  • IMG_6896.jpg
    IMG_6896.jpg
    192.7 KB · Views: 201
  • IMG_6902.jpg
    IMG_6902.jpg
    178 KB · Views: 196
Surprise, surprise, the deck core was made up of square scraps of plywood joined together with resin. I honestly have no idea what they were thinking when they used this method, but it obviously worked (for a while).
After exposing the damage, and not liking the method of construction used, I bit the bullet and cut the whole top skin off to expose even the patchwork quilt of ply that was still solid, Unfortunately, although it was not water damaged, the ply had delaminated from the bottom layer of glass, which was ridiculously thin. Like 1mm thin. One single layer of chopped strand mat. How this was considered adequate I will never know. I decided to remove all of the exposed squares of ply leaving just the bottom skin.
Here is where I had to make a decision. Do I just replace the core and cross my fingers that the water didn't travel any further, or do I investigate further?
Of course, I have come this far, so why not dig myself a deeper hole and cut out the bottom skin as well to assess the structural timber frame.
Low and behold, to my surprise, not one splinter of timber was damaged, and the frame was as good as the day it was built 40 years ago. I could now see the top of the ceiling lining, the wiring and the framework.

Now to tackle the bit I knew would be the worst, the beam that extended port to starboard that made up the step to the flybridge, as well as the mounting point for the mast. Out came the multi-tool again.
WOW! there was nothing left of the solid timber beam, and it had so much moisture in it that I could squeeze the water out. I was able to completely remove the beam, and triangle wedge that made up the lip under the step.
 

Attachments

  • IMG_6908.jpg
    IMG_6908.jpg
    158.8 KB · Views: 186
  • IMG_6909.jpg
    IMG_6909.jpg
    167.2 KB · Views: 182
  • IMG_6967.jpg
    IMG_6967.jpg
    185.2 KB · Views: 171
  • IMG_6969.jpg
    IMG_6969.jpg
    187.2 KB · Views: 174
  • IMG_6972.jpg
    IMG_6972.jpg
    193.5 KB · Views: 180
Now comes the fun bit, replacing all of the rotten mush with a solid structural material. My gut was to repair like for like. If it lasted 40 years, then it would surely last at least another 40 if done in the same material but with better installation.
The beam was about 70mm wide by 35mm deep. Instead of using thick ply which would struggle to obtain the curve needed, I ended up laminating together 4 layers of 9mm marine ply with west systems epoxy, making sure I completely encapsulated each layer in epoxy. One layer of 12mm ply had to be slid down into the groove to make up the lip, which had to be cut to match the curve using a stencil. I was not able to install this in one piece so I did it in two halves.
The other solid section between the beam and the framing was also made by laminating layers of ply. Unfortunately, this wasn't easy as the thickness was nowhere near consistent. Thickness varied from 32 to 45mm so I ended up layering different thicknesses of ply to best fill the void.

I was given advice to run a pvc conduit to run cables through, which was always on my to-do list. Instead of drilling holes through the framework toward the bow, I thought I would keep the structural integrity of the frame, and instead run the pvc from the center of the deck, coming out underneath the overhang, and run it to starboard poking up inside the wall cavity of the flybridge structure. As I already had this exposed, this was no issue.
After the epoxy had cured, the new step was extremely solid, and I am now ready to contemplate laying the core back down over it all.
The mast was really getting in the way, so i made up a temporary support post and pulled it down.
 

Attachments

  • IMG_7012.jpg
    IMG_7012.jpg
    143.2 KB · Views: 176
  • IMG_7013.jpg
    IMG_7013.jpg
    156.2 KB · Views: 162
  • IMG_7015.jpg
    IMG_7015.jpg
    132 KB · Views: 179
thanks for taking your time to do this right up. how much epoxy have you used? I guess you are relying on the enclosure to keep it dry if a storm comes through.
 
Next time you need to drill stainless, (there will be a next time in a project this size), use a cutting lubricant and you will be amazed at how easily you can get through the Stainless. It cuts more like butter with a sharp drill and liberal quantities of lubricant.
 
Thanks for taking the time to post your refit. :thumb:

It looks like you are making great progress. Definitely good news to find the structural timber frame to be intact. I had read in several other threads that although one might expect to find plywood under the fiberglass, that the use of scrap wood was fairly common in these types of boats.

I have a couple of different trawlers on my short list of future boats. Honestly, however, thinking of what might be under the teak decks is somewhat scary.

Looking forward to seeing your progress on this, as well as your future projects.

Jim
 
Thanks guys,
Timb I am a little further than what I have posted, and so far have used 2 gallons of epoxy. I did however try and fill all voids with epoxy which ate up a fair bit. Yes I rely heavily on the canvas to keep it dry between visits, but I also cover it with a tarp.
Koliver, I did try using WD40 spray but it wasnt really helping, I will certainly be better prepared next time.
JLD yes every thread I see the decks seem to be made up of offcits, but on mine luckily it is only the top deck, the larger upper deck is sheeted with large sheets of plywood and glasses over. Thank goodness.
I’ll be keeping it coming as I get time.
Tim
 
Bunnings sell a drilling/cutting lubricant. I used it with a reciprocating saw(Sawzall type)cutting some steel onboard, it helped.
 
The next step was to replace what I had removed. I originally wanted to re-use the bottom fiberglass skin, but after trying to clean it up, it had so many holes and with a closer inspection it appeared it wasn't actually flat which would make it very hard to bond a new ply core to it. If you are wondering what I mean by not being flat, it was as if the squares of plywood they used were all different thicknesses. I actually kept the old ones in a pile so I checked it, and sure enough some were 9mm, some were 12mm. They just used whatever they had around the yard.
This proved my theory that the top bridge deck was actually built upside down.
There would have been a mould that they laid with gelcoat, then a thick layer of glass, ply squares for a core, and then a thin layer of glass to hold it all together. When finished, it was popped out of the mould, turned over and installed onto the boat. This explains how it was possible to have such a thin bottom layer, and why it wasn't flat as it adhered to slightly different thicknesses of core material.
So I had to come up with a way to re-build it as is, not upside down haha.
I got two sheets of 3mm ply and laid them over the frame to give the fiberglass something to bond to, but also to give it shape so it wouldn't slump into the roof cavity.
I then laid a layer of woven cloth fiberglass over the top so it overlapped the old skin, and made sure it was soaked in epoxy. This was to be the strength for the bottom layer of the core, but also a means of waterproofing and stop water penetrating into the ceiling downstairs if the core was to ever get wet later down the track (which I hope it never does).
While the glass was still tacky, I laid down the first layer of 6mm marine ply (which I had already cut and dry fit beforehand). I had also coated the ply in epoxy to seal it and provide a better bond. I then immediately did the same with the second layer of 6mm marine ply prepared in the same way, laminating them with a layer of thickened epoxy. I had also cut the sheets differently so the joins were offset to maximize strength.
I sat weights around the deck while it cured. Gas bottles and buckets of water. A few days later I returned, removed the weights and gave it the walk test. MY GOD! the overhang step was as solid as a rock, I could've easily jumped on it with no issues. The rest of the deck was pretty solid too, you could feel a bit of bounce toward the middle but as there is no top layer of fiberglass yet I think I am happy with how it has turned out.
 

Attachments

  • IMG_7055.jpg
    IMG_7055.jpg
    121.2 KB · Views: 168
  • IMG_7057.jpg
    IMG_7057.jpg
    156.2 KB · Views: 200
ATF makes an excellent cutting fluid, and is cheap and readily available. Put some in an old-school little tin oilcan and you will have it easy to dispense.

This is clearly going to be a fantastic thread. Looking roward to more; thanks!
 
While the glass was still tacky, I laid down the first layer of 6mm marine ply (which I had already cut and dry fit beforehand). I had also coated the ply in epoxy to seal it and provide a better bond. I then immediately did the same with the second layer of 6mm marine ply prepared in the same way, laminating them with a layer of thickened epoxy. I had also cut the sheets differently so the joins were offset to maximize strength.
I sat weights around the deck while it cured. Gas bottles and buckets of water. A few days later I returned, removed the weights and gave it the walk test. MY GOD! the overhang step was as solid as a rock, I could've easily jumped on it with no issues. The rest of the deck was pretty solid too, you could feel a bit of bounce toward the middle but as there is no top layer of fiberglass yet I think I am happy with how it has turned out.

Clipper, I am in absolute awe of what you are doing. I would never have been game for it. I look forward to the end product. However, can I just ask one thing..? The Clipper 34 is a nice-looking boat, with really nice lines. Once all that enclosed upper surface covering has served it's purpose, helping cure your resurfacing, painting, etc, will you then be removing all that windage, and allowing her to emerge, in all her beauty, rather like a butterfly out of its chrysalis..? :) :flowers:
 
Thanks Peter B,
Yes it was something I really wasn’t experienced with, and the first cut had me thinking “am I really doing the right thing?”
But the more I do, the more confident I am getting.
I agree, the Clipper/CHB has absolutely beautiful lines.
All of the covers are removable. The clears all roll up, the shade cloth material sections also have zippers and roll up, and the canvas over the front cabin is only there to keep water out until it is repaired. Over the years we have tried many combinations and layouts of the canvas, and without most of it, it looks bare or out of proportion. Here is a photo of how she looked 15 years ago, and my aim is to get her this beautiful again!
 

Attachments

  • 553EE007-9FDF-449F-AF3B-A82BECA8E65C.jpeg
    553EE007-9FDF-449F-AF3B-A82BECA8E65C.jpeg
    107.5 KB · Views: 171
Front cabin

It’s been a long time since I’ve done an update. Had to take some time away from the boat due to a new addition to the family.
So I decided to jump back into the deep end, and gut the front cabin walls and ceiling. These were seriously rotted out from water entering through cracks in the fiberglass and through the screw holes. From the timber trims.
To say it was bad would be an understatement. There was almost nothing left of the structural timber frame, and the ply was just mush.
I had originally planned to remove the interior linings and repair from the inside, but after seeing what was there (or what wasn’t there), I think I am going to have to cut the exterior fiberglass skin, and start from scratch.
 

Attachments

  • 0F176C28-A7AF-4BF6-A47A-1F3D1C9E50EE.jpg
    0F176C28-A7AF-4BF6-A47A-1F3D1C9E50EE.jpg
    51.5 KB · Views: 141
  • 64DBC85A-445E-4D13-9DBC-7B4149632DD2.jpg
    64DBC85A-445E-4D13-9DBC-7B4149632DD2.jpg
    70 KB · Views: 127
  • 0F5E0923-562C-49FC-8152-E23979D32B8E.jpg
    0F5E0923-562C-49FC-8152-E23979D32B8E.jpg
    110.6 KB · Views: 132
  • B6F6C928-3AA9-4275-96C0-5987648C0459.jpg
    B6F6C928-3AA9-4275-96C0-5987648C0459.jpg
    99.3 KB · Views: 124
  • B59C8428-9FA8-4EE2-96B9-56669976366F.jpg
    B59C8428-9FA8-4EE2-96B9-56669976366F.jpg
    121.6 KB · Views: 133
  • 8E03D5D8-5F32-4C77-9F0A-1C6F1289AB4E.jpg
    8E03D5D8-5F32-4C77-9F0A-1C6F1289AB4E.jpg
    124.8 KB · Views: 114
  • C8D65464-8C21-4518-B63B-F8FFD4716F4F.jpg
    C8D65464-8C21-4518-B63B-F8FFD4716F4F.jpg
    102.9 KB · Views: 118
Found something really cool.
In between the plywood but joins were pieces of newspaper. They are all in Taiwanese but there is 1977 written on one piece.
 

Attachments

  • E267BF11-52CF-45E2-8067-6FF050FF304D.jpg
    E267BF11-52CF-45E2-8067-6FF050FF304D.jpg
    133.9 KB · Views: 123
  • C2060EA6-88C1-45B0-BC6C-80AF9BF5715E.jpg
    C2060EA6-88C1-45B0-BC6C-80AF9BF5715E.jpg
    151.6 KB · Views: 124
if the inside is gone and you cut the outside walls??? . you seem to be very resourceful can't wait to see what you have planned . i wonder how much it would weigh if you cut the entire raised portion off to flip and fix .

you have made me scared of what is under my headliner .

keep up the good work .congratulations on the new addition .

Tim
 
Thanks Tim.
To be honest I doubt it would weigh much at all. The outside fiberglass would be lucky to be 1mm thick. It’s quite disappointing to be honest. No wonder they leak.
I’ve never really fiberglassed before all this, but there is only one way to learn. As long as I get the timber frame done, lined in ply and at least one layer of glass over it to seal it, I can always get help with the final layers later.
I plan on insulating the ceiling cavity as well. Why not!
As I’m on a mooring, I’m just going to build a temporary frame above like a tent to protect from the weather.
Hope it works anyway. Not sure when I’ll continue, I probably need a good 3-4 days in a row with good weather.
 
Well, on a routine visit to the boat, I arrived to find the front cabin hatch lying on the floor. The whole lot, timber frame and all, had ripped clean out of the fiberglass.
To make it worse, a storm was about to hit and I had about half an hour to come up with a repair before the heavens opened. I grabbed some offcuts of plywood from the top deck and whipped up a temporary hatch cover. Thank god for 18v tools.

This has made me slightly worried about how much rot is there and how quickly things degrade. I need to get onto this asap.
 

Attachments

  • IMG_9187.jpg
    IMG_9187.jpg
    84.3 KB · Views: 90
  • IMG_9191.jpg
    IMG_9191.jpg
    105.3 KB · Views: 86
  • IMG_9193.jpg
    IMG_9193.jpg
    132.3 KB · Views: 92
So last weekend I decided I was going to do something about it. I started stripping off the trims and trying to carefully remove the timber that I can either re-use, or use as a template to make new ones.
After a day on the water I was able to uncover the puzzle to how these boats are put together. I was always curious as to how the different moulds were joined. Well, it seems the front deck wraps around the bow in one piece, and has a lip of fiberglass that the mould for the cabin top is bolted to. This join is covered by the interior timbers, and the timber decking outside.

I will hopefully be able to remove the teak decking to expose the bolt heads on the outside, and I have already exposed the nuts on the inside. If I can undo or cut these small 5mm bolts, I can hopefully lift off the fiberglass cabin top.

I will be returning in a week or so to continue stripping out the front cabin and bathroom to expose all of the structural timbers as I know there will have rot in them too.
More to come soon.
See the attached pics.
 

Attachments

  • IMG_9801.jpg
    IMG_9801.jpg
    114 KB · Views: 89
  • IMG_9803.jpg
    IMG_9803.jpg
    196.3 KB · Views: 90
  • IMG_9806.jpg
    IMG_9806.jpg
    197.5 KB · Views: 89
  • IMG_9808.jpg
    IMG_9808.jpg
    156 KB · Views: 93
  • IMG_9810.jpg
    IMG_9810.jpg
    143.3 KB · Views: 84
Greetings,
Mr. 34. I was hesitant to comment on your re-build previously due to faulty/non existent memory cells but your pictures have helped to recall what I experienced 25+ years ago.
It appears you have exactly the same situation we had with our 1974 MT DC. Our 34's front cabin was constructed of a timber framework covered with 1/2" ply wood THEN sheathed with FRP. NO molds involved in our case. The side layer and the top layer were seamed underneath the 1/2 round teak molding you show on the outside of the cabin in picture #3 (post #21).
You may be further ahead to completely remove the FRP shell, construct a new framework, sheath with ply and re-glass rather than attempting to wiggle-fit new pieces into place. Just a thought...


Edit: Sorry Mr. 34. Just re-read the whole thread and what I suggested seems to be what you're planning to do...


200.webp
 
Last edited:
Great project!

Keep us updated. Pleeeese.
 
Cabin

RT, you had this similar issue years ago? No photos I am assuming.
Did you track down the source of water entry? Mine seems to be the corners of the windscreen and the screw holes that hold the timber trim that wraps around the top section of the outer fiberglass

I will certainly keep you all updated. I have the boat booked in to be lifted out of the water for an antifoul and put on the hardstand for me to work on for a week.

A few funny things I found, the original battery charger was hidden behind a hatch in the forward cupboard. Marked as "Chen ming chang machine company". Who else still has one of these bad boys??
Also, evidence of one of the builders making a mistake with the hinges. They were accidently notched out on the wrong side of the door opening, and then filled in. The two lower doors in the front cabin were never there when my dad bought the boat over 20 years ago. I wonder what happened to them?
 

Attachments

  • charger.jpg
    charger.jpg
    110.9 KB · Views: 84
  • IMG_9811.jpg
    IMG_9811.jpg
    79.7 KB · Views: 81
wow . looks like you have a plan . i would look into coosa board just to protect from future leaks . defiantly keep us informed . i think i have some issues but i hope they are mostly limited to the rear cabin . thanks for the insight .
 
Greetings,
Mr. 34. Pictures? With a camera? From 25+ years ago? Heck we only got indoor plumbing last month.


giphy.webp


Difficult to tell the source of OUR leaks but most probably the same as yours. I'm still attempting to remember the situation. I think our cabin sides were mostly gone and I think I re-did the roof structure with 2" X 2" beams covered with two glued layers of 1/4" marine ply wood. There was not much curvature to the roof that I recall.

We also had a raised hatch similar to this:


iu


I would most definitely keep that relic battery charger. VERY handy to have a 12V power supply to use when testing electrical stuff at home on the workbench. Looks basically like a variable DC power supply. Again, VERY handy IMO.


AHA!!!! I just remembered! Our cabin sides were rotted and in the same shape (non existent) as yours AND, I remember how I did the repairs! EGAD!!! I remembered!


There is a lip (pictures 1 to 4, post #22 above) that is continuous with the bottom of your side deck that curves up inside and encapsulates the cabin sides to a height of about 2". I cleaned out all the rotten wood from this "groove" and filled the groove with pieces of 1/2" marine ply wrapped in wet resin. I also applied several layers of FRP mat and cloth to the inside of the existing outer skin. More....
 
Last edited:
Greetings,
More: (didn't want to lose the above post).


By building up the inside of the existing forward cabin with FRP, I didn't have to worry about the fit of any replacement wood as I wasn't using any. It probably ended up 1/4+ thick and was solid. I also used the same (jamb a piece of wet wrapped ply into the void) technique with the corner supports (your picture #1-right hand side, above) as well, to tie everything together.


Make any sense? Not saying what I did was correct but it seemed to work at the time. I used polyester resin throughout.


Hope this helps...
 
Last edited:
Haha thanks RT, not that I think about it, it’s a bit of a silly question. You tend to forget how precious photos were back in the film days, and you most certainly didn’t just snap photos of everything.I got my first digital camera in about 2004 (15 years ago), and camera phones certainly make things easy nowadays, you tend to take it for granted.

It’s funny you mention how you repaired yours, because that’s exactly what I was planning on doing originally. Until I saw the extent of the damage, and how far back it extended under the windscreen. Because of the lack of support, the windscreen has dropped slightly and cracked a pane of glass. I’m going to have to prop it up and replace the timber framework to restore the strength. I also had reservations about fiberglassing upside down. As I am new to it, I thought I would let gravity help me at first until I get some practice. Did you have any issues with the new poly resin sticking to the old stuff?

I will certainly keep the old charger, not in the boat though as it isn’t the most suitable charger for maintenance free and AGM batteries.
Thanks for the feedback, it’s great to have opinions and advice.
 
Greetings,
Mr. 34. "You tend to forget..." Yes. EVERYTHING!!!


I don't think I did both the cabin sides and the roof at the same time. I DID glass the sides as I described and I DID do the roof as I described above but I did the sides one year and the roof a few years later. I don't recall any adhesion problems using polyester resin. The fact that the sides were solid meant a good base for the roof supports.


Wish I could remember more. Sorry.


giphy.webp
 

Latest posts

Back
Top Bottom