Butyl Tape and Sikaflex

The friendliest place on the web for anyone who enjoys boating.
If you have answers, please help by responding to the unanswered posts.

Tom.B

Moderator Emeritus
Joined
Jul 30, 2009
Messages
5,839
Location
USA
Vessel Name
Skinny Dippin'
Vessel Make
Navigator 4200 Classic
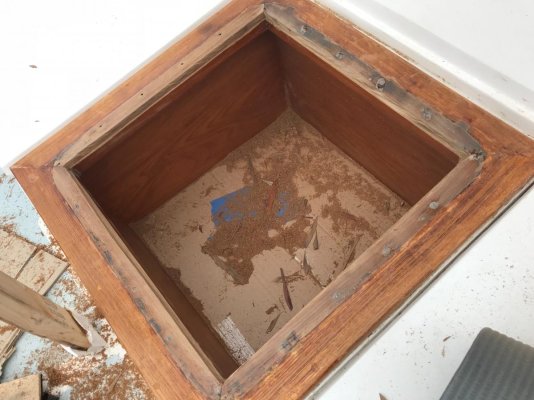
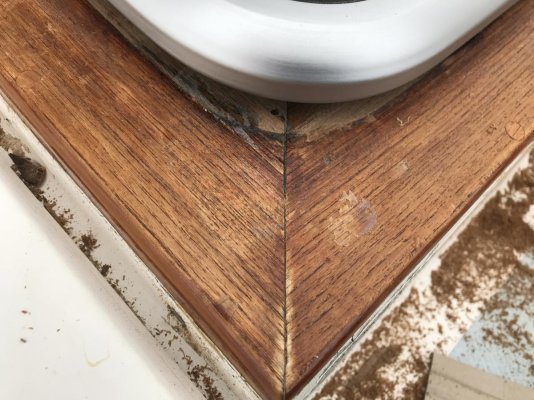
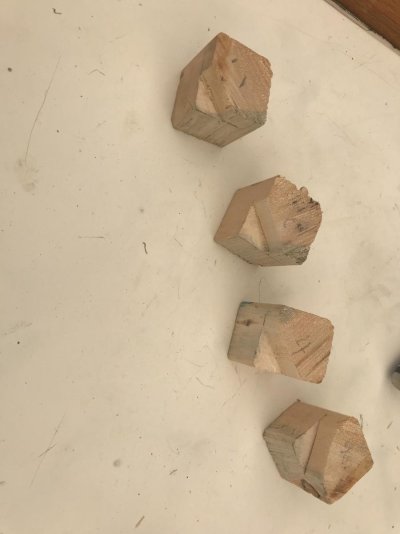
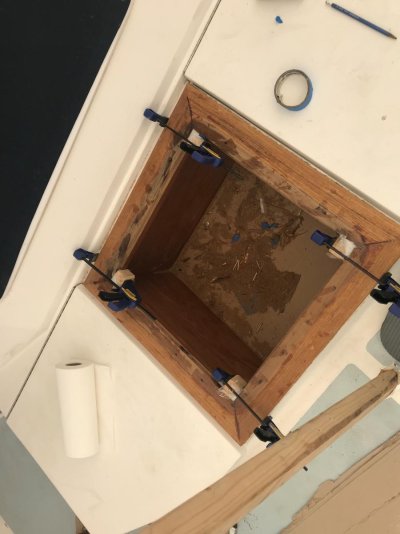
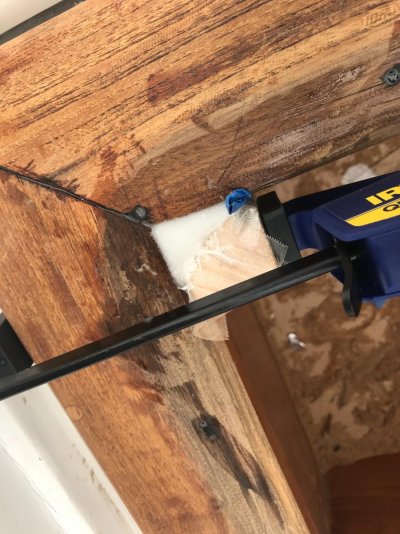
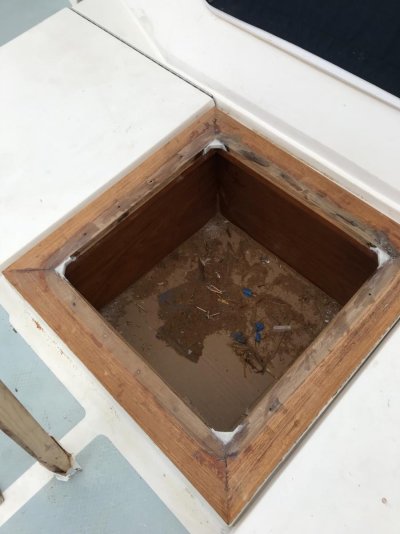
I am in the middle of rebedding a leaking portlight. It is a Bomar S616MBSS. The hole in the hull was cut pretty poorly and the inside of the hull is lined with 3/8" wood that is now rotted. So, of course, I need to replace the wood and reseal it. The poorly cut hole leaves varying gaps of up to 5mm around the edge of the frame itself. If I fabricate new wood for inside the hull that fits around the frame more closely, there will then be a gap that is the thickness of the hull hat needs filling most of the way around the portlight frame.


I was considering filling the gaps with butyl tape then using Sikaflex to seal around the frame on the outside of the hull. Will the Sikaflex seal to the butyl tape? Should I use only butyl tape to seal the entire portlight or use only Sikaflex all through these gaps. I have never worked with butyl tabe before and am a little fearful of using it as the only sealant for this application.


I will try and post some pics here later. Maybe it will help you understand the problem.


As always, any help y'all can be would be great!
 
Butyl tape isnt far from silly putty or modeling clay in moldability and gap filling....usually perfect for window frame bedding, but a wrong sized hole is the issue, not what type bedding/sealant.


Cant quite picture your project but you shouldnt need both. Either the tape will fill a major gap (never the best solution) or it is small enough to fill with any decent caulk.
 
I would go with butyl tape for everything. Easier and less messy. If the gap is bigger just use more butyl. When you insert the hatch the butyl will squeeze into the gaps and the extra you can trim off.
 
I did some templates last night. In this photo, the wood represents the fiberglass hull and the cardboard it the expectation of the interior replacement of rotted wood. The gap is just about accurate to what I need to fill. Let me be clear that the jagged edge of the wood (hull) is NOT sloppy jigsaw work. It is pretty much like that.

**Don't be confused by the placement of the trim ring. The flange should goto the outside, but for the sake of showing the gap, I have it flipped around in a couple of pictures with the flange on the inside.

This picture is of the INNER frame.

IMG_1702.jpg
 
Last edited:
Here is another.


IMG_1704.jpg
 
Last edited:
And the hole.


IMG_1694.jpg
 
Last edited:
Other end.

IMG_1703.jpg
 
Last edited:
Another question about butyl tape: The outer frame is only held in with tabs. Will that pull back enough on it for butyl tape to hold? Isnt butyl tape just a sealant and not an adhesive?

IMG_1699.jpg
 
Butyl tape is not an adhesive. However if the mounting surface is cleaned and prepared properly it will adhere tenaciously yet not glue.

I have a much wider hole than my portlights, although different material/style,
so I used some of the Foam rods from construction where tiltup concrete walls need to have the gap filled. They use the rods to fill most of the gap and then apply a sealant. They are available in several different diameters and can be squeezed into place tightly which is good.

I did not use the sealant but a large rope of butyl tape that filled the remaining gap. I also butyled the trip ring all around with narrow pieces cut from the tape.

Then used some clamps and pressure pads to squeeze the whole works together a bit at a time working my way around the perimeter.

As I snugged the clamps I could monitor the squeeze out all around.

I also ensured that any wood was epoxy waterproofed fairly heavily before all this was done.

5 or so years later I needed to remove that same portlight and that tape argued with me. It was still adhering strongly but NOT GLUED.
To boot That butyl tape was still stretching/elastic. Once apart a chisel and scraper removed the remains.

I will never use Sika or any similar product in an application like this because it is a glue and I almost destroyed another portlight trying to get release.
I do use Sika but not for anything similar any longer.

I'm well aware of heat guns and such but the Sika I guess was told differently.
 
Last edited:
I replaced 11 portholes on my boat last year. I only used butyl tape. I had to route the holes about 5/16” larger than the porthole all around. Then I clamped the port into the hole centered. Forced butyl in all around and all the way through the hull to completely fill the gap. Then put on the trim rings on the outside with butyl and used clamps to squeeze the trim ring into the hull while tightening the screws. The manufacturer said absolutely do not use any caulk instead of the butyl.
 
After giving it some thought, I think I’m going to do butyl tape first, then test it and see where it goes. That way, if I need to redo it, the removal isn’t going to be a huge messy task. I do worry that tabs are all that hold it. However, The Bomar port light that I have installs differently than either of the examples above. The external trim ring will seal to the hull first and then the inner frame will be pushed in from the inside. So it looks like I’m going to have to put butyl tape on the external frame first. Order of operation seems key here.
 
I would still use butyl even if you have to install the trim ring first. Butyl will work with any movement of the trim ring or porthole much more than any caulk. Keep in mind that butyl takes a long time to compress so you have to put it in and then clamp the trim ring and let it set and over time keep tightening the clamps and let the butyl gradually squeeze out.
 
I would still use butyl even if you have to install the trim ring first. Butyl will work with any movement of the trim ring or porthole much more than any caulk. Keep in mind that butyl takes a long time to compress so you have to put it in and then clamp the trim ring and let it set and over time keep tightening the clamps and let the butyl gradually squeeze out.


How long are we talking here?
 
It depends on temperature. The higher ambient temperature the faster the butyl will squeeze out. Generally overnight will do but if it is cool maybe longer.
 
It depends on temperature. The higher ambient temperature the faster the butyl will squeeze out. Generally overnight will do but if it is cool maybe longer.
It is much much better to install butyl tape while it is cold it is thinner and less sticky. It will than when it will become warmer spread/expand and seal even better. I create L shape line and lay it all around window opening ( make sure the surface is cleaned prior to install butyl tape ) than reinstall window or port lite. suggestion use wide tape, all the overage then cut with the blade or exacto knife. Most importantly clean both surfaces as best as it would be when they were new.
 
Last edited:
One more thing IMHO you should coat your plywood with epoxy. Both surface and most importantly the cut edge.
 
One more thing IMHO you should coat your plywood with epoxy. Both surface and most importantly the cut edge.


That is absolutely in the plan. :)
 
Thanks for the advice and tips everyone. As insurance, I also posted over at CMS/Mainesail's forum to get his take on it. Hopefully he will reply before this weekend, however, I do have more confidence now to use butyl tape for this project.
 
Anyone suggest using Compass Marines butyl over others? Everyone seems to prefer that formulation.
 
I may have answered my own question now deciphering “CMS” ;-)
 
Anyone suggest using Compass Marines butyl over others? Everyone seems to prefer that formulation.


Honestly, in the interest of time, I have just gone with Amazon's option. I had to. The Compass Marine store didn't seem to offer expedited shipping and I have to wrap this project up before it rains like hell again.
 
+1 on the epoxy on the raw wood edge.
I’d prefer to use a sealant, because windows frequently wind up having to come out.

The part that is bothering me is that your original picture shows the gaps around the rough cut around the window needing to be filled. why? Other than helping to center the window, that’s not your sealing edge. If you have water that far back, it’s already leaked, your wood is already compromised. The sealing edge should be on the outside face which should be perfectly flat with a lip. That’s the only surface that should need sealing, and it won’t be a very big surface. Was there a picture of the condition of those two sealing surfaces?

I’m not quite understanding how those flimsy looking tabs provide the clamping force to keep pressure on the sealing surfaces. Maybe that’s the weak part. If you can’t maintain even and consistent pressure, that’s the moment I’d go from a sealant right to an adhesive sealant. I might even go straight to 5200, which I hate having to use, but the stuff is reliable when used correctly.

Those were my questions. If you need to fill those gaps, I might only do it around the 4 compass points just to hold it in place.

I might well have misinterpreted how this window is intended to seal, but sealing around the edges and not on a lipped face would be unusual.
 
The part that is bothering me is that your original picture shows the gaps around the rough cut around the window needing to be filled. why? Other than helping to center the window, that’s not your sealing edge.


I see what you are saying, but the hole, I feel, is large enough, compared to the size of the outer frame, that the sealing edge just is not that big. IMHO, not big enough to make a great seal. Moreover, the outer frame is not flat. It's like a semi-circle so only the edge makes contact. If it were flat and could lay flat against the hull, I would be inclined to not worry about it as much.
 
I did get a reply from CMS/MaineSail:


#1 Not all butyl tape is the same and there are literally hundreds of different formulations. Bed-It Tape was specifically formulated & tested for marine use and it is not really a "butyl" tape but rather a hybrid product.

#2 That is the wrong application for Bed-It Tape or any other "butyl" because those tabs are simply not adequate enough to provide the sealing force required to compress the tape the way it is needed.

#3 I would begin by fixing how the builder screwed the pooch so you can start with minimal gaps.

#4 I would suggest a polysulfide such as BoatLIFE Life-Calk rather than a polyurethane or silicone for that application. They will eventually leak again so you want to be able to remove them.
 
I use CMS butyl for most butyl applications but in the porthole installation I used what the manufacturer sold since it was about 3/8” diameter. The CMS butyl is much smaller in size so it did not fill the gap as well as what the manufacturer sold. No idea what brand it was.
 
Last edited:
I see what you are saying, but the hole, I feel, is large enough, compared to the size of the outer frame, that the sealing edge just is not that big. IMHO, not big enough to make a great seal. Moreover, the outer frame is not flat. It's like a semi-circle so only the edge makes contact. If it were flat and could lay flat against the hull, I would be inclined to not worry about it as much.


I’m terribly empathetic, especially with window frames. Clamp some boards on either side, flush with the true sealing surface. Fill the gap with thickened epoxy and then come back and route the opening with a straight bit. Basically, give yourself the sealing lip the lack of which makes it impossible to get a good seal. Also seals the ends of the wood. Then I would use an adhesive/sealant, because I’m still giving a nasty look at the flimsy method of getting a mechanical squish on the sealing lip.

The designers here really did not give you reliable mechanisms here.

I know this sounds drastic, and I guess it is a bit, but I’m so used to this kind of dilemma, I know I could much improve that lip issue in an afternoon. Maybe two since I’d likely not finish sand until day 2.

If as you say, the sealing lip can’t lay flat, you will have a serious issue keeping that water tight. “Caulking”, in which you can’t truly capture your sealant in a mechanical vice, well I’ve never learned how to ever make that work. So I go to whatever lengths necessary to avoid it and suddenly molding a workable sealing lip seems perfectly reasonable, if not the only workable solution.
 

1 Is this picture taken from inside the boat? If so, you have not sent any pictures taken from outside the boat.
Outside would be where you would want to seal the portlight, on the outside surface, not on the inside surface. That surface should be uniformly smooth all around the hole into which the portlight fits. Your flange around the outside should accept a butyl tape that will then be compressed as you pull the portlight in with your inside attachment, whatever that may be.

2 I agree with Compass, that not all butyl is created equal. I have used a lot of butyl in various projects. The last time I tried butyl, in replacing glass in main cabin forward windows, I got the BT from the Glass Guy where I got the glass. It was hard and not very sticky, so didn't mold to the shape that I wanted and I ended up using 291 Sika, which worked very well. I asked about the tape after that and learned that a recent re-formulation had a lot of window installers complaining. If your Amazon BT is soft and sticky it should be OK, but if it is hard and not sticky it may be the same as what I DIDN"T USE.
 
Tom, I had a somewhat similar issue on our leaking forward hatch replacement. The new hatch has rounded corners on the flange that sits inside the wooden frame on the deck. The wooden frame had 90-degree corners, so there were gaps and guaranteed leaks at all 4 corners.

I made some blocks to create moulds at each corner and worked in some thickened epoxy. Used plastic sheeting of some kind to ensure the blocks would release from the epoxy once it set. A little grinding, some butyl rubber tape and it’s been totally water tight over the last year and a half.
 

Attachments

  • A8089F04-86DF-408C-A08D-50E132A54AB9.jpg
    A8089F04-86DF-408C-A08D-50E132A54AB9.jpg
    136.2 KB · Views: 44
  • 13AC90BF-7B4D-4738-AF61-5F161EB3BDAC.jpg
    13AC90BF-7B4D-4738-AF61-5F161EB3BDAC.jpg
    167.5 KB · Views: 53
  • ADD0823C-325A-40A5-BF5F-269FC6169156.jpg
    ADD0823C-325A-40A5-BF5F-269FC6169156.jpg
    58 KB · Views: 52
  • C602582A-93EB-4CD2-BADD-892ACD867946.jpg
    C602582A-93EB-4CD2-BADD-892ACD867946.jpg
    87.9 KB · Views: 52
  • 99C33EA7-D78E-4295-B0FF-2371477136C7.jpg
    99C33EA7-D78E-4295-B0FF-2371477136C7.jpg
    169.6 KB · Views: 55
  • B862FABD-2485-4AA2-941E-D1DDCCC47CEF.jpg
    B862FABD-2485-4AA2-941E-D1DDCCC47CEF.jpg
    91.9 KB · Views: 54
  • B766C141-B4F7-4A64-8E51-449A7FB52F1E.jpg
    B766C141-B4F7-4A64-8E51-449A7FB52F1E.jpg
    81.3 KB · Views: 53
I've only used 2 but tapes but have to say the Compass Marine stuff was far superior IMHO
I did a motorhome water heater repair many yrs ago and used some from a RV supply... OK but the boat hatch rebrd using CM stuff was much better. Very tenacious thinner and a lot less mess cleaning up the residue.
 

Latest posts

Back
Top Bottom