Winter Project II: Raw Water Plumbing

The friendliest place on the web for anyone who enjoys boating.
If you have answers, please help by responding to the unanswered posts.

Tom.B

Moderator Emeritus
Joined
Jul 30, 2009
Messages
5,839
Location
USA
Vessel Name
Skinny Dippin'
Vessel Make
Navigator 4200 Classic
As a part of Skinny Dippin's Charging System Upgrade project that I am undertaking this winter HERE (new window) I need to move a few of the raw water components to make space. Currently, the HVAC and anchor washdown systems share the same thru-hull and strainer. It's been a bit of a pain to send Bess to the engine room to flip the levers to send the water to the washdown pump before we pull up the anchor. Lucily, the previous owner had installed another thru-hull, but had never plumbed it to the washdown system. I am finally going to split the systems to each have their own strainer and thru-hull.

Once again, I plan to mount the entire system to a piece of Starboard in a central location.

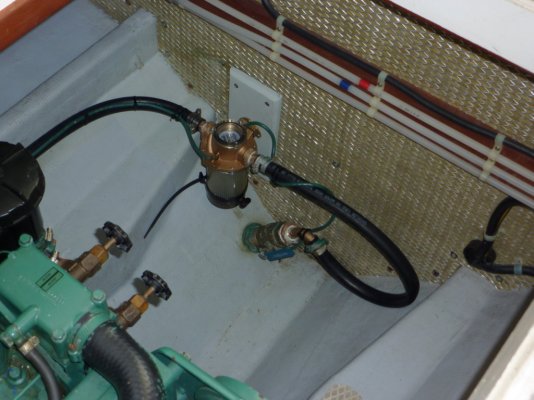
Here is the current system just below the house battery bank. You can see the unused thru-hull with the square-head PVC plug on it. All-in-all, not the best use of space.


P1000959 by GonzoF1, on Flickr

Here is the first mock-up on plywood with the washdown pump (left) and HVAC pump (right). BTW, the nipple on the AC pump is only a temp piece. The one on order will be for 3/4" tubing.


plummockup1 by GonzoF1, on Flickr


-- Edited by GonzoF1 on Monday 16th of January 2012 10:26:36 AM
 
superdiver wrote:
I LOVE the way you set up your mock ups first... I have to ask out of ignorance, what is the HVAC pump for? I dont believe i have one on my boat...

Most marine AC systems are water cooled.* Same with the reverse cycle heat.* It extracts heat from the water.

In response to the original post, my washdown pump shared a thru hull and seacock with the raw water head intake.* I had to operate a valve to change from one to the other.* After some thought, I realized that there was no good reason to have a valve so I replaced it with a "T" fitting.* It works fine.* I thought I might need check valves but I don't.
*
 
Ron,

Does your "T" fitting draw off water from your sea water line before or after your sea water pump?

Gonzo,

How much was the "Blaster"? And can it run w the wash down valve closed without any vent or relief?

Eric
 
nomadwilly wrote:
Ron,

Does your "T" fitting draw off water from your sea water line before or after your sea water pump?

Gonzo,

How much was the "Blaster"? And can it run w the wash down valve closed without any vent or relief?

Eric

The "T" is connected directly to the seacock that's connected directly to the thru hull.* One branch goes to the head intake, the other to the inlet side of the washdown pump which is a couple feet away.

The pump was already installed on the boat (aftermarket) when I bought it.*I just replumbed the inlet side. *I suspect it was somewhere between $100 and $150.* It's just a standard washdown pump.

I don't quite understand the last question, but the pump turns on automatically when I open the nozzle to wash down the chain or deck and shuts off when I close the nozzle.* I also have a toggle switch to turn it off when I'm not cruising just in case there's a leak or the nozzle gets hit and partway opens.
*
 
What Ron said is correct. It uses a pressure switch (the 2 wires that go to the non-motor end) to turn off the pump when pressure is reached.Just like your freshwater pump. We have a cutoff switch too,but it's just the breaker in the panel ;-).BTW... I have no idea how much it was. It was installed when we bought her. It does a great job though. I can't imagine not having one considering the muck the bottom of the Neuse is made of. ICK!
 
I needs some help finding a couple of parts for this rig. I need to reduse the 1 1/2" female threads of the seacock down to 3/4" hose barb and have it be bronze. Not had much luck. Can y'all help?
 
check McMaster for reducing bushings
 
That was the ticket right there. THANKS! I always forget to look there after I look at Grainger.

Wait... Can brass and bronze me mixed in salt water environment? Or can I thread BSPT into NPT?


-- Edited by GonzoF1 on Tuesday 17th of January 2012 07:31:39 PM
 
GonzoF1 wrote:
I needs some help finding a couple of parts for this rig. I need to reduse the 1 1/2" female threads of the seacock down to 3/4" hose barb and have it be bronze. Not had much luck. Can y'all help?

I had pretty much the same problem a couple months ago and was able to find the bronze fittings at my local West Marine.* It took two pieces to do it.* A reducer bushing (I think it's called) and a 3/4" male threaded to hose barb adapter.* The bushing screws into the seacock and the adapter screws into the bushing.
*
 

Attachments

  • finished strainer.jpg
    finished strainer.jpg
    170.5 KB · Views: 86
West Marine? Who knew???... Now I have exactly what I need. Thanks Ron!
 
GonzoF1 wrote:
West Marine? Who knew???... Now I have exactly what I need. Thanks Ron!

Yep, they carry some boat stuff!

Not the least expensive place in town, but when it's for a boat, it's a good place to start.* And you get to put your hands on the items before you buy them so you can be sure you're getting what you need.* Also, if you're not sure, you can buy extra stuff and return it for a refund if you don't use it.

My sea strainer replacement project took several plumbing fittings as well as the sea strainer itself.* I took printouts from defender.com and another boating site with me to West Marine and they matched the prices on the items I was able to price on line.* I ended up saving quite a bit.
*


-- Edited by rwidman on Wednesday 18th of January 2012 07:52:58 AM
 
rwidman wrote:GonzoF1 wrote:
West Marine? Who knew???... Now I have exactly what I need. Thanks Ron!

*

You're welcome.

Yep, they carry some boat stuff!

Not the least expensive place in town, but when it's for a boat, it's a good place to start.* And you get to put your hands on the items before you buy them so you can be sure you're getting what you need.* Also, if you're not sure, you can buy extra stuff and return it for a refund if you don't use it.

My sea strainer replacement project took several plumbing fittings as well as the sea strainer itself.* I took printouts from defender.com and another boating site with me to West Marine and they matched the prices on the items I was able to price on line.* I ended up saving quite a bit.
*


-- Edited by rwidman on Wednesday 18th of January 2012 07:52:58 AM

*
 
Yep, thanks Keith. After I asked, I did a little research about it. I also found what I needed at both WM and Jamestown Distributors. If you go look in the thread about my electrical upgrade project, I got a Jamestown box in today with my bronze 3/4" NPT -> 3/4" I.D. hose barb. I have some coming from WM tomorrow. I will compare the two, but the WM ones appear to have a longer hose barb, so I will likely use them on the actual seacock connection.

Next question for the masses: What thread sealer? I used Pyrex blue for the fuel rig and it's working fine. Any reason I can't use it here or should I use thread tape of some kind?
 
Gonzo and Ron,

I really like your radiused 90 degree elbow. And I'm envious of your very clean bilge Ron. Your's too if you've got one Gonzo. Thanks for the explanation about the flow and the pressure switch. I use fresh water for my head so I am looking at the sea water intake plumbing for the source for the wash down pump. Anybody doing that?

Eric
 
Actually, with the limited space I am stuffing this into, I am not using a radius elbow like Ron's picture shows. I am going to use tighter "standard flow" elbows. My application is only for washdown and A/C raw water. I don't think the lower flow will be a problem with those systems. However, if/when I get to redoing the plumbing to the engine coolant raw water, I will use a "full flow" elbow for that.

Standard Flow Elbow (new window)

Full Flow Elbow (new window)

(BTW... My bilge is not NEARLY as clean as Ron's... Yet.)


-- Edited by GonzoF1 on Wednesday 18th of January 2012 10:34:51 PM
 
GonzoF1 wrote:
Next question for the masses: What thread sealer? I used Pyrex blue for the fuel rig and it's working fine. Any reason I can't use it here or should I use thread tape of some kind?

I would use plumbers "pipe dope".* It seals the threaded connection while maintaining the electrical continuity you want for bonding.* Tape may or may not cut through and allow the metals to actually make a good contact.
*
 
I use Permatex #2 (the non-hardening type) for all my threaded fittings.
 
In my installation, the only reason for the radius is that the seacock and strainer are too close together to use a straight adapter. It would have kinked the hose. Two 45 degree adapters might have worked.

As for the clean bilge comment, thanks.
 
Not a huge jump, but I thought I would just post a pic of the mock-up as it sits now. A few new parts came in like the 90-degree elbows and the reducing bushings (top center).

I would like to point out something I have found that may be very important to future generations that might read this thread or to someone that wants to attempt this kind of project themselves. There is a WIDE variety of quality of manufacture in bronze fittings!!! The Apollo branded stuff I ordered from West Marine is generally crap. Some of the ugliest casting and QC I have seen. The Graco fittings from Jamestown Distributors are FAR superior in construction and mass. FYI


plummockup2 by GonzoF1, on Flickr
 
If this is to be mounted on a wall, or some other vertical surface, that ac pump arangement is going to be a problem. The water flow from the thru hull, to the strainer, to the pump has to be steady up hill and all below the water line, or you will get air locks and will always be having to "burp" the system. The pump intake (end fitting) also has to be below the discharge. The pump head will rotate (remove the 4 screws at the end, rotate, replace screws. O-ring seals so it's easy to do). If it's not, the pump will air-lock every time. I also suggest the longer, higher flow 90's if you can work them in. I always use "Full Flow" fittings at least from the thru hull to the pump intake. They are an oversize fitting that used the next size up hose. For example, 3/4" full flow fittings have 3/4 pipe threads, but use 1" hose. There is a tremendous amount of flow that goes through an ac system, and a lot of crud. The easier it is for the crud to get to the strainer, the better the system will work and the less maintenance required. Those tight 90's are a great place for a clog. These ac pumps are not self priming, so you have to have all of the plumbing where the water will flow right into the pump as soon as you open the valve.

You'll notice your old system has the proper arrangement for flow. Thru hull to strainer up hill. Strainer to pump on the same plane, with the discharge fitting on the pump above the intake. You can rotate the pump where it discharges straight up, or to the side, it doesn't matter, as long as it is above the intake. The discharge hose also needs to continue up hill away from the pump for a short ways at least. Long enough that if you get a*shot of air in the system it will travel through the pump and on up the line. Just don't want the pump to be the high point in the system and trap air (air lock).

Hope I've made sense, and been some help!

*


-- Edited by Brent Hodges on Sunday 22nd of January 2012 05:20:22 PM


-- Edited by Brent Hodges on Sunday 22nd of January 2012 05:21:26 PM


-- Edited by Brent Hodges on Sunday 22nd of January 2012 05:21:50 PM
 
One more thought. Your blaster pump is a diapharm type and will pump air, so it's arrangement isn't as critical, although it will work better if the pump is above the strainer so the air will work out of the system naturally.
 
What if I just flip the whole design over? Will that satisfy the requirements? Hang on, I'll get a pic.

Ok... here are two different versions. In the first one, I'll have to wait and see if the hosing will make that turn, but I could try a few different fittings to work it out.


plummockup3 by GonzoF1, on Flickr


plummockup4 by GonzoF1, on Flickr


-- Edited by GonzoF1 on Sunday 22nd of January 2012 05:51:31 PM
 
In the first pic, you could swap the fittings on the strainer and pump then it would be a straight shot, but I wouldn't mount the pump in that position.

These pumps work better (and are intended to be) mounted horizonally. Maybe mount the ac strainer in the lower left position with the pump in the lower right. Output of the strainer right into the pump. Then stagger the washdown strainer slightly to the left and above the ac strainer and pump above the ac pump? Play with that, but you're on the right track. Also, all hose on the suction side of the pumps (thru hull all the way to pump) needs to be wire reinforced hardwall water hose. Non-reinforced hose will collapse.
 
I also see the termnal strip in the pic. Excellent choice for hooking these pumps up. Gives you a great place to troubleshoot, and makes removal of the pump a snap. For the terminal strip you use on the 120v stuff, Blue Sea Systems makes a DualBus cover (part # 2709) that protects these strips from damage and you from a "shocking" experience! :eek:)
 
Brent Hodges wrote:
In the first pic, you could swap the fittings on the strainer and pump then it would be a straight shot, but I wouldn't mount the pump in that position.

These pumps work better (and are intended to be) mounted horizonally. Maybe mount the ac strainer in the lower left position with the pump in the lower right. Output of the strainer right into the pump. Then stagger the washdown strainer slightly to the left and above the ac strainer and pump above the ac pump? Play with that, but you're on the right track. Also, all hose on the suction side of the pumps (thru hull all the way to pump) needs to be wire reinforced hardwall water hose. Non-reinforced hose will collapse.
*I wondered about the pumps orientation, but there was no documentation so I gave up trying to look it up.

Reinforced hose is on order :-D

I'll try your config and see how it looks. Thanks for all the help.

Tom-
 
By the way, what type of boat is that? It's a good looking boat, but can't put my finger on the brand.

You may or may not know, but my Albin, Friendship, is the center boat in the banner at the top of these pages! The one with the anchor out holding all 5 boats. Oh, and the ICW mustache.
 
GonzoF1 wrote:Brent Hodges wrote:
In the first pic, you could swap the fittings on the strainer and pump then it would be a straight shot, but I wouldn't mount the pump in that position.

These pumps work better (and are intended to be) mounted horizonally. Maybe mount the ac strainer in the lower left position with the pump in the lower right. Output of the strainer right into the pump. Then stagger the washdown strainer slightly to the left and above the ac strainer and pump above the ac pump? Play with that, but you're on the right track. Also, all hose on the suction side of the pumps (thru hull all the way to pump) needs to be wire reinforced hardwall water hose. Non-reinforced hose will collapse.
*I wondered about the pumps orientation, but there was no documentation so I gave up trying to look it up.

Reinforced hose is on order :-D

I'll try your config and see how it looks. Thanks for all the help.

Tom-

*

Tom, this is what Shurflo says about orientation. That way if the pump should ever leak or need to be dismantled water doesn't run on the motor. I do this for all my electric pumps. Love your mockups, nothing beats "measure many times - cut once" and thats what the mockups do.

MOUNTING*

Consider a dry location that allows easy access if maintenance is required. *The pump should not*be located in an area of less than one cubic foot unless adequate ventilation is provided. * * * * **

Excessive heat may trigger the integral thermal breaker and interrupt operation. When the*temperature *drops the breaker will automatically reset and start operation.

Mount higher than the outside water (sea) level. The pump is capable of a 6 ft. [2M] vertical*prime above the outside water level. The pump can be mounted in any position. *If mounting *the pump vertically, the pump head should be in the down position.
 
Here are the two new mock-ups:

This one is just the swap of the fittings:


plummockup5 by GonzoF1, on Flickr

This one I think I like better (ignore the weird hose fitting on the washdown pump... it's just for mock-up)


plummockup6 by GonzoF1, on Flickr
 
Tom, this is what Shurflo says about orientation. That way if the pump should ever leak or need to be dismantled water doesn't run on the motor.

Mount higher than the outside water (sea) level. The pump is capable of a 6 ft. [2M] vertical*prime above the outside water level. The pump can be mounted in any position. *If mounting *the pump vertically, the pump head should be in the down position. (endsnip)

----------------------------------------------------------------------------------


That is exactly right for a diaphram type pump, like your Blaster, but NOT the ac pump. Two completely different animals. You*CANNOT mount the ac centrifical type pump above the water line, and it must be mounted in such a way as to not trap air. Also, the motor on this particular ac pump is sealed so it can get splashed. This is actually meant to be a "wet location" pump. The motor part is even water cooled. Note the 1/4" or so lines going from the pump heat to the motor.
 
Back
Top Bottom