Repair Torrid 20 gal hot water tank?

The friendliest place on the web for anyone who enjoys boating.
If you have answers, please help by responding to the unanswered posts.

Insequent

Guru
Site Team
Joined
Mar 17, 2012
Messages
4,275
Location
Australia
Vessel Name
Insequent
Vessel Make
Ocean Alexander 50 Mk I
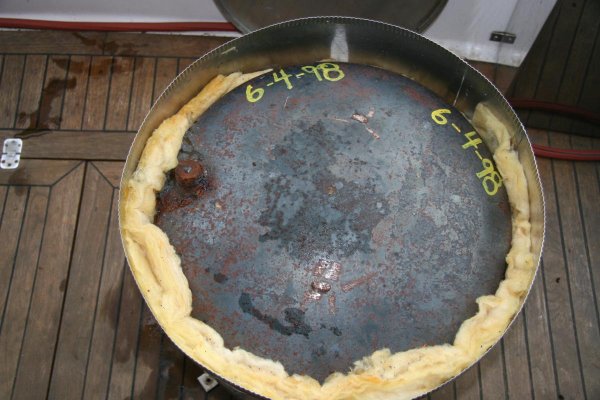
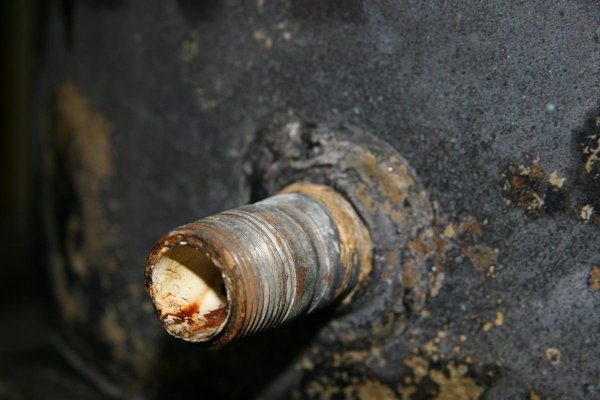
So, my Torrid Hot water tank has developed a leak. I have started to remove connections to it and will remove it (hopefully) in the next few days. It was installed then piping and other stuff placed in front of it, so getting it out is going to be a little tricky.

I see in the Torrid literature that they refer to the inner tank as being glass lined and with a non-porous porcelain surface. This does not sound like something that is readily repairable. Of course it might just be a leak around a fitting, and that might well be repairable.

Has anyone disassemble and repaired a Torrid unit?
 
Look at everything very closely. I do not have the same tank as you but mine was leaking at one of the fittings outside of the tank. The water would run down between the inner tank and the outer shell, across the bottom, and run out into the bilge. I finally figured it out by checking the water temperature of the water running out. The water was cold and it should have been at least warm if it was leaking out of the inner tank. I would think a tank with a porcelain lining would last forever.
 
Thanks, thats encouraging. The leaking water is cold. I will certainly look at it closely once I've removed it. Local available replacements are running at around A$2000 !
 
" I would think a tank with a porcelain lining would last forever."


Most dirt house HW tanks use a porcelain lining with an expected life of 10 -12 years,
 
Brian: We had a Torrid water heater and it leaked at the cold water filling. It corroded where it went into the tank and was unrepairable. It was our fault. We lived on a water maker for 7 out of the 10 years we had it and I never changed the anode. They are good water water heaters, probably one of the best of any we’ve had. Let us know what you find out.
 
I have the same unit, about 8 years old. The fact that the water is cold is an important clue, maybe pointing to the feed line connection. I was going to suggest that you also check the tank's anode for a leak, but that would be hot water.
 
Thanks folks. I have never changed the anode so I might just have repeated Larry's mistake. :banghead:

I'm going to start working on it today now that the heat wave has eased a bit. It was 38°C yesterday, and I did not feel like being in the ER for an extended period!
 
Roll your own?

Rheem has Marathon tanks which are guaranteed "forever" , 30 gallon might fit.

The off grid folks sell heat exchangers that use the pressure/temp overflow access to heat the tank contents for consumption or heating purposes.

Combining the two products might make a great system as the Marathon tanks have far thicker & better insulation, and are used in areas where the water is heated to 190F.

Just thinking out loud but install an anti-scald valve if you use the idea.
 
Last edited:
FF
Good idea, but location and space available mean that wont work for a refit.
 
Well I eventually managed to wrangle the Torrid out of the ER and into the cockpit.

With the top removed I can now see the anode, but it looks to be rusted-in. At least I now know when it was manufactured!

With the base removed there is quite a lot of rust evident. A slow leak for some time that became a fast leak a few days ago. The culprit may well be the inlet, but I don't fancy trying to remove it and re-seat it. I think I'll declare this unit 'unrepairable'.

A Raritan 20 gal will fit, although its 1" taller so will involve moving a couple more things to be able to position.
 

Attachments

  • Torrid - top.jpg
    Torrid - top.jpg
    124.8 KB · Views: 93
  • Torrid - base.jpg
    Torrid - base.jpg
    94.5 KB · Views: 83
"The culprit may well be the inlet, but I don't fancy trying to remove it and re-seat it."


You never know , a soak with PB Blaster , tapping with a light hammer and in 2-3 days an attempt with a proper fitting box wrench could save the day.
 
I guarantee, the porcelain liner is shot. They crack and steel rusts. If it was robust, no one would ever need a new one, and the industry would collapse, and the remaining few sellers would charge 10 times the prices.

And say you managed to get that anode rod out, simply removing it likely to be near impossible, They jam them on at 200 ft lbs. I tried once using an air wrench, no good. Put a huge breaker bar, no good. And doing so will flex the steel and crack the porcelain. They really don't want you taking them out. My next step would have been my acetylene torch. A couple years after me trying to remove it, the home water heater sprang a leak. It was about 10 yrs old.
 
20 yr old water heater? It doesn't owe you anything!

You're on the money, REPLACE IT!
 
"The culprit may well be the inlet, but I don't fancy trying to remove it and re-seat it."


You never know , a soak with PB Blaster , tapping with a light hammer and in 2-3 days an attempt with a proper fitting box wrench could save the day.


It may buy some time, but monkeying with the tank fittings with a hammer or an impact tool will certainly damage the porcelain with failure the inevitable result, just maybe a bit later. Better to invest that time in replacing it and doing it just once!
 
Although I agree with most of the comments above, replacing the tank will be a project. The Isotemp is A$2000 but is too long so I would need to go to the smaller 50 litre one. I'd rather not lose 25 l of capacity! The 75 litre Raritan will be difficult to get into place, involve some re-positioning of PEX as well (and I don't have the tool or fittings) and is A$2600 when a temperature mixing valve is included.

So, rather than just dropping off the Torrid at the metal recyclers, I will take it home first and attempt to remove the fittings and anode. If I wreck the tank in the process, so be it, nothing really lost other than some time. There is a chance that I can get all the fittings off it. Then an internal flush and camera inspection should reveal the condition of the liner. If it looks OK welding shop should be able to braze the area that is leaking. I'm in for a project whatever I do!
 
Brian: Keep us posted. I'm curious to see what the insides look like after 20 years. Bummer on the replacement costs.
 
Although I agree with most of the comments above, replacing the tank will be a project. The Isotemp is A$2000 but is too long so I would need to go to the smaller 50 litre one. I'd rather not lose 25 l of capacity! The 75 litre Raritan will be difficult to get into place, involve some re-positioning of PEX as well (and I don't have the tool or fittings) and is A$2600 when a temperature mixing valve is included.

So, rather than just dropping off the Torrid at the metal recyclers, I will take it home first and attempt to remove the fittings and anode. If I wreck the tank in the process, so be it, nothing really lost other than some time. There is a chance that I can get all the fittings off it. Then an internal flush and camera inspection should reveal the condition of the liner. If it looks OK welding shop should be able to braze the area that is leaking. I'm in for a project whatever I do!


Smart move. You have nothing to lose. If nothing else, removing the anode and reporting it’s condition may shed some light on what caused the ultimate failure. Was it anode neglect, or just good old fashion age and degradation?
 
I have the unit at home, and have removed the anode. There is just a thin iron rod remaining, the Mg has all been converted to a relatively soft white oxide/carbonate. There was some rust around the nut and tank next to it, so it appears that it had been leaking slightly.

About 4 years ago I thought I would replace the anode, but could not find it. It was not where the downloaded manual said it would be. It turns out that the anode in this 20 yo model is in the top of the tank, and the top cover and insulation have to be removed to access it.

I did have the yard convert it from 120VAC to 240VAC 6 years ago, using a kit from Torrid. But I don't know whether or not the anode was replaced at that time.

Next I need to remove the element and heat exchanger. The latter is a 2" fitting which so far is refusing to loosen.

I flushed the tank via the outlet/inlet nipples and a quantity of fine brown sediment came out, which is not particularly encouraging for what the inside will look like.
 
Last edited:
Your dissection is appreciated.


For what it's worth, the latest Torrid tanks have the anodes fitted from the side rather than the top where they are nearly always inaccessible. Seems like progress, but time will tell. If only all manufacturers checked in with their end-customers to see how things are going..... It seems so simple....
 
I remember well when I changed the anode on mine, the first and only time. It is on the side of the tank with pretty bad access. It took a breaker bar and all the swear words I could muster to pop it free. The anode was corroded right down to the core, as you described on yours. I don't understand why they torque them so hard at the factory.
 
1/2" air space under the tank and hoses on the drain tap and pressure relief valve to lead drips to the bilge will triple the life expectancy of most tanks
 
Ken - be glad your anode was secure! I think it was the source of my leak.

I was able to remove the heat exchanger and element OK, but decided to leave the inlet & outlet nipples in place. There is a label on the tank warning to not use heat or else you could damage the 'thermoplastic dielectric fittings'. Also, a warning not to rotate the outlet nipple as there is an air vent to release trapped air. Fortunately, with the top and base removed the outer SS skin would deform enough to slide up over the nipples and off the inner tank.

The glass wool insulation was wet around the base and stained with rust. The tank base had some pitting and flaking rust, but is about 1/8" thick so I don't think it is too concerning. As I noted previously, there had been a leak at the anode area. I cleaned the whole tank up, wire brushed it and then put rust converter on it. The base looks a bit ratty, but the concave base has a 3/4" section that is not part of the pressure vessel, so it should not be an issue.

The good news is that all of the weld-on sockets appear to be in good condition, other than a small amount of surface rust. However, pic 1 shows the anode socket and there is some pitting running down the right side. On close inspection of the anode fitting, there is corrosion of part of the thread (pic 2). I surmise that the anode has had a slight leak for a long time, and that recently the corroded thread allowed a much greater leak. The inlet socket (pic 3, apologies for poor depth of field) looks to be pretty good.

I closed the orifices off and filled the tank with water. So far no wet patches anywhere. Assuming that remains the case in the morning I will cobble together something to allow a pressure test to about 150psi. If that passes then I will connect the element to power and repeat the pressure test at normal operating temp. It will take me a few days as I want to borrow some pipe-thread taps & dies from a friend to clean all the threads on the fittings before pressure testing. My HD borescope camera should arrive early next week as well. I am keen to see what the inside of the tank looks like. The element and heat exchanger had some light brown powdery scale that is easily removed. I image the lining will have some also. I have flushed a bit out already. I might put a couple of gallons of vinegar in the tank and rotate it around periodically to dislodge it.

Assuming the pressure testing is OK then I will paint the inner tank with engine enamel, get some new insulation wool and re-assemble. I think I have gotten lucky with this!
 

Attachments

  • Torrid anode socket.jpg
    Torrid anode socket.jpg
    155.4 KB · Views: 43
  • Torrid anode.jpg
    Torrid anode.jpg
    85.7 KB · Views: 40
  • Torrid inlet.jpg
    Torrid inlet.jpg
    89.8 KB · Views: 37
  • Torrid heat exch-element.jpg
    Torrid heat exch-element.jpg
    90.8 KB · Views: 41
Last edited:
Nice job!.


Not sure what your pressure test plans are, but I have found testing with compressed air is very handy. Leave a pressure gauge on it and you will see a pressure drop over time. You can also hear air leaks where you typically can't hear a water leak unless it's a real gusher. And the air leaks don't make a mess.
 
If I can get the necessary fittings then I will use compressed air, and yes I have a gauge and valve that I should be able have connected. But I'll leave the tank pretty full, just remove a few litres or so of water. This means a smaller volume of air from the compressor and will be more safe if the tank actually ruptured. I will see any damp spots on the unpainted tank surface if there are leaks.
 
If I can get the necessary fittings then I will use compressed air, and yes I have a gauge and valve that I should be able have connected. But I'll leave the tank pretty full, just remove a few litres or so of water. This means a smaller volume of air from the compressor and will be more safe if the tank actually ruptured. I will see any damp spots on the unpainted tank surface if there are leaks.

Once pressurized spray down all seams with a spray bottle filled with soapy water. Careful with the amount of pressure.
 
Thanks. My Headhunter X-Caliber water pump has a max pressure of 67psi. So there's not much point in going beyond about 75. I'll take the pressure up in stages, and give it a bit of time at each point. There is no rush. I'll leave the soapy water until the end as I want to be able to see any damp patches during the test. I have the tank on a stand outside near my workshop, in good light. Any dampness is easy to see.
 
Last edited:
Have you ever seen the episode of Myth Busters when they ran a HW tank over pressure? Spectacular.
 
Hey TT, stop scaring me! I missed that Mythbusters episode, thankfully under the circumstances.

These days Torrid say that the working pressure limit is 150psi, but that the tanks are tested to 300psi. And that the P-T relief valve is rated at 100psi. For my old tank, I'm not sure if it had the same specs. But I'm only interested in whether the thing will leak at the max pressure of my water system. So I'll only go to 75psi. And stand clear, and don some safety gear!

Pressure test with water for safety purposes. Any immediate rupture with air can throw off shrapnel. Years ago a guy was decapitated where I worked when a pressure test with air blew a flange of the 36” pipe.
 
Another update, and it turns out I was over optimistic. I started a pressure test with the tank almost full of water. At 20psi the upper part of the vertical weld seam became damp. At 40psi there was a fine mist emerging from 2 or 3 points on the seam, close together. The seam looks fine from the outside, just minor surface rust. The glass lining must be at least partly shot, and it rusted from the inside.

So at this point the tank is toast. I'll see if I can get a borescope pic on Monday. But I need to fly across to the west coast for a funeral on Tuesday, so if the camera does not arrive early on Monday it will be the week after before I can post the update.
 
Back
Top Bottom