Water tank issues

The friendliest place on the web for anyone who enjoys boating.
If you have answers, please help by responding to the unanswered posts.
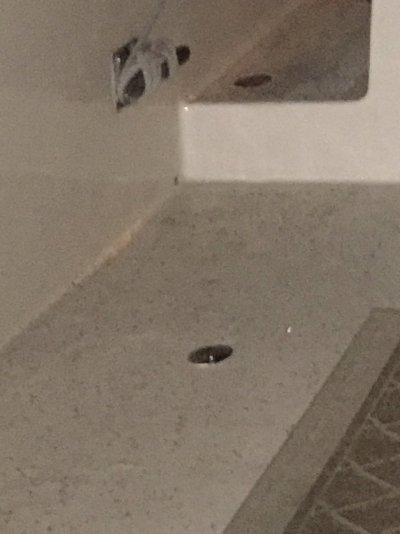
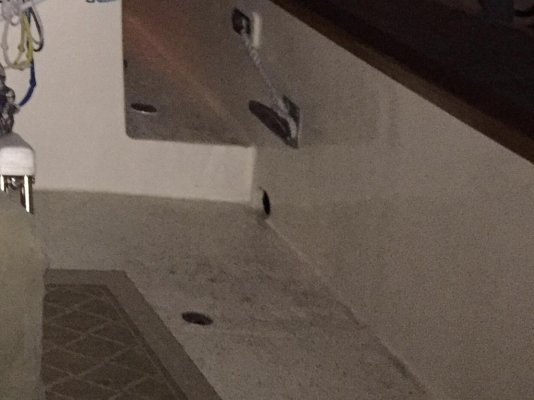
Maerin, Ok I’m sorry I see what you’re talking about now, repair the hole in the void area . Sounds good to me. I can open up th outside as big is I want with a hole saw and a plug in the hole , patch the hole in the void area and build it up from there. Great idea thanks so much
 
I read in Good Old Boat about making a piece out of thin plastic just bigger than the hole you make. Run a piece of string thru it. Squeeze it till it goes inside the hole. Pull the string. And epoxy away. Maybe put a piece of saturated fiberglass on the inside of the plastic to bond to the inside of the tank. Make the hole big enough to rough up the inside edge. Fill the hole with thickened epoxy or make a plug and epoxy it in after the inside fiberglass kicks. On the outside use another piece of fiberglass to cover the edges.
 
The patch on the inside of the tank only needs to provide a surface for the real patch (epoxy) to form up against.

Even a piece of cardboard shmeered with Bondo pulled in with a finger hole will suffice.

Clean up the old hole as best you can and fill the area with thickened epoxy.

A can lid over the epoxy can make enough pressure to be sure the void is filled .

Remember a 3 ft deep tank has less than 4psi to contain.
 
Ok I got a little deeper into the tanks today and they don’t look so good on the inside . First I’m going to see if the yard thinks they can rebuild the tanks like original but I don’t see how they can. If they can’t I’m going to cut the deck out on each side and install poly tanks or get somebody to custom build me a couple stainless tanks. Either way if the yard does repair or me the deck is more than likely gonna need to be cutout. The area will be about 3’x3’. Here are a couple pics of my water fills and tank tops are directly under the deck about 15” from the bottom of the deck. Suggestions?
 

Attachments

  • D3E355F1-8F5C-4402-9FEB-571C3958B6F7.jpeg
    D3E355F1-8F5C-4402-9FEB-571C3958B6F7.jpeg
    130.3 KB · Views: 62
  • 87863497-859A-46E0-88E3-F1F862B81CBA.jpg
    87863497-859A-46E0-88E3-F1F862B81CBA.jpg
    106.5 KB · Views: 60
Last edited:
A modest inspection port in the top will allow a custom flexible tank to be installed.

Depending on the size of the tank a water bladder that is larger than the tank will fill it and have no problems.

Vetus sells 35 Gallon , other sources may have OTS larger.
 
Greetings,
Mr. PM. I think Mr. FF is onto something (post#33). I vaguely recall a soft plastic "mushroom" type device for changing seacocks that one pushed through the through hull and held in place. Perhaps that may be an option instead of a piece of cardboard to provide backing inside the tank to allow epoxy patching.


I HOPE someone can help me out here regarding the plastic device I mentioned above. NO memory is a real bugger sometimes. Thanks.
 
Firefly... They make a plug for pipe that you can insert then turn a bolt or screw that expands and seals. Think the drain plug on a small boat. 2 Metal washers with a rubber insert between and a bolt thru it. When you tighten the bolt the washers expand the rubber sealing the pipe. No idea on the sizes but I've seen 1.5 inch...
Since the OP said he has wood coring inside the fiberglass walls of the tanks I think epoxy would be better. Or a flexible tank as others have suggested.
 
I found a 39 gallon off the shelf poly tank that I think I can make work without cutting the deck up. I'm going to make a plywood mock up of the tank,cut the top out of my old tank and set that in the area and see how it looks. If that looks like it will work I'll frame out a area inside my old tank to hold the new poly tank secure and go from there. Originally my old tank was 50 gallon so I'm only losing 11 gallons if it works.
Regardless of what I decide to do I still have to cut the top out of my old tank to repair the area. Even if I go with a bladder or try to repair the old tank the inside of the old tank needs repair. This is my plan until I sleep on it again:facepalm:
 
Last edited:
Marty, do you know about Ronco Plastics? They make close to 500 different size and shapes of high quality plastic tanks. When you are looking at the different shapes remember you can change the orientation of the tank.
https://ronco-plastics.com
 
Marty, do you know about Ronco Plastics? They make close to 500 different size and shapes of high quality plastic tanks. When you are looking at the different shapes remember you can change the orientation of the tank.
https://ronco-plastics.com
Thanks Parks I haven't looked at Ronco yet I've been looking at tanks for the last three days and I'm about to go batty. I think once I get the top off I'll have a better idea of what I need. I just hate making that first sawzall cut. It's never the same after that .
When the PO install the four new fuel aluminum fuels he did a ratty job with the sawzall and I want to do a much neater job. Some folks just shouldn't be allowed to use a sawzall.The tanks are part of the original build. I know I won't get close to that but I at least want it neat.
 
I will second Ronco for quality tanks. Also they will install the fittings to your specs.
 
My other issue is the deck hatch to get the new tank through is only 16 x 30 .
 

Attachments

  • C9A64E55-5116-4B3D-9DE7-F37F40FADAF0.jpg
    C9A64E55-5116-4B3D-9DE7-F37F40FADAF0.jpg
    110.9 KB · Views: 60
"My other issue is the deck hatch to get the new tank through is only 16 x 30 ."


Multiple tanks?
 
Just got started and got the top cut out.
 

Attachments

  • 10117FDE-142C-43E3-8A9D-F316B57A2345.jpg
    10117FDE-142C-43E3-8A9D-F316B57A2345.jpg
    103.1 KB · Views: 54
Few more pics from the inside of tank.
 

Attachments

  • 26482478-A35E-43DE-874E-AEB91A522831.jpg
    26482478-A35E-43DE-874E-AEB91A522831.jpg
    69.4 KB · Views: 58
  • 3A922334-CB7E-4F10-AD1E-D9DB6290C1F9.jpg
    3A922334-CB7E-4F10-AD1E-D9DB6290C1F9.jpg
    62.9 KB · Views: 67
  • 80FE1894-3CDD-4DB4-9C74-EEEA0AB45655.jpg
    80FE1894-3CDD-4DB4-9C74-EEEA0AB45655.jpg
    171 KB · Views: 64
I built this mock up of an off the shelf Ronco tank. It’s 35 gallons and I know it will fit through the hatch and in the old water tank compartment. It’s not ideal but I’m hoping it might lead me to another in stock tank that’s a better fit. The 1/4” luan plywood is cheap enough and good for building mock ups and templates.
 

Attachments

  • CD96D2BA-8319-4FD7-B72C-5CB0DE07D694.jpg
    CD96D2BA-8319-4FD7-B72C-5CB0DE07D694.jpg
    87.6 KB · Views: 59
  • 7975FF31-A5EB-4DD6-A9A3-E9C48F85DBEB.jpg
    7975FF31-A5EB-4DD6-A9A3-E9C48F85DBEB.jpg
    84.6 KB · Views: 58
Greetings,
Mr. PM. Ah, cinnamon Altoids. Have you tried the ginger flavor? VERY hard to source but excellent (my fave). Oh...Tank looks good.
 
Greetings,
Mr. PM. Ah, cinnamon Altoids. Have you tried the ginger flavor? VERY hard to source but excellent (my fave). Oh...Tank looks good.
I haven’t tried the ginger. The containers are perfect for small drill bits.
 
I built this mock up of an off the shelf Ronco tank. It’s 35 gallons and I know it will fit through the hatch and in the old water tank compartment. It’s not ideal but I’m hoping it might lead me to another in stock tank that’s a better fit. The 1/4” luan plywood is cheap enough and good for building mock ups and templates.

When you’re looking at the Ronco tanks, don’t forget you can turn them and make any side the top. Your test tank is low and wide. You could turn it so it was tall and skinny.
 
Well this mock up was a little too tight to get in the area. I’m gonna build another one or two tomorrow. I want to keep it low and wide. I’m picking out another couple of off the self Ronco tanks , one smaller and one larger. The hatch is limiting me . Stay tuned I ain’t done.
 

Attachments

  • 0067FA2C-381E-4614-81B1-A2E1FD5AD1B5.jpg
    0067FA2C-381E-4614-81B1-A2E1FD5AD1B5.jpg
    87.6 KB · Views: 64
Just remember that I have a reciprocating saw you can borrow.
 
Just remember that I have a reciprocating saw you can borrow.
Thanks I’m hoping I don’t have to open up the hatch. This mock up made it through the hatch ok but I needed about a inch to twist it and drop it in the old water tank hole.
 
"I needed about a inch to twist it and drop it in the old water tank hole."


Remember part of fitting is the ability to access the fittings,
 
I built 2 more mock up tanks this past weekend and neither one did it for me . Now I’m looking at installing two smaller tanks that should hug the hull better.This area of the hull has some belly. I’m trying to get a full size drawing or a cad file from Ronco.
I finally bought myself an oscillating saw. I should’ve bought one of these years ago, much easier to control than my sawzall or jig saw.
 
Last edited:
"I finally bought myself an oscillating saw. I should’ve bought one of these years ago, much easier to control than my sawzall or jig saw."

When they were $300 and up one had to have a real need.

Now that the Chinese ones are under $20, many folks will find out how handy they are.

Remember the abrasive saw blades do the nicest job on fiberglass
 
Hopefully this will be my last mock up template. I faked the shape based on the little drawing they have. My plan now is to install two of these side by side with some padding between them. This will give me 44 gallons only 6 less than original. They charge 25 % restocking if you have to send them back. I’ve got all winter to try and get it as right as I can .
 

Attachments

  • 5EF4424C-8660-4A9B-A4D9-96C57546EB9A.jpg
    5EF4424C-8660-4A9B-A4D9-96C57546EB9A.jpg
    93 KB · Views: 61
  • BEA8500F-5C8F-48C4-8EEC-5DB0DCFA545A.jpg
    BEA8500F-5C8F-48C4-8EEC-5DB0DCFA545A.jpg
    89.6 KB · Views: 59
  • B4498357-C7B9-46E4-BBE4-0B29B30309CE.jpg
    B4498357-C7B9-46E4-BBE4-0B29B30309CE.jpg
    87.2 KB · Views: 64
Last edited:
Marty will you join the two tanks so you can fill and draw from them at the same time?

Possum had two 25 gallon water tanks, one port and one Starboard. I ran a hose under the engine connecting them. The fill and draw fittings were both in the port tank but I had no trouble filling and emptying both.
 

Latest posts

Back
Top Bottom