Farrell Trawler Rebuild Project

The friendliest place on the web for anyone who enjoys boating.
If you have answers, please help by responding to the unanswered posts.

PNW Drifter

Senior Member
Joined
Aug 26, 2018
Messages
182
Location
Canada
Good Day Everyone,

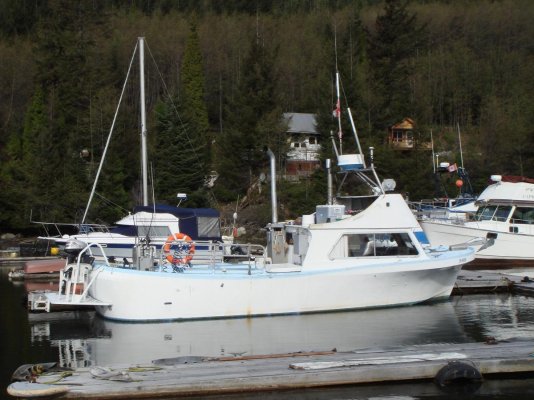
About 8 years ago, I purchased a 29' converted ex-gillnetter fishing boat, built by Barry Farrell. I think the boat is from the mid-1970's. It is currently powered by a turbocharged and after-cooled Volvo AD41B 200hp (mid-1980s).

The Farrell design is ubiquitous to the BC coast, and one can expect to see a Farrell in virtually every marina in BC. These solid fibreglass hulled boats have stood the test of time.

Vessels Built by the Farrell Family.
Harbour Publishing: Boats in My Blood

-----------
Interestingly enough, my great grandfather, John Andrews, built boats on the Thames River in England. He pioneered a new design that had a sloping stern, giving rise to the "slipper launch".

Slipper launches still "HOT" - Henley Sales & Charter
https://en.wikipedia.org/wiki/Slipper_launch
-----------

Before buying the Farrell, I was considering building a boat from plans, and I went as far as purchasing the Devlin Surf Scoter 26 plans, and the Devlin stitch and glue books. - plans for sale if anyone is interested- pm me.

However, I saw an ad in the paper (back in those days!) for the Farrell, and it was going to be cheaper and faster to get out on the water with buying a used boat.

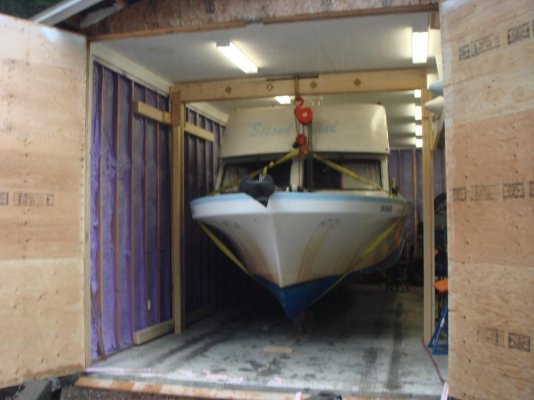
I bought the boat at a great price point, because at the time, the marina it was at was closing, and the owner wanted to move south. My family and I have enjoyed some great adventures and fishing on this boat. That being said, underneath the white paint, the wooden house was rotting, and now the time has come to do something about it.

As I looked closer and deeper into the boat, it was clear that the renovation would be substantial, but I would try to save what I could. In the end, the whole thing was gutted, which was a relief in a way, as I now had a blank slate to work with.

I'm going to share my journey in this thread. Please join in with me, as I hope you will find it entertaining. :lol:
 

Attachments

  • DSC02871.jpg
    DSC02871.jpg
    157.2 KB · Views: 341
  • DSC02870.jpg
    DSC02870.jpg
    115.2 KB · Views: 354
Out of the water and into the workshop.
 

Attachments

  • P1010676.jpg
    P1010676.jpg
    195.6 KB · Views: 255
  • DSC04265.jpg
    DSC04265.jpg
    89.6 KB · Views: 253
Brutal, gory gutted pictures coming soon... Keeping it clean for now! :D

And gotta build the suspense....:popcorn:

DSC_1604.jpg

DSC_1607.jpg

Removing stuff, and then cutting stuff off. Unbolting hardware was straightforward, with the exception of the occasional rust frozen bolt.

There was no magically easy way to cut the boat apart. If you think tearing a boat apart will be easy, you are sadly mistaken. :rofl:

Chainsaw exhaust filled shop with choking fumes, not to mention carbon monoxide. Hits nails or screws and gets dull very fast.

Circular saw spins fast so it melts/burns the polyester resin, making a terrible stink.

Reciprocating saw would cause sympathetic vibrations with the material being cut, vastly reducing the effectiveness, plus being hard on the arms. Nails/screws further reduced effectiveness.
 
IMG_0668.jpg
Dust was becoming a problem. I sheeted in with poly, and used a sonotube and fan to create a negative pressure ventilation system.

....:popcorn: ........

Gut shots next :eek: :devil:
 
More! More! I can smell the burning polyester resin!

This has to be more satisfying (in the end) than shooting up Git Rot with syringes and horse needles.
 
If you are faint of heart, please avert your eyes........

:eek::eek::eek::eek:
IMG_0162.jpg

Click on the image for the full effect, if you are into that sort of thing. :devil:


Stay tuned!
 
Take it off baby, take it all off!!!!!!
 
Smart move keeping the toilet in place.
 
OMG! That is more than I can take at high res, even with gin and tonic.

Apollo 13 "Houston, we have a problem!"

Must replenish/refill before further maritime decay can be adsorbed/diluted/dispersed.

Obsessed now, what is next? What could possibly be worse?
 
Drifter I thought you said “gutted”.
I see an engine’s still there.
 
"I see an engine’s still there."

IMG_0259.jpg

Nomad, when I said completely gutted, the engine wasn't part of the deal. :D
Sorry for any misunderstanding. :)

Lou_tribal, the engine is 200hp Volvo Penta AD41B turbo/after-cooled, ~5000hrs. Gonna keep it in for now.

MurrayM, the toilet is going to go..... sorry (we Canadians are good for that!).
 
The fuel tank (no picture) was a 200gallon aluminum bottom mounted v-shaped thing. It was foamed in place. Bilge water and diesel has completely saturated the foam, dripping liquid when removed, and pretty stinky too. And heavy.

The tank looked corroded, and had lots of tiny pinholes. I had the tank inspected by a local welding/boat fab guy, and he said the tank was a write-off. This was disappointing, and not in the budget. :nonono:

Off the shelf plastic gunnel tanks 2 x 50 gal would be the cheapest option, and easy to build around.

Foam removed.
IMG_0670.jpg
 
IMG_0182.jpg

Grinding off the bulkhead remnants. Its amazing how simply and yet strongly the bulkheads were attached to the hull (fibreglass tape and resin) and in some of them didn't have filet.

Banging them off with a hammer did work on occasion, revealing that the weak link was adhesion. In the end, I used an angle grinder and personal protective equipment (PPE), which was a 3M brand full face shield respirator with organic cartridges and hearing protection.

By this point, a lot of really hard, physical, dirty dusty work has gone into this, and I'm not done yet. I had now realized that the front and rear decks couldn't be saved. This was a low point. And there is no turning back. :ermm:
 
Further into the rabbit hole.....

The fuel tank rubbed against the stringers, causing breeches, and allowing bilge water to get soaked into the the foam used to mold the stringers.

Maybe it could have been left alone, but I chose to clean them out. I cut open the stringers and used a claw hammer to pull out the saturated foam.

IMG_0252.jpg

IMG_0253.jpg

Of course, this meant more work fixing the stringers later..... :ermm:
 
IMG_0262.jpg
Front deck removed.

Still to go: rear deck, front and rear helms, and some hoses.

The hull was starting to feel slightly "floppy" when walking around in it, so getting the stringers fixed was a priority.
 
Whew! You really can't get much deeper into the disassembly portion of your rehab, I guess! The projected plans sure do make for a nice looking finished product. Having a building available makes a huge difference. We spend an ungainly amount of time covering and covering our boat each time we work on it, and that's on days when we can work on it. Between the extreme heat and heavy rains we've been having, our work opportunity's have been limited. You're very fortunate!
 
Wait before going further. If you keep it the way it is now, you will a lot of deck space and easy access to the engine, think about it! :)

L
 
View attachment 80157
Front deck removed.

Still to go: rear deck, front and rear helms, and some hoses.

The hull was starting to feel slightly "floppy" when walking around in it, so getting the stringers fixed was a priority.

Assume there is a good reason you are leaving the engine in place and not doing the same rehab on the stringers that act as engine beds.
It would be a shame to find out in a few years that those too needed rehab. You won't find an easier time to lift that TAMD41.
 
I appreciate the interest and the comments/replies.

boomerang, thanks, its easy to take for granted to be able to work inside a building. :blush:

Lou_tribal, I thought about that, but it rains a lot where I am. Would go a lot faster, I recon. :thumb:

koliver, great question/comment. The main engine stringers/beams are hollow box beams, no foam. Stay tuned, as that concern gets addressed. ;)

Your engine question is a very good one, and for me was a bit of a tough call. So before I proceeded further, I consulted two different marine diesel mechanics, and the answers I got weren't easy black and white. They said it depends on usage, proper maintenance etc. I had general agreement that if properly maintained, and not abused, a rebuild at 5k hrs would be too soon. I was asked if it started easily and ran well, which it does, and then if I had any issues like burning oil, and I said no, and the consensus was leave it. This seemed sensible to me.

I did get to know the previous owner enough to trust that he wasn't abusing the engine.

Maintenance I did do was that I removed and thoroughly cleaned the heat exchanger and after cooler, and flushed the freshwater system. Replaced gaskets with the cooling pipes. I replaced the raw water pump. Filters and oil changed. I inspected the turbo (I have turbo experience) and didn't think there was any issues. Replaced the belts.
 
koliver, my engine tag says 41B, and yet it's definitely turbocharged and after cooled, which I thought for sure that makes it a TAMD41B. Any ideas?

IMG_0470.jpg
 
One more thing I would do to the engine now that it is totally accessible is to clean the after cooler, assuming it has one. For best results you need to remove it from the engine, disassemble and clean both tube and air sides thoroughly. Then reassemble with new gaskets or o-rings with lots of grease on the sealing surfaces.


On other engines, Cummins after cooled engines in particular, if you don't do this regularly they will fail and cost big bucks to replace or worse salt the engine with salt spray from a sealing surface leak.


David
 
The best thing here is that as you design from ground up you can plan for an easy access/haul out of the engine, this is something I would put high on my wish list.

L
 
Great advice and much appreciated. Intercooler was cleaned, with new o-ring to the turbo pipe. Access for future engine re and re will be incorporated. :thumb:

Stringer repair started...

Test patch
IMG_0265.jpg

My first actual rebuilding starts. :dance:
Laying down tape.
IMG_0266.jpg

Epoxy.
IMG_0267.jpg
 
Unless I missed it, are you going to put it back together the same way? Or will you be changing the layout/cabin area?
 

Latest posts

Back
Top Bottom