Rust and Car Window Seal-up

The friendliest place on the web for anyone who enjoys boating.
If you have answers, please help by responding to the unanswered posts.
Joined
Oct 31, 2007
Messages
18,745
Location
USA
Vessel Name
Willy
Vessel Make
Willard Nomad 30'
Rust and Car Window Seal-up problem re the back window.

Propper way to do this is to remove the window glass, clean up all the rust down to metal and install a new rubber seal with appropriate sealer. An auto body product I’m sure.

My knee jerk reaction would be to clean up the rust and apply black SikaFlex or black 3M 4200 (for UV resistance) and repeat once a year. It’s a cute little 1.8L turbo car and I’d like to stop the rust and seal w a somewhat shinny black sealer. But this sealer would be an exterior finish.

What do you guys think?
 

Attachments

  • 39B25514-F5C4-4764-9527-5C129C2BABF0.jpg
    39B25514-F5C4-4764-9527-5C129C2BABF0.jpg
    197.6 KB · Views: 70
  • 5DEF07FE-7EC6-40ED-B5CD-79C54B3A2D08.jpg
    5DEF07FE-7EC6-40ED-B5CD-79C54B3A2D08.jpg
    134.2 KB · Views: 69
Last edited:
5200 and be done?
 
Or go to a scrap yard and look if they do not have a replacement for cheap.

L
 
Lou,
A replacement for what?

RT,
Do you know about the adhesion of Por-15? To possibly rubber?
I’ve painted my BW gear w Por-15 and a heating oil tank in Alaska. Love the way it brushes on. It flows very smooth. But in this app it will need to adhere to both steel and rubber. I know about the steel but not the rubber. That’s why I was thinking bout SikaFlex and 3M 4200. Next week I’ll take it to a bodyshop and see what I can learn.

TowLou,
5200 has weak UV performance. But 4200 was formulated for apps where there’s exposure to sunlight as a substitute for 5200. I assume it’s adhesion is a little south of 5200. But that may or probably will be plenty of adhesion.

Thanks all very much.
I think the 4200 will adhere to rubber and be flexible enough.
 
Last edited:
Replacement of the rear door. You may be able to find a cheap one in a scrap yard and even if more expensive than a can of por-15 it may be easier and last longer.
 
Given the geometry of the piece, that it is going to collect and hold water at the top of the sealant, and the depth of bubbling in the rust, I don't think coating it is the best answer. But there is a minimal-work/cost approach that can yield better results.

I am an enthusiastic hobby "mechanic" and do the odd restoration project every few years. For example, today for fun I am replacing the lower control arm on her car, and power window in my SUV. I did a similar rust repair job on the door sills of an older vehicle recently.

The scrapyard suggestion is good, but a color match will be hard to track down. That assembly will not be bad to install, but it will likely be (relatively) costly because of scarcity - rear-end collisions put a premium on parts like that. If this was a car I really cared about, I would try this. The willingness to put sealant on it tells me you want a simpler/more cost effective approach.

Short of pulling the glass, the best way to deal with that IMO is as follows:

a) Mask off the glass and surrounding paint, and take a rotary tool with a wire wheel and grind out all rust. The bubbling implies to me there will be pitting that needs to be ground down, too. You can likely pry up the edge of the seal to check for any spread under it and treat that, too.

b) Sand and thoroughly clean that with acetone or similar to de-grease and de-water.

c) Use a rust converter brushed on to seal it. I use Napa Rust Treatment (made by Permatex and available elsewhere, too), it is Napa item 765-1671. You can spray it into the cap and then brush on after it dries a little. it will dry clear, not black like the cap would indicate.

d) after that cures (a day or two), brush on matching touch-up paint in steps to fill to the proper level, then lightly sand.

The results will look fairly OK and vastly better than applying sealant. But, they will be vastly more successful in preventing spread and/or re-occurrence. The material costs are pretty minimal, under $20. The skills required are not advanced, and the time investment is not large.
 
Greetings,
Mr. NW. Given POR 15 sticks to rusty steel so well, I would be sorely tempted to simply keep applying it until any and all gaps are filled. Scrape off any loose rust beside and under any rubber and have at it. What's the worst that can happen? Quick and dirty and it's available in black. I fully appreciate Mr. Civ's approach but this is NOT a classic/collector car and I'm sure you don't want to waste your time making it perfect when you have so many anchors to modify...
 
Yes RTF you’ve got the scope on this problem of mine.
I’ll go look and see if I can be selective and coat the steel and not the rubber. There’s no leaking. Just the rust is the problem. That would solve the problem of the rubber being so different than the steel.
Thanks for the insight.

Civilitas.
Very good advice but it has’nt all sunk in yet.
Yes a Dremel tool w wire should nix the rust. I have iffy thoughts about “prying” up the rubber seal.
I’ll check out the “rust converter” at NAPA and my favorite garage. Is this NAPA stuff a sealer? Very much need to keep the water out down the road.
 
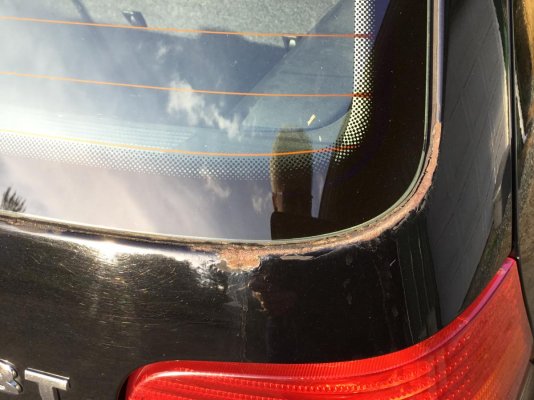
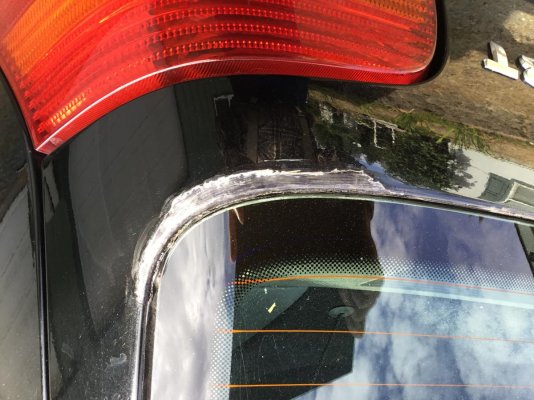
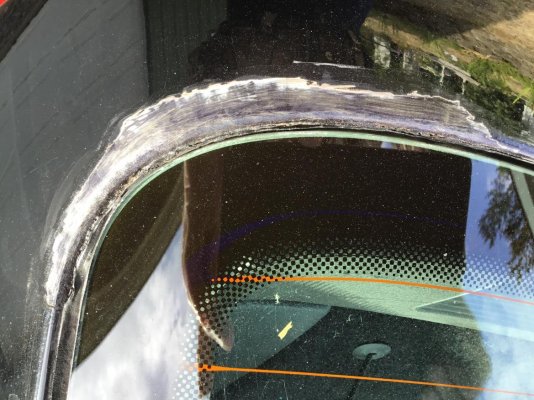
By "prying up" I did not mean prying OUT the seal. I meant just sticking like a knife (carefully) or edge of a credit card, etc. under the lip of the seal and looking. Painters will do this, then stick like a small bearing, dried pea, etc. under there to hold it up while you clean up the metal to the edge. Then you can prep/paint it, let it dry, then come back and take your vegetables out and when the seal snaps back in place, it looks perfect and like you took the assembly out like you were supposed to. ;) Neat trick.

The Permatex sealant is very good stuff. It goes on like a clear coat. Then it chemically alters the iron oxide to be inert to neutralize the rust, and dries like a clear primer. You can then prep and paint it. Or leave it.

Two years ago in the fall, after pulling a Nelson and turning a blind eye to the increasing number of rock chips on her car, I spent a whole afternoon and really almost a day getting the rust out of the chips and smoothing the mess. Then I went back and brushed this on. After it cured, I did a 2nd coat. After all that, I had no desire to do any more messing with it, so I left it (I like to do things properly, but I am not insanely anal about it). Then the rains came - I live in the same basic scenario as you ( I have been to Concrete a few times) - Cascade foothills with the attendant rain "enchancement" vs. Seattle, and lots of gravel trucks to make lots of holes in paint, windows, headlights - I have been in Snoqualmie the last several years. I didn't touch anything up with the actual car paint until last month - two years later. No change - no rust in any spots I treated with it. I did the trailer hitch on my SUV with it last fall, then top-coated with black, the truck looked great but the lower-quality finish on the aftermarket hitch was rusting in spots from our non-stop rain.

I do all my own mechanical work up to and including an engine or transmission rebuild (my dad was a machinist early in life and still a hobbyist at it, and taught me; I'm not a professional. He did large diesel work for the Army, L&N, and even some steam boiler work on antique engines). Anyway - my point is I like mechanical work and hate body work - but small things like this and ABS fenders, bumpers etc. are easy to do I have learned. Large panels or more, etc. I don't do. Farm it out. But this kind of stuff is easy.

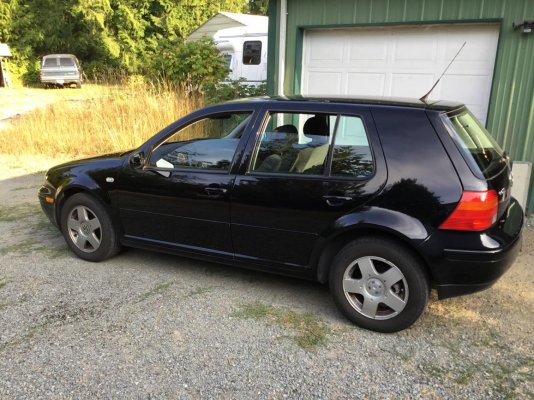
Also, if you ever go to sell it, It's going to knock hundreds off the resale if Por15 is slathered on, vs. none/very little if a reasonably careful home repair job is done, which costs very little besides some sweat equity. It's a decent looking little car and worth spending an hour or two on IMO. I had a bad German car problem in the past until I saw the light, and I still have one classic Audi on the books (actually, on a lift awaiting resto), so it's not unreasonable to put a little effort into it.

I do not disagree with RTF or others' approach if that is all you want to mess with. BUT: doing a better job is not costly or really that hard if you have a little time. I've seen many of your posts since I joined the board to learn not long ago, so I know you have MORE than enough aptitude and skill...
 
Last edited:
Civilitas,
Here’s better pics of the car. The rust is not as bad as it looks in the intro post. I’m going to use this Permatex stuff .. get some monday. Did a little cleaning in my garage and got the little “Middy Ann” inside. Gonna keep her dry till I take care of the rust. Itch’in to drive her though. My Avalon is really nice but I get bored. All real cars are manual shift.

Lou,
I have vertigo problems w my i-pad.
No worry I have the same with my iPhone was just teasing you, you know I like it that way ;)

L
 
Update;
Ground off the rust w a Dremil tool.
Sprayed the “Rust Treatment” stuff into a lid and applied it w a small artist brush (1/8”).
Should-a sprayed but it came out better than I thought right after the application.

Now I think in a week or two I’ll sand a bit and apply a very light primer and follow w black car paint (spray).

Civilitas,
Didn’t come out clear like yours or black like it said on the can. ???
That’s OK it’ll come out black when I’m done.
You can feather your cap if you like as I mostly used your input. Thank you much.

The dumb pics are up-side-down again. Oh well I’ll leave them as these pics don’t really require right-side-up. Sorry .. next time I’ll wipe the dust off.
 

Attachments

  • DF92F685-A7D8-459F-9AB7-4D55B027363A.jpg
    DF92F685-A7D8-459F-9AB7-4D55B027363A.jpg
    163.7 KB · Views: 54
  • 302A3DB6-8A19-405D-8C35-98F77BC6206C.jpg
    302A3DB6-8A19-405D-8C35-98F77BC6206C.jpg
    195.9 KB · Views: 50
Last edited:

Latest posts

Back
Top Bottom