Exposing balsa deck core for re-sealing

The friendliest place on the web for anyone who enjoys boating.
If you have answers, please help by responding to the unanswered posts.

Aquabelle

Guru
Joined
Jun 15, 2012
Messages
935
Location
australia
My foredeck's screwed-down teak planking is worn right down to the screw heads (and beyond in places) and is too thin to take re-grooving. I know the conventional approach is to pull up the boards, remove the ~1,000 screws and epoxy-seal the screw holes in the upper layer of 'glass...and then prep this upper layer to take either a non-skid finish or new teak. And I know that conventionally, one would also tap out the top 'glass layer to i.d. areas of balsa-core rot, cut out the top layer in these areas, make the core repair and reinstate the top 'glass layer.

I would like to get feedback on a possible alternative approach. This would involve setting the depth on a circular saw so that it cuts through the teak and just through the top 'glass layer and cutting out a square (maybe 3' x 16" ?) at a time and lifting the whole cut panel, teak, screws and top layer of 'glass, out in one go. If the newly exposed balsa core below is OK, it would be sealed; if not, the rotten core would be replaced then sealed. Then another panel cut out, and so on until the whole foredeck had been worked across.

Would this work....or will the balsa core be adhered to the underside of the top layer of 'glass and to the bottom 'glass layer, making pulling up the cut-out panel impossible? ( I don't have any reason to think there's any delamination between the core and the top 'glass layer: the deck doesn't creak and isn't spongy or soft. It doesn't leak either.)

Of course I can and likely will attempt one panel and just see what happens...but I'd be keen to hear from anyone who has attempted this approach and successfully or otherwise avoided the time, trouble, work and cost of tearing up the teak and dealing with all those stainless screws.
 
It might work. From memory my upper glass layer was not all that strongly bonded to the balsa. But I'm pretty certain it all still needed a chisel hammered in to seperate. Maybe try 6" x 3' ie a narrow strip instead of a rectangle to get started. Depending on how easy it lifts up you could then take greater widths.

The lower layer of glass probably is not very thick. We felt it was not strong enough to support a person's weight. It should not have any screw holes in it and best to avoid cracking it, hence repairing in sections approach is a good idea. We did 4' sections the full width of the bow, working forward.
 
Last edited:
Use a saw blade made for metal studs. It lasts a lot longer when cutting fiberglass than a wood blade. Also if you hit a screw, it goes right thru.
 
And then people are worried about rust on steel boats.
 
I've not done a deck but a hatch. Rotten balsa but would it let go, NO.

Some truly rotten stuff did but a lot that was soaked would not release.
I used my pneumatic hammer with a bent, mfgd. that way, chisel blade.
The stuff went flying. I did need to be careful with it, chisel, as it could gouge.
I did try first with a hammer and chisel and was going no where.

In my case I had to cut the backside of the hatch in ~ 2" or 3" squares to even get to the stage that the chisel could get in. That was done with a Skil type saw, actually a near 60 yr old Craftsman, and a carbide tipped blade.

If the screws holding the teak decking are brass/bronze then the carbide should cut them. If they are not but are steel then the metal cutting blade may be the better bet. Don't know about that.

You may find that unless the balsa is really nearly rotten that it will not let go of either the upper layer you are working from or the bottom layer unless worked in small areas like I did. That pneumatic hammer was fast and stuff flew.

Maybe try what Insequent did with small areas as a trial. Of course you could try the larger areas and if no joy then go smaller.


JMO and limited experience.
 
Last edited:
My Albin had teak plywood on the main decks and the glass was still pretty firmly attached in many ares if not most of it.

The flybridge was a different story being composed of hundreds of little blocks of teak with a really shoddy layer of glass barely bonded to them.

I am afraid you wont know till you cut a panel and start pulling .
 
It has been a while since I started this thread, but I finally have some progress to report. I should say in my own defence that I haven’t been completely idle. Knowing the windlass had to come off ahead of the foredeck work, I decided to use it first to end-to-end my 300’ 3/8” anchor chain. Inspecting it as it lay stretched out along the dock, I concluded it needed re-galvanizing. And since I was off to the galvanizer, why not get my Super Sarca anchor (circa 2009) done at the same time? With those items off the boat, I dismounted the windlass and then decided I’d better give it a thorough-going service while I was at it. Then with all the ground tackle out of the way, my bow rollers, now exposed for the world to see, looked a bit worse for wear….so off they came for a visit to the electroplating shop.

I had already decided that the foredeck work would include fabricating a ‘glass-and-stainless ‘well’ for the windlass to go into, to direct anchor-chain mud to a drain in the bottom of the anchor locker: no more washing mud off the soon-to-be-new foredeck for me. So time was spent looking at various alternative designs for that and agreeing a final solution with my boatbuilder mate who was taking on the overall project, with me as his sidekick.

In fact it was amazing how many jobs I could come up with to defer starting on stripping the teak and tackling whatever was below….but this week, a start was finally made.

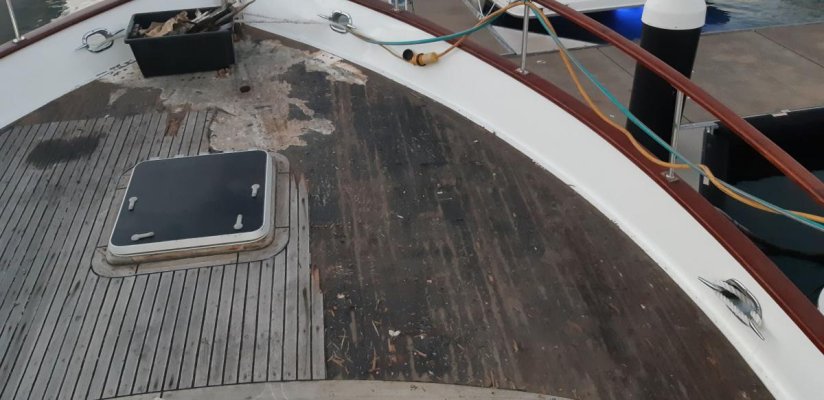
I had already put the idea I described in my opening post to my mate and had that politely but firmly dismissed. “No need to expose the core….you have no leaks, let’s just get the teak off, clean back the top ‘glass layer and go from there” was his perfectly sensible strategy. So we decided to start at the forepeak where the new windlass well will go and continue on down the Stbd side of the deck, leaving the Port side intact as a clean working area. We popped bungs, unscrewed those screws that would cooperate and used an EZ-OUT drill bit on the recalcitrants. Then we levered up the teak boards, exposing the predicted black sticky stuff still being used in Taiwan in 1985. This stuff was still very flexible and the teak was adhered very, very well to the ‘glass layer: we both commented on how unnecessary the 974 stainless screws were. After a full day, we had the Stb half cleared of teak and the black sticky stuff exposed and threatening to end up everywhere we didn’t want it.

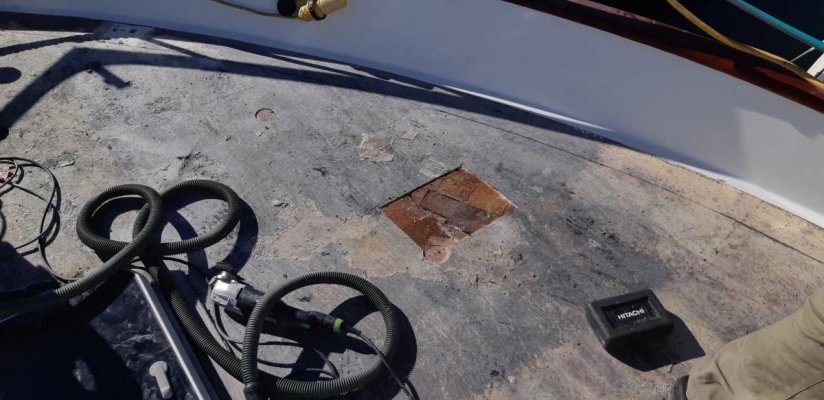
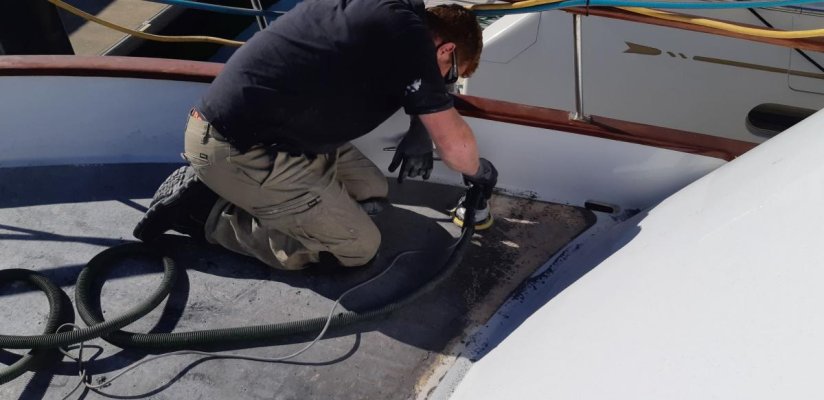
The next day, my mate arrived with a very large container of talcum powder and sprinkled this heavily all over the black sticky. A great trade tip: the stickiness was effectively neutralized and we could scrape off the muck without too much trouble…and of course the job site had a much better smell to it. By mid-day, we were ready to start sanding. A few smallish areas of the ‘glass appeared to have partially delaminated and so before getting too far with the sanding, we decided to use a hole-saw and see what was happening in these areas by removing a circular section of ‘glass down to the core. The small areas of delam we soon determined to be a non-issue…BUT what we found was that the ‘glass top layer had separated completely from the timber core below. We took more samples with the hole-saw and finally used a multi-tool to take out a larger rectangular piece of ‘glass and everywhere, no adhesion between top ‘glass layer and the core.

After a bit of head-scratching in the highly perfumed atmosphere now permeating the air above my slip, we realised that taking off the top layer of glass and reinstating it with a couple of layers of new would be no big deal: in fact, far less work than sanding all the black muck off and glassing cover strips over the rows of screw holes. So that is what we did: we used the multi-tool to cut panels about 3’ x 6’ and they peeled off like a sticking plaster.

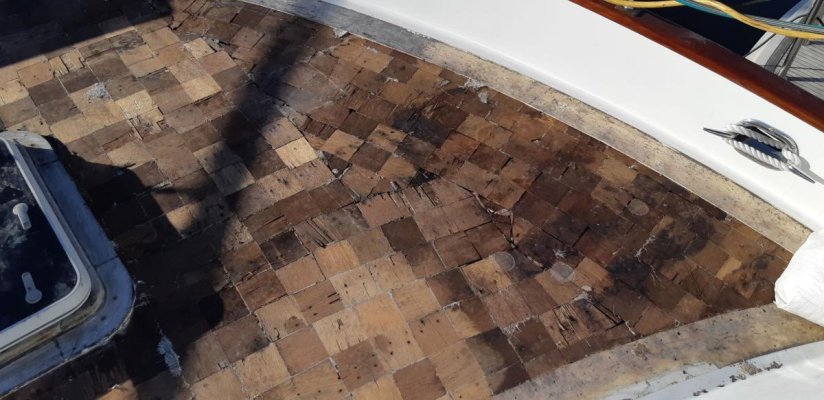
As we pulled up the ‘glass panels, we were rewarded with the magnificent sight of lots of little plywood blocks all artisitcially arranged in imitation of a quality coring material. They had clearly been saturated with some sort of resin and were well-adhered to the bottom layer of ‘glass…but there were plenty of empty voids between them. In the forepeak and right down the Stb side, we found no real rot but many of these blocks were damp, at least on the surface. It took us no more than 40minutes to clear more than 50% of the foredeck area in this way.

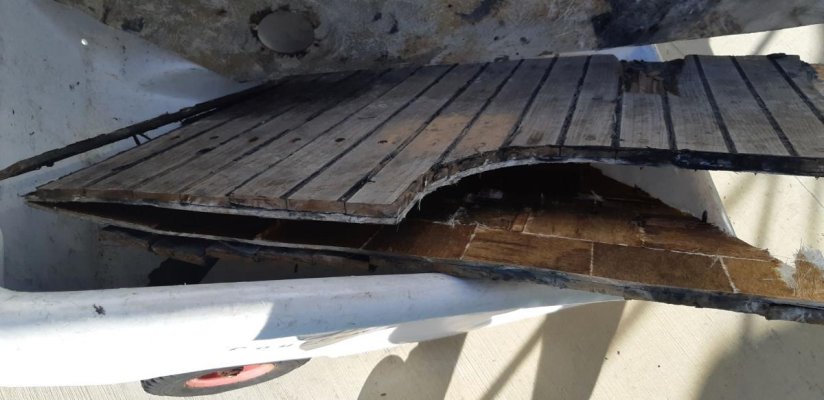
Delighted with our progress, we turned our attention to the Port side, still with its teak boards (and screws) intact. With good grace, my boatbuilder mate agreed to now try my originally-suggested approach and using a circular saw this time to cut through the teak and the 5mm (3/16”) ‘glass layer, we cut out and prised up 3’ x 4’ panels containing teak, screws, black muck and top ‘glass layer in one clean go. In under 2 hours, we had accomplished more than we would have achieved in 4 days’ hard yakka otherwise.

Some photos attached to prove I am not making this up. From the top:
1. Teak removed and black sticky exposed Stb side 2. Test holes revealed lack of adhesion between 'glass top deck and core. Talcum powder over black sticky 3. We started sanding the black sticky...but not for long 4. Complete cut-out panels with teak, screws, black sticky and top layer of fibreglass 5. Quality core material...not!

Tomorrow, we will lightly sand the blocks of core material and then screed over it with a runny epoxy, to fill the voids. Thickened epoxy over this and then a couple of layers of ‘glass, should give us a surface good enough to take the pre-fabricated teak panels (no screws!) I have decided to go with as a finished surface. Before that, the windlass ‘well’ and a ‘glass frame to replace the teak original around the hatch in the centre of the foredeck will have to be fabricated and installed. I will post on those components as progress permits.
 

Attachments

  • Teak gone and black sticky exposed.jpg
    Teak gone and black sticky exposed.jpg
    95.1 KB · Views: 117
  • Exploratory cuts and talcum powder.jpg
    Exploratory cuts and talcum powder.jpg
    111 KB · Views: 124
  • Sanding the black sticky back to clean glass.jpg
    Sanding the black sticky back to clean glass.jpg
    71.4 KB · Views: 127
  • Teak & glass complete cutout panels.jpg
    Teak & glass complete cutout panels.jpg
    82.5 KB · Views: 127
  • Quality Core.jpg
    Quality Core.jpg
    108.9 KB · Views: 134
Last edited:
Thank You for the great information. This will be helpful for many of us.
 
Very productive period of work!

What amazes me, and is rather puzzling, is that you have the little wooden blocks as core. I replaced all my foredeck as well, and in my case it was all end-grain balsa. I would not have expected the same yard to use different materials, and your boat is only a year newer than mine.

I think you have done the right thing by stripping the top layer of glass. Had you not done it there would have always been a lingering doubt about wet core. notwithstanding hammer tests and no apparent soft spots. As to your other projects, the joys of having far too long in the marina due to Uni Dormitory duties!

Meanwhile, I am sitting at anchor (actually on a mooring ball) in Stonehaven Bay. Heading to Airlie Beach tomorrow to drop off my brother then its onward to the north and warmer weather!
:hide:
 
Brian...I was hoping you would chip in, but I supposed it might take a while given your perambulations. Internet connection in Stonehaven....I'm impressed!!
 
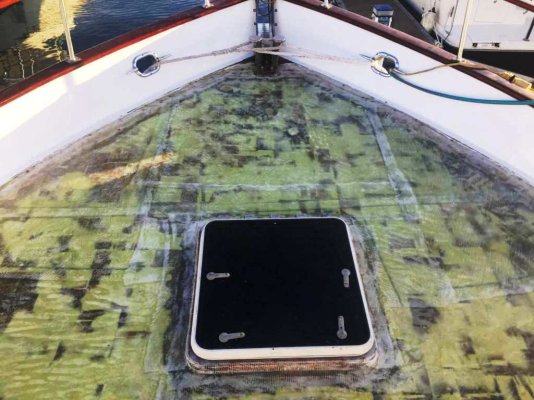
Next stage completed. Having removed the original upper layer of 'glass and exposed the 'little wooden blocks' pretending to be quality core, we lightly sanded the tops of these blocks and then used a thickened epoxy to first fill the voids between them and then seal over the top of all. We sanded to create a smooth overall surface. (That epoxy filler is the green-ish tinge visible in the photos....it is under the clear 'glass laid over.)


Then applied 3 x 500oz layers of 'glass over a week or so (mate coming and going, other jobs in between). Each layer took about 2.5 hours with two of us in the swing of me mixing 2-part epoxy on the dock and passing up to my mate, who did the skilled work of laying down/soaking out of the 'glass.

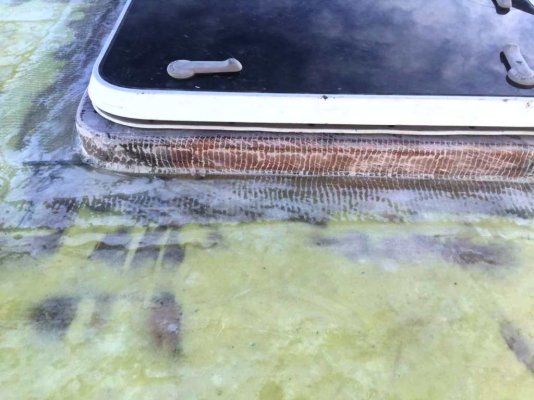
The hatch in the centre of the deck over the v-berth below had a conventional teak trim that has always been a pain to keep varnished....so we laid up 'glass over this too and then the final deck layer went over this again. (Hatch was removed for this process of course; photo shows it temporarily re-installed.) In due course, we'll fair and spray-paint this.

Boat builder mate now away for a week or so. When he's back, we'll make up a mold for the windlass 'tray'. As part of that process, we will leave on the deck a 'frame' in the exact position that the finished tray will occupy. That should allow the Teak Decking Systems agent to template up and be making the teak panels, while we're making and installing the windlass tray. That's the theory anyway.....we shall see !
 

Attachments

  • wide view.jpg
    wide view.jpg
    75.9 KB · Views: 126
  • Hatch detail.jpg
    Hatch detail.jpg
    67.2 KB · Views: 120
Last edited:
Good progress! How high will your windlass tray be? I assume you are leaving the bow 'gash' unchanged? I painted my hatch surround when we installed the new windlass a few months back. In my case it was leaking so it needed attention. All good now though.

I'm at Lizard Island, and unexpectedly have a phone connection. The Cel-Fi GO is getting 1 bar, mostly. Sometime more, sometimes nothing. Once the wind drops a bit at the weekend I'll go over to Princess Charlotte Bay for a couple of days.
 
Brian: The tray will be off the deck about 50mm on the inside, with the surrounding containment frame about 75-100mm high. We are going to work this out as we form up the mold and see how it all looks. And yes, the 'gash' stays as does the stainless roller guide piece...we'll just seal up to that.

Have been following your travels with great interest on MarineTraffic. I feel a bit like a stalker, but as I've never been north of Bowen (by boat) I am very interested in the ports you have chosen and your experiences of the various anchorages. Have the winds been kind? Daytime temps?

best regards...Annette says Hullo too
 
Paul
Hi to Annette as well! I'll update my trip thread with some info rather than hijack this one of yours.
 
The purpose of the core in a composite deck is to create an I beam .

This allows thinner glass to be stiff when loaded.

If the core is not as sound as the center of an I beam , the purpose of the composite deck is failed.

Rotten plywood or balsa goo does not make a stiff composite deck.
 
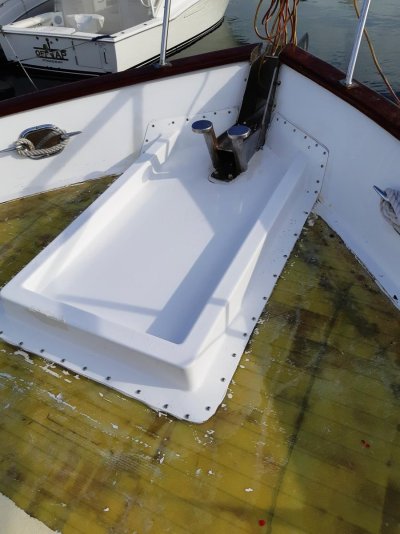
Progress is slow but steady. We marked up the deck accurately to show the position of the windlass tray when completed. This allowed the Teak Decking Systems contractor to come aboard and make his templates for the future teak panels. He has ordered the teak and will make up the panels while we press ahead with the windlass tray. After making up and fitting a plug, a mold was taken and the tray was fabricated. The photo shows the tray epoxied and screwed down. The screws will be removed when the epoxy cures and the flange ground down and faired to the sub-deck. The teak will cover the flange and come right up around the well edge. Meantime, the mold is being used by the stainless fabricator to make up the lining to this tray. We will install that, cut in drains and cable-ways and reinstall the mighty Lofrans Falkon windlass before I let the teak guy back aboard to do his thing.

Targeting end-October for all to come together. Of course that date has the usual accuracy associated with any boat project....
 

Attachments

  • windlass tray.jpg
    windlass tray.jpg
    119 KB · Views: 91
Wrapping Up

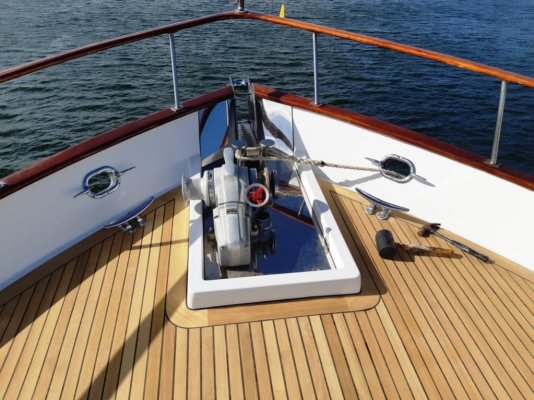
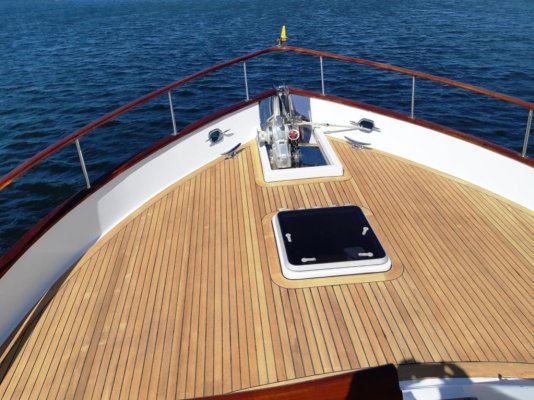
I have been remiss in not posting photos of the completed project. Photo 1 shows a close-up of the windlass tray; photo 2 a wider view of the foredeck. Teak Decking Systems templated teak panels (with areas between hatch and windlass tray and between hatch and entry from Portuguese bridge done as loose boards).

Very pleased with how it has all come together and I think it looks 'factory', which was the objective.
 

Attachments

  • close view.jpg
    close view.jpg
    131 KB · Views: 56
  • wide view.jpg
    wide view.jpg
    133.7 KB · Views: 55
Looks very nice. I just finished using 26 tubes of their caulk on my teak deck, never again...
 
Looks very nice. I just finished using 26 tubes of their caulk on my teak deck, never again...
The guy I used was exceptionally neat and clean with the limited caulking he did on the boat itself....which was really just the panel joints, the loose boards and the edge to the windlass well. He taped all these and so contained the mess. I have always found those YouTube vids of people spreading caulk everywhere and then sanding the whole deck....again....to remove the excess, terrifying.
 
Yes, very 'factory' like! Except for the missing screws.:hide:

What do you plan to use on top of the teak, or will you leave it to go grey?

The PO had covered my decks in cetol, which made them dangerously slippery when wet. I stripped that off then lightly sanded before using Starbrite Teak Oil for a couple of years. Then I used Teak Wonder. Very easy to apply but needed frequent re-application. But worst of all, it tended to leach out of the deck in the rain and then stain the hull below the scuppers. My latest approach is to use Deks Olje, #1 only. I use it on the rails, but with the gloss #2 over the top. So far the #1 on the deck areas is holding up quite well.
Brian I am tempted to use nothing.... but the only alternative to that I would consider is clear natural semco. this is practically invisible but allegedly resists dirt penetrating the deck. the marina I am at currently seems to cop a lot of very fine red dust fallout for some reason and that is giving me some concern. before I can use semco I need to wait a minimum of three weeks to allow the surface oil to dissipate and even then it needs to be given a light detergent wash off with a sponge. I would be interested in hearing from anyone who has experience of using semco in tropical or subtropical conditions. my understanding is that it is likely to only last 12 months before a new application is required and while applying is quick and easy the cost of the product itself is very high
 
Yes we taped before we caulked, have not sanded yet still waiting for the caulk to fully cure in our cool temperatures. We are going to use Semco oil for the finish. The PO had put on so much varnish you could not see the screw bungs.
 
For cutting just GRP the blades that are an abrasive cut fast and produce less dust that itches.

Folks can dust their arms and hands with Talc and then wash off with cold water if itching is a bother.
 
Last edited:
... I would be interested in hearing from anyone who has experience of using semco in tropical or subtropical conditions. my understanding is that it is likely to only last 12 months before a new application is required and while applying is quick and easy the cost of the product itself is very high

We’ve been using Semco since the late 90s. On our sailboat we replaced the teak decks on the house and re-cut/re-caulked the side decks. We started using Semco on the recommendation of a guy who did teak decks for a living. At the time we spent 6 years in the tropics including 20 months in Australia. When we sold the boat after 10 years the decks looked great. We’ve owned Hobo now for 12 years and have used Semco since day one. We haven’t seen cold weather since 2008.

Here’s what Lena does: She cleans the decks using Cascade liquid dishwashing detergent mixed with water, 1/4 cup per 2 gallons of water. After wetting the decks she uses a 3M White Scotch Pad (the least aggressive) to clean the decks. After they’re dry, she uses a 3” foam brush to apply the Semco. After the first coat dries, she goes over it again, this time using a rag for applying the Semco. The process takes about a quart and 3 hours over the course of a day. She does this every six months. It doesn’t affect the non-skid properties of the teak and keeps them from drying out from what I can tell plus it keeps dirt from getting deep into the grain.

By the way, your decks look beautiful!
 
Here’s what Lena does: She cleans the decks using Cascade liquid dishwashing detergent mixed with water, 1/4 cup per 2 gallons of water.
By the way, your decks look beautiful!
My boat washing crew does a similar treatment but they use "Dawn" detergent and a string mop, always mopping across the grain. When dry, the deck is finished and is allowed to grey naturally until another cleaning is needed. I've had the boat for four years and will continue with this process until....?:whistling:

.
 

Attachments

  • dirty.jpg
    dirty.jpg
    199.3 KB · Views: 41
  • Clean.jpg
    Clean.jpg
    202 KB · Views: 37
Back
Top Bottom