Prairie 36 Improvements

The friendliest place on the web for anyone who enjoys boating.
If you have answers, please help by responding to the unanswered posts.
Is Schedule 40 sufficient for the pumpout run or is Schedule 80 the only suitable PVC? My tank-to-pumpout fitting hose is due for replacement and I'm considering using PVC.

Al, schedule 80 is designed (usually) for pressurized water supply installations, where schedule 40 is for D/WV (drain, waste, vent). 40 should be easily stout enough for pump out lines, but cost for that short line will be nothing for either. Just don't skimp on the pvc glue/cement - takes more than most think - especially as you get to 1.5" and up - and LOTS when gluing up 4" drain lines! (speaks the landlord:hide:)
Good luck with the install.

Great info! Thanks, FC.
 
I installed the high-water alarm. I think the boat originally had 2 bilge pumps, each with its own breaker, and the on-off-auto switch looked like an afterthought. I added a 2nd similar switch for the other pump. There is also a forward bilge pump which I suspect was an add-on, too. It's wired to the windlass circuit directly off the starting bank, so it's "always on" even if the breaker panel is totally powered down. Not a bad backup.

I've toyed with the idea of a 4th, larger pump in the lazarette. Normally there's not much water there, except what weeps in around the rudder shaft logs, but if we took some sort of running gear damage it could fill fast. The other option would be mounting the larger pump a little higher than the mid pump, which is where the water normally ends up anyway.

I thought I saw some good size limber holes that would direct any leaks from the rudder shaft logs to the aft lower section of the bilge. I’ll have to check the next time I have the bed open.

BTW I did have another issue with my aft bilge pump with the lower float switch. At first I thought I was getting some bad float switches, because they would only last a couple of months before burning out. But then after some investigation I realized that the float switch was in the aft section of the bilge and the pump was much further forward in the engine room section of the bilge.

The submersible pump would be running dry but there was still water holding the float switch up. Once I moved the pump next to the float switch in the aft section of the bilge I haven’t had a problem.
 
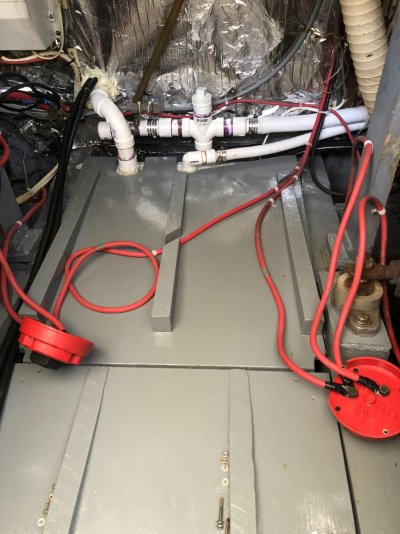
Holding Tank Installation Complete

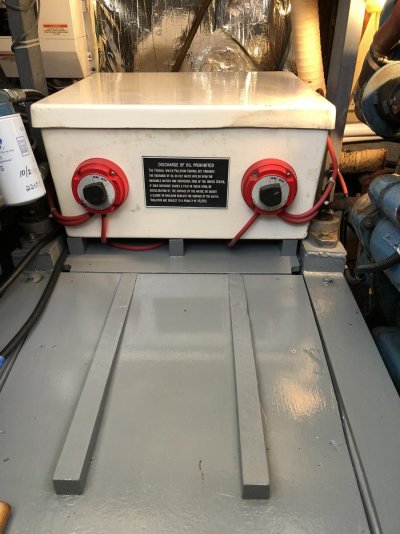
I'm calling my holding tank installation - done. New engine room floor installed over new holding tank.

As with just about everything boat, you always find something else to improve while you're doing another improvement project.

I made a few wiring changes to my battery box and will be adding another battery box just for the inverter.
 

Attachments

  • IMG_1434.jpg
    IMG_1434.jpg
    111.5 KB · Views: 51
  • IMG_1436.jpg
    IMG_1436.jpg
    135.3 KB · Views: 59
  • IMG_1437.jpg
    IMG_1437.jpg
    125.9 KB · Views: 63
That was an ingenious idea for the holding tank.
I do like the workmanship and the way she looks now.

Congrats.

You boat is coming along well and I hope you can escape to cruise soon.

Tim
 
Thanks guys.

She is scheduled for a bottom paint job in one month. Once they splash her, we will be starting the Great Loop.

I have a few more things on the improvement list, but some will just have to wait.
 
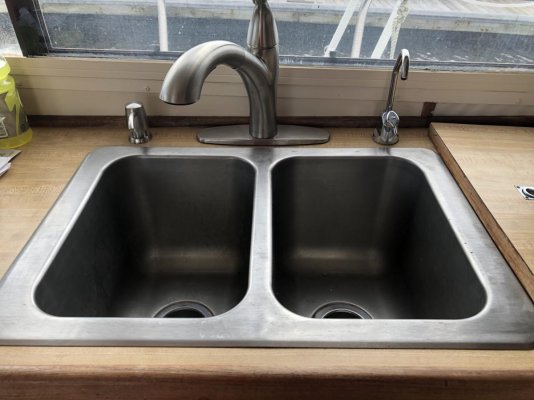
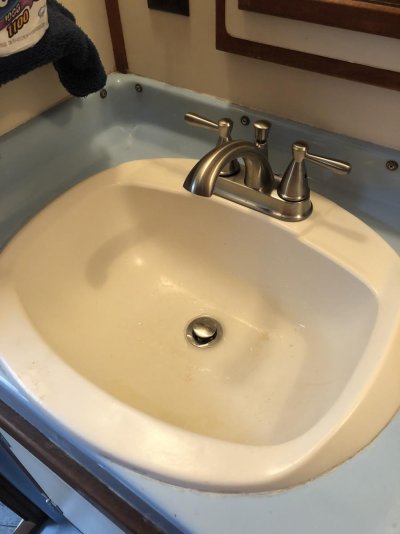
Galley and Aft head Faucet Installation

I almost got away without buying anything when I installed new galley and aft head faucets. Everything was going great until I turned the water pressure back on. Then drip, drip in the galley cabinet. But this was from a connection that I didn't even mess with.

After taking that connection apart I noticed the plastic compression nut was cracked. Not only that, there was some kind of "fix it" tape wrapped around it. So it must have been cracked for some time and someone tried to repair it with tape. It worked, but I must have moved something to cause the drip, drip.

So I had to buy a 1/2" compression fitting, brass, to fix it. The irony in all of this is that looking for something else I found a good, un-cracked plastic compression nut in my boat stuff stash.

I'll hang on to the good plastic compression nut for an emergency. Or better yet, I think I'll buy a couple of brass compression fittings for spares. I don't know what else I may find and it seems like good insurance.
 

Attachments

  • IMG_1439.jpg
    IMG_1439.jpg
    114.1 KB · Views: 61
  • IMG_1438.jpg
    IMG_1438.jpg
    66.4 KB · Views: 57
The one thing I hate working on is plumbing. No matter how careful I am, there is always a drip... Usually have to take it apart and put it back together several times to get the drip to stop.
 
The one thing I hate working on is plumbing. No matter how careful I am, there is always a drip... Usually have to take it apart and put it back together several times to get the drip to stop.

Dave, I feel the same way. This time after everything was fixed, I left the boat for about an hour to run an errand, purposely leaving the water pressure ON. :eek:
 
My luck with plumbing I would come back to a boat full of water...
 
Was this the grey plastic "Qest" fittings? They had a very bad reputation in the building industry and are no longer used. Anytime I work on some part of the system, I've been replacing what I can with PEX. Actually, I can't complain, they've held up well and you can still buy fittings, but PEX is the newer standard.

Trick with Qest: hand-tighten just until they squeak. No more!

They are grey and plastic. Next time I’m at the boat I’ll check to see if I can see “Qest” written on any of the parts.

If there are PEX fittings that work with the grey plastic tubing on the boat, that would be great. This time I was going from the grey plastic tubing into a brass elbow with a pipe fitting. So I used the brass 1/2” compression fitting on the grey plastic tubing which had a 1/2” pipe fitting on the other end that connected to the brass elbow.

This is the cold line coming though the bulkhead just above the shelf under the galley sink. May be the same on your boat. It’s just a b**ch working in that confined area.

Next time if I’m going plastic to plastic I’ll check out the PEX fittings. Thanks for the tip.
 
I don't know if you'll find a marking on the Qest stuff. But if it's grey and plastic, that's it.

The good news is, the threads are the same as normal plumbing fittings. It's pretty easy to go from a Qest fitting to just about anything else. And, as bad as their reputation is in houses, they've held up pretty well on my boat for 38 years now.

That is good news. I was surprised and delighted to find this out. However, the scary thing for me was connecting the plastic fittings to the brass fittings on the new faucet. If you’re not very careful they are easy to cross thread. :eek:

It took me several tries to get the plastic tubing lined up so the nut fitting would thread nicely by hand onto the new faucet. BTW, I could only get one hand in there to line things up and turn the nut simultaneously. :banghead:
 
Auto Pilot Project - Maybe

When I purchased our Prairie 36 there was not an auto pilot in the listing. However, there was a circuit breaker for one on the electrical panel. The broker said it was not working and had been removed.

A few weeks ago I found the Course Setter 21 by Benmar control in the fly bridge cabinet piled up with some other stuff. There was a cable attached but a little bit of water started coming out of the plastic enclosure so of course I didn't turn it on.

I couldn't find manuals, but thanks to Sam here on the forum I now have an electronic set. When I opened the enclosure I found the compass cylinder is filled with a fluid. I think the fluid is suppose to be there but I'm not 100% sure. The manual doesn't say anything about it but it does say that is should be mounted level. So I think the compass needs to float like a regular compass.

I have a theory on how the compass may be providing electronic signals to the auto pilot circuitry but before I dig any further I'm hoping someone can shed some light on this.

Anyone have experience with this model?
 

Attachments

  • IMG_1441.jpg
    IMG_1441.jpg
    164.6 KB · Views: 56
New Pantry

So does adding a couple of shelves to a closet now make it a pantry?

The admiral says she needs more storage space, so this was the logical place for some shelves and her additional stuff. Still need to paint and maybe put on some fiddles.
 

Attachments

  • IMG_1446.jpg
    IMG_1446.jpg
    79 KB · Views: 50
So does adding a couple of shelves to a closet now make it a pantry?

The admiral says she needs more storage space, so this was the logical place for some shelves and her additional stuff. Still need to paint and maybe put on some fiddles.

Our bunk closet is now our pantry we did the same thing
 
Closets Closets

On the Prairie 36 there is another closet inside of this closet. Open the large hinged door and you have access to wiring, gauges, and control cables, etc. behind the lower helm.

I still wanted access to this area, but didn’t want to have to remove all of the pantry shelves. So I mounted the lower shelf just below the inside hinged door. That shelf is made of 3/4” plywood. I can kneel, sit, or stand on it to work on stuff inside the inner closet.

The upper shelf is cut so half of it can be easily removed and the inside closet hinged door opened for access. As with most things on a boat, this was just another compromise.
 
More Storage

The Admiral and I were mapping where things would be stored on the boat today and I had forgotten about one of the easiest improvements I had made to our Prairie 36.

It's a simple Dock Box that adds several cubic feet of easy to get to storage. I found one that fits nicely between the two aft cabin port lights. All I had to do was buy it and put it on board.
 

Attachments

  • IMG_0938.jpg
    IMG_0938.jpg
    82.4 KB · Views: 65
We mounted a deck box on the bow of our boat. Really love the storage for dock lines.
 
The Admiral and I were mapping where things would be stored on the boat today and I had forgotten about one of the easiest improvements I had made to our Prairie 36.

It's a simple Dock Box that adds several cubic feet of easy to get to storage. I found one that fits nicely between the two aft cabin port lights. All I had to do was buy it and put it on board.

A PO had put two dock boxes on my boat; one just aft of the mast, and one centered aft on the flybridge. I can't imagine being without them. I'll have to think about whether I want to take up that much space in the tiny "cockpit" area, but it seems like it would be very handy to have one there!

Looking at the price of dock boxes, I was seriously thinking about the storage box/bench products they sell as patio furniture. Removing the "marine" aspect lowers the price considerably, but some seem pretty well made.
 
Dave,

How did you secure the dock box to the deck? Screws or through bolt or ?
Seems like there could be a lot of action on the bow.


Tom,

I like the aft of the mast idea for the dock box, but you would have to move it every time you needed to drop the mast for a bridge while doing the Loop. I do need to side step around it while moving from side to side in the cockpit. Something to think about.

Our fly bridges must be different. Mine has seating with storage underneath that is “L” shaped from the port side to the aft part of the fly bridge. Also another seat and storage on the starboard side.
 
I epoxied an aluminum plate in each end of the dock box. Then through bolted a 2x3 inch aluminum tube to the deck at each end of the dock box and through bolted the dock box to the aluminum tubes. I couldn’t directly bolt the dock box to the deck due to the camber of the deck. With the tubes it allowed the box to sit above the camber and also lets me hose out under the dock box when leaves and stuff gets under the dock box.
 
I epoxied an aluminum plate in each end of the dock box. Then through bolted a 2x3 inch aluminum tube to the deck at each end of the dock box and through bolted the dock box to the aluminum tubes. I couldn’t directly bolt the dock box to the deck due to the camber of the deck. With the tubes it allowed the box to sit above the camber and also lets me hose out under the dock box when leaves and stuff gets under the dock box.

Great work. I don’t think that dock box is going anywhere.

I bought my dock box used and it has about 1” x 2” teak cleats at each end that compensate for the deck camber. I’m just planning to use some caulking under the teak to secure it to the deck.
 
Dave,

How did you secure the dock box to the deck? Screws or through bolt or ?
Seems like there could be a lot of action on the bow.


Tom,

I like the aft of the mast idea for the dock box, but you would have to move it every time you needed to drop the mast for a bridge while doing the Loop. I do need to side step around it while moving from side to side in the cockpit. Something to think about.

Our fly bridges must be different. Mine has seating with storage underneath that is “L” shaped from the port side to the aft part of the fly bridge. Also another seat and storage on the starboard side.

My dock boxes are secured with small wooden "L" shaped blocks at each corner. These prevent the "feet" at each corner from sliding. The whole box stands a couple of inches above the deck in the middle, which solves the camber issue.

It's not too hard to lift it up high enough to clear the blocks and slide it out of the way to drop the mast. The dock box doubles as a nice place to sit at night and watch the stars.

Yes, there are two (or more) flybridge designs. Mine has seating port and starboard which are molded into the helm area, and open space aft. Again, the flybridge dock box doubles as seating. We have a folding bench seat from West Marine that we put on the dock boxes if we want back support. We call it the "Granny Seat" after Granny Clampett's seat on the Beverly Hillbilly's truck.

I like how your dock box is mounted on the aft deck. :thumb:
I’m going to give that idea more consideration.
 
Carpeting

Do you guys just put carpet over the plywood flooring? This would be for the aft cabin and V berth areas. Just carpet or padding underneath? Staple it down or double sided tape?

In all of my sailboats, there was never carpet. So carpet in a boat is a new concept for me.
 
A PO of my boat put down Pergo (or similar) flooring in the cabins. It's actually pretty good.

My disaster is the saloon. I pulled up the vinyl self-stick squares and replaced with a much better quality vinyl plank material, but between the old adhesive and the number of rounded edges on the hatches and hatch openings, it looks like crap again.

Anyone have any suggestions for something to cover the saloon sole? It can't be a floating floor covering, because there's more hatch area than not. There are a lot of edges to deal with on the hatches, and the hatch openings. It can't be very thick, or it won't match up with the trim at the stairs (fore and aft.)
 
Back
Top Bottom