More solar questions....

The friendliest place on the web for anyone who enjoys boating.
If you have answers, please help by responding to the unanswered posts.
I drilled 2 holes in gland, very little cable from panel to gland, none laying on deck, and it is under panel, so stays dry unless taking water over bow
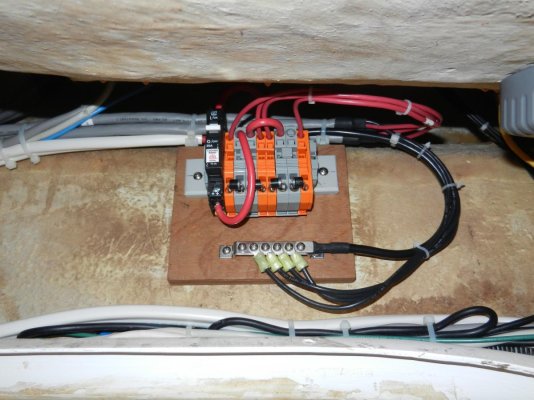
I puzzled over how to manage routing conductors from 4 panels to inside. I ended up combining the conductors into a 2 conductor round cable that a cable gland would seal. I wanted to wire the panels in parallel/series to maximize output due to expected shading so it was helpful to have each panel's output accessible.

The DIN rail junctions enabled me to jumper the panel outputs and add diodes to allow half the array full output when the other half is shaded. It was a compromise I accepted at the planning stage, and has panned out as anticipated.

The controller & panel mfrs both recommended a breaker in the panel output, and the DIN rail made that easy.
 

Attachments

  • DSCN6180.jpg
    DSCN6180.jpg
    66.4 KB · Views: 107
  • DSCN6139.jpg
    DSCN6139.jpg
    134.4 KB · Views: 106
A few numbers for you. Maximum one way distance for different wire gauges running between the panel you mentioned and the controller for a 3% voltage drop. Calculated for maximum power point (36.7 v, 9.95 a)

Wire gauge - Distance (ft)
14 - 21
12 - 34
10 - 55
8 - 87

For the controller to the batteries you want to have no more than a 1% voltage drop. An MPPT controller operating at 36.7v, 9.95 a input will put out around 28 amps at the start of charging. So the maximum on way wire lengths for 1% voltage drop at 13 volts are:

Wire gauge - Distance (feet)
10 - 2.3
8 - 3.7
6 - 5.9
4 - 9.3
2 - 14.8
1 - 18.7
0 - 23.6
00 - 30
000 - 37
0000 - 47

I assume that the wires from your batteries are sized for a 3% voltage drop. I also assume that for your boat the wire run from the pilot house to the batteries is longer than the 1% voltage drop length for 0 or 00 wire. Thus you would be better off running longer wires from the panels to the controller than using the wires from the batteries to the pilot house. I suspect that #10 wire will be OK from the panel to the controller even with the controller next to the batteries.

I do have one concern about using the existing battery wiring and that is - where is your battery switch located. If the switch is between the connection point you envision for the controller and the batteries, you will need to leave that switch on all the time or you won't be charging your batteries.

All the charging voltages on the Victron MPPT controllers are fully programmable, so you can set up a custom charging profile with charging voltages adjusted to compensate for the voltage drops in your wiring runs and use the existing 00 wires from the pilothouse to the batteries.

Finally, I strongly suggest that you buy a Victron SmartSolar 100/30 if you have a smart phone. That controller has built in Bluetooth so you can directly connect your smart phone to it for monitoring and programming. The best prices I have found for Victron controllers are at shop.pkys.com (Peter Kennedy Yacht Services in Annapolis). I have bought quite a few things from them. They are fast and I have always been satisfied with their service.
 
Last edited:
Dave: Further thoughts on this. Watts on Solar panels is analogous to “two-foot-itis” on boats. You always want more. PSNeald’s suggestion to consider a swing mounted setup, possibly on a rail on the boat deck might be useful to consider.

The first amperage from panels goes to servicing the real-time loads on the boat. So if fridge and freezer are running, that is where the output from the panels goes. The rest of the output goes into the bank. As will any output from any additional panels you can add. You should consider sizing your controller accordingly, i.e. for additional future panels.

...I would love another 100 watts of panels!
 
if you want more solar....

My 2 fixed are on hinges hanging vertically from the bridge railing. Good for morning and afternoon sun if so. They hinge up to 120 degrees, so either flat or pointing to other side of boat. Normally I use rigid pipe as supports of 2 different lengths for best angle, but if tied to mast halyards, they are infinitely adjustable.

I also keep 2, 100 watt panels unmounted , and use 15 foot pigtails tied in so I can place them anywhere on the boat to avoid shade and get a good sun angle.

There seems to be some misinformation about controllers and the best ways to rig them. In simple applications, such as one panel, there is dissent on which kind of controller is better or about equal. Larger arrays and diffetent panels, sure some design is necessary.

of course, 2 year old info like I studied may already be out of date


Sounds like a nice setup. If I was serious about adding, more solar I’d probably mount panels where my Bimini is and use the panels for that. Your idea of movable panels is great. I have a flexible panel that I use to charge my Torquedo outboard. It is handy to be able to move it around to where the sun is.
 
Sounds like a nice setup. If I was serious about adding, more solar I’d probably mount panels where my Bimini is and use the panels for that. Your idea of movable panels is great. I have a flexible panel that I use to charge my Torquedo outboard. It is handy to be able to move it around to where the sun is.

Just my nature to think outside the box.

My 400 watts probably does more than others 800 watts....just more tweaking throughout the day.
 
A few numbers for you. Maximum one way distance for different wire gauges running between the panel you mentioned and the controller for a 3% voltage drop. Calculated for maximum power point (36.7 v, 9.95 a)

Wire gauge - Distance (ft)
14 - 21
12 - 34
10 - 55
8 - 87

For the controller to the batteries you want to have no more than a 1% voltage drop. An MPPT controller operating at 36.7v, 9.95 a input will put out around 28 amps at the start of charging. So the maximum on way wire lengths for 1% voltage drop at 13 volts are:

Wire gauge - Distance (feet)
10 - 2.3
8 - 3.7
6 - 5.9
4 - 9.3
2 - 14.8
1 - 18.7
0 - 23.6
00 - 30
000 - 37
0000 - 47

I assume that the wires from your batteries are sized for a 3% voltage drop. I also assume that for your boat the wire run from the pilot house to the batteries is longer than the 1% voltage drop length for 0 or 00 wire. Thus you would be better off running longer wires from the panels to the controller than using the wires from the batteries to the pilot house. I suspect that #10 wire will be OK from the panel to the controller even with the controller next to the batteries.

I do have one concern about using the existing battery wiring and that is - where is your battery switch located. If the switch is between the connection point you envision for the controller and the batteries, you will need to leave that switch on all the time or you won't be charging your batteries.

All the charging voltages on the Victron MPPT controllers are fully programmable, so you can set up a custom charging profile with charging voltages adjusted to compensate for the voltage drops in your wiring runs and use the existing 00 wires from the pilothouse to the batteries.

Finally, I strongly suggest that you buy a Victron SmartSolar 100/30 if you have a smart phone. That controller has built in Bluetooth so you can directly connect your smart phone to it for monitoring and programming. The best prices I have found for Victron controllers are at shop.pkys.com (Peter Kennedy Yacht Services in Annapolis). I have bought quite a few things from them. They are fast and I have always been satisfied with their service.


Thanks for those numbers. When I did the calculations, based on 0/2 cable instead of the slightly larger 70 sqmm that I have, I was getting a 1.46% voltage drop using a 50’ one way run. That is higher than I might like, but as you say, the Victron allows a custom charge profile. I agree that running 8 AWG from the panel to the controller next to the batteries would be a better setup. I would get less voltage drop. However, being inherently lazy, I’d rather not run the new wire from the pilothouse to the aft lazarrette. Back to a comment psneed made in another thread, it doesn’t have to be perfect, it just has to meet my needs.

You are correct that using the DC panel cable to backfeed the batteries does mean that the panel has to be switched on. As it is, that panel gets left on all the time anyway, so it wouldn’t be an issue for me.

I will look into the SmartSolar controller and compare it to the BlueSolar. I think I’m probably going to want a display/controller for the MPPT, not sure how much more use I would get out the Bluetooth connectivity. I don’t have internet on the boat when I’m not on it. But, the SmartSolar isn’t that much more than the BlueSolar controller.
 
Regarding the cable gland, I recently bought these on Amazon. It is designed for two wires.


I'm planning a similar installation. The LG panel looks good. Is it a recent release? I hadn't seen it in my research.


https://www.amazon.com/gp/product/B0111RNZDY/ref=oh_aui_detailpage_o00_s00?ie=UTF8&psc=1


https://images-na.ssl-images-amazon.com/images/I/51qQl5nwz6L._SL1001_.jpg


I think it is a relatively new panel in their line. That cable gland looks interesting as well, thanks.
 
If 4200 is your sealer of choice why not simply feed wire through hole and as you push the last few inches through load the wire up with 4200 and then finish off neatly.

Its not as if you'll see it and you won't be removing it.

My boat came to me with a 1/2" radar cable passing through the wall at the helm, then through the side of the Flybridge before going up the mast. Each of the holes were sealed with 4200 or 5200 and were still in as new condition when the radar died of old age. I used the same sort of sealer on the new Radar about 15 yrs ago and it is still in "as new" condition. I used white where it shows against white gelcoat and black where it goes through teak. Neither looks at all out of place.
 
psneeld`s hinged panels make a lot of sense.
There are "suitcase" type panels, a pair which are hinged and close up when not in use, protecting the panels. On ebay here. I deconstructed 3 pairs to get six panels the size to fit an available space.
 
Thanks for those numbers. When I did the calculations, based on 0/2 cable instead of the slightly larger 70 sqmm that I have, I was getting a 1.46% voltage drop using a 50’ one way run. That is higher than I might like, but as you say, the Victron allows a custom charge profile. I agree that running 8 AWG from the panel to the controller next to the batteries would be a better setup. I would get less voltage drop. However, being inherently lazy, I’d rather not run the new wire from the pilothouse to the aft lazarrette. Back to a comment psneed made in another thread, it doesn’t have to be perfect, it just has to meet my needs.

You are correct that using the DC panel cable to backfeed the batteries does mean that the panel has to be switched on. As it is, that panel gets left on all the time anyway, so it wouldn’t be an issue for me.

I will look into the SmartSolar controller and compare it to the BlueSolar. I think I’m probably going to want a display/controller for the MPPT, not sure how much more use I would get out the Bluetooth connectivity. I don’t have internet on the boat when I’m not on it. But, the SmartSolar isn’t that much more than the BlueSolar controller.

Dave, the Bluetooth lets the controller talk to your phone. Look at my video showing what you can do with a SmartSolar controller and a smart phone

 
Grounding...?

I was reading through the installation and spec information on the solar panel and I saw the requirement for grounding. This caught me by surprise a little bit. In all the information I have seen for boat installations I've not seen where the panels were grounded. Am I missing something?
 
The grounding recommendation is probably for lightning protection on building installations. I doubt if anyone grounds panels separately from the DC negative on boats. But you can do it if you want. Use big wire, #8 at least and run it to the engine block ground.

David
 
I was reading through the installation and spec information on the solar panel and I saw the requirement for grounding. This caught me by surprise a little bit. In all the information I have seen for boat installations I've not seen where the panels were grounded. Am I missing something?


Dave: I was convinced by my supplier to ground the panels, but it seems there is no requirement to do so with marine installations. I used AWG 8 gauge. I believe it’s a building requirement. I also have a breaker before and after the controller, again likely overkill.
 
The grounding recommendation is probably for lightning protection on building installations. I doubt if anyone grounds panels separately from the DC negative on boats. But you can do it if you want. Use big wire, #8 at least and run it to the engine block ground.

Dave: I was convinced by my supplier to ground the panels, but it seems there is no requirement to do so with marine installations. I used AWG 8 gauge. I believe it’s a building requirement. I also have a breaker before and after the controller, again likely overkill.

Thanks. I would rather not do a ground wire if I can help it simply to avoid having to run another wire from the PH roof to the interior.
 
Panels self fitted 7 years ago. No ground,no problems,so far.
 
Thanks Bruce.

Retriever, if you are still following this thread, I'd be interested in knowing how they attached your LG panel to your roof. What type of mount did they use? I spoke with Platt today and they were recommending a rail mount. Sounds fine, but it seems like that adds a bunch more fiddly bits to the installation.

I am thinking I may go with the LG350QIC-A5 rather than the LG365QIC-A5. 350W instead of 365W but it would end up being about $66 cheaper. Another way of looking at it is the 365W panel would cost me 13% more for only 4% more output.
 
I helped a buddy install two 250 watt panels on his boat. We used L shaped brackets cut from angle aluminum, but Amazon has them ready to go, here- https://www.amazon.com/HQST-Solar-M...sr=8-3&keywords=solar+panel+mounting+brackets. Then we used 5200 to attach them to the cabin roof- no screws. Holds just fine.

David


Exactly my approach, except I used 4200 and $20 of angle aluminum. They are still rock hard. I used 4 sets of brackets per panel. I’d suggest 6-8 sets for you as your panel is larger than my 145 panel. Take the money you save from making your own mounts and put it into you 365 watt panel. My panels are rock hard

Pre-drill holes along the angle aluminum before you cut it in 1.5-2” sections. Attach to panels with SS bolts and nylock nuts to get the fit and mark on the boat deck. Use masking tape for the 4200. Get the panels raised off the deck with blocks so there is about 1/8” gap between the foot of the angle aluminum and the deck. Lift everything off, put on the 4200 (or 5200) then carefully place the panel in position.
 
Re grounding, it's a safety thing, just like the ground in an AC wiring system. With panels wired for 30V or so it's not such a big deal, but when you series wire panels you end up with very high voltages. I have done a couple of systems that run at 400V, give or take. The right (wrong) kind of wire or panel fault can light up the metal frames and the whole array.
 
David and JDCAVE, thanks for the info. I was thinking of doing something very similar but was curious how Retrievers were mounted since they are the same type of panel. As near as I can tell, they have mounting holes in the bottom of the frame rail. The guy at Platt was talking about using a mounting rail. The advantage I see with that is the panel is supported along the entire length on either side so there would be much less chance of any flex in the panel. The downside of course is cost of the extra fittings.
 
David and JDCAVE, thanks for the info. I was thinking of doing something very similar but was curious how Retrievers were mounted since they are the same type of panel. As near as I can tell, they have mounting holes in the bottom of the frame rail. The guy at Platt was talking about using a mounting rail. The advantage I see with that is the panel is supported along the entire length on either side so there would be much less chance of any flex in the panel. The downside of course is cost of the extra fittings.

I have rails, then angle iron feet that mount them to the hardtop. They provide good support as you suggest, but also provide a more expansive level mounting surface on what is always a curved hardtop. The more panels, and the more complex curvature in the hardtop surface, the more beneficial the rails. But with a single panel, I don't think it will help much vs direct mount as others have done successfully.
 
You drill the bracket mounting holes in the sides of the aluminum panel up or down to match the curvature. Rails just add another complication. With 6 brackets the panel will be well supported.

David
 
David and JDCAVE, thanks for the info. I was thinking of doing something very similar but was curious how Retrievers were mounted since they are the same type of panel. As near as I can tell, they have mounting holes in the bottom of the frame rail. The guy at Platt was talking about using a mounting rail. The advantage I see with that is the panel is supported along the entire length on either side so there would be much less chance of any flex in the panel. The downside of course is cost of the extra fittings.


I’ve got the same panels in transit so have been looking into mounting options as well.

If you look at the product description, you can see that the panels do indeed have mounting holes in the bottom of the frame.

http://www.lg.com/us/business/download/resources/BT00002151/BT00002151_2831.pdf

I also found an installation manual that would support the idea that you can mount these directly to the PH roof with angled brackets using four of the mounting holes without rails. (See Fig1 Appendix on page 13)
http://www.lg.com/us/business/download/resources/BT00002151/BT00002151_2574.pdf

I’m going to go with that using one of these brackets.
https://www.amazon.com/gp/product/B00BR3KFKE/ref=oh_aui_detailpage_o03_s01?ie=UTF8&psc=1

Or:
https://www.amazon.com/gp/product/B00NEZ8CJO/ref=oh_aui_detailpage_o04_s00?ie=UTF8&psc=1
 
Thanks Bruce.

Retriever, if you are still following this thread, I'd be interested in knowing how they attached your LG panel to your roof. What type of mount did they use? I spoke with Platt today and they were recommending a rail mount. Sounds fine, but it seems like that adds a bunch more fiddly bits to the installation.

I am thinking I may go with the LG350QIC-A5 rather than the LG365QIC-A5. 350W instead of 365W but it would end up being about $66 cheaper. Another way of looking at it is the 365W panel would cost me 13% more for only 4% more output.

These are the mounts I used. Low profile, simple, and inexpensive!

Solar Panel Mount Mounting Z Bracket Set RV Boat Off Grid Roof https://www.amazon.com/dp/B00NEZ8CJO/ref=cm_sw_r_cp_api_LRvQAbEYDCR8T
 
I’ve got the same panels in transit so have been looking into mounting options as well.

If you look at the product description, you can see that the panels do indeed have mounting holes in the bottom of the frame.

http://www.lg.com/us/business/download/resources/BT00002151/BT00002151_2831.pdf

I also found an installation manual that would support the idea that you can mount these directly to the PH roof with angled brackets using four of the mounting holes without rails. (See Fig1 Appendix on page 13)
http://www.lg.com/us/business/download/resources/BT00002151/BT00002151_2574.pdf

I’m going to go with that using one of these brackets.
https://www.amazon.com/gp/product/B00BR3KFKE/ref=oh_aui_detailpage_o03_s01?ie=UTF8&psc=1

Or:
https://www.amazon.com/gp/product/B00NEZ8CJO/ref=oh_aui_detailpage_o04_s00?ie=UTF8&psc=1

Thanks! I am going to check out the links. I'd like to be able to get the bottom edge of the panel frame about 3.5" from the roof. I'll see if any of those may do the trick.
 
Do you have rails running down the length of the panels that the brackets attach to or are they attached directly to the panels?

They’re attached directly to the panels. The LG 365w panels I bought had holes already drilled for mounts like these. And the roof is flat so I didn’t have to tweak anything for the panels to sit correctly on the roof.
 
They’re attached directly to the panels. The LG 365w panels I bought had holes already drilled for mounts like these. And the roof is flat so I didn’t have to tweak anything for the panels to sit correctly on the roof.


Thanks.

Renogy makes an “L Step” bracket for their systems that looks like it would make a great Z bracket by simply doubling them. This would also give me enough height for the clearance I want.
 
Back
Top Bottom